
C#API接口调试工具
自从去年软件界网站开发推崇前后端分离,我们公司也在进行转行行,从原先的前端架构,后端架构,数据库搭建一肩挑的模式也逐渐转型为前后端分离,大量招收前端开发人员,原来的人员也转型为专职的后端开发,这样的变化就对于后端开发人员的接口调试带来了一定的麻烦,在原来的前后端一起的开发模式下,我们可以利用前端的请求直接后台打断点进行调试,然而进行了前后端分离以后,直接叫前端开发人员帮忙发请求再进行大断点调试是不可能的了,因此我们后端开发人员就应该寻找调试接口的代替方案,用来提高我们的工作效率。下面介绍两种用于调试后台接口的工具。
一:swagger在.net中使用
1.NuGet包安装
Install-Package Swashbuckle.core 主程序上引用(启动项) 管理NuGet里面搜索安装
2.安装之后会在App_Start文件夹中添加SwaggerConfig.cs类,该类中的Register()方法会在应用程序启动的时候调用
3.启用生成xml文档,右击项目文件属性,生成

4.配置SwaggerConfig.cs (方法一) 实际上是读取生成的xml文件路径

 public class SwaggerConfig
    {
        public static void Register()
        {
            Swashbuckle.Bootstrapper.Init(GlobalConfiguration.Configuration);

            // NOTE: If you want to customize the generated swagger or UI, use SwaggerSpecConfig and/or SwaggerUiConfig here ...


            SwaggerSpecConfig.Customize(c =>
            {
                c.IncludeXmlComments(GetXmlCommentsPath());
            });
        }

        protected static string GetXmlCommentsPath()
        {
            return System.String.Format(@"{0}\bin\WebApiSwagger.XML", System.AppDomain.CurrentDomain.BaseDirectory);
        }
    }
4.配置SwaggerConfig.cs (方法二)
 public class SwaggerConfig
    {
        public static void Register()
        {
            Swashbuckle.Bootstrapper.Init(GlobalConfiguration.Configuration);

            // NOTE: If you want to customize the generated swagger or UI, use SwaggerSpecConfig and/or SwaggerUiConfig here ...

            SwaggerSpecConfig.Customize(c =>
            {
                c.IncludeXmlComments(GetXmlCommentsPath(thisAssembly.GetName().Name()));
            });
        }

        protected static string GetXmlCommentsPath(string name)
        {
            return System.String.Format(@"{0}\bin\{1}.xml", System.AppDomain.CurrentDomain.BaseDirectory,name);
        }
    }
5.浏览地址:http://localhost:50453/swagger/ui/index.html(应用程序的地址+api+swagger)就可以看到了
二:使用WebApiTestClient 测试工具
2:如何引入组件:右击API项目管理NuGet里面搜索安装 a sample test client for ASP.net Web API
引入成功后,将向项目里面添加一些主要文件:
- Scripts\WebApiTestClient.js
- Areas\HelpPage\TestClient.css
- Areas\HelpPage\Views\Help\DisplayTemplates\TestClientDialogs.cshtml
- Areas\HelpPage\Views\Help\DisplayTemplates\TestClientReferences.cshtml
2、如何使用组件
、修改Api.cshtml文件
通过上述步骤,就能将组件WebAPITestClient引入进来。下面我们只需要做一件事:打开文件 (根据 Areas\HelpPage\Views\Help) Api.cshtml 并添加以下内容:
- @Html.DisplayForModel("TestClientDialogs")
- @Html.DisplayForModel("TestClientReferences")
添加后Api.cshtml文件的代码如下
@using System.Web.Http
@using WebApiTestClient.Areas.HelpPage.Models
@model HelpPageApiModel

@{
    var description = Model.ApiDescription;
    ViewBag.Title = description.HttpMethod.Method + " " + description.RelativePath;
}

<link type="text/css" href="~/Areas/HelpPage/HelpPage.css" rel="stylesheet" />
<div id="body" class="help-page">
    <section class="featured">
        <div class="content-wrapper">
            <p>
                @Html.ActionLink("Help Page Home", "Index")
            </p>
        </div>
    </section>
    <section class="content-wrapper main-content clear-fix">
        @Html.DisplayForModel()
    </section>
</div>

@Html.DisplayForModel("TestClientDialogs")
@section Scripts{
    <link href="~/Areas/HelpPage/HelpPage.css" rel="stylesheet" />
    @Html.DisplayForModel("TestClientReferences")
}
2、配置读取注释的xml路径
其实,通过上面的步骤,我们的项目已经可以跑起来了,也可以调用接口测试。但是,还不能读取 /// <summary> 注释里面的东西。需要做如下配置才行。
(1)配置生成xml的路径。我们在项目上面点右键→属性→生成标签页配置xml的路径
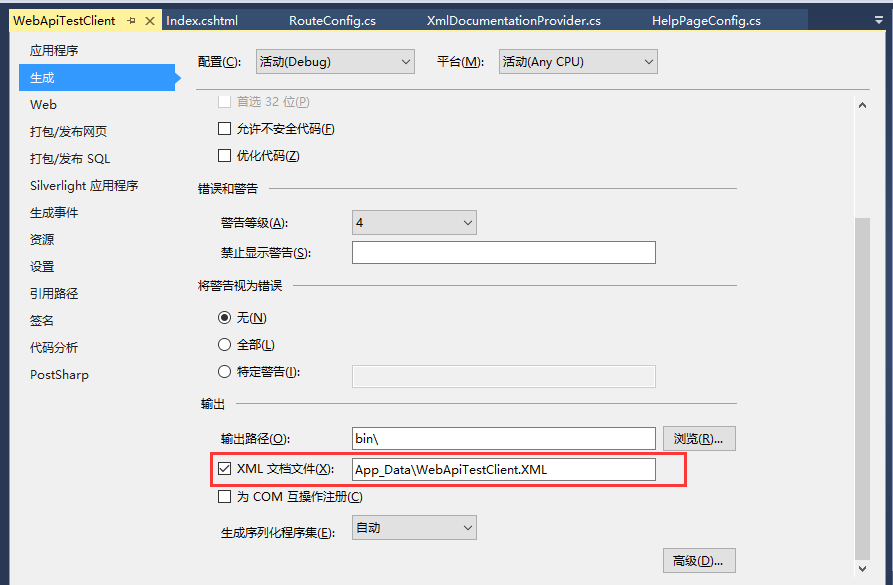
(2)在xml的读取路径:在下图的HelpPageConfig.cs里面配置一句话,指定xml的读取路径。

这句代码如下:
至此,环境就搭完了,剩下的就是运行了。我们在url里面敲地址http://localhost:8080/Help/Index或者http://localhost:8080/Help就能得到你的API列表。

 浙公网安备 33010602011771号