IM 之小程序引入

IM使用之小程序

IM最新使用指南,相关使用时在VUE3的基础上进行使用的。

PS:引入的过程中肯定会遇到路径不对的这个问题,这个就需要自己根据实际情况做相关的修改了。

参考文档:

https://cloud.tencent.com/document/product/269/64507

https://cloud.tencent.com/document/product/269/83858

https://cloud.tencent.com/document/product/647/78912

小程序使用的时候一般在分包中使用,相关操作步骤如下:

1.首先时引入IM聊天(非音视频),步骤如下:

npm下载,修改APP.vue,page.json文件(详情见第一个参考文档)

image


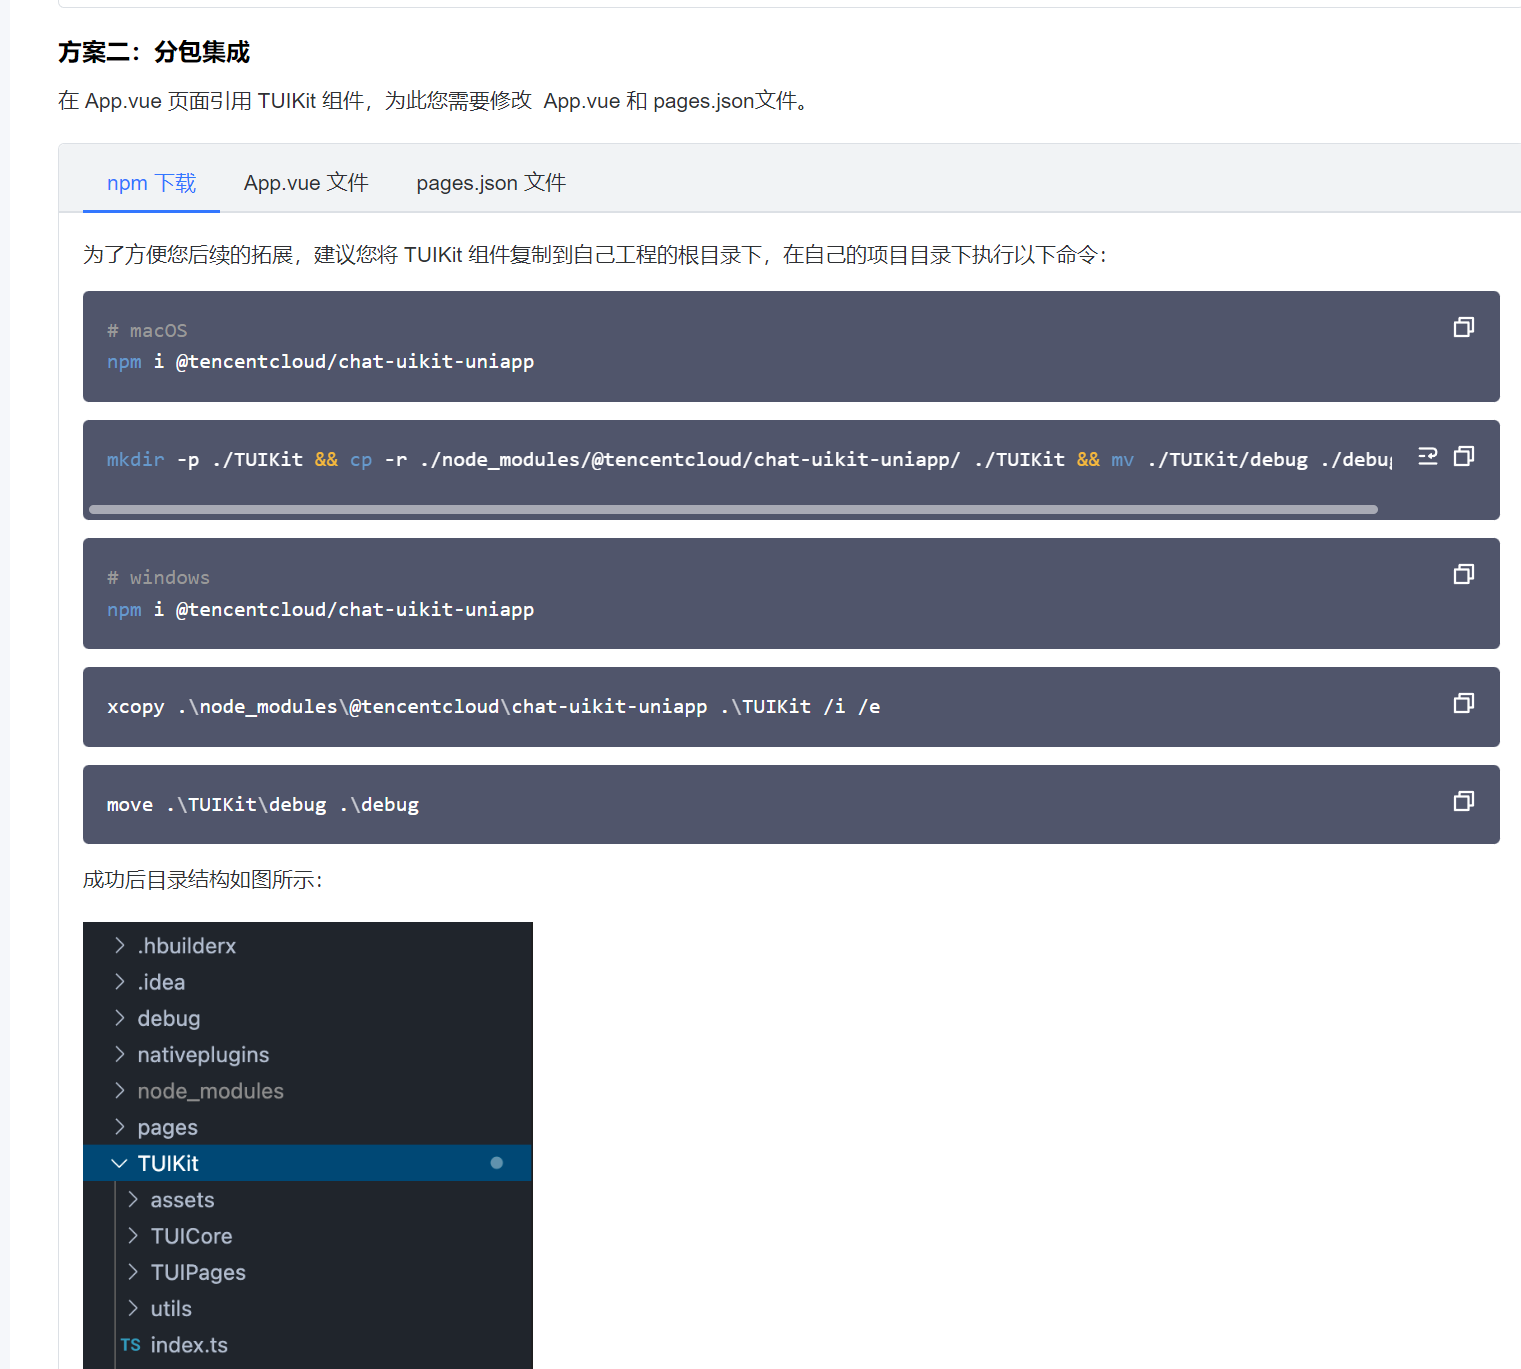
此步骤之后基本引入基本可以实现相关的聊天。
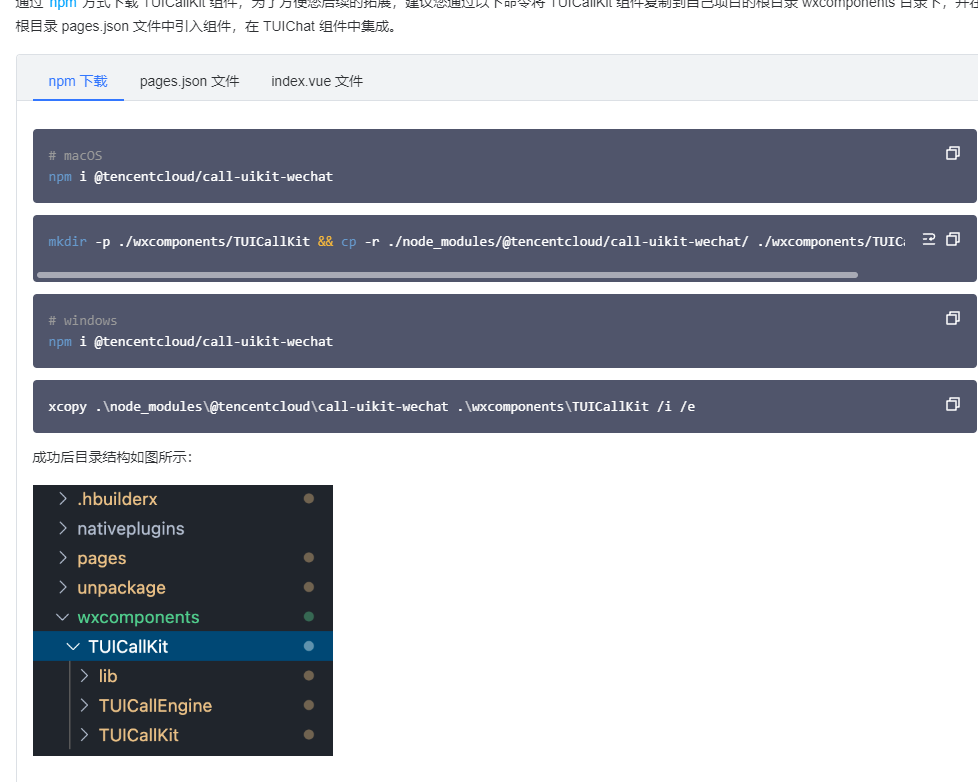
2.IM音视频引入

npm下载,page.json文件修改,index.vue文件修改。详情见第二个参考文档。

image


引入之后要在微信开发工具重新构建一下npm才可以运行,具体步骤如下:

首先在微信开发工具的终端输入如下代码:

npm init -y
npm i @tencentcloud/call-uikit-wechat
 

然后在微信开发工具选择【工具】>【构建npm】,基本上就可以运行成功了,每次上传更新代码之前都要重新构建一下。

PS:因为VUE3,所以每次都要重新构建,执行此步骤(文档暂时这样标注的)。每次构建之前都要清空缓存重新编译,防止缓存占据空间。

3.关于外部页面的进入chat页面

以智享乐安小程序为例,做一个简单的流程说明。


因为是在分包内进行的,所以直接把这个聊天界面新建在相关的分包文件夹里,命名为userCaht,样式还是原来的样式,相关的引入步骤如下:

import store from "../../TUICore/store";

import { TUIConversationServer, TUIProfileServer } from "../../TUICore/server";


onUnload(){
  uni.$TUIKit.TUIConversationServer.destroyed();
},
onShow(){
  store.commit("timStore/setConversationID", "");
},
 

走后台接口,获取相关的userID和userSig,然后进行登录,可重复登录

IMLogin(){
  var that = this
  this.$request.get(this.$port.IMLogin).then(res=>{
    if(res.error_code==0){
      const userID = res.data.user_id
      const userSig = res.data.user_sig
      uni.setStorageSync('userID',userID)
      uni.setStorageSync('userSig',userSig)
      uni.$TUIKit.login({ userID: userID, userSig:userSig }).then((res) => {
        // sdk 初始化,当 sdk 处于ready 状态,才可以使用API,文档
      });
    }else{
      that.$global.errorMsg(res.message)
    }
  }).catch(res=>{})
},
 

点击在线咨询的时候,相关方法如下:

//消息咨询
makeNews(item){
  if(item.tx_id == ''||item.tx_id == null){
    this.$global.errorMsg('该工作人员暂未开通此功能!')
  }else{
    let name = item.name
    let id = item.tx_id;
    var that = this
    //走自己的接口回去历史聊天记录
    var userId = item.tx_id
    this.$request.get(that.$port.kefu.updateChat, {
      user1: this.$global.getUserId(),
      user2: userId
    }).then(res => {
      if (res.error_code == 0) {
        var newId = 'C2C'+id
          uni.$TUIKit.TUIConversationServer = new TUIConversationServer();
          uni.$TUIKit.TUIProfileServer = new TUIProfileServer();
            store.commit("timStore/setConversationID", 'C2C'+id);
            uni.navigateTo({
              url: `../TUIChat/index?conversationName=`+res.data.user2_info.nick,
            });
            uni.$TUIKit.TUIConversationServer.setMessageRead('C2C'+id);
            const curConversation = store.state.timStore.conversationList.filter((item) => {
            return item.conversationID == newId
            });
          store.commit("timStore/setConversation", curConversation);
            uni.$TUIKit.TUIConversationServer.getConversationProfile(
              newId
            ).then((res) => {
              // 通知 TUIChat 关闭当前会话
              store.commit("timStore/setConversation", res.data.conversation);
            });

      }else{
        that.$global.errorMsg(res.message)
      }
    }).catch(res => {})
  }

},
 

然后进入相关的页面就可以根据实际情况展示相关的信息了。

最后有登录就有退出,在切换账号或者切换身份的时候退出登录就可以了。

uni.$TUIKit.logout().then(() => {
  uni.clearStorageSync();
  store.commit('timStore/setLoginStatus', false);
  uni.reLaunch({
    url:'/index/loginWorker'
  })
});
 

4.关于社区工作着用户列表登录展示。

社区工作者的页面展示也是如此。因为IM用到的sotre是在分包内的,所以社区工作登录后展示的会话列表我也放在了相对应的分包内。智享乐安的相关页面是

TUIKit/TUIPages/TUIChat/userIndex。相关的代码展示可自行查看。简单来书就是一个会话列表。根据自己的实际需要做相关的修改,页面展示

除了增加登录,音视频通话见步骤二,没什么可操作的,基本源码展示即可。

5.关于聊天页面的修改

在使用的过程中发现输入文字之后没有相关的发送按钮,所以对TUIKit/TUIPages/TUIChat/components/message-input/index.vue做微调,可自行查看,也可看如下微调内容:

添加@input方法

<input
          class="TUI-message-input-area"
          :adjust-position="true"
          cursor-spacing="20"
          v-model="inputText"
          confirm-type="send"
          confirm-hold="true"
          @confirm="handleSendTextMessage"
      @input="onInputValueChange"
          maxlength="140"
          type="text"
          placeholder-class="input-placeholder"
          placeholder="说点什么呢~"
        />
 

此处做如下更改,判断是否展示

<view @tap="handleExtensions" v-if="!sendMessageBtn">
          <image
            class="TUI-icon"
            src="../../../../assets/icon/more.svg"
          ></image>
        </view>
<view v-else class="TUI-sendMessage-btn" @touchend.prevent="handleSendTextMessage">发送</view>
 

相关的js操作

// 发送消息
    const handleSendTextMessage = (e: any) => {
      if (data.inputText.trimEnd()) {
        uni.$TUIKit.TUIChatServer.sendTextMessage(
          JSON.parse(JSON.stringify(data.inputText))
        );
      }
      data.inputText = " ";
  data.sendMessageBtn = false
  // message.scrollId='C2C'+message.ID
    };
//监听右侧按钮的变化
const onInputValueChange  = (e: any) => {
  if (e.detail.value) {
    data.sendMessageBtn = true
  }else{
    data.sendMessageBtn = false
  }
    };
 

6.关于聊天页面回滚底部

聊天界面点击发送按钮之后不会回滚底部。做了如下操作:

watch(messages, (newVal: any, oldVal: any) => {
      nextTick(() => {
        const newLastMessage = newVal[newVal.length - 1];
        const oldLastMessage = oldVal ? oldVal[oldVal.length - 1] : {};
        data.oldMessageTime = messages.value[0].time;
        handleShowTime();
        if (oldVal && newLastMessage.ID !== oldLastMessage.ID) {
//发完消息之后的页面滚动
setTimeout(() => {
  data.scrollTop = 998+(newVal.length-15)*50;
}, 500);
          // handleScrollBottom(); // 非从conversationList 首次进入
        }
      });
    });


posted @ 2026-01-29 11:13  星宝攸宁  阅读(2)  评论(0)    收藏  举报