Volume
本节我们讨论 Kubernetes 的存储模型 Volume,学习如何将各种持久化存储映射到容器。
我们经常会说:容器和 Pod 是短暂的。
其含义是它们的生命周期可能很短,会被频繁地销毁和创建。容器销毁时,保存在容器内部文件系统中的数据都会被清除。

为了持久化保存容器的数据,可以使用 Kubernetes Volume。

Volume 的生命周期独立于容器,Pod 中的容器可能被销毁和重建,但 Volume 会被保留。

本质上,Kubernetes Volume 是一个目录,这一点与 Docker Volume 类似。当 Volume 被 mount 到 Pod,Pod 中的所有容器都可以访问这个 Volume。Kubernetes Volume 也支持多种 backend 类型,包括 emptyDir、hostPath、GCE Persistent Disk、AWS Elastic Block Store、NFS、Ceph 等,完整列表可参考 https://kubernetes.io/docs/concepts/storage/volumes/#types-of-volumes

Volume 提供了对各种 backend 的抽象,容器在使用 Volume 读写数据的时候不需要关心数据到底是存放在本地节点的文件系统中呢还是云硬盘上。对它来说,所有类型的 Volume 都只是一个目录。

我们将从最简单的 emptyDir 开始学习 Kubernetes Volume。

# 为什么需要存储卷
容器部署过程中一般有以下三种数据:
    • 启动时需要的初始数据,例如配置文件
    • 启动过程中产生的临时数据,该临时数据需要多个容器间共享
    • 启动过程中产生的持久化数据,例如MySQL的data目录
一、emptyDir(临时存储卷)
1、简介
当 Pod 被分配给节点时,⾸先创建 emptyDir 卷,并且只要该 Pod 在该节点上运⾏,该卷就会存在。正如卷的名字所述,它最初是空的。Pod 中的容器可以读取和写⼊ emptyDir 卷中的相同⽂件,尽管该卷可以挂载到每个容器中的相同或不同路径上。当出于任何原因从节点中删除 Pod 时, emptyDir 中的数据将被永久删除。

注意:容器崩溃不会从节点中移除pod,因此emptyDir卷中的数据在容器崩溃时是安全的。

# emptyDir的用法有:

    1.暂存空间,例如用于基于磁盘的合并排序

    2.用作长时间计算崩溃恢复时的检查点

    3.Web服务器容器提供数据时,保存内容管理器容器提取的文件

# 优点
	优点是能够方便地为 Pod 中的容器提供共享存储,不需要额外的配置。但它不具备持久性,如果 Pod 不存在了,emptyDir 也就没有了

# 总结:
    emptyDir只是一个临时挂载的文件,pod删除后,该目录也会在node节点上被删除;但是容器崩溃时,该文件还存在.

# Pod使用Volume步骤:
    1、在Pod上定义存储卷,并关联至目标存储服务上;
    2、在需要用到存储卷的容器上,挂载其所属Pod的存储卷。
2、创建emptyDir资源清单
---
kind: Deployment
apiVersion: apps/v1
metadata:
  name: emptydir
spec:
  replicas: 2
  selector:
    matchLabels:
      app: emptydir
  template:
    metadata:
      labels:
        app: emptydir
    spec:
      containers:
        - name: busybox
          image: busybox
          command:
            - '/bin/sh'
            - '-c'
            - 'while true; do echo `hostname` > /opt/test/index.html; sleep 1; done'
          volumeMounts:  # 使用存储卷
            - mountPath: /opt/test/
              name: test01
      volumes:   # 配置存储卷
        - name: test01
          emptyDir: {}
3、部署emptyDir
# 部署
[root@k8s-master-01 k8s]# kubectl apply -f emptydir.yaml
deployment.apps/emptydir created

# 查看
[root@k8s-master-01 k8s]# kubectl get pods
NAME                       READY   STATUS    RESTARTS   AGE
emptydir-64989648f-4c2fk   1/1     Running   0          39s
emptydir-64989648f-n59pd   1/1     Running   0          39s

# 验证
[root@k8s-master-01 k8s]# kubectl exec -it emptydir-64989648f-4c2fk -- sh
/ # cd /opt/test
/opt/test # cat index.html
emptydir-64989648f-4c2fk
4、emptyDir资源清单详解
spec:    # 容器的基本信息
  containers:
    - name: busybox
      image: busybox
      command:
        - '/bin/sh'
        - '-c'
        - 'while true; do echo `hostname` > /opt/test/index.html; sleep 1; done'
      volumeMounts:  # 使用存储卷
        - mountPath: /opt/test/  # 容器文件系统上的挂载点路径
          name: test01  # 要挂载的存储卷的名称,必须匹配存储卷列表中的某项定义
  volumes:   # 配置存储卷
    - name: test01
      emptyDir: {}
二、hostPath(节点存储卷)
1、简介
    hostostPath类型的存储卷是指将工作节点上某个文件系统的目录或文件挂载于Pod中的一种存储卷,它独立于Pod资源的生命周期,因而具有持久性。但它是工作节点本地的存储空间,仅适用于特定情况下的存储卷使用要求,例如,将工作节点上的文件系统关联为Pod的存储卷,从而使得容器访问节点文件系统上的数据。这一点在运行有管理任务的系统级Pod资源需要访问节点上的文件时尤为有用。

# hostPath的用途如如下:
    - 运行需要访问Docker内部的容器;使用/var/lib/docker的hostPath
    - 在容器中运行cAdvisor;使用/dev/cgroups的hostPath
    - 运行pod指定给定的hostPath是否应该在pod运行之前存在,是否应该创建,以及它应该以什么形式存在

# 注意
    - 如资源清单中未配置type字段则为默认选项(默认的值为空字符串),空字符串(默认)⽤于向后兼容,这意味着在挂载 hostPath 卷之前不会执⾏任何检查;就是不检查path的类型

    - 由于每个节点上点文件都不同,具有相同配置(例如从podTemplate创建的)的pod在不同节点上的行为可能会有所不同
    - 当Kubetnetes安装计划添加资源感知调度时,将无法考虑hostPath使用的资源
    - 在底层主机上创建的文件或目录只能由root写入。需要在特权容器中以root身份运行进程,或修改主机上的文件权限以便写入hostPath卷。
2、创建hostPath资源清单
# 在宿主主机上创建一个存储卷,容器部署到那一台主机上,就相当于跟当前主机创建一个存储卷。
# 可以同步时间,或者数据

---
kind: Deployment
apiVersion: apps/v1
metadata:
  name: hostname
spec:
  selector:
    matchLabels:
      app: hostname
  template:
    metadata:
      labels:
        app: hostname
    spec:
      containers:
        - name: nginx
          image: nginx
          volumeMounts:
            - mountPath: /usr/share/nginx/html/  # 挂载节点的目录
              name: test01  # 名字一定和存储卷名义一致
      volumes:  # 定义存储卷
        - name: test01
          hostPath:   # 宿主主机的路径
            path: /opt # 建立存储映射
3、部署hostPath资源清单
# 部署
[root@k8s-master-01 k8s]# kubectl apply -f hostname.yaml
deployment.apps/hostname created

# 查看
[root@k8s-master-01 k8s]# kubectl get pods -o wide
NAME                        READY   STATUS    RESTARTS   AGE         IP             NODE          NOMINATED NODE
hostname-6945f84db4-kwpzx   1/1     Running   0          96s         10.244.1.205   k8s-node-01   <none>
# 在node-01上

# 验证
[root@k8s-node-01 ~]# cd /opt
[root@k8s-node-01 opt]# echo `hostname` > index.html    # 先在节点上创建
[root@k8s-node-01 opt]# cat index.html
k8s-node-01

# 宿主机访问
[root@k8s-master-01 k8s]# curl 10.244.1.205
k8s-node-01
4、总结
# 数据卷:hostPath
hostPath卷: 挂载Node文件系统(Pod所在节点)上文件或者目录到Pod中的容器。

# 应用场景: Pod中容器需要访问宿主机文件

    hostPath Volume 的作用是将 Docker Host 文件系统中已经存在的目录 mount 给 Pod 的容器。大部分应用都不会使用 hostPath Volume,因为这实际上增加了 Pod 与节点的耦合,限制了 Pod 的使用。不过那些需要访问 Kubernetes 或 Docker 内部数据(配置文件和二进制库)的应用则需要使用 hostPath。
三、configMap
1、简介
# 简介
    1.ConfigMap是一种API对象,用来将非加密数据保存到键值对中。可以用作环境变量、命令行参数或者存储卷中的配置文件。
    2.ConfigMap可以将环境变量配置信息和容器镜像解耦,便于应用配置的修改。如果需要存储加密信息时可以使用Secret对象
    3.把应用的代码和配置分开,通过配置configmap管理pod,一种统一的集群配置管理方案。

# 应用场景
    1. 将ConfigMap中的数据设置为容器的环境变量
    2. 将ConfigMap中的数据设置为命令行参数
    3. 使用Volume将ConfigMap作为文件或目录挂载  # 但是一旦挂载当前目录中所有的文件全部删除。
    4. 编写代码在 Pod 中运行,使用 Kubernetes API 来读取 ConfigMap

# 缺点:
	1.configMap一旦被挂载,当前目录中所有的文件全部删除。具备热更新   # 但是可以用subPath解决,但是不具备热更新。
2、创建configMap资源清单
2.1 映射成环境变量
 ---
kind: ConfigMap
apiVersion: v1
metadata:
  name: configmap
data:
  MYSQL_ROOT_PASSWORD: '123456'
---
kind: Deployment
apiVersion: apps/v1
metadata:
  name: configmap
spec:
  selector:
    matchLabels:
      app: configmap
  template:
    metadata:
      labels:
        app: configmap
    spec:
      containers:
        - name: mysql
          image: nginx
          envFrom:
            - configMapRef:
                name: configmap # configmap名称
                optional: true  # 是否为可读

# 部署
[root@k8s-master-01 k8s]# kubectl apply -f configmap.yaml
configmap/configmap created
deployment.apps/configmap created

# 查看
[root@k8s-master-01 k8s]# kubectl get pods
NAME                         READY   STATUS    RESTARTS   AGE
configmap-74cfcb9db6-v58g7   1/1     Running   0          96s

# 测试,进入容器
[root@k8s-master-01 k8s]# kubectl exec -it configmap-74cfcb9db6-v58g7 -- bash
root@configmap-74cfcb9db6-v58g7:/# printenv
MYSQL_ROOT_PASSWORD=123456  # 成功映射为环境变量
2.2 volume挂载方式
---
kind: ConfigMap
apiVersion: v1
metadata:
  name: nginx
data:
  nginx.conf: |
    user nginx;
    worker_processes auto;
    error_log /var/log/nginx/error.log;
    pid /run/nginx.pid;
    events {
        worker_connections 1024;
    }
    http {
        log_format  main  '$remote_addr - $remote_user [$time_local] "$request" '
                          '$status $body_bytes_sent "$http_referer" '
                          '"$http_user_agent" "$http_x_forwarded_for"';
        access_log  /var/log/nginx/access.log  main;
        sendfile            on;
        tcp_nopush          on;
        tcp_nodelay         on;
        keepalive_timeout   65;
        types_hash_max_size 4096;
        default_type        application/octet-stream;
        include /etc/nginx/conf.d/*.conf;
    }
  default.conf: |
    server {
        listen 80;
        server_name www.test.com;
        location / {
            root /opt/;
            index index.html;
        }
    }
---
kind: Deployment
apiVersion: apps/v1
metadata:
  name: nginx
spec:
  selector:
    matchLabels:
      app: nginx
  template:
    metadata:
      labels:
        app: nginx
    spec:
      containers:
        - name: nginx
          image: nginx
          volumeMounts:  # 使用存储卷
            - mountPath: /etc/nginx/
              name: nginxconf
      volumes:  # 设置存储卷
        - name: nginxconf
          configMap:
            name: nginx
            items:
              - key: nginx.conf
                path: ./nginx.conf
              - key: default.conf
                path: ./conf.d/default.conf

# 部署
[root@k8s-master-01 k8s]# kubectl apply -f nginx.yaml
configmap/nginx created
deployment.apps/nginx created

# 查看
[root@k8s-master-01 k8s]# kubectl get pods
NAME                         READY   STATUS    RESTARTS   AGE
nginx-668c8996d5-p2l8j       1/1     Running   0          45s

# 进入容器测试
[root@k8s-master-01 k8s]# kubectl exec -it nginx-668c8996d5-p2l8j -- bash
root@nginx-668c8996d5-p2l8j:/# cd /etc/nginx/
root@nginx-668c8996d5-p2l8j:/etc/nginx# ls -l
lrwxrwxrwx 1 root root 13 Jan 10 13:28 conf.d -> ..data/conf.d
lrwxrwxrwx 1 root root 17 Jan 10 13:28 nginx.conf -> ..data/nginx.conf
# 测试结果:容器有两个文件,其余的文件都被删除。具备热更新
2.3 subPath解决
---
kind: ConfigMap
apiVersion: v1
metadata:
  name: nginx
data:
  nginx.conf: |
    user nginx;
    worker_processes auto;
    error_log /var/log/nginx/error.log;
    pid /run/nginx.pid;
    events {
        worker_connections 1024;
    }
    http {
        log_format  main  '$remote_addr - $remote_user [$time_local] "$request" '
                          '$status $body_bytes_sent "$http_referer" '
                          '"$http_user_agent" "$http_x_forwarded_for"';
        access_log  /var/log/nginx/access.log  main;
        sendfile            on;
        tcp_nopush          on;
        tcp_nodelay         on;
        keepalive_timeout   65;
        types_hash_max_size 4096;
        default_type        application/octet-stream;
        include /etc/nginx/conf.d/*.conf;
    }
  default.conf: |
    server {
        listen 80;
        server_name www.test.com;
        location / {
            root /opt/;
            index index.html;
        }
    }
---
kind: Deployment
apiVersion: apps/v1
metadata:
  name: nginx
spec:
  selector:
    matchLabels:
      app: nginx
  template:
    metadata:
      labels:
        app: nginx
    spec:
      containers:
        - name: nginx
          image: nginx
          volumeMounts:
            - mountPath: /etc/nginx/nginx.conf
              name: nginxconf
              subPath: nginx.conf  # 使用subPath
            - mountPath: /etc/nginx/conf.d/default.conf
              name: defaultconf
              subPath: default.conf
      volumes:
        - name: nginxconf  # 只能挂载一个
          configMap:
            name: nginx
            items:
              - key: nginx.conf
                path: nginx.conf  # 只能指定名字
        - name: defaultconf
          configMap:
            name: nginx
            items:
              - key: default.conf
                path: default.conf # 只能指定名字

# 部署
[root@k8s-master-01 k8s]# kubectl apply -f nginx.yaml
configmap/nginx created
deployment.apps/nginx created

# 查看
[root@k8s-master-01 k8s]# kubectl get pods
NAME                         READY   STATUS    RESTARTS   AGE
nginx-858b66f7b9-f9l5x       1/1     Running   0          64s

# 进入容器查看
[root@k8s-master-01 k8s]# kubectl exec -it nginx-858b66f7b9-f9l5x -- bash
root@nginx-858b66f7b9-f9l5x:/# cd /etc/nginx/
root@nginx-858b66f7b9-f9l5x:/etc/nginx# ls -l
total 24
drwxr-xr-x 2 root root   26 Dec 29 19:28 conf.d
-rw-r--r-- 1 root root 1007 Dec 28 15:28 fastcgi_params
-rw-r--r-- 1 root root 5349 Dec 28 15:28 mime.types
lrwxrwxrwx 1 root root   22 Dec 28 15:40 modules -> /usr/lib/nginx/modules
-rw-r--r-- 1 root root  631 Jan 10 13:44 nginx.conf
-rw-r--r-- 1 root root  636 Dec 28 15:28 scgi_params
-rw-r--r-- 1 root root  664 Dec 28 15:28 uwsgi_params

# 总结:使用subPath可以映射全部文件,但是不具备热更新。
四、secret
1、简介
Secret是用来保存小片敏感数据的k8s资源,例如密码,token,或者秘钥。这类数据当然也可以存放在Pod或者镜像中,但是放在Secret中是为了更方便的控制如何使用数据,并减少暴露的风险。
用户可以创建自己的secret,系统也会有自己的secret。
Secret 会以密文的方式存储数据,避免了直接在配置文件中保存敏感信息。Secret 会以 Volume 的形式被 mount 到 Pod,容器可通过文件的方式使用 Secret 中的敏感数据;此外,容器也可以环境变量的方式使用这些数据。
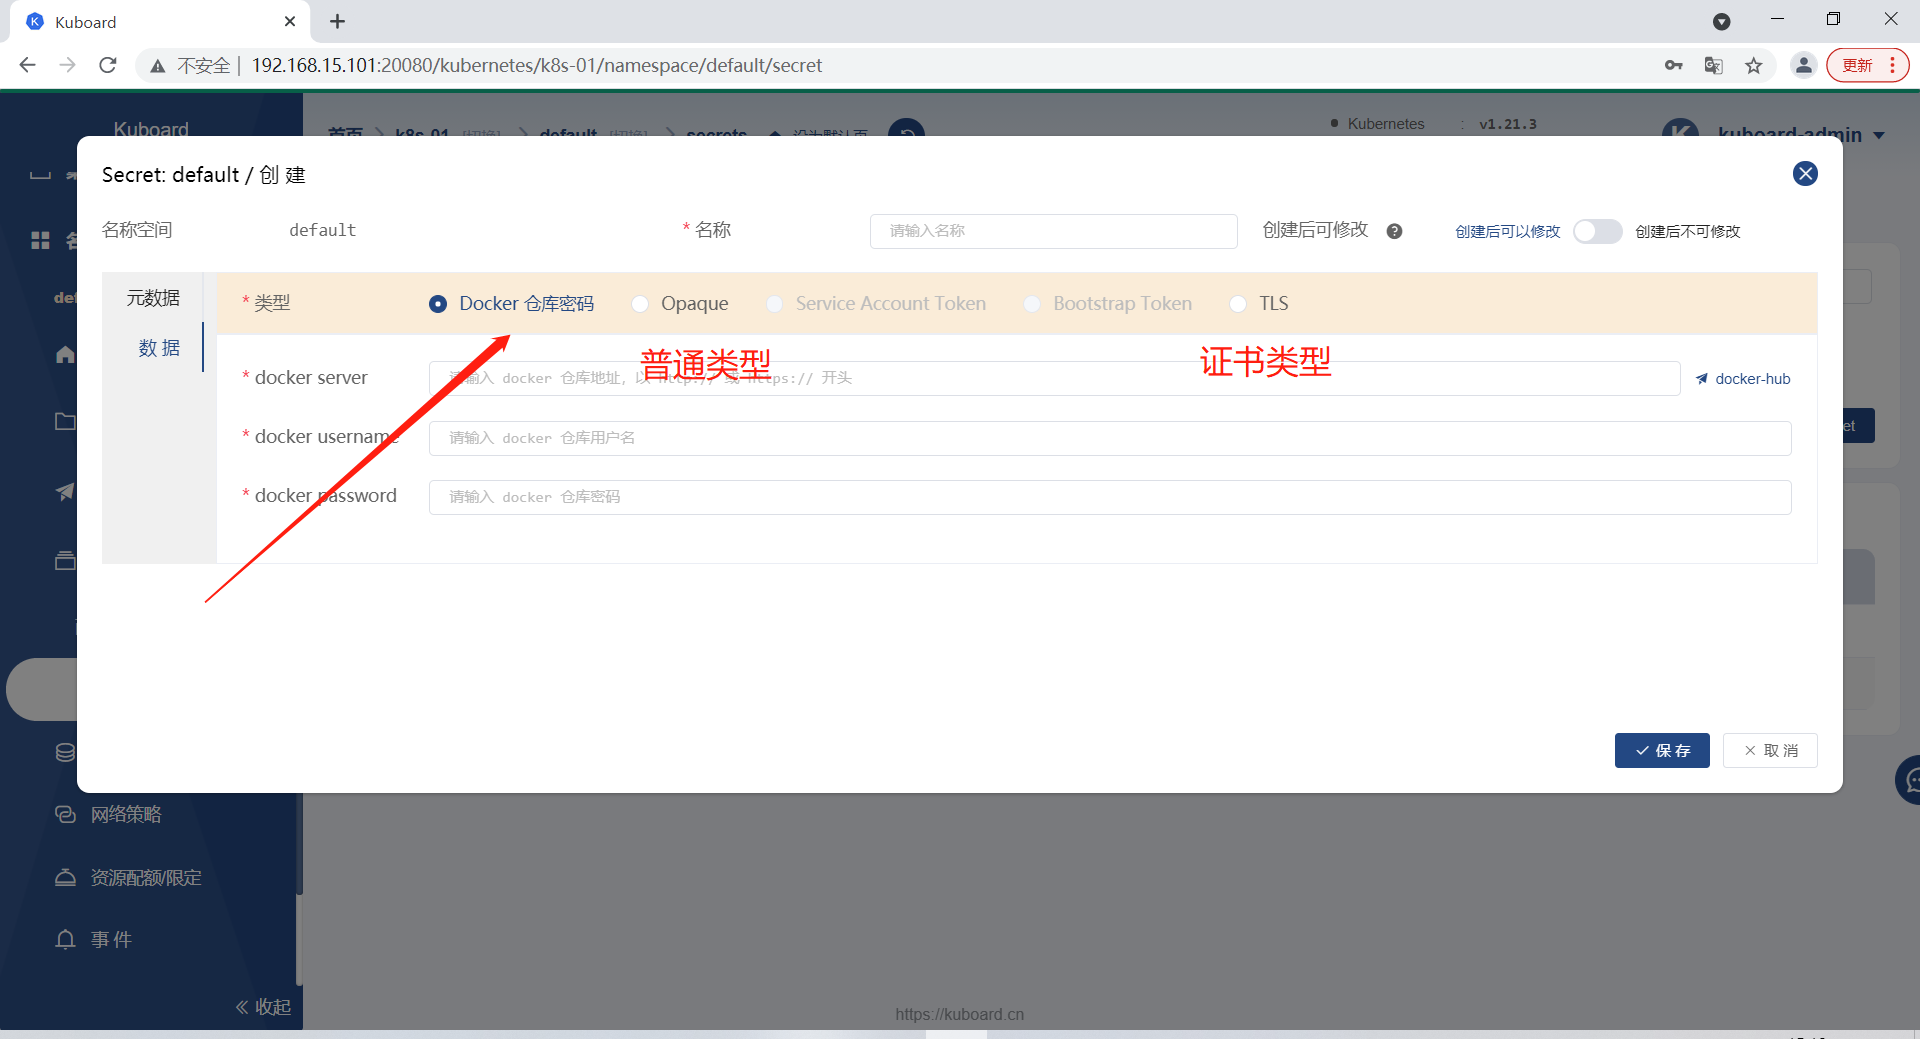
# secret有三种类型
1.普通类型
2.存放docker仓库用户名密码
3.存放集群秘钥证书
# 相当于加密的configMap
2、创建secret资源清单
2.1 普通类型的secret
---
kind: Secret
apiVersion: v1
metadata:
  name: secret
data:
  MYSQL_ROOT_PASSWORD: MTIzNDU2  # 加密后的密码

# 加密密码
[root@k8s-master-01 ~]# echo -n 123456 | base64
MTIzNDU2

# 部署
[root@k8s-master-01 k8s]# kubectl apply -f secret.yaml

# 查看
[root@k8s-master-01 k8s]# kubectl get secret
NAME                  TYPE                                  DATA   AGE
default-token-ft5dv   kubernetes.io/service-account-token   3      10d
test01                Opaque                                1      35s

# 但是这个密码很好解析
[root@k8s-master-01 k8s]# echo 'MTIzNDU2' | base64 -d
123456
2.2 存放docker仓库用户名密码
[root@k8s-master-01 ~]# kubectl create secret docker-registry aliyun01 --docker-server=registry.cn-hangzhou.aliyuncs.com --docker-username=yangyang091022 --docker-password=123456 # 手动创建或者图形化界面创建
2.3 存放集群秘钥证书
# 创建证书
[root@k8s-master-01 k8s]# mkdir ssl
[root@k8s-master-01 k8s]# cd ssl
[root@k8s-master-01 ssl]# openssl genrsa -idea -out jesonc.key 1024
[root@k8s-master-01 ssl]# openssl req -new -key jesonc.key -out jesonc.csr

# 查看
[root@k8s-master-01 ssl]# ll
-rw-r--r-- 1 root root 599 Jan 11 15:33 jesonc.csr
-rw-r--r-- 1 root root 947 Jan 11 15:32 jesonc.key

# 编写
[root@k8s-master-01 k8s]# vim nginx-aliyun.yaml
---
kind: Ingress
apiVersion: extensions/v1beta1
metadata:
  name: www-test-com
spec:
  tls:
    - hosts:
        - www.test.com
      secretName: www-test-com
  rules:
    - http:
        paths:
          - backend:
              serviceName: aliyun01
              servicePort: 80
      host: www.test.com
---
kind: Service
apiVersion: v1
metadata:
  name: aliyun01
spec:
  selector:
    app: aliyun01
  ports:
    - port: 80
      targetPort: 80


# 部署
[root@k8s-master-01 k8s]# kubectl apply -f nginx-aliyun.yaml
ingress.extensions/www-test-com created
service/aliyun01 created

# 查看
[root@k8s-master-01 k8s]# kubectl get svc -n ingress-nginx
NAME                                 TYPE        CLUSTER-IP       EXTERNAL-IP   PORT(S)                      AGE
ingress-nginx-controller             NodePort    10.106.253.254   <none>        80:32153/TCP,443:31859/TCP   12h
ingress-nginx-controller-admission   ClusterIP   10.111.156.164   <none>        443/TCP                      12h

# 测试
https://www.test.com:31859/
五、pv/pvc
1、简介
  管理存储是管理计算的一个明显问题。该PersistentVolume子系统为用户和管理员提供了一个API,用于抽象如何根据消费方式提供存储的详细信息。为此,我们引入了两个新的API资源:PersistentVolume和PersistentVolumeClaim

  PersistentVolume(PV)是集群中由管理员配置的一段网络存储。 它是集群中的资源,就像节点是集群资源一样。 PV是容量插件,如Volumes,但其生命周期独立于使用PV的任何单个pod。 此API对象捕获存储实现的详细信息,包括NFS,iSCSI或特定于云提供程序的存储系统。 # pv: 存储

  PersistentVolumeClaim(PVC)是由用户进行存储的请求。 它类似于pod。 Pod消耗节点资源,PVC消耗PV资源。Pod可以请求特定级别的资源(CPU和内存)。声明可以请求特定的大小和访问模式(例如,可以一次读/写或多次只读)。  # pvc: 存储请求
2、访问策略
pv的访问策略有四种:
    1、ReadWriteMany		: 多路可读可写
    2、ReadWriteOnce		:单路可读可写
    3、ReadOnlyMany		:多路只读
    4、ReadWriteOncePod	: 当节点只读(1.22+)
3、创建资源清单
3.1 前提准备
# 1.创建目录
[root@k8s-master-01 k8s]# mkdir -p /nfs/v{1..5}
[root@k8s-master-01 k8s]# yum install nfs-utils rpcbind -y

# 2.修改配置文件
[root@k8s-master-01 k8s]# vim /etc/exports
/nfs/v1 192.168.15.0/24(rw,sync,all_squash,anonuid=666,anongid=666)
/nfs/v2 192.168.15.0/24(rw,sync,all_squash,anonuid=666,anongid=666)
/nfs/v3 192.168.15.0/24(rw,sync,all_squash,anonuid=666,anongid=666)
/nfs/v4 192.168.15.0/24(rw,sync,all_squash,anonuid=666,anongid=666)
/nfs/v5 192.168.15.0/24(rw,sync,all_squash,anonuid=666,anongid=666)

# 3.重启
[root@k8s-master-01 k8s]# systemctl start nfs-server rpcbind

# 4.查看
[root@k8s-master-01 k8s]# showmount -e
Export list for k8s-master-01:
/nfs/v5 192.168.15.0/24
/nfs/v4 192.168.15.0/24
/nfs/v3 192.168.15.0/24
/nfs/v2 192.168.15.0/24
/nfs/v1 192.168.15.0/24
3.2 创建pv资源清单
---
kind: PersistentVolume
apiVersion: v1
metadata:
  name: pv001
  labels:
    app: pv001
spec:
  nfs:
    path: /nfs/v2
    server: 192.168.15.101
  accessModes:
    - "ReadWriteMany"
    - "ReadWriteOnce"
  capacity:
    storage: 10Gi

# 部署
[root@k8s-master-01 k8s]# kubectl apply -f pv.yaml
persistentvolume/pv001 created

# 查看
[root@k8s-master-01 k8s]# kubectl get pv
NAME    CAPACITY   ACCESS MODES   RECLAIM POLICY   STATUS      CLAIM   STORAGECLASS   REASON   AGE
pv001   10Gi       RWO,RWX        Retain           Available                                   39s
3.3 创建pvc资源清单
---
apiVersion: v1
kind: PersistentVolumeClaim
metadata:
  name: pvc
  namespace: default
spec:
  accessModes:
    - "ReadWriteMany"
  resources:
    requests:
      storage: "6Gi"

# 部署
[root@k8s-master-01 k8s]# kubectl apply -f pvc.yaml
persistentvolumeclaim/pvc created

# 查看
[root@k8s-master-01 k8s]# kubectl get pvc
NAME   STATUS   VOLUME   CAPACITY   ACCESS MODES   STORAGECLASS   AGE
pvc    Bound    pv001    10Gi       RWO,RWX                       59s
   # Bound:和pv处于绑定状态
3.4 使用pv与pvc
[root@k8s-master-01 k8s]# vim pvc.yaml  # 加入到pvc配置清单下面

---
kind: Deployment
apiVersion: apps/v1
metadata:
  name: pv-pvc
spec:
  selector:
    matchLabels:
      app: pv-pvc
  template:
    metadata:
      labels:
        app: pv-pvc
    spec:
      containers:
        - name: nginx
          image: nginx
          volumeMounts:
            - mountPath: /usr/share/nginx/html
              name: pvc
      volumes:
        - name: pvc
          persistentVolumeClaim:
            claimName: pvc

# 部署到pvc中
[root@k8s-master-01 k8s]# kubectl apply -f pvc.yaml
persistentvolumeclaim/pvc unchanged
deployment.apps/pv-pvc created

# 查看
[root@k8s-master-01 k8s]# kubectl get pods
NAME                         READY   STATUS              RESTARTS   AGE
pv-pvc-7d6ccffd6d-vgzvp      0/1     ContainerCreating   0          58s

# 会报错,需要去节点下载nfs
[root@k8s-node-01 ~]# yum install nfs-utils rpcbind -y

# 启动成功
[root@k8s-master-01 k8s]# kubectl get pods
NAME                         READY   STATUS    RESTARTS   AGE
pv-pvc-7d6ccffd6d-vgzvp      1/1     Running   0          4m42s

# 测试
[root@k8s-master-01 ~]# cd /nfs/v2
[root@k8s-master-01 v2]# echo 'hi' > index.heml
[root@k8s-master-01 v2]# curl 10.244.1.216

 浙公网安备 33010602011771号