

maven私服nexus3.9安装配置
maven私服nexus3.9安装配置
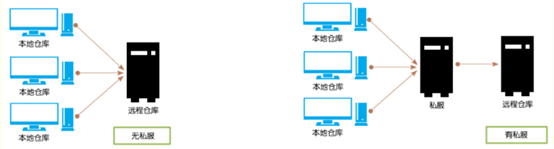
私服介绍
私服是指私有服务器,是架设在局域网的一种特殊的远程仓库,目的是代理远程仓库及部署第三方构建。有了私服之后,当 Maven 需要下载构件时,直接请求私服,私服上存在则下载到本地仓库;否则,私服请求外部的远程仓库,将构件下载到私服,再提供给本地仓库下载。Nexus是一个强大的Maven仓库管理器,它极大地简化了本地内部仓库的维护和外部仓库的访问。
本人的安装环境:
1、操作系统:Windows 10 /Windows 7
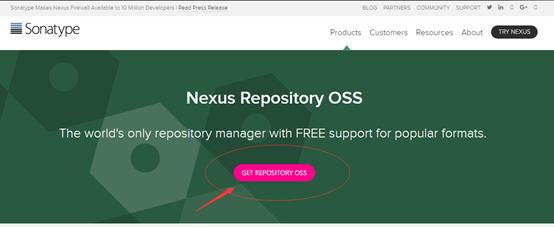
2、nexus版本:nexus-3.9.0-01-win64(Nexus 专业版是需要付费的,这里我们下载开源免费版 Nexus OSS)
下载地址:https://www.sonatype.com/nexus-repository-oss

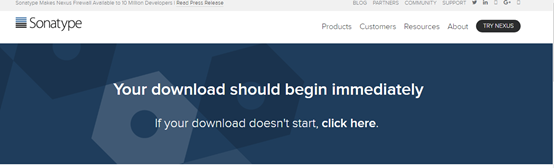
也可以直接访问:https://www.sonatype.com/oss-thank-you-win64.zip
进行下载。
下载下来为一个压缩包:

解压到自己的安装目录:
进入/nexus-3.6.1-02-win64/nexus-3.6.1-02/bin目录下,以管理员身份打开命令行:nexus /install Nexus3 ,该命令将会将Nexus Repository注册成为Windows服务。启动刚刚注册的Nexus3服务,启动需要几分钟。

打开浏览器,输出localhost:8081,出现如下界面,安装成功。

使用默认的用户名和密码登陆(admin/admin123),
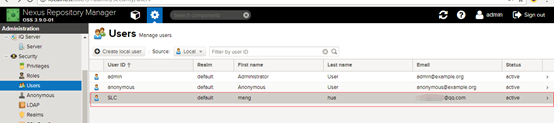
可以点击上面的"设置"图标,在"设置"里可以添加用户、角色等。
一些概念:
1.component name的一些说明:
1)maven-central:maven中央库,该仓库代理Maven中央仓库,默认从https://repo1.maven.org/maven2/拉取jar ,其策略为Release,只会下载和缓存中央仓库中的发布版本构件。
2)maven-releases:私库发行版jar
3)maven-snapshots:私库快照(调试版本)jar
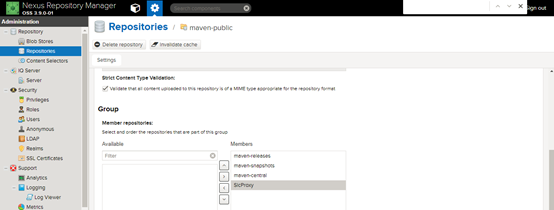
4)maven-public:仓库分组,把上面三个仓库组合在一起对外提供服务,在本地maven基础配置settings.xml中使用。
2.Nexus默认的仓库类型有以下四种:
1)group(仓库组类型):又叫组仓库,开发人员自己设定的仓库组;
2)hosted(宿主类型):内部项目的发布仓库(内部开发人员,发布上去存放的仓库);
3)proxy(代理类型):从远程中央仓库中寻找数据的仓库
4)virtual(虚拟类型):虚拟仓库(这个基本用不到,重点关注上面三个仓库的使用)
3.Policy(策略):表示该仓库为发布(Release)版本仓库还是快照(Snapshot)版本仓库,snapshots是快照版本,也就是不稳定版本。
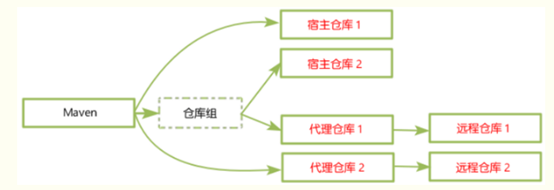
4.Nexus仓库分类的概念:
1)Maven可直接从宿主仓库下载构件,也可以从代理仓库下载构件,而代理仓库间接的从远程仓库下载并缓存构件
2)为了方便Maven可以从仓库组下载构件,仓库组并没有实际的内容(下图中用虚线表示),访问它时,它会转向包含的宿主仓库或者代理仓库获得实际构件的内容).
Nexus自带Jetty容器,默认的端口是8081,若想修改Nexus的服务端口,可以在nexus-3.9.0-01-win64\sonatype-work\nexus3\etc\ nexus.properties配置中修改 application-port=自己设置的端口号。
5.Nexus的工作目录是sonatype-work(路径一般在nexus同级目录下),用户数据和设置都在这个目录下面,若要备份,备份这个目录即可;
Nexus的web界面功能介绍
1.1 Search

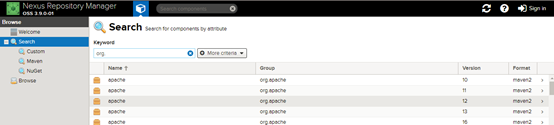
这个就是类似Maven仓库上的搜索功能,就是从私服上查找是否有哪些包。
在Search这级是支持模糊搜索的,如图所示:
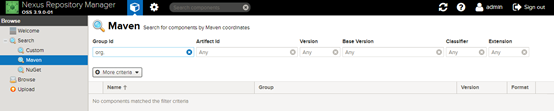
如果进入具体的目录,好像不支持模糊搜索,如图所示:
1.2 Browse
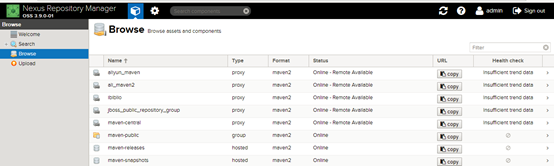
这里查看所有的库以及库里面的组件
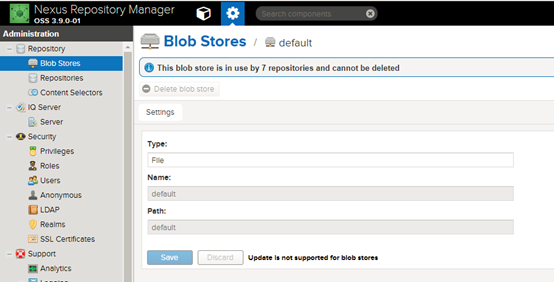
1.3 Blob Stores
文件存储的地方,创建一个目录的话,对应文件系统的一个目录,如图所示:
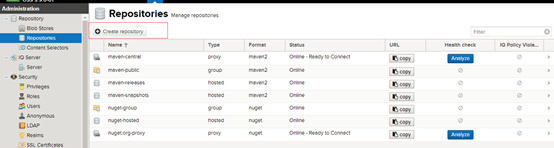
2.1 Repositories
Proxy就是代理的意思,代理中央Maven仓库,当PC访问中央库的时候,先通过Proxy下载到Nexus仓库,然后再从Nexus仓库下载到PC本地。
这样的优势只要其中一个人从中央库下来了,以后大家都是从Nexus私服上进行下来,私服一般部署在内网,这样大大节约的宽带。
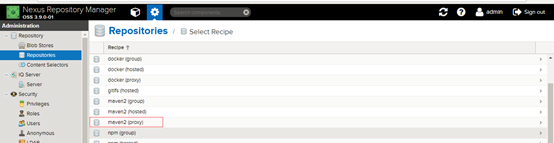
创建Proxy的具体步骤
1--点击"Create Repositories"按钮
2--选择要创建的类型
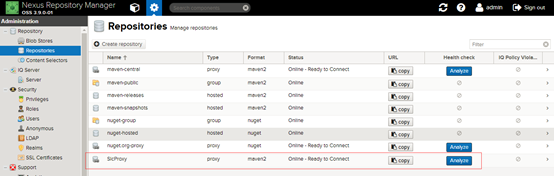
3--填写详细信息
Name:就是为代理起个名字
Remote Storage: 代理的地址,Maven的地址为: https://repo1.maven.org/maven2/
Blob Store: 选择代理下载包的存放路径
创建完成后如下图:
将添加的代理仓库加入 Public Repositories 仓库组
4.配置远程索引
新搭建的neuxs环境只是一个空的仓库,需要手动和远程中心库进行同步,nexus默认是关闭远程索引下载。
由于使用代理之前需要先下索引,但是索引较大400多M,从国外可能线上更新索引会比较慢,我们可以使用迅雷之类的加速工具,离线下载然后再上传到nexus服务器即可。
索引下载地址:http://repo.maven.apache.org/maven2/.index/
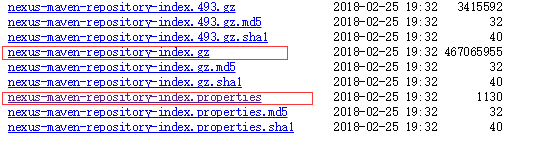
将nexus-maven-repository-index.gz 、nexus-maven-repository-index.properties 、indexer-cli-6.0.0.jar 放置到同一目录下,运行命令:java -jar indexer-cli-6.0.0.jar -u nexus-maven-repository-index.gz -d indexer
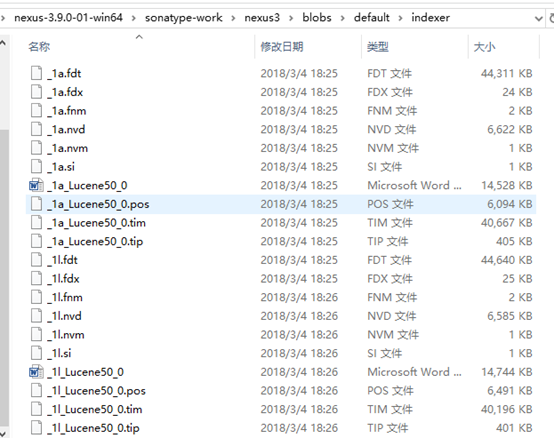
将indexer中的全部文件移动到 sonatype-work\nexus3\blobs\仓库名下,
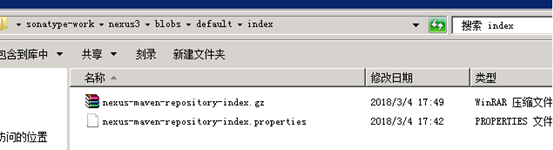
在\ sonatype-work\nexus3\blobs\仓库名下面新建index 将nexus-maven-repository-index.gz 、nexus-maven-repository-index.properties 放到index文件夹下
重新启动nexus。等待一段时间

 Status从 Online-Remote Avaliable 变为Online-Remote Avaliable
使用一些Maven代理镜像网站就不用手动下索引了
<mirrors> <mirror> <id>alimaven</id> <name>aliyun maven</name> <url>http://maven.aliyun.com/nexus/content/groups/public/</url> <mirrorOf>central</mirrorOf> </mirror> <mirror> <id>central</id> <name>Maven Repository Switchboard</name> <url>http://repo1.maven.org/maven2/</url> <mirrorOf>central</mirrorOf> </mirror> <mirror> <id>repo2</id> <mirrorOf>central</mirrorOf> <name>Human Readable Name for this Mirror.</name> <url>http://repo2.maven.org/maven2/</url> </mirror> <mirror> <id>ibiblio</id> <mirrorOf>central</mirrorOf> <name>Human Readable Name for this Mirror.</name> <url>http://mirrors.ibiblio.org/pub/mirrors/maven2/</url> </mirror> <mirror> <id>jboss-public-repository-group</id> <mirrorOf>central</mirrorOf> <name>JBoss Public Repository Group</name> <url>http://repository.jboss.org/nexus/content/groups/public</url> </mirror> <!-- 中央仓库在中国的镜像 --> <mirror> <id>maven.net.cn</id> <name>oneof the central mirrors in china</name> <url>http://maven.net.cn/content/groups/public/</url> <mirrorOf>central</mirrorOf> </mirror> <mirror> <id>alimaven</id> <mirrorOf>central</mirrorOf> <name>aliyun maven</name> <url>http://maven.aliyun.com/nexus/content/repositories/central/</url> </mirror> </mirrors> |
与Maven集成
集成的方式主要分以下种情况:代理中央仓库、Snapshot包的管理、Release包的管理、第三方Jar上传到Nexus上。找到myeclipse使用的maven配置文件\apache-maven-3.3.9\conf\settings.xml,如果myeclispe没修改,默认起作用的是C盘下
C:\Users\${user.name}\.m2\settings.xml 。
<servers> <server> <id>nexus</id> <username>admin</username> <password>admin123</password> </server> </servers> <mirrors> <mirror> <!--This sends everything else to /public --> <id>nexus</id> <!--此处配置所有的构建均从私有仓库中下载 *代表所有 --> <mirrorOf>*</mirrorOf> <!--私服路径 --> <url>http://localhost:8081/repository/maven-public/</url> </mirror> </mirrors>
<profiles> <profile> <id>nexus</id> <!--Enable snapshots for the built in central repo to direct --> <!--all requests to nexus via the mirror --> <repositories> <repository> <id>central</id> <url>http://central</url> <releases> <enabled>true</enabled> </releases> <snapshots> <enabled>true</enabled> </snapshots> </repository> </repositories> <pluginRepositories> <pluginRepository> <id>central</id> <url>http://central</url> <releases> <enabled>true</enabled> </releases> <snapshots> <enabled>true</enabled> </snapshots> </pluginRepository> </pluginRepositories> </profile> </profiles>
<activeProfiles> <!--make the profile active all the time --> <activeProfile>nexus</activeProfile> </activeProfiles>
</settings> |
注意以下三点:
1 将<mirror><url>标签内的地址修改成nexus服务的地址。
2 <servers>标签内填写nexus服务的账号密码,发布maven项目到nexus时,需要用到。
3 <server><id>下id需要跟<mirror><id>一致。
如果想发布项目到nexus仓库
还需要在项目的pom.xml文件内,指定发布地址:
<distributionManagement>
<repository>
<id>nexus</id>
<name>Releases</name>
<!-- 从repository/maven-releases管理页面复制url地址 -->
<url>http://localhost:8081/repository/maven-releases/</url>
</repository>
<snapshotRepository>
<id>nexus</id>
<name>Snapshot</name>
<url>http://localhost:8081/repository/maven-snapshots/</url>
</snapshotRepository>
</distributionManagement>
关于仓库详细配置可参考官方文档:
http://books.sonatype.com/nexus-book/reference3/admin.html#admin-repositories
Nexus3.x.x上传第三方jar:
第一种方式:写脚本上传jar
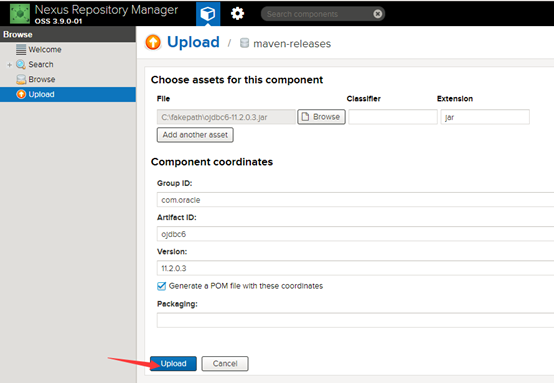
mvn deploy:deploy-file -DgroupId=com.oracle -DartifactId=ojdbc6 -Dversion=11.2.0.3 -Dpackaging=jar -Dfile=D:\ojdbc6-11.2.0.3.jar -Durl=http://localhost:8081/repository/maven-releases/ -DrepositoryId=nexus
其中-DgroupId 为上传的jar的groupId
-DartifactId 为上传的jar的artifactId
-Dversion 为上传的jar的需要被依赖的时候的版本号
然后是-Dpackaging为jar,-Dfile为jar包路径
-Durl 为要上传的路径
-DrepositoryId 为repository的唯一标示,跟第二步中赋权配置的server相同
第二种方式:使用Nexus Repository Manager图形化界面上传
参考博文:
http://www.blogjava.net/xiaomage234/archive/2014/05/13/413584.html
https://www.cnblogs.com/kevingrace/p/6201984.html
http://blog.csdn.net/lusyoe/article/details/52821088
https://www.zhihu.com/question/47261839/answer/134716331
http://blog.csdn.net/iopfan/article/details/71107686

 浙公网安备 33010602011771号