


Vue-Router本质
根据"不同的hash值"或者"不同的路径地址", 将不同的内容渲染到router-view中,所以实现VueRouter的核心关键点就在于如何监听'hash'或'路径'的变化, 再将不同的内容写到router-view中。
window.addEventListener('popstate', ()=>{}) // 监听浏览器后退
window.addEventListener('pushState', ()=>{}) // 监听浏览器前进
// history.pushState(null, null, path)
window.addEventListener('hashchange', ()=>{}) // 监听浏览器地址hash变化
window.addEventListener('load', ()=>{}) // 监听浏览器首次加载
提取路由信息
在 src/router/ 下实现自己的router对象。
初始化路由信息
注入全局属性
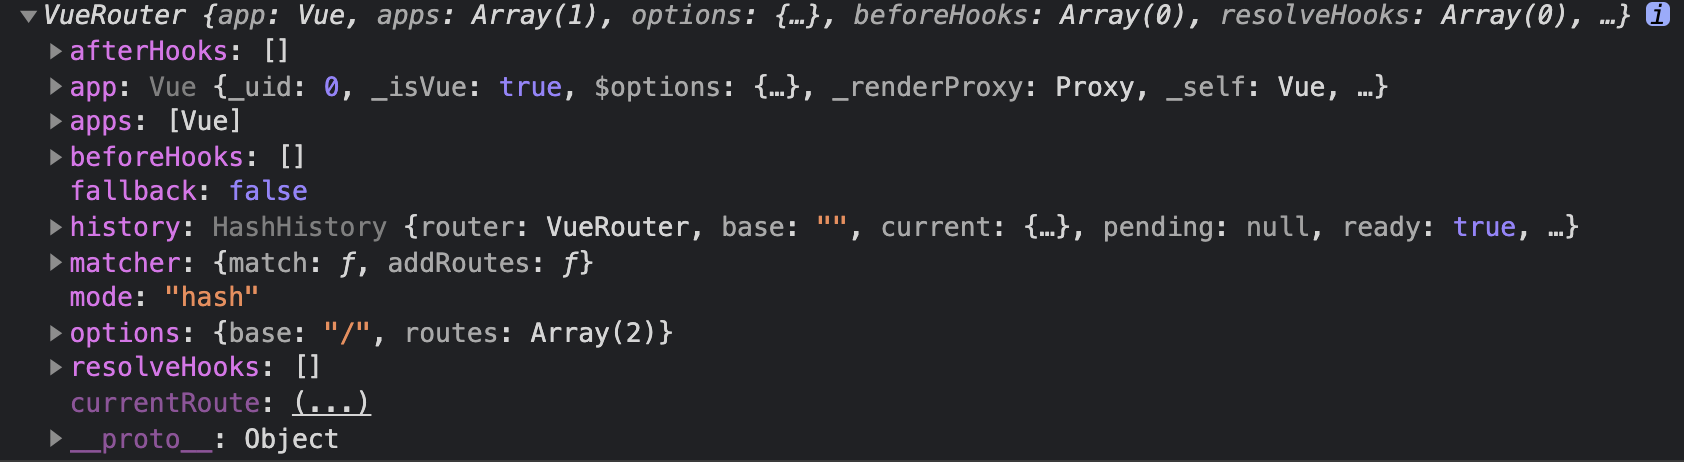
Vue根实例的router配置传入router实例,每个子组件中注入 this.$router 和 this.$route。
this.$router 拿到的是VueRouter对象,里面包含router对象的所有信息。
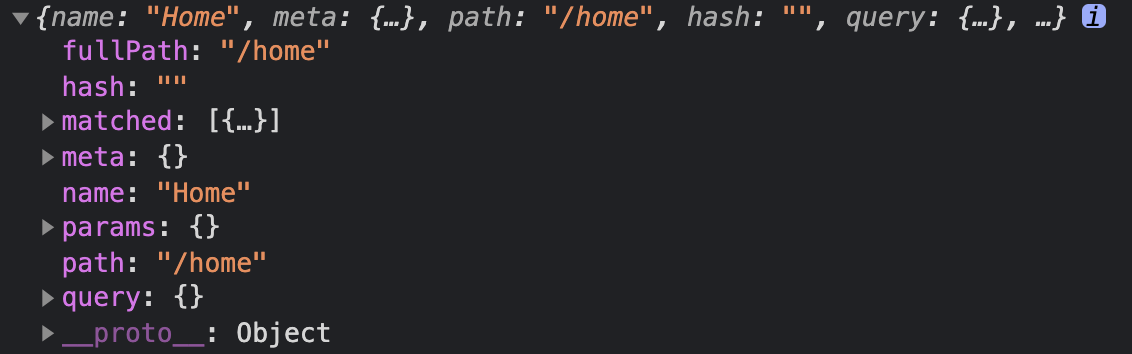
this.$route 拿到的是当前路由的信息。
自定义路由组件
只要外界使用了Vue-Router, 那么我们就必须提供两个自定义的组件 router-link、 router-view 给外界使用;只要外界通过Vue.use注册了Vue-Router, 就代表外界使用了Vue-Router;只要外界通过Vue.use注册了Vue-Router, 就会调用插件的install方法所以我们只需要在instal方法中注册两个全局组件给外界使用即可。
自定义路由出口组件
// src/router/Nue-Router.js
class NueRouteInfo {
    constructor(){
        this.currentPath = null;
    }
}

class NueRouter {
    constructor(options){
        this.mode = options.mode || 'hash';
        this.routes = options.routes || [];
        // 提取路由信息
        /* 格式
        {
            '/home': Home,
            '/about': About
        }
        * */
        this.routesMap = this.createRoutesMap();
      	this.routeInfo = new NueRouteInfo();
        // 初始化默认的路由信息
        this.initDefault();
    }
    initDefault(){
        if(this.mode === 'hash'){
            // 1.判断打开的界面有没有hash, 如果没有就跳转到#/
            if(!location.hash){
                location.hash = '/';
            }
            // 2.加载完成之后和hash发生变化之后都需要保存当前的地址
            window.addEventListener('load', ()=>{
                this.routeInfo.currentPath = location.hash.slice(1);
            });
            window.addEventListener('hashchange', ()=>{
                this.routeInfo.currentPath = location.hash.slice(1);
            });
        }else{
            // 1.判断打开的界面有没有路径, 如果没有就跳转到/
            if(!location.pathname){
                location.pathname = '/';
            }
            // 2.加载完成之后和history发生变化之后都需要保存当前的地址
            window.addEventListener('load', ()=>{
                this.routeInfo.currentPath = location.pathname;
            });
            window.addEventListener('popstate', ()=>{
                this.routeInfo.currentPath = location.pathname;
            });
        }
    }
    createRoutesMap(){
        return  this.routes.reduce((map, route)=>{
            map[route.path] = route.component;
            return map;
        }, {})
    }
}

NueRouter.install = (Vue, options)=>{
    Vue.mixin({ // 注入全局属性
        beforeCreate(){
            if(this.$options && this.$options.router){ // 根组件,main.js中的Vue对象
                this.$router = this.$options.router;
                this.$route = this.$router.routeInfo;
              	Vue.util.defineReactive(this, 'xxx', this.$router); // 让Vue双向绑定这个router对象,这样点击router-link触发路由更新的时候会触发监听事件,再次执行router-view组件的render方法。
            }else{ // 子组件
                this.$router = this.$parent.$router;
                this.$route = this.$router.routeInfo;
            }
        }
    });
    /*
    只要外界使用了Vue-Router, 那么我们就必须提供两个自定义的组件给外界使用;只要外界通过Vue.use注册了Vue-Router, 就代表外界使用了Vue-Router;只要外界通过Vue.use注册了Vue-Router, 就会调用插件的install方法所以我们只需要在install方法中注册两个全局组件给外界使用即可。
    * */
    Vue.component('router-link', {
        props: { // router-link组件接收一个to参数
            to: String
        },
        render(){ // 告诉外界 router-link 的本质,使用router-link的时候会被替换为rende返回的内容。
            // 注意点: render方法中的this并不是当前实例对象, 而是一个代理对象,如果我们想拿到当前实例对象, 那么可以通过this._self获取
            // console.log(this._self.$router.mode);
            let path = this.to;
            if(this._self.$router.mode === 'hash'){
                path = '#' + path;
            }
            return <a href={path}>{this.$slots.default}</a>
        }
    });
    Vue.component('router-view', {
        render(h){ // 组件渲染会先执行render方法,后面执行之前注册的load方法,但是第一次执行render方法的时候currentPath还没有取到,无法渲染,这就需要让Vue双向绑定这个router对象,router变化的时候会触发更新,再次执行render方法,这个时候组件才能被正确渲染。也就是执行router-view会两次执行render方法。
            let routesMap = this._self.$router.routesMap;
            let currentPath = this._self.$route.currentPath;
            // console.log(currentPath);
            let currentComponent = routesMap[currentPath];
            return h(currentComponent);
        }
    });
}
export default NueRouter;
// src/router/index.js
import Vue from 'vue'
// import VueRouter from 'vue-router'
import VueRouter from './Nue-Router'
import Home from '../views/Home.vue'
import About from '../views/About.vue'
Vue.use(VueRouter)
const routes = [
  {
    path: '/home',
    name: 'Home',
    component: Home
  },
  {
    path: '/about',
    name: 'About',
    component: About
  }
]
const router = new VueRouter({
  mode: 'history', // eg: #/home mode模式:/home
  base: process.env.BASE_URL,
  routes
})
export default router
<div id="nav">
  <router-link to="/home">首页</router-link>
  <router-link to="/about">关于</router-link>
</div>
<router-view></router-view>
监听路由变化
beforeRouteUpdate
可以监听 $route 或者 使用钩子函数 beforeRouteUpdate。
全局前置守卫
beforeEach
beforeEach 所有路由跳转之前执行
const router = new VueRouter({ ... })

router.beforeEach((to, from, next) => {
  // ...
})
全局解析守卫
beforeResolve
router.beforeResolve 导航被确认之前,同时在所有组件内守卫和异步路由组件被解析之后,解析守卫就被调用。
全局后置钩子
afterEach
router.afterEach
router.afterEach((to, from) => {
  // ...
})
路由独享的守卫
beforeEnter*
const router = new VueRouter({
  routes: [
    {
      path: '/foo',
      component: Foo,
      beforeEnter: (to, from, next) => {
        // ...
      }
    }
  ]
})
组件内的守卫
beforeRouteEnter
beforeRouteUpdate
beforeRouteLeave
你可以在路由组件内直接定义以下路由导航守卫:
const Foo = {
  template: `...`,
  beforeRouteEnter(to, from, next) {
    // 在渲染该组件的对应路由被 confirm 前调用
    // 不!能!获取组件实例 `this`
    // 因为当守卫执行前,组件实例还没被创建
  },
  beforeRouteUpdate(to, from, next) {
    // 在当前路由改变,但是该组件被复用时调用
    // 举例来说,对于一个带有动态参数的路径 /foo/:id,在 /foo/1 和 /foo/2 之间跳转的时候,
    // 由于会渲染同样的 Foo 组件,因此组件实例会被复用。而这个钩子就会在这个情况下被调用。
    // 可以访问组件实例 `this`
  },
  beforeRouteLeave(to, from, next) {
    // 导航离开该组件的对应路由时调用
    // 可以访问组件实例 `this`
  }
}
完整的导航解析流程
1、导航被触发。
2、在失活的组件里调用 beforeRouteLeave 守卫。
3、调用全局的 beforeEach 守卫。
4、在重用的组件里调用 beforeRouteUpdate 守卫。
5、在路由配置里调用 beforeEnter。
6、解析异步路由组件。
7、在被激活的组件里调用 beforeRouteEnter。
8、调用全局的 beforeResolve 守卫 (2.5+)。
9、导航被确认。
10、调用全局的 afterEach 钩子。
11、触发 DOM 更新。
12、调用 beforeRouteEnter 守卫中传给 next 的回调函数,创建好的组件实例vm会作为回调函数的参数传入。

 浙公网安备 33010602011771号