

Centos7系统-postgresql+etcd+patroni+haproxy+keepalived高可用集群部署
一、概况
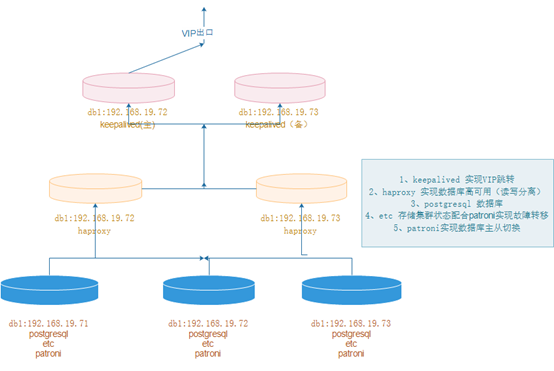
1、概念
pgsql高可用集群采用postgresql+etcd+patroni+haproxy+keepalived等软件实现,以postgresql做数据库,etcd存储集群状态,patroni与etcd结合实现数据库集群故障切换,haproxy实现数据库高可用(读读写分离),keepalived实现VIP跳转。 |
2、拓扑图
软件下载地址:
链接:https://pan.baidu.com/s/1VIWwXcfQRCumJjEXndSXPQ
提取码:5bpz
二、postgresql部署(三个节点)
1、下载解压
|
1
2
3
|
https://www.enterprisedb.com/download-postgresql-binariesmkdir -p /data/pg_datatar xf postgresql-10.18-1-linux-x64-binaries.tar.gz -C /data/ |
2、创建用户并授权
|
1
2
3
|
useradd postgrespasswd postgreschown -R postgres.postgres /data/ |
3、初始化数据库(postgres用户下)
|
1
2
3
4
|
切换目录[root@centos7 ~]# su – postgres初始化目录[postgres@centos7 ~]$ /data/pgsql/bin/initdb -D /data/pg_data/ |
4、配置变量
|
1
2
3
4
5
6
7
8
9
10
11
12
13
|
su – postgresvim .bash_profilePATH=$PATH:$HOME/bin export PATHexport PATHexport PGHOME=/data/pgsqlexport PATH=$PATH:$PGHOME/binexport PGDATA=/data/pg_dataexport PGLOG=/data/pg_log/pg.logsource .bash_profile mkdir -p /data/pg_logchown postgres.postgres /data/pg_datachown postgres.postgres /data/pg_log |
5、配置postgresql启动脚本
|
1
2
3
4
5
6
7
8
9
10
11
12
13
14
15
16
|
vim /etc/systemd/system/postgresql.service[Unit]Description=PostgreSQL database serverAfter=network.target[Service]Type=forking User=postgres Group=postgresExecStart= /data/pgsql/bin/pg_ctl -D /data/pg_data/ startExecReload= /data/pgsql/bin/pg_ctl -D /data/pg_data/ restartExecStop= /data/pgsql/bin/pg_ctl -D /data/pg_data/ stopPrivateTmp=true [Install]WantedBy=multi-user.target |
6、启动与关闭
|
1
2
3
4
5
6
7
|
systemctl daemon-reload开启systemctl start postgresql 关闭systemctl stop postgresql 重启systemctl restart postgresql |
7、数据库添加密码
|
1
2
|
[postgres@pgsql-19 ~]$ psql -U postgres -h localhostpostgres=# alter user postgres with password 'P@sswrd'; |
8、允许远程连接
|
1
2
|
vim /data/pg_data/pg_hba.confhost all all 0.0.0.0/0 md5 |

|
1
2
3
4
5
6
7
|
vim /data/pg_data/postgresql.conflisten_addresses = '*'password_encryption = on重启数据库systemctl restart postgresql |
三、etcd部署(三个节点)
1、下载解压
|
1
2
|
tar xf etcd-v3.1.20-linux-amd64.tar.gz -C /usr/local/ln -s /usr/local/etcd-v3.1.20-linux-amd64 /usr/local/etcd |
2、文件配置
|
1
2
3
4
5
6
7
8
9
10
11
12
13
14
15
16
17
18
19
20
21
22
23
24
25
26
27
28
29
30
31
32
33
34
35
|
mkdir -p /usr/local/etcd/data/etcdvim /usr/local/etcd/conf.ymlname: pgsql_1971data-dir: /usr/local/etcd/data/etcdlisten-client-urls: http://192.168.19.71:2379,http://127.0.0.1:2379advertise-client-urls: http://192.168.19.71:2379,http://127.0.0.1:2379listen-peer-urls: http://192.168.19.71:2380initial-advertise-peer-urls: http://192.168.19.71:2380initial-cluster: pgsql_1971=http://192.168.19.71:2380,pgsql_1972=http://192.168.19.72:2380,pgsql_1973=http://192.168.19.73:2380initial-cluster-token: etcd-cluster-tokeninitial-cluster-state: newmkdir -p /usr/local/etcd/data/etcvim /usr/local/etcd/conf.ymlname: pgsql_1972data-dir: /usr/local/etcd/data/etcdlisten-client-urls: http://192.168.19.72:2379,http://127.0.0.1:2379advertise-client-urls: http://192.168.19.72:2379,http://127.0.0.1:2379listen-peer-urls: http://192.168.19.72:2380initial-advertise-peer-urls: http://192.168.19.72:2380initial-cluster: pgsql_1971=http://192.168.19.71:2380,pgsql_1972=http://192.168.19.72:2380,pgsql_1973=http://192.168.19.73:2380initial-cluster-token: etcd-cluster-tokeninitial-cluster-state: newmkdir -p /usr/local/etcd/data/etcvim /usr/local/etcd/conf.ymlname: pgsql_1973data-dir: /usr/local/etcd/data/etcdlisten-client-urls: http://192.168.19.73:2379,http://127.0.0.1:2379advertise-client-urls: http://192.168.19.73:2379,http://127.0.0.1:2379listen-peer-urls: http://192.168.19.73:2380initial-advertise-peer-urls: http://192.168.19.73:2380initial-cluster: pgsql_1971=http://192.168.19.71:2380,pgsql_1972=http://192.168.19.72:2380,pgsql_1973=http://192.168.19.73:2380initial-cluster-token: etcd-cluster-tokeninitial-cluster-state: new |
3、启动并加入到开机自启中
|
1
2
|
加入开机自启里边nohup /usr/local/etcd/etcd --config-file=/usr/local/etcd/conf.yml & |
4、集群检查
|
1
2
|
netstat -lntup|grep etcd/usr/local/etcd/etcdctl member list |
四、patroni部署(三个节点)
1、更新postgresql.conf文件,先执行下面第三步再执行从第一步顺序执行
|
1
2
3
4
5
6
7
8
9
10
11
12
|
postgresql.conf配置如下max_connections = '500'max_wal_senders = '10'port = '5432'listen_addresses = '*'synchronous_commit = onfull_page_writes = onwal_log_hints = onsynchronous_standby_names = '*'max_replication_slots = 10wal_level = replica |
注:wal_log_hints = on,synchronous_standby_names = '*' 这两个参数会导致数据库执行呆滞,后来者欢迎留言看是怎么回事儿
2、更新pg_hba.conf文件

vim /data/pg_data/pg_hba.conf
清理最后配置的配置,新增以下
local   all             all                                     peer
host    all             all             127.0.0.1/32            md5
host    all             postgres        127.0.0.1/32            md5
host    all             all             192.168.19.0/24      md5
host    all             all             ::1/128                 md5
local   replication     replicator                                peer
host    replication     replicator        127.0.0.1/32            md5
host    replication     replicator        ::1/128                 md5
host    replication     replicator        192.168.19.71/32      md5
host    replication     replicator        192.168.19.72/32      md5
host    replication     replicator        192.168.19.73/32      md5
以上配置完成后,重启数据库
3、在主节点上创建复制槽,很重要,patroni会用到
|
1
|
postgres=# create user replicator replication login encrypted password '1qaz2wsx'; |
4、配置stream replication(在两个从节点操作)
|
1
2
3
4
|
systemctl stop postgresql&&su - postgrescd /data/ && rm -rf pg_data/data/pgsql/bin/pg_basebackup -h 192.168.19.71 -D /data/pg_data -U replicator -v -P -Rsystemctl start postgresql |
5、安装patroni(三个节点)
|
1
2
3
4
5
6
7
8
9
|
yum install -y python3 python3-psycopg2 python3-develpip3 install --upgrade pippip3 install psycopg2-binary -i http://pypi.douban.com/simple/ --trusted-host pypi.douban.compip3 install patroni[etcd] -i http://pypi.douban.com/simple/ --trusted-host pypi.douban.com 验证是否安装成功which patronipatronictl --help |
6、创建patroni配置文件
|
1
|
cat /etc/patroni.yml
|
|
1
2
3
4
5
6
7
8
9
10
11
12
13
14
15
16
17
18
19
20
21
22
23
24
25
26
27
28
29
30
31
32
33
34
35
36
37
38
39
40
41
42
43
44
45
46
47
48
49
50
51
52
53
54
55
56
57
58
|
scope: batman
namespace: /service/ name: postgresql3 restapi: listen: 0.0.0.0:8008 connect_address: 192.168.200.149:8008 etcd: host: 192.168.200.149:2379 bootstrap: dcs: ttl: 30 loop_wait: 10 retry_timeout: 10 maximum_lag_on_failover: 1048576 master_start_timeout: 300 synchronous_mode: false postgresql: use_pg_rewind: true use_slots: true parameters: listen_addresses: "0.0.0.0" port: 5432 wal_level: logical hot_standby: "on" wal_keep_segments: 1000 max_wal_senders: 10 max_replication_slots: 10 wal_log_hints: "on" initdb: - encoding: UTF8 - locale: C - data-checksums pg_hba: - host replication replicator 0.0.0.0/0 md5 - host all all 0.0.0.0/0 md5 postgresql: listen: 0.0.0.0:5432 connect_address: 192.168.200.149:5432 data_dir: /data/pg_data bin_dir: /data/pgsql/bin authentication: replication: username: replicator password: 1qaz2wsx superuser: username: postgres password: P@sswrd tags: nofailover: false noloadbalance: false clonefrom: false nosync: false |
7、patroni配置启动脚本
为了方便开机自启,故配置成 patroni.service,3个node都需要进行配置,配置好patroni.service后就可以直接在root用户下切换Leader以及重启postgres节点等操作
|
1
2
3
4
5
6
7
8
9
10
11
12
13
14
15
16
17
18
|
cat /etc/systemd/system/patroni.service
[Unit] Description=Runners to orchestrate a high-availability PostgreSQL After=syslog.target network.target [Service] Type=simple User=postgres Group=postgres #StandardOutput=syslog ExecStart=/usr/local/bin/patroni /etc/patroni.yml ExecReload=/bin/kill -s HUP $MAINPID KillMode=process TimeoutSec=30 Restart=no [Install] WantedBy=multi-user.target |
8、依次启动patroni服务
为了方便开机自启,故配置成 patroni.service,3个node都需要进行配置,配置好patroni.service后就可以直接在root用户下切换Leader以及重启postgres节点等操作
|
1
2
|
Postgres用户下启动nohup patroni /etc/patroni.yml & |
9、禁用postgresql脚本采用patroni服务启动数据库
|
1
2
3
4
5
6
7
8
9
|
禁止 postgresql 的自启动,通过 patroni 来管理 postgresqlsystemctl stop postgresqlsystemctl status postgresqlsystemctl disable postgresqlsystemctl status patronisystemctl start patronisystemctl enable patroni |
五、集群检查
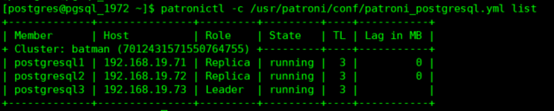
1、数据库集群检查
|
1
|
patronictl -c /usr/patroni/conf/patroni_postgresql.yml list |
2、etcd检查
|
1
2
|
/usr/local/etcd/etcdctl ls /service/batman/usr/local/etcd/etcdctl get /service/batman/members/postgresql1 |
六、haproxy部署(两个从节点)
1、安装haproxy服务
|
1
2
|
yum install -y haproxycp -r /etc/haproxy/haproxy.cfg /etc/haproxy/haproxy.cfg_bak |
2、配置文件
|
1
2
3
4
5
6
7
8
9
10
11
12
13
14
15
16
17
18
19
20
21
22
23
24
25
26
27
28
29
30
31
32
33
34
35
36
37
38
39
40
41
42
43
44
45
46
47
48
49
50
51
52
53
54
55
56
57
58
59
60
61
62
63
64
65
66
67
68
69
70
71
72
73
74
75
76
77
78
79
80
81
82
83
84
85
86
87
88
89
90
91
92
93
94
95
96
97
98
99
100
101
102
103
104
105
106
107
108
|
vi /etc/haproxy/haproxy.cfg#---------------------------------------------------------------------# 全局定义global # log语法:log [max_level_1] # 全局的日志配置,使用log关键字,指定使用127.0.0.1上的syslog服务中的local0日志设备, # 记录日志等级为info的日志# log 127.0.0.1 local0 info log 127.0.0.1 local1 notice chroot /var/lib/haproxy pidfile /var/run/haproxy.pid # 定义每个haproxy进程的最大连接数 ,由于每个连接包括一个客户端和一个服务器端, # 所以单个进程的TCP会话最大数目将是该值的两倍。 maxconn 4096 # 用户,组 user haproxy group haproxy # 以守护进程的方式运行 daemon # turn on stats unix socket stats socket /var/lib/haproxy/stats #---------------------------------------------------------------------# 默认部分的定义defaults # mode语法:mode {http|tcp|health} 。http是七层模式,tcp是四层模式,health是健康检测,返回OK mode tcp # 使用127.0.0.1上的syslog服务的local3设备记录错误信息 log 127.0.0.1 local3 err #if you set mode to http,then you nust change tcplog into httplog option tcplog # 启用该项,日志中将不会记录空连接。所谓空连接就是在上游的负载均衡器或者监控系统为了 #探测该服务是否存活可用时,需要定期的连接或者获取某一固定的组件或页面,或者探测扫描 #端口是否在监听或开放等动作被称为空连接;官方文档中标注,如果该服务上游没有其他的负 #载均衡器的话,建议不要使用该参数,因为互联网上的恶意扫描或其他动作就不会被记录下来 option dontlognull # 定义连接后端服务器的失败重连次数,连接失败次数超过此值后将会将对应后端服务器标记为不可用 retries 3 # 当使用了cookie时,haproxy将会将其请求的后端服务器的serverID插入到cookie中,以保证 #会话的SESSION持久性;而此时,如果后端的服务器宕掉了,但是客户端的cookie是不会刷新的 #,如果设置此参数,将会将客户的请求强制定向到另外一个后端server上,以保证服务的正常 option redispatch #等待最大时长 When a server's maxconn is reached, connections are left pending in a queue which may be server-specific or global to the backend. timeout queue 525600m # 设置成功连接到一台服务器的最长等待时间,默认单位是毫秒 timeout connect 10s # 客户端非活动状态的超时时长 The inactivity timeout applies when the client is expected to acknowledge or send data. timeout client 525600m # Set the maximum inactivity time on the server side.The inactivity timeout applies when the server is expected to acknowledge or send data. timeout server 525600m timeout check 5s maxconn 5120 #---------------------------------------------------------------------# 配置haproxy web监控,查看统计信息listen status bind 0.0.0.0:1080 mode http log global stats enable # stats是haproxy的一个统计页面的套接字,该参数设置统计页面的刷新间隔为30s stats refresh 30s stats uri /haproxy-stats # 设置统计页面认证时的提示内容 stats realm Private lands # 设置统计页面认证的用户和密码,如果要设置多个,另起一行写入即可 stats auth admin:passw0rd # 隐藏统计页面上的haproxy版本信息# stats hide-version #---------------------------------------------------------------------listen master bind *:5000 mode tcp option tcplog balance roundrobin option httpchk OPTIONS /master http-check expect status 200 default-server inter 3s fall 3 rise 2 on-marked-down shutdown-sessions server node1 192.168.19.71:5432 maxconn 1000 check port 8008 inter 5000 rise 2 fall 2 server node2 192.168.19.72:5432 maxconn 1000 check port 8008 inter 5000 rise 2 fall 2 server node3 192.168.19.73:5432 maxconn 1000 check port 8008 inter 5000 rise 2 fall 2listen replicas bind *:5001 mode tcp option tcplog balance roundrobin option httpchk OPTIONS /replica http-check expect status 200 default-server inter 3s fall 3 rise 2 on-marked-down shutdown-sessions server node1 192.168.19.71:5432 maxconn 1000 check port 8008 inter 5000 rise 2 fall 2 server node2 192.168.19.72:5432 maxconn 1000 check port 8008 inter 5000 rise 2 fall 2 server node3 192.168.19.73:5432 maxconn 1000 check port 8008 inter 5000 rise 2 fall 2 |
3、启动服务并加入开机自启
|
1
2
3
4
5
6
|
systemctl start haproxysystemctl enable haproxysystemctl status haproxy浏览器访问http://192.168.19.72:1080/haproxy-stats输入用户名admin密码passw0rd这里我们通过5000端口和5001端口分别来提供写服务和读服务,如果需要对数据库写入数据只需要对外提供192.168.216.136:5000即可,可以模拟主库故障,即关闭其中的master节点来验证是否会进行自动主从切换 |
七、keepalived部署(两个从节点)
1、安装keepalived服务
|
1
|
yum install -y keepalived |
2、配置更新
|
1
2
3
4
5
6
7
8
9
10
11
12
13
14
15
16
17
18
19
20
21
22
23
24
25
26
27
28
29
30
31
32
33
34
35
36
37
38
39
40
41
42
43
44
45
46
47
48
49
50
51
52
53
54
55
56
57
|
pg-node1cat keepalived.confglobal_defs {notification_email { root@localhost #收邮件人 }smtp_server 127.0.0.1smtp_connect_timeout 30 router_id master-node router_id LVS_01} vrrp_instance VI_1 { state MASTER interface eth0 virtual_router_id 51 priority 150 advert_int 1 authentication { auth_type PASS auth_pass 1221 } virtual_ipaddress { 192.168.19.110/24 dev eth0 label eth0:0 }}-------------------------------------------------------------------------------pg-node2cat keepalived.conf !Configuration File for keepalivedglobal_defs {notification_email { root@localhost #收邮件人} smtp_server 127.0.0.1smtp_connect_timeout 30router_id master-node router_id LVS_02} vrrp_instance VI_1 { state BACKUP interface eth0 virtual_router_id 51 priority 100 advert_int 1 authentication { auth_type PASS auth_pass 1221 } virtual_ipaddress { 192.168.19.110/24 dev eth0 label eth0:0 }} |
3、启动keepalived服务
|
1
2
|
systemctl restart keepalivedsystemctl enable keepalived |
4、对外提供访问端口
|
1
2
3
|
VIP:192.168.19.110端口:5000 读写权限端口:5001 读权限 |
注:以上部署有个问题就是haproxy与keepalived相互依存的问题,我的观点是除非死机否则不切换,所以我没有做脚本控制,其他要是有问题,欢迎大佬们提提意见哦!!!

 浙公网安备 33010602011771号