

nacos的配置中心--服务端
1.1:概述
Nacos Config提供了配置管理的功能,它允许用户在nacos上配置key-value对,并在客户端订阅需要的配置。当配置发生变更时,订阅的客户端会获得通知,随后拉取最新的key-value对。
Config Server为了最大程度保证可用性采用了一种三层的存储架构设计,mysql - 本地文件 - 内存缓存:

1.2:数据库
Config Server所有的key-value配置信息都最终存储在mysql数据库中,当中包含四张核心表(table):
config_info - 存储配置信息,包含id/data_id/group_id/tenant_id/content/md5/gmt_created/gmt_modified/app_name等列。当中data_id + group_id + tenant_id三者唯一确定一条key-value配置。
config_tags_relation - 存储配置上附加的tag,包含id/tag_name/tag_type/data_id/group_id/tenant_id/nid等列。
config_info_beta - 存储beta环境的特殊配置值,除了config_info表中的列之外新增了beta_ips列。
config_info_tag - 存储某个tag对应的特殊配置值,除了config_info表中的列之外新增了tag_id列。
1.3:本地磁盘
mysql数据库中存储的是最终的配置信息,config server在启动后会周期性(360min)的从mysql中将所有配置信息dump到本地文件系统中。配置会被存储到一个特殊的目录/{user.home}/nacos/data/config-data/{groupId}/{dataId}下,每条配置存在一个独立的文件中。
config server中关于配置的读取都是走本地文件系统中的dump,这种设计一方面提升了系统的可用性(防止mysql奔溃导致config不可用),另一方面极大降低了mysql数据库的负载,使得config server的水平扩张变得非常容易。
1.4:缓存
当config server启动时会一次性把mysql中存储的所有配置dump到本地文件系统中,并设置一个定时器周期性(默认6h)做全量dump。config server也有一种quick start模式,允许重用文件系统中保留的配置数据,做增量dump。
配置信息的写首先进入到mysql数据库中。mysql插入成功之后server会生成一个ConfigDataChangeEvent事件,在AsyncNotifyService中将捕获这个事件,对当前每一个config server发起/dataChange调用。
/dataChange调用在CommunicationController中被处理,通过ConfigService将变动的数据dump到本地文件中并更新内存缓存。
配置的读取及订阅都是从内存Cache + 本地文件中完成。
二、数据存储
2.1:流程图
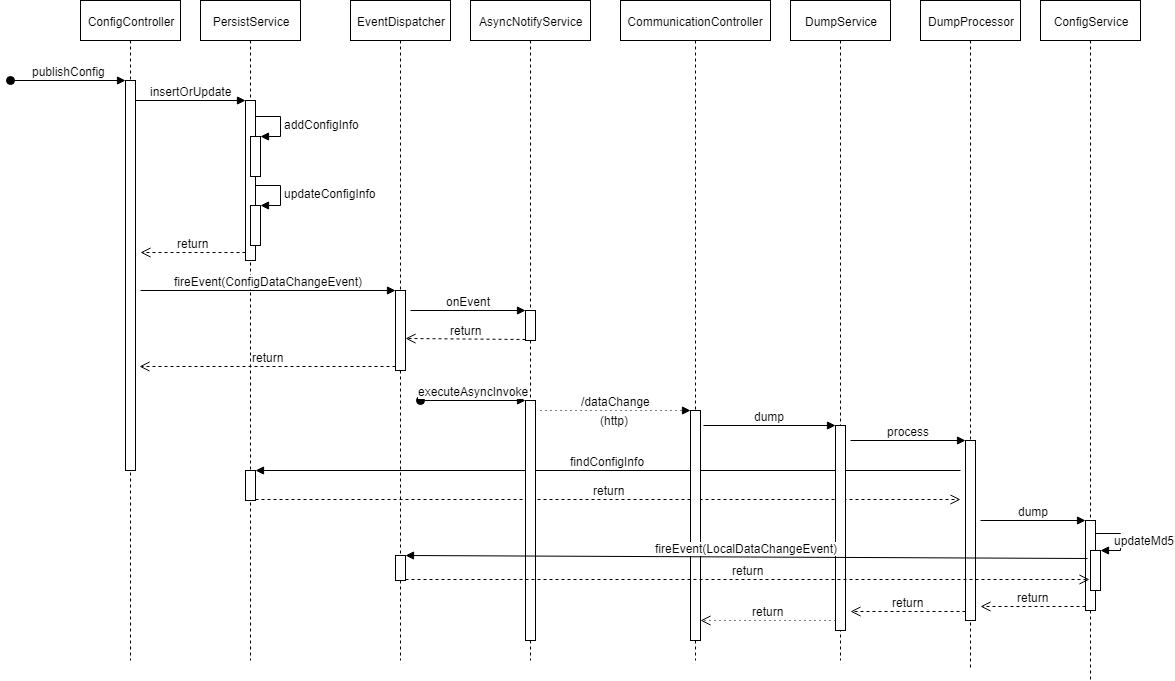
整个流程分为两大部分:
-
入库。插入mysql数据库,发起ConfigDataChangeEvent,调用所有server上的/dataChange接口。
-
dump。server响应/dataChange请求,异步dump数据库配置信息到本地。
2.2:ConfigController.publishConfig
处理config获取/订阅/变更相关的http请求。
2.2.1:入口
其中进行一系列的逻辑判断,但是可以看出主要做了两件事:持久化和事件发布。
public Boolean publishConfig(HttpServletRequest request, HttpServletResponse response,
        @RequestParam(value = "dataId") String dataId, @RequestParam(value = "group") String group,
        @RequestParam(value = "tenant", required = false, defaultValue = StringUtils.EMPTY) String tenant,
        @RequestParam(value = "content") String content, @RequestParam(value = "tag", required = false) String tag,
        @RequestParam(value = "appName", required = false) String appName,
        @RequestParam(value = "src_user", required = false) String srcUser,
        @RequestParam(value = "config_tags", required = false) String configTags,
        @RequestParam(value = "desc", required = false) String desc,
        @RequestParam(value = "use", required = false) String use,
        @RequestParam(value = "effect", required = false) String effect,
        @RequestParam(value = "type", required = false) String type,
        @RequestParam(value = "schema", required = false) String schema) throws NacosException {
            .......
                //进行持久化保存
                persistService.insertOrUpdate(srcIp, srcUser, configInfo, time, configAdvanceInfo, true);
                //配置更新事件
                ConfigChangePublisher
                        .notifyConfigChange(new ConfigDataChangeEvent(false, dataId, group, tenant, time.getTime()));
            .......
        }
其中持久化主要交互到数据库,进行配置数据的插入和历史表的插入。
后面一步,封装成为ConfigDataChangeEvent进行事件发布,只需要找到监听位置进行跟踪后续逻辑。事件的发布和监听,是nacos自己写的逻辑,将任务发布即将任务加入到某个任务队列,另外有一个线程在阻塞监听队列的数据,一旦发现队列中有数据,会根据任务类型找到任务的订阅者,由订阅者处理新发布的事件。
2.2.2 ConfigDataChangeEvent监听
监听事件的处理内容:
@Override
public void onEvent(Event event) {
    // Generate ConfigDataChangeEvent concurrently
    if (event instanceof ConfigDataChangeEvent) {
        ConfigDataChangeEvent evt = (ConfigDataChangeEvent) event;
        long dumpTs = evt.lastModifiedTs;
        String dataId = evt.dataId;
        String group = evt.group;
        String tenant = evt.tenant;
        String tag = evt.tag;
        Collection<Member> ipList = memberManager.allMembers();

        // In fact, any type of queue here can be
        //初始化一个队列
        Queue<NotifySingleTask> queue = new LinkedList<NotifySingleTask>();
        for (Member member : ipList) {
            //遍历nacos集群的成员,并在队列中添加通知任务
            queue.add(new NotifySingleTask(dataId, group, tenant, tag, dumpTs, member.getAddress(),
                    evt.isBeta));
        }
        //开辟新的任务,执行队列中的任务
        ConfigExecutor.executeAsyncNotify(new AsyncTask(httpclient, queue));
    }
}
2.2.3 不同节点同步
private void executeAsyncInvoke() {
    while (!queue.isEmpty()) {
        //弹出队列的数据
        NotifySingleTask task = queue.poll();
        String targetIp = task.getTargetIP();
        //判断是否是集群成员
        if (memberManager.hasMember(targetIp)) {
            // start the health check and there are ips that are not monitored, put them directly in the notification queue, otherwise notify
            boolean unHealthNeedDelay = memberManager.isUnHealth(targetIp);
            //判断节点是否为非监控节点,如果不健康则延时进行调用,并根据尝试次数增加延时时长
            if (unHealthNeedDelay) {
                // target ip is unhealthy, then put it in the notification list
                ConfigTraceService.logNotifyEvent(task.getDataId(), task.getGroup(), task.getTenant(), null,
                        task.getLastModified(), InetUtils.getSelfIp(), ConfigTraceService.NOTIFY_EVENT_UNHEALTH,
                        0, task.target);
                // get delay time and set fail count to the task
                asyncTaskExecute(task);
            } else {
                //对于健康节点,直接执行通知逻辑
                HttpGet request = new HttpGet(task.url);
                request.setHeader(NotifyService.NOTIFY_HEADER_LAST_MODIFIED,
                        String.valueOf(task.getLastModified()));
                request.setHeader(NotifyService.NOTIFY_HEADER_OP_HANDLE_IP, InetUtils.getSelfIp());
                if (task.isBeta) {
                    request.setHeader("isBeta", "true");
                }
                //执行请求,并带上回调函数
                httpclient.execute(request, new AsyncNotifyCallBack(httpclient, task));
            }
        }
    }
}
对于非监控节点延长延时时间,主要是根据次数增减加时长
private static int getDelayTime(NotifySingleTask task) {
    int failCount = task.getFailCount();
    int delay = MIN_RETRY_INTERVAL + failCount * failCount * INCREASE_STEPS;
    if (failCount <= MAX_COUNT) {
        task.setFailCount(failCount + 1);
    }
    return delay;
}
对于回调函数的内容,无非就是对http请求成功或者失败的判定,以及根据结果进行后续的逻辑处理:
无论是请求成功结果状态码不正确还是调用失败,异或是取消,都会添加任务到队列中进行重试。
 @Override
    public void completed(HttpResponse response) {
        long delayed = System.currentTimeMillis() - task.getLastModified();
        if (response.getStatusLine().getStatusCode() == HttpStatus.SC_OK) {
           ......
        } else {
            ......
            asyncTaskExecute(task);
            .......
        }
        HttpClientUtils.closeQuietly(response);
    }
    @Override
    public void failed(Exception ex) {
        ......
        asyncTaskExecute(task);
        ......
    }
    @Override
    public void cancelled() {
        ......
        asyncTaskExecute(task);
        ......
    }
    private NotifySingleTask task;
    private CloseableHttpAsyncClient httpClient;
}
2.3:CommunicationController.notifyConfigInfo
该接口,对应与2.2中的通知逻辑,该部分主要进行两件事情:
(1):将配置数据更新到缓存和磁盘文件之中;
(2):如果有客户端长连接监听配置信息的变化,此时会找到对应key的长连接的请求,并进行响应。
2.3.2 接收到请求
if (StringUtils.isNotBlank(isBetaStr) && trueStr.equals(isBetaStr)) {
    dumpService.dump(dataId, group, tenant, lastModifiedTs, handleIp, true);
} else {
    dumpService.dump(dataId, group, tenant, tag, lastModifiedTs, handleIp);
}
dump的方法,根据dataId, group, tenant(命名空间编号),组装成的key。
public void dump(String dataId, String group, String tenant, long lastModified, String handleIp, boolean isBeta) {
    String groupKey = GroupKey2.getKey(dataId, group, tenant);
    //添加任务
    dumpTaskMgr.addTask(groupKey, new DumpTask(groupKey, lastModified, handleIp, isBeta));
}
//添加任务到tasks中,添加任务时候使用lock,大概是防止在任务添加的时候,执行该类的processor方法。
public void addTask(String type, AbstractTask task) {
    this.lock.lock();
    try {
        AbstractTask oldTask = tasks.put(type, task);
        MetricsMonitor.getDumpTaskMonitor().set(tasks.size());
        if (null != oldTask) {
            task.merge(oldTask);
        }
    } finally {
        this.lock.unlock();
    }
}
该类中有一个processor的方法,该方法是当前类循环执行,每次执行间隙会休眠:
public void run() {
    while (!TaskManager.this.closed.get()) {
        try {
            Thread.sleep(100);
            TaskManager.this.process();
        } catch (Throwable e) {
            LogUtil.DUMP_LOG.error("execute dump process has error : {}", e);
        }
    }
}
在processor方法两阶段事情:
(1):判断当前任务是否还需要继续执行,不需要就将任务对队列中去除;
(2):找到TaskProcessor,并调用result = processor.process(entry.getKey(), task);方法
protected void process() {
    for (Map.Entry<String, AbstractTask> entry : this.tasks.entrySet()) {
        AbstractTask task = null;
        this.lock.lock();
        try {
            // Getting task.
            //判断当前任务是否还需要继续执行,不需要就删除
            task = entry.getValue();
            if (null != task) {
                if (!task.shouldProcess()) {
                    // If current task needn't to process, then it will skip.
                    continue;
                }
                // Remove task from task maps.
                this.tasks.remove(entry.getKey());
                MetricsMonitor.getDumpTaskMonitor().set(tasks.size());
            }
        } finally {
            this.lock.unlock();
        }

        if (null != task) {
            // Getting task processor.找到对应的TaskProcessor,此时会使用默认this.processor = new DumpProcessor(this);
            TaskProcessor processor = this.taskProcessors.get(entry.getKey());
            if (null == processor) {
                // If has no related typpe processor, then it will use default processor.
                processor = this.getDefaultTaskProcessor();
            }
            if (null != processor) {
                boolean result = false;
                try {
                    // Execute the task.
                    result = processor.process(entry.getKey(), task);
                } catch (Throwable t) {
                    LOGGER.error("task_fail", "处理task失败", t);
                }
                if (!result) {
                    // If task is executed failed, the set lastProcessTime.
                    task.setLastProcessTime(System.currentTimeMillis());

                    // Add task into task map again.
                    this.addTask(entry.getKey(), task);
                }
            }
        }
    }

    if (tasks.isEmpty()) {
        this.lock.lock();
        try {
            this.notEmpty.signalAll();
        } finally {
            this.lock.unlock();
        }
    }
}
2.3.3 DumpProcessor.process
其中一大坨代码,只是进行两个操作:包装数据和调用DumpConfigHandler.configDump(build.build())方法:
......
//包装数据
ConfigDumpEvent.ConfigDumpEventBuilder build = ConfigDumpEvent.builder().namespaceId(tenant).dataId(dataId)
        .group(group).isBeta(isBeta).tag(tag).lastModifiedTs(lastModified).handleIp(handleIp);
......
    //查询数据,查出最新数据
    ConfigInfo4Beta cf = persistService.findConfigInfo(dataId, group, tenant);
    //如果查出是null的处理
    build.remove(Objects.isNull(cf));
    build.betaIps(Objects.isNull(cf) ? null : cf.getBetaIps());
    build.content(Objects.isNull(cf) ? null : cf.getContent());
    //进行进步调用
    return DumpConfigHandler.configDump(build.build());
}
2.3.4 DumpConfigHandler.configDump
其中的核心代码:
//对比md5值之后,保存到缓存和本地文件
result = ConfigCacheService.dump(dataId, group, namespaceId, content, lastModified, type);
直接进入ConfigCacheService.dump:
开始部分:
尝试获取一次写锁,如果获取失败,就会直接返回,不再进行数据写入,写锁是代码层面实现,不深入。
final int lockResult = tryWriteLock(groupKey);
assert (lockResult != 0);
if (lockResult < 0) {
DUMP_LOG.warn("[dump-error] write lock failed. {}", groupKey);
return false;
}
接下来进入主题:
//获取当前内容的md5值
final String md5 = MD5Utils.md5Hex(content, Constants.ENCODE);
if (md5.equals(ConfigCacheService.getContentMd5(groupKey))) {
    DUMP_LOG.warn("[dump-ignore] ignore to save cache file. groupKey={}, md5={}, lastModifiedOld={}, "
                    + "lastModifiedNew={}", groupKey, md5, ConfigCacheService.getLastModifiedTs(groupKey),
            lastModifiedTs);
} else if (!PropertyUtil.isDirectRead()) {
    //保存到本地磁盘
    DiskUtil.saveToDisk(dataId, group, tenant, content);
}
//更新MD5值
updateMd5(groupKey, md5, lastModifiedTs);
其中保存本地磁盘不再细化,即找到目标文件,将数据写入。后面updateMd5值:
public static void updateMd5(String groupKey, String md5, long lastModifiedTs) {
    CacheItem cache = makeSure(groupKey);
    if (cache.md5 == null || !cache.md5.equals(md5)) {
        cache.md5 = md5;
        cache.lastModifiedTs = lastModifiedTs;
        NotifyCenter.publishEvent(new LocalDataChangeEvent(groupKey));
    }
}
其中makerSure就是获取缓存数据,上面已经叙述缓存中只保存对应的md5值和更新时间,读写锁等信息,不包括具体的配置数据。
此时可以看到发布LocalDataChangeEvent事件,监听该事件部分在下一个章节进行描述。

 浙公网安备 33010602011771号