2020-02-03 Linux安装nodejs,创建vue项目
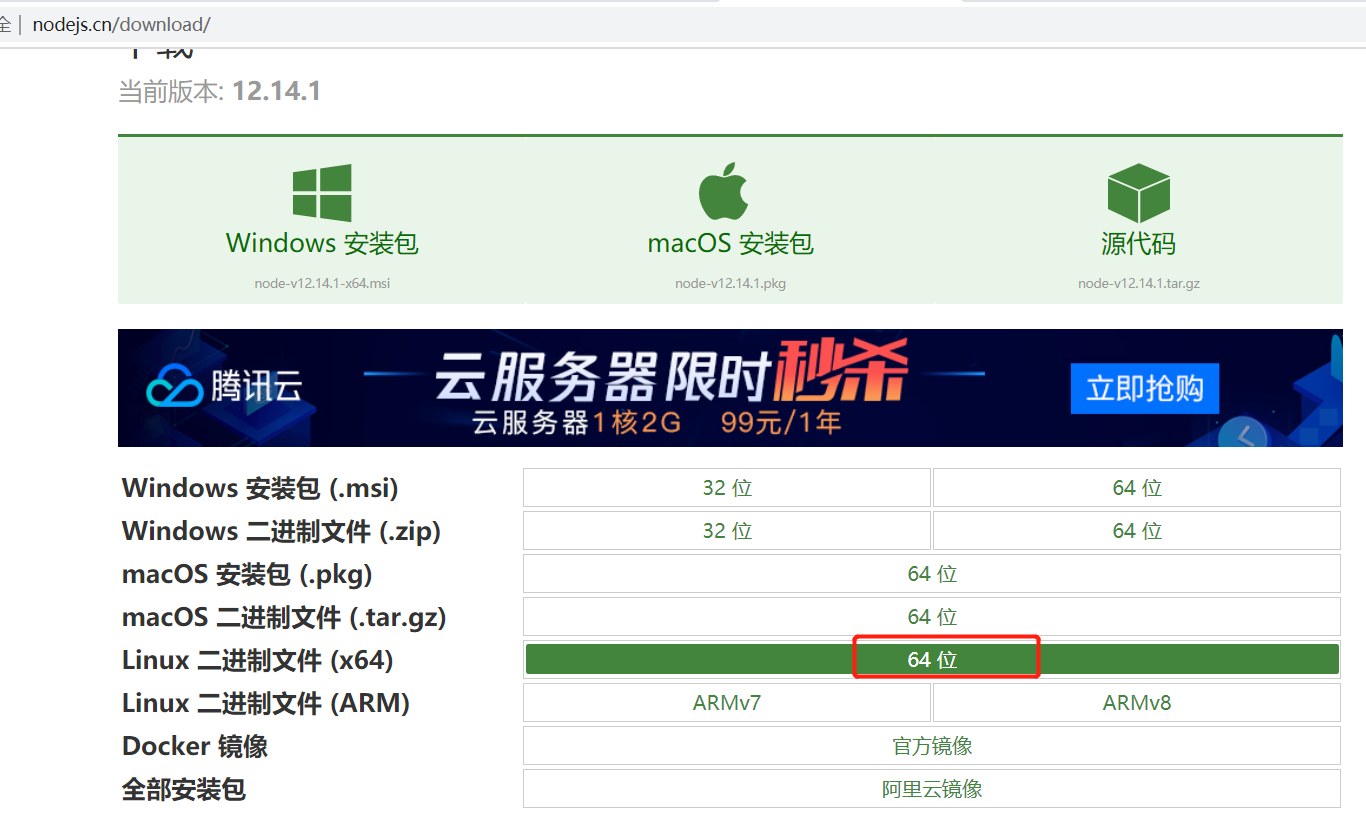
一、去官网下载和自己系统匹配的文件:
英文网址:https://nodejs.org/en/download/
中文网址:http://nodejs.cn/download/
下载后,放在
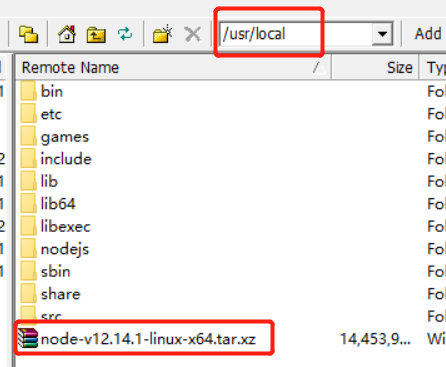
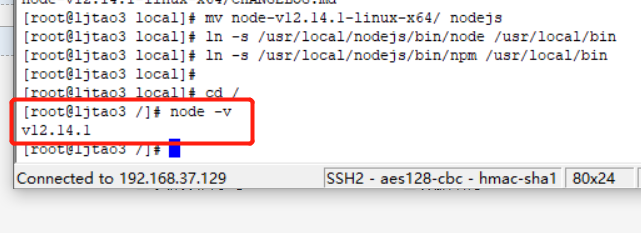
cd /usr/local/
解压:tar  xf node-v12.14.1-linux-x64.tar.xz -C /usr/local/
更名:mv node-v12.14.1-linux-x64.tar.xz/ nodejs

确认一下nodejs下bin目录是否有node 和npm文件,如果有执行软连接,如果没有重新下载执行上边步骤;

建立软连接,变为全局
ln -s /usr/local/nodejs/bin/node /usr/local/bin
ln -s /usr/local/nodejs/bin/npm /usr/local/bin
最后查看版本,出现这个说明成功
二、继续安装cnpm
安装完node之后,npm包含的很多依赖包是部署在国外的,在天朝,大家都知道下载速度是超级慢啊。所以我们要安装cnpm,cnpm是淘宝对npm的镜像服务器,这样依赖的包安装起来就快多了。
安装命令为: npm install -g cnpm --registry=https://registry.npm.taobao.org
建立软连接
rm -f /usr/local/bin/cnpm
ln -s /usr/local/nodejs/lib/node_modules/cnpm/bin/cnpm /usr/local/bin/cnpm
查看版本,
cnpm -v
三、安装vue-cli
1、cnpm install -g vue-cli
安装完,创建软连接
ln -s /usr/local/nodejs/bin/vue /usr/local/bin/vue
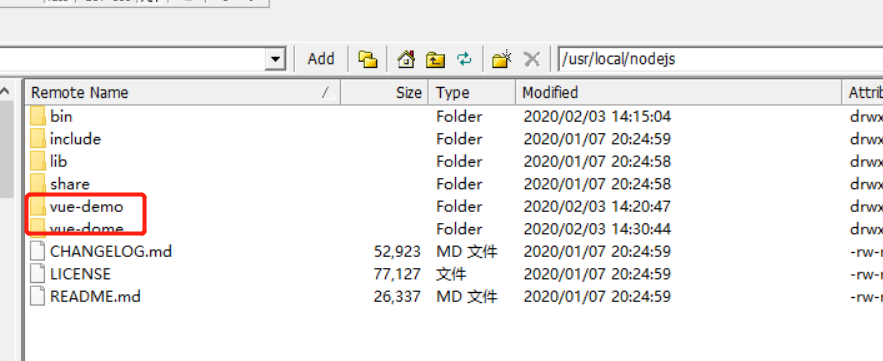
2、创建vue项目
安装项目: vue init webpack vue-demo
Project name(工程名):回车
Project description(工程介绍):回车
Author:作者名
Vue build(是否安装编译器):回车
Install vue-router(是否安装Vue路由):回车
Use ESLint to lint your code(是否使用ESLint检查js代码):n
Set up unit tests(安装单元测试工具):n
Setup e2e tests with Nightwatch(是否安装端到端测试工具):n
Should we run npm install for you after the project has been created? (recommended):回车。
在哪个目录下创建项目,项目就存在在哪个目录下
3、启动项目
项目创建完成之后,可定要启动一下的
- 进入项目目录:cd vue-demo
- 安装项目所需要的依赖:npm install
- 启动项目:npm run dev
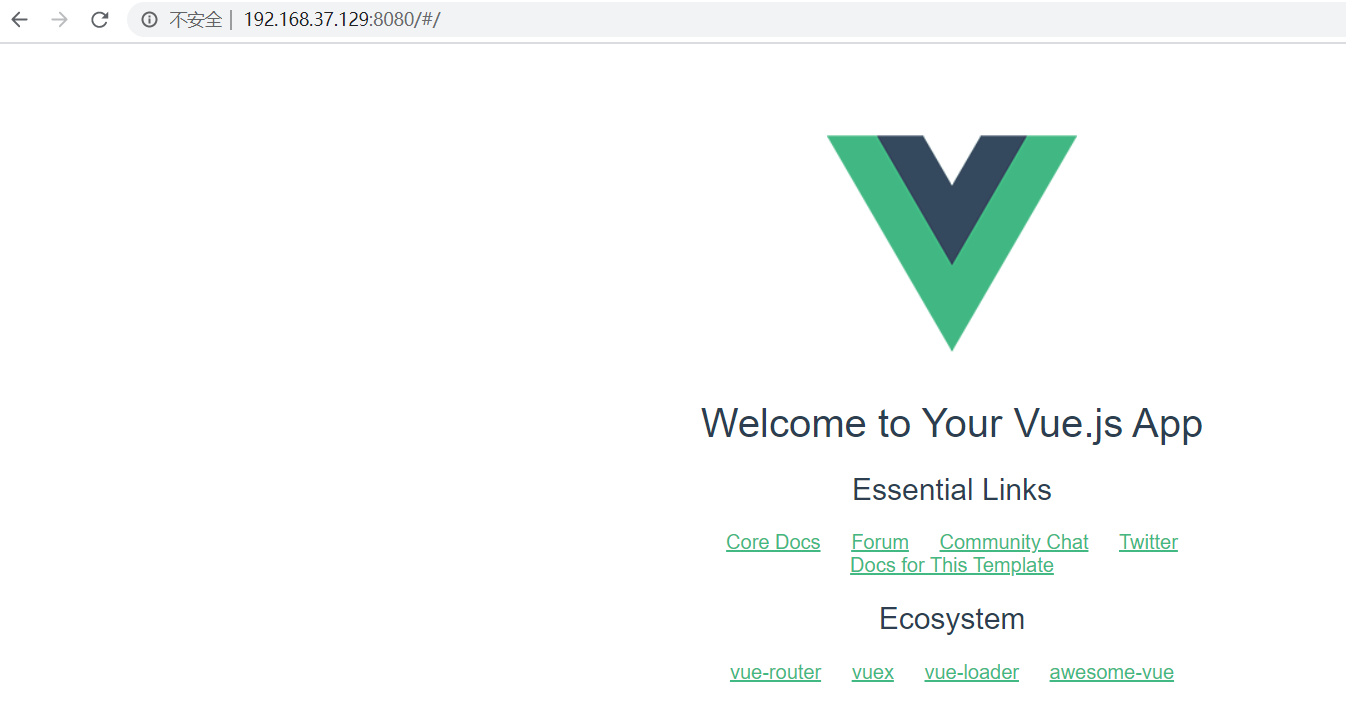
理论上启动了就能用http:\\localhost:8080启动了 当时在centOS上没有办法运行
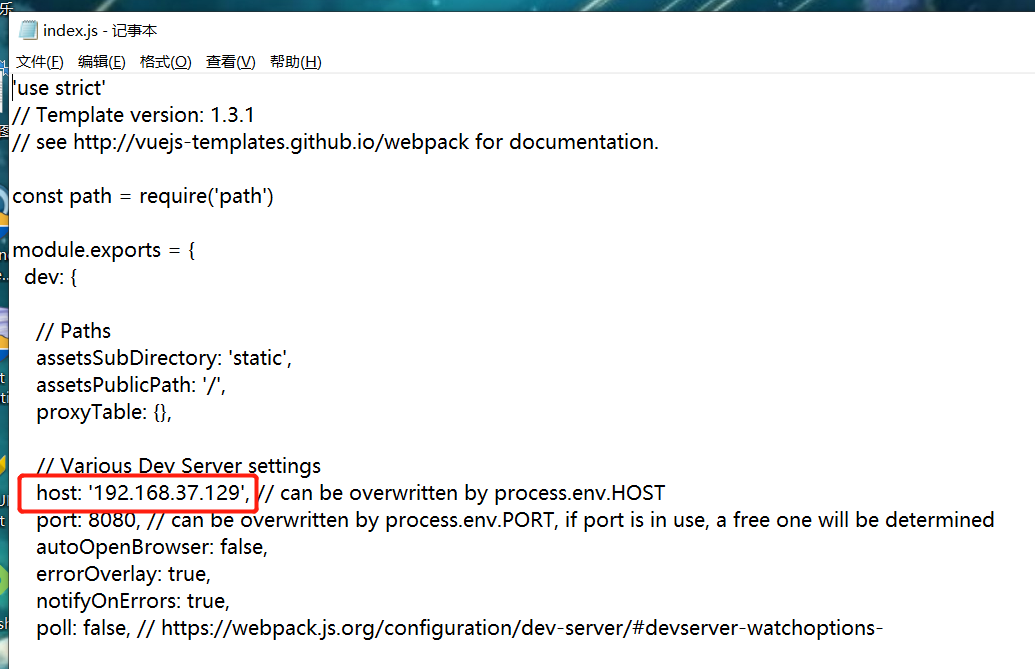
解决方式:vue-demo >config>index.js 修改host为192.168.37.129 指定Linux的ip地址就可以了
Linux 关闭下防火墙,要不然主机浏览器会一直访问不到项目。
systemctl stop firewalld
输入链接访问
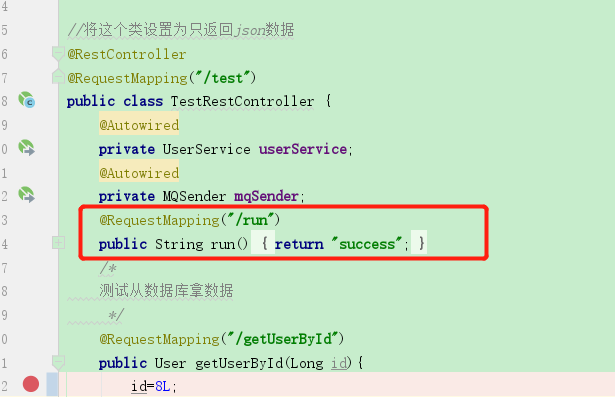
4、调用后端接口
vue项目:
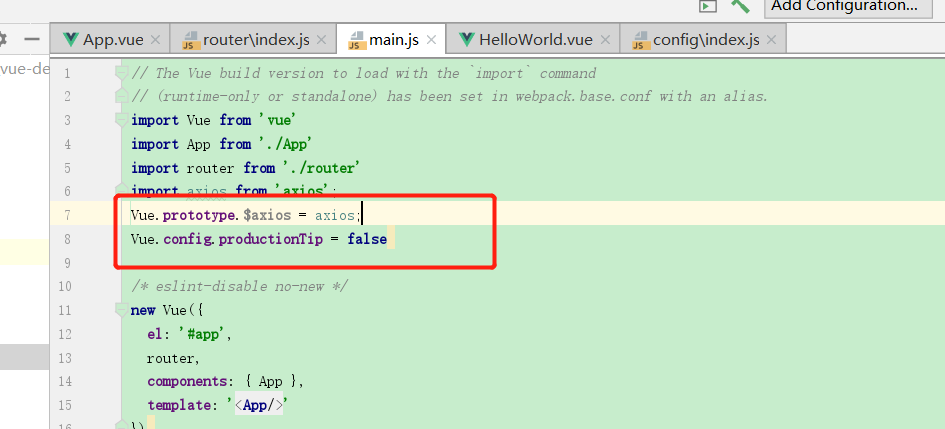
Vue.prototype.$axios = axios;
Vue.config.productionTip = false
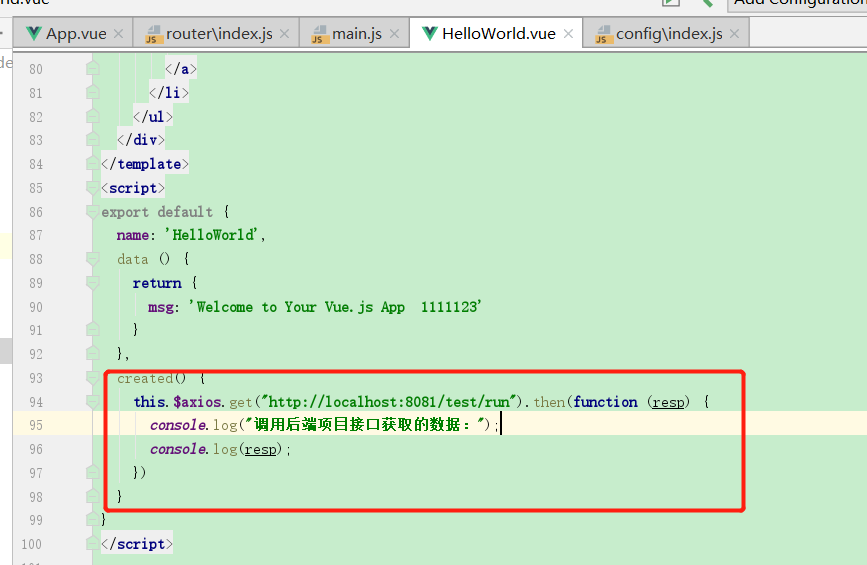
created() {
    this.$axios.get("http://localhost:8081/test/run").then(function (resp) {
      console.log("调用后端项目接口获取的数据:");
      console.log(resp);
    })
  }
后端项目设置跨域问题,以及接口
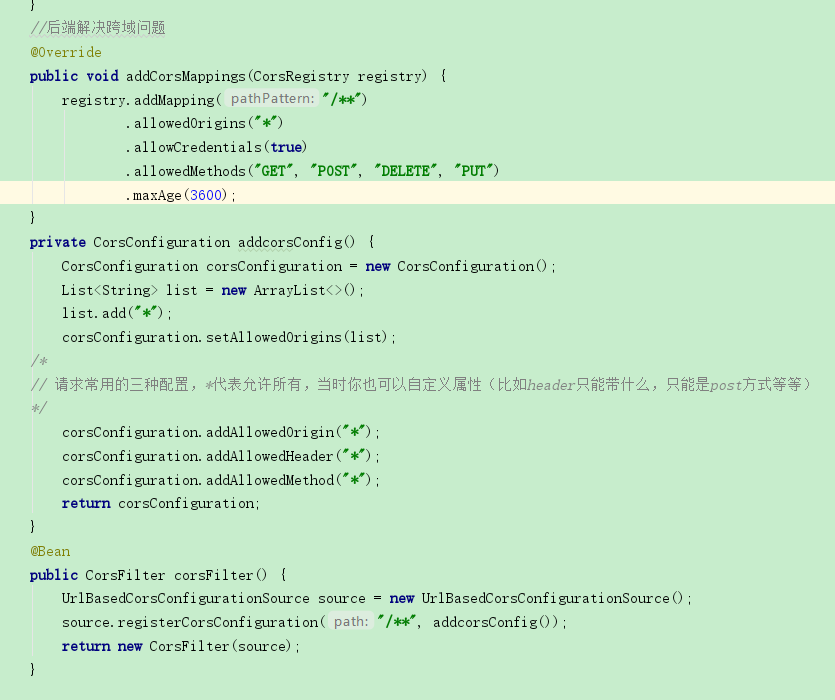
package com.ljtao.springbootmiaosha.config;


import com.ljtao.springbootmiaosha.access.AccessLimitInterceptor;
import org.springframework.beans.factory.annotation.Autowired;
import org.springframework.context.annotation.Bean;
import org.springframework.context.annotation.Configuration;
import org.springframework.web.cors.CorsConfiguration;
import org.springframework.web.cors.UrlBasedCorsConfigurationSource;
import org.springframework.web.filter.CorsFilter;
import org.springframework.web.method.support.HandlerMethodArgumentResolver;
import org.springframework.web.servlet.config.annotation.CorsRegistry;
import org.springframework.web.servlet.config.annotation.InterceptorRegistry;
import org.springframework.web.servlet.config.annotation.WebMvcConfigurer;

import java.util.ArrayList;
import java.util.List;
@Configuration
public class WebConfig implements WebMvcConfigurer {
    @Autowired
    private UserArgumentResolver userArgumentResolver;
    @Autowired
    private AccessLimitInterceptor accessLimitInterceptor;
    //添加自定义请求参数解析器
    @Override
    public void addArgumentResolvers(List<HandlerMethodArgumentResolver> resolvers) {
        resolvers.add(userArgumentResolver);
    }
    //添加自定义拦截器
    @Override
    public void addInterceptors(InterceptorRegistry registry) {
        //addPathPatterns() 添加需要拦截得路径
        // excludePathPatterns() 添加不需要拦截的路径
        registry.addInterceptor(accessLimitInterceptor);
    }
    //后端解决跨域问题
    @Override
    public void addCorsMappings(CorsRegistry registry) {
        registry.addMapping("/**")
                .allowedOrigins("*")
                .allowCredentials(true)
                .allowedMethods("GET", "POST", "DELETE", "PUT")
                .maxAge(3600);
    }
    private CorsConfiguration addcorsConfig() {
        CorsConfiguration corsConfiguration = new CorsConfiguration();
        List<String> list = new ArrayList<>();
        list.add("*");
        corsConfiguration.setAllowedOrigins(list);
    /*
    // 请求常用的三种配置,*代表允许所有,当时你也可以自定义属性(比如header只能带什么,只能是post方式等等)
    */
        corsConfiguration.addAllowedOrigin("*");
        corsConfiguration.addAllowedHeader("*");
        corsConfiguration.addAllowedMethod("*");
        return corsConfiguration;
    }
    @Bean
    public CorsFilter corsFilter() {
        UrlBasedCorsConfigurationSource source = new UrlBasedCorsConfigurationSource();
        source.registerCorsConfiguration("/**", addcorsConfig());
        return new CorsFilter(source);
    }
}
4、官网说明
https://vuejs-templates.github.io/webpack/

 浙公网安备 33010602011771号