

Linux学习django-CentOS部署自己本地的django项目
前言
自己本地写好的django项目,如何部署到linux服务器上,让其他的小伙伴也能访问呢?本篇以centos系统为例,把本地写好的django项目部署到linux服务器上
环境准备:
环境准备:
1.一台Linux服务器, 操作系统: CentOS 7.4 64位
2.python3.6 (前面已经搭建好)
3.django-2.1.4
django环境准备
前面已经安装好了python3.6.8的环境并且pip也配置好了,安装django直接用pip安装就可以了,安装的django版本位django-2.1.4
pip install django
[root@yoyo ~]# pip -V
pip 18.1 from /usr/local/python3/lib/python3.6/site-packages/pip (python 3.6)
[root@yoyo ~]# pip install django
Looking in indexes: http://mirrors.aliyun.com/pypi/simple/
Collecting django
  Downloading http://mirrors.aliyun.com/pypi/packages/fd/9a/0c028ea0fe4f5803dda1a7afabeed958d0c8b79b0fe762ffbf728db3b90d/Django-2.1.4-py3-none-any.whl (7.3MB)
    100% |████████████████████████████████| 7.3MB 4.8MB/s
Collecting pytz (from django)
  Downloading http://mirrors.aliyun.com/pypi/packages/f8/0e/2365ddc010afb3d79147f1dd544e5ee24bf4ece58ab99b16fbb465ce6dc0/pytz-2018.7-py2.py3-none-any.whl (506kB)
    100% |████████████████████████████████| 512kB 60.9MB/s
Installing collected packages: pytz, django
Successfully installed django-2.1.4 pytz-2018.7
django项目代码
linux服务器上的django环境已经准备好了,接下来就是把在本地电脑已经调通的django项目代码全部复制到服务器上的某个目录下
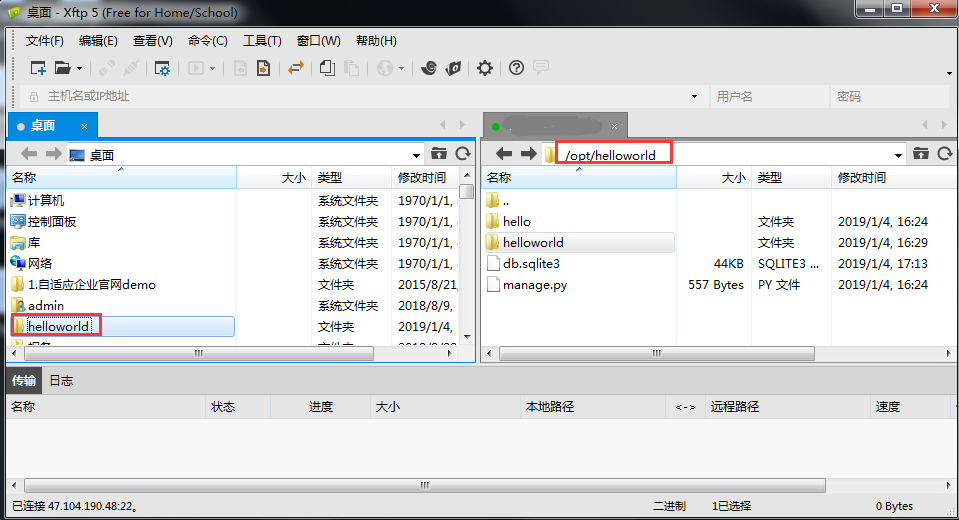
如下图,通过xftp工具把本地项目代码全部传到/opt/helloworld目录下,前提是在本地浏览器测试没问题了。
启动django
打开到helloworld目录,启动服务:python manage.py runserver
[root@yoyo ~]# cd /opt/helloworld/
[root@yoyo helloworld]# python manage.py runserver
Performing system checks...

System check identified no issues (0 silenced).

You have 18 unapplied migration(s). Your project may not work properly until you apply the migrations for app(s): admin, auth, contenttypes, hello, sessions.
Run 'python manage.py migrate' to apply them.

January 04, 2019 - 08:31:40
Django version 2.1.4, using settings 'helloworld.settings'
Starting development server at http://127.0.0.1:8000/
Quit the server with CONTROL-C.
由于这个是搭建在服务器上的,所以只能本机访问:http://127.0.0.1:8000/,可以用python代码验证下
[root@yoyo ~]# python
Python 3.6.8 (default, Jan 2 2019, 16:43:17)
[GCC 4.8.5 20150623 (Red Hat 4.8.5-16)] on linux
Type "help", "copyright", "credits" or "license" for more information.
>>> import requests
>>> r = requests.get("http://127.0.0.1:8000/")
>>> r.status
>>> r.status_code
200
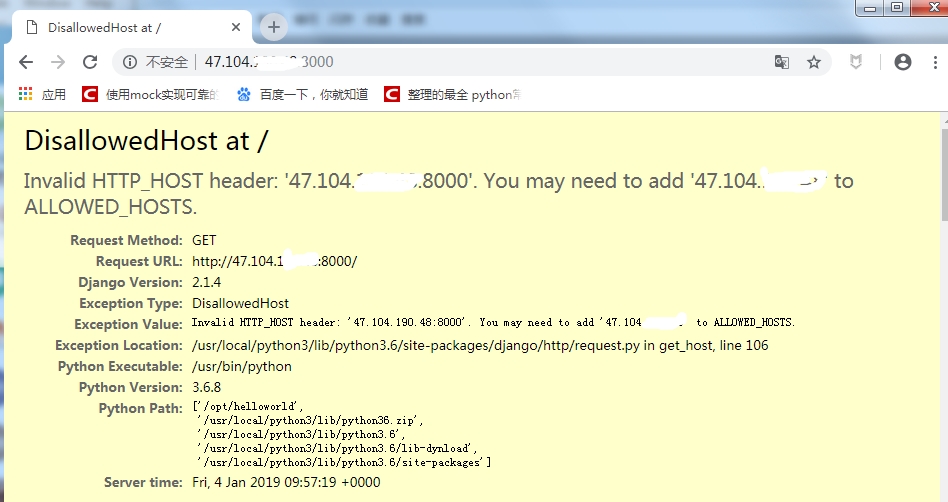
>>> 接下来登录阿里云ECS后台-安全组-配置规则-开放8000端口,在浏览器上输入http://47.104.xx.xx:8000/发现无法访问
外网访问django
如果启动方式是 python manage.py runserver默认只能本机访问,为了放开访问权限,让其他人也能访问到这台机器,需加参数0.0.0.0:端口
python manage.py runserver 0.0.0.0:8000
^C[root@yoyo helloworld]# python manage.py runserver 0.0.0.0:8000
Performing system checks...

System check identified no issues (0 silenced).
January 04, 2019 - 09:57:15
Django version 2.1.4, using settings 'helloworld.settings'
Starting development server at http://0.0.0.0:8000/
Quit the server with CONTROL-C.
Invalid HTTP_HOST header: '47.104.x.x:8000'. You may need to add '47.104.x.x' to ALLOWED_HOSTS.
Bad Request: /
[04/Jan/2019 09:57:20] "GET / HTTP/1.1" 400 59588
启动服务后在浏览器输入:http://47.104.x.x:8000/ ,会报错‘Invalid HTTP_HOST header: '47.104.x.x:8000'. You may need to add '47.104.x.x' to ALLOWED_HOSTS.’
关闭debug,设置ALLOWED_HOSTS
打开helloworld/settings.py文件,找到这2行代码
# SECURITY WARNING: don't run with debug turned on in production!
DEBUG = True

ALLOWED_HOSTS = []
关闭debug调试功能,ALLOWED_HOSTS设置为全部
# SECURITY WARNING: don't run with debug turned on in production!
DEBUG = False

ALLOWED_HOSTS = ["*"]
修改完成后保存下,重启django服务
python manage.py runserver 0.0.0.0:8000
接着在本地浏览器上访问,就能正常的打开页面了
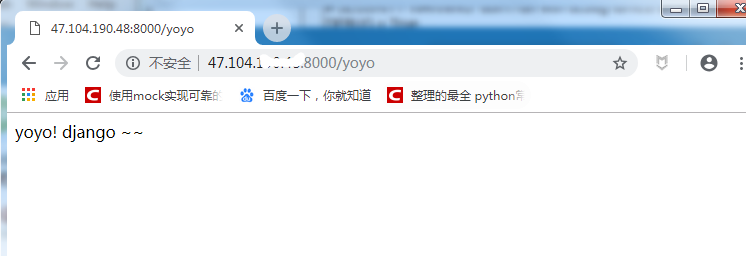
到这里一个简单的django的demo项目就已经成功的部署到linux服务器上了,于是就可以通知你的小伙伴看你做的网站咯~

 浙公网安备 33010602011771号