

迁移桌面程序到MS Store(12)——WPF使用UWP InkToolbar和InkCanvas
我们在《迁移桌面程序到MS Store(4)——桌面程序调用Win10 API》提到了对Win10 API的调用,但仍存在无法在WPF中使用UWP控件的问题,虽然都是XAML控件,但却是两套命名空间下的同名类型,无法混用。
人总会被现实打败,强大如某软也得向生活低头,UWP一直没有起色,某软的老大又一心去搞Azure。Windows平台的重振,似乎想走回头路,从1903版本开始,支持在.NET Framwork的WPF和WinForm工程中,直接使用部分的UWP控件了。首当其冲的,就是有点骚包的InkToolbar和InkCanvas。
接下来我们就来试试如何在WPF工程中,使用UWP的InkToolbar和InkCanvas。
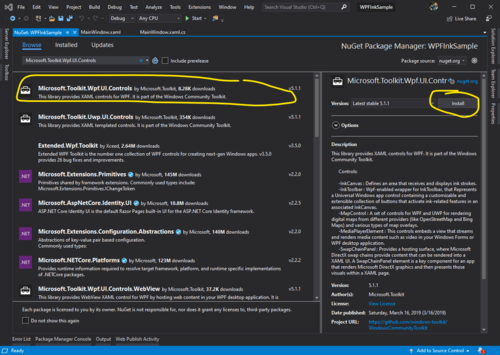
首先创建一个空的WPF工程,完成后,在Nuget的搜索界面填入 Microsoft.Toolkit.Wpf.UI.Controls ,选中第一个进行安装。
完成安装后,打开MainWindow.xaml,添加对命名空间的引用xmlns:Controls="clr-namespace:Microsoft.Toolkit.Wpf.UI.Controls;assembly=Microsoft.Toolkit.Wpf.UI.Controls"。接着就可以在<Grid>节点中添加UWP版本的InkToolbar和InkCanvas控件了。
<Window x:Class="WPFInkSample.MainWindow"
        xmlns="http://schemas.microsoft.com/winfx/2006/xaml/presentation"
        xmlns:x="http://schemas.microsoft.com/winfx/2006/xaml"
        xmlns:d="http://schemas.microsoft.com/expression/blend/2008"
        xmlns:mc="http://schemas.openxmlformats.org/markup-compatibility/2006"
        xmlns:local="clr-namespace:WPFInkSample"
        xmlns:Controls="clr-namespace:Microsoft.Toolkit.Wpf.UI.Controls;assembly=Microsoft.Toolkit.Wpf.UI.Controls"
        mc:Ignorable="d"
        Title="MainWindow" Height="450" Width="800">
    <Grid >
        <Grid.RowDefinitions>
            <RowDefinition Height="Auto"/>
            <RowDefinition Height="*"/>
        </Grid.RowDefinitions>
        <Controls:InkToolbar TargetInkCanvas="{x:Reference myInkCanvas}" Grid.Row="0" />
        <Controls:InkCanvas x:Name="myInkCanvas" Grid.Row="1" />
    </Grid>
</Window>
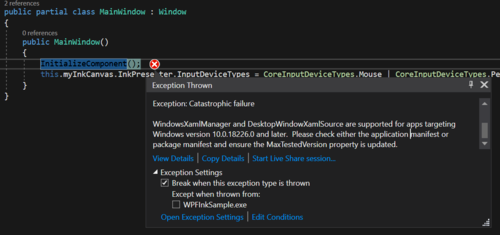
同时我们还需要在MainWindow.xaml.cs中设置InputDeviceTypes。
    public partial class MainWindow : Window
    {
        public MainWindow()
        {
            InitializeComponent();
            this.myInkCanvas.InkPresenter.InputDeviceTypes = CoreInputDeviceTypes.Mouse | CoreInputDeviceTypes.Pen;
        }
    }
然后按下F5运行,某软的骚操作来了……因为仅在1903以后的版本才支持这种骚操作(10.0.18226是稍早的preview版),所以需要做额外的处理才可以。
我们这里有两种选择,一是通过《迁移桌面程序到MS Store(1)——通过Visual Studio创建Packaging工程》来打包这个WPF程序,然后在Packaging工程的属性里,将Target version和Minimum version同时设置为Windows 10, version 1903 (10.0.18362) 。这是MSDN上推荐的标准做法,这样做的好处在于,打包好的程序可以直接上传MS Store。
如果我们想保持exe的可执行文件形式,还有另一种做法,在Project文件上右键点击Add->New Item,添加一个manifest文件。
在这个文件中,找到<!--Windows 10-->,然后做如下编辑:
  <compatibility xmlns="urn:schemas-microsoft-com:compatibility.v1">
    <application>
      <!-- A list of the Windows versions that this application has been tested on
           and is designed to work with. Uncomment the appropriate elements
           and Windows will automatically select the most compatible environment. -->

      <!-- Windows Vista -->
      <!--<supportedOS Id="{e2011457-1546-43c5-a5fe-008deee3d3f0}" />-->

      <!-- Windows 7 -->
      <!--<supportedOS Id="{35138b9a-5d96-4fbd-8e2d-a2440225f93a}" />-->

      <!-- Windows 8 -->
      <!--<supportedOS Id="{4a2f28e3-53b9-4441-ba9c-d69d4a4a6e38}" />-->

      <!-- Windows 8.1 -->
      <!--<supportedOS Id="{1f676c76-80e1-4239-95bb-83d0f6d0da78}" />-->

      <!-- Windows 10 -->
      <maxversiontested Id="10.0.18362.0"/>
      <supportedOS Id="{8e0f7a12-bfb3-4fe8-b9a5-48fd50a15a9a}" />

    </application>
  </compatibility>
保存后,再通过F5运行,即发现一切正常,不在出现之前的运行时错误了。
本篇我们介绍了如何在WPF工程中使用UWP InkToolbar和InkCavas。因为这个功能仅在1903后的版本支持,所以下一篇我们会介绍如何简单地判断Win10 API 版本,在运行时判断是否执行对应版本的代码。
Github:
https://github.com/manupstairs/WPFInkSample.git

 浙公网安备 33010602011771号