

本文我是复制与 https://cloud.tencent.com/developer/article/1379155,在这里也非常感谢大神的分享。
AirTest相比Appuim有个好处就是可以对GUI图片进行捕捉和最新版本支持WebView(目前Appuim不支持iOS12的WebView进行Xpath抓取) AirTest环境搭建可参考以下链接: https://airtest.netease.com/docs/docs_AirtestIDE-zh_CN/1_quick_start.html
环境配置:
libimobiledevice: stable 1.2.0 (bottled), HEAD Python 3.7 WebDriverAgent 用AirTest提供的[https://github.com/AirtestProject/IOS-Tagent ] Xcode10.1 AirtestIDE
启动AirTest
运行WebDriverAgent【运行之前先用Xcode打开WebDriverAgent.xcodeproj,选择开发者账号来Build正常】 可以采用终端方式来运行:
xcodebuild build-for-testing test-without-building -project [WebDriverAgent.xcodeproj目录地址] -scheme WebDriverAgentRunner -destination id=[设备UDID] test
事先用$ brew install libimobiledevice 安装 libimobiledevice 每次在WDA启动后进行端口映射:
$ iproxy 8100 8100
页面上输入http://127.0.0.1:8100/status 有Json格式返回,就代表连接成功
1.然后打开AirtestIDE对iOS设备进行连接
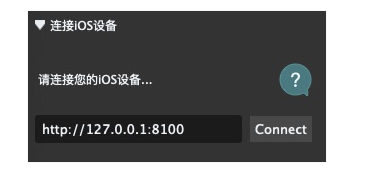
iOS连接.png
捕捉参数录制脚本
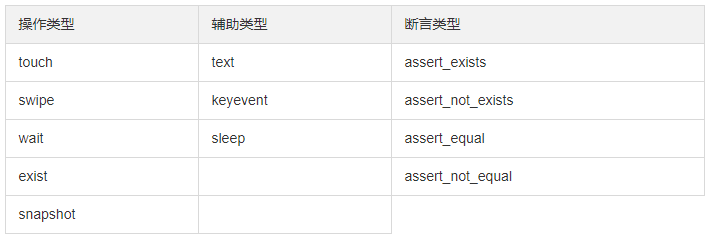
Airtest提供了两个插件库让我们方便进行自动化测试: 1:AirTest库,主要通过对GUI图片进行定位来操作实现自动化 2:POCO库,类似appuim,通过形成UI树Xpath,对多层次控件进行操作来实现自动化
因为我们自动化测试主要是针对多型号设备进行测试,每台设备的UI可能因为适配状况,会有不一样,会导致AirTest的成功率不稳定,所以,理论上优先使用POCO进行元素定位,其次才是AirTest进行定位
AirTest捕捉
1.AirTest初始化:
from airtest.core.api import *
2.手动捕捉 在AirtestIDE的Airtest录制辅助窗内,包含有三种类型的录制按钮:
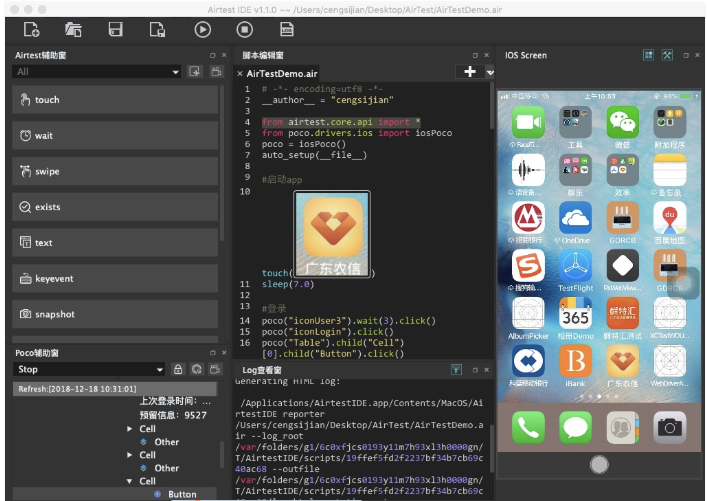
AirTestIDE.png
点击 touch/swipe/wait/exists/assert_exists/assert_not_exists 按钮后,在设备画面上按下鼠标左键进行截图框选,抬起鼠标左键完成框选。对应操作语句会自动插入编辑器脚本中。
点击操作:
 点击.png
等待操作:
assert_exists(图片, "等待成功登陆出现")
自动捕捉 点击AirTest辅助窗右上角的录制按钮,然后在设备视窗进行操作,就能自动录制操作脚本,但因为这种方式错误性比较高,建议少用,主要是通过手动捕捉对应的图片再进行之后的操作
POCO捕捉
POCO初始化
from poco.drivers.ios import iosPoco
poco = iosPoco()
手动捕捉
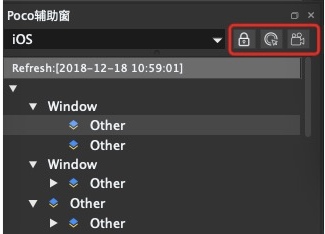
POCO.png
点击POCO辅助窗右上方第一个按钮【POCO Pause】,对窗口进行冻结,然后在Log显示元素属性,并且通过点击右键【UI-Path Code】获取对应的UI-path,然后再进行操作,如:
poco("iconUser3").wait(3).click()
poco("iconLogin").click()
transBtn = poco("iconLogin")
poco.wait_for_all([transBtn])
transBtn.click()
#向上滑动一个屏幕的高度
screenWidth,screenHeigth = poco.get_screen_size()
swipe((screenWidth*0.5,screenHeigth*0.9),vector=[0,-0.5])
POCO辅助窗右上方第二个按钮【POCO Inspector】是在不冻结窗口的情况下进行捕捉
自动捕捉 POCO辅助窗右上方第三个按钮【POCO Auto Recording】是进行自动捕捉录制,任何操作都录制成脚本
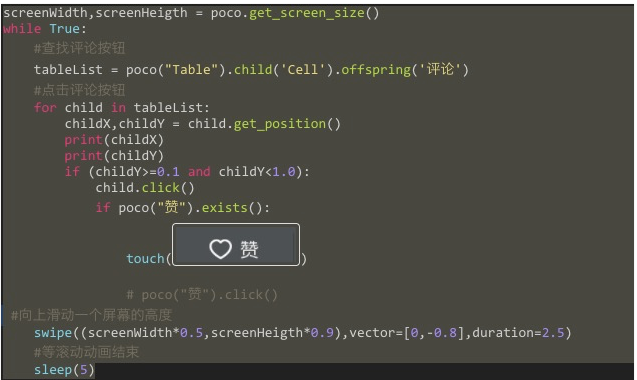
微信朋友圈无限点赞
from airtest.core.api import *
from poco.drivers.ios import iosPoco
poco = iosPoco()
auto_setup(__file__)


assert_exists(Template(file:///Users/cengsijian/Desktop/AirTest/AirTestWeixinTest.air/tpl1545103410488.png, record_pos=(0.119, -0.708), resolution=(750, 1334)), "进入微信测试")

poco("微信").click()


assert_exists(Template(file:///Users/cengsijian/Desktop/AirTest/AirTestWeixinTest.air/tpl1545103527211.png, record_pos=(0.125, 0.815), resolution=(750, 1334)), "请填写测试点")
poco("发现").click()
poco("朋友圈").click()

screenWidth,screenHeigth = poco.get_screen_size()
while True:
    #查找评论按钮
    tableList = poco("Table").child('Cell').offspring('评论')
    #点击评论按钮
    for child in tableList:
        childX,childY = child.get_position()
        print(childX)
        print(childY)
        if (childY>=0.1 and childY<1.0):
            child.click()
            if poco("赞").exists():
                touch(Template(file:///Users/cengsijian/Desktop/AirTest/AirTestWeixinTest.air/tpl1545118102228.png, record_pos=(0.057, 0.385), resolution=(750, 1334)))

                # poco("赞").click()
 #向上滑动一个屏幕的高度
    swipe((screenWidth*0.5,screenHeigth*0.9),vector=[0,-0.8],duration=2.5)
    #等滚动动画结束
    sleep(5)

 浙公网安备 33010602011771号