nginx 安装lnmp配置
1. 安装PHP
sudo yum install php php-fpm
2. 安装mysql
sudo yum install mysql-client mysql-server
3. 安装nginx
sudo yum install nginx
配置解析PHP:
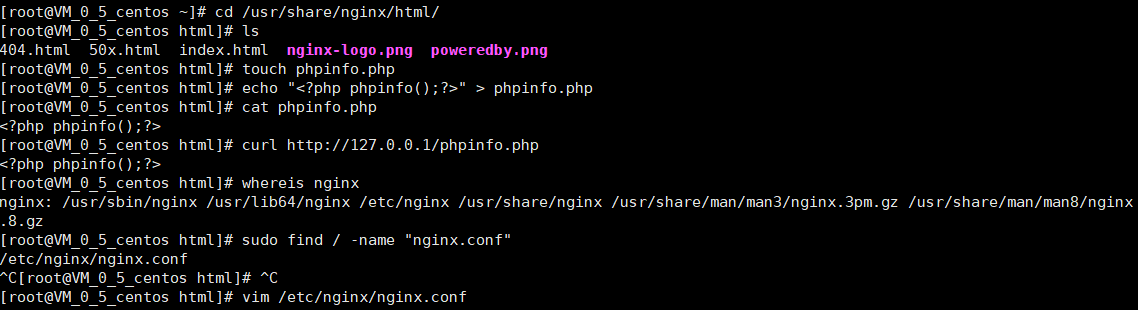
从图中我们看到curl访问phpinfo.php的时候是没法解析的。如果使用浏览器来访问,是会弹出下载框的。也就是说我们的php文件并没有被解析。此时我们需要做的就是配置nginx的配置文件,使其通过php-fpm解析PHP。
我们键入:
vim /etc/nginx/nginx.conf
# For more information on configuration, see:
#   * Official English Documentation: http://nginx.org/en/docs/
#   * Official Russian Documentation: http://nginx.org/ru/docs/

user nginx;
worker_processes auto;
error_log /var/log/nginx/error.log;
pid /run/nginx.pid;

# Load dynamic modules. See /usr/share/nginx/README.dynamic.
include /usr/share/nginx/modules/*.conf;

events {
    worker_connections 1024;
}

http {
    log_format  main '$http_user_agent'  '$remote_addr - $remote_user [$time_local] "$request" '
                      '$status $body_bytes_sent "$http_referer" '
                      '"$http_user_agent" "$http_x_forwarded_for"';

    access_log  /var/log/nginx/access.log  main;

    sendfile            on;
    tcp_nopush          on;
    tcp_nodelay         on;
    keepalive_timeout   65;
    types_hash_max_size 2048;

    include             /etc/nginx/mime.types;
    default_type        application/octet-stream;

    # Load modular configuration files from the /etc/nginx/conf.d directory.
    # See http://nginx.org/en/docs/ngx_core_module.html#include
    # for more information.
    include /etc/nginx/conf.d/*.conf;

    server {
        listen       80 default_server;
        listen       [::]:80 default_server;
        server_name  _;
        root         /usr/share/nginx/html;

        # Load configuration files for the default server block.
        include /etc/nginx/default.d/*.conf;

        # 系统给的注释掉,或者覆盖成下边添加的都可以
        #location / {
        #}

        # 需要做的就是添加这里的几行
        location ~ \.php$ {
            fastcgi_pass 127.0.0.1:9000;
            fastcgi_param SCRIPT_FILENAME /$document_root$fastcgi_script_name;
            include fastcgi_params;
        }


        error_page 404 /404.html;
            location = /40x.html {
        }

        error_page 500 502 503 504 /50x.html;
            location = /50x.html {
        }
    }

# Settings for a TLS enabled server.
#
#    server {
#        listen       443 ssl http2 default_server;
#        listen       [::]:443 ssl http2 default_server;
#        server_name  _;
#        root         /usr/share/nginx/html;
#
#        ssl_certificate "/etc/pki/nginx/server.crt";
#        ssl_certificate_key "/etc/pki/nginx/private/server.key";
#        ssl_session_cache shared:SSL:1m;
#        ssl_session_timeout  10m;
#        ssl_ciphers HIGH:!aNULL:!MD5;
#        ssl_prefer_server_ciphers on;
#
#        # Load configuration files for the default server block.
#        include /etc/nginx/default.d/*.conf;
#
#        location / {
#        }
#
#        error_page 404 /404.html;
#            location = /40x.html {
#        }
#
#        error_page 500 502 503 504 /50x.html;
#            location = /50x.html {
#        }
#    }

}
直接看注释就好了,这里配置Nginx解析PHP ,需要添加的就是上边配置文件中的三行。
然后我们检测配置是否正确:
[root@VM_0_5_centos html]# nginx -t
nginx: the configuration file /etc/nginx/nginx.conf syntax is ok
nginx: configuration file /etc/nginx/nginx.conf test is successful
没问题,然后重启:
[root@VM_0_5_centos html]# nginx -s reload
nginx: [error] invalid PID number "" in "/run/nginx.pid"
发现出了问题,然后我从网上查到需要重新加载配置文件然后重启:
[root@VM_0_5_centos html]# nginx -c /etc/nginx/nginx.conf
nginx: [emerg] bind() to 0.0.0.0:80 failed (98: Address already in use)
nginx: [emerg] bind() to [::]:80 failed (98: Address already in use)
nginx: [emerg] bind() to 0.0.0.0:80 failed (98: Address already in use)
nginx: [emerg] bind() to [::]:80 failed (98: Address already in use)
nginx: [emerg] bind() to 0.0.0.0:80 failed (98: Address already in use)
nginx: [emerg] bind() to [::]:80 failed (98: Address already in use)
nginx: [emerg] bind() to 0.0.0.0:80 failed (98: Address already in use)
nginx: [emerg] bind() to [::]:80 failed (98: Address already in use)
nginx: [emerg] bind() to 0.0.0.0:80 failed (98: Address already in use)
nginx: [emerg] bind() to [::]:80 failed (98: Address already in use)
nginx: [emerg] still could not bind()
此时却提示我们80端口被占用,我们看下进程发现nginx已经启动。所以我们杀掉进程然后重启:
killall -9 nginx
[root@VM_0_5_centos html]# service nginx start
Redirecting to /bin/systemctl start  nginx.service
[root@VM_0_5_centos html]# ps aux | grep nginx
root     19828  0.0  0.1 122904  2120 ?        Ss   11:56   0:00 nginx: master process /usr/sbin/nginx
nginx    19829  0.0  0.1 125372  3572 ?        S    11:56   0:00 nginx: worker process
root     19832  0.0  0.0 112648   964 pts/0    R+   11:56   0:00 grep --color=auto nginx
然后访问一下:
[root@VM_0_5_centos sbin]# curl http://127.0.0.1/1.php

hello, world

 浙公网安备 33010602011771号