


事件处理基础
AWT 事件处理机制的概要:
•监听器对象是一个实现了特定监听器接口(listener interface) 的类的实例。
•事件源是一个能够注册监听器对象并发送事件对象的对象。
•当事件发生时,事件源将事件对象传递给所有注册的监听器。
•监听器对象将利用事件对象中的信息决定如何对事件做出响应。
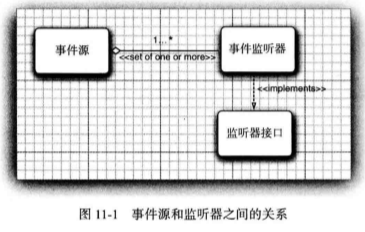
图 11-1显示了事件处理类和接口之间的关系。
下面是监听器的一个示例:
ActionListener listener = . . .; JButton button = new JButton("0K"); button.addActionListenerGistener);
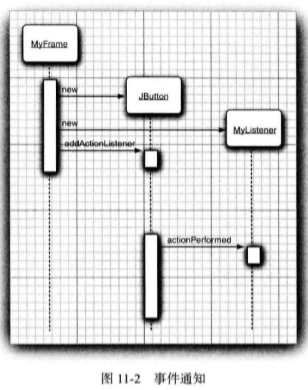
现在, 只要按钮产生了一个“ 动作事件”,listener 对象就会得到通告。对于按钮来说, 正像我们所想到的,动作事件就是点击按钮。
为了实现 ActionListener 接口,监听器类必须有一个被称为 actionPerformed 的方法,该 方法接收一个 ActionEvent 对象参数。
class MyListener iipleaents ActionListener {
    ...
    public void actionPerforied(ActionEvent event) {
        // reaction to button click goes here
        ...
    }
}
只要用户点击按钮,JButton 对象就会创建一个 ActionEvent 对象, 然后调用 listener, action Performed (event) 传递事件对象。可以将多个监听器对象添加到一个像按钮这样的事件源中。这样一来, 只要用户点击按钮,按钮就会调用所有监听器的 actionPerformed方法。
实例:处理按钮点击事件
程序清单li-i包含了完整的框架类。无论何时点击任何一个按钮,对应的动作监听器就 会修改面板的背景颜色。
//程序清单 button/ButtonFrame.java package button; import java.awt.*; import java.awt.event.*; import javax.swing.*; /** * A frame with a button panel */ public class ButtonFrame extends JFrame { private JPanel buttonPanel; private static final int DEFAULT_WIDTH = 300; private static final int DEFAULT_HEIGHT = 200; public ButtonFrame() { setSize(DEFAULT_WIDTH, DEFAULT_HEIGHT); // create buttons JButton yellowButton = new JButton("Yellow"); JButton blueButton = new JButton("Blue"); JButton redButton = new JButton("Red"); buttonPanel = new JPanel(); // add buttons to panel buttonPanel.add(yellowButton); buttonPanel.add(blueButton); buttonPanel.add(redButton); // add panel to frame add(buttonPanel); // create button actions ColorAction yellowAction = new ColorAction(Color.YELLOW); ColorAction blueAction = new ColorAction(Color.BLUE); ColorAction redAction = new ColorAction(Color.RED); // associate actions with buttons yellowButton.addActionListener(yellowAction); blueButton.addActionListener(blueAction); redButton.addActionListener(redAction); } /** * An action listener that sets the panel's background color. */ private class ColorAction implements ActionListener { private Color backgroundColor; public ColorAction(Color c) { backgroundColor = c; } public void actionPerformed(ActionEvent event) { buttonPanel.setBackground(backgroundColor); } } }
简洁地指定监听器
如上一节中的彩色按钮。在这种情况 下, 可以实现一个辅助方法:
public void makeButton(String name, Color backgroundedor) {
    JButton button = new JButton(name);
    buttonPanel.add(button);
    button.addActionListener(event -> buttonPanel.setBackground(backgroundColor));
}
需要说明, lambda 表达式指示参数变量backgroundColor。 然后只需要调用:
makeButton("yellow", Color.YELLOW);
makeButton("blue", Color.BLUE);
makeButton("red", Color.RED);
在这里, 我们构造了 3 个监听器对象, 分别对应一种颜色, 但并没有显式定义一个 类。每次调用这个辅助方法时,它会建立实现了 ActionListener 接口的一个类的实例 它的 actionPerformed动作会引用实际上随监听器对象存储的backGroundColor 值。不过, 所有这 些会自动完成,而无需显式定义监听器类、实例变量或设置这些变量的构造器。
实例:改变观感
在默认情况下,Swing 程序使用 Metal 观感,可以采用两种方式改变观感。第一种方式 是在 Java 安装的子目录jre/lib下有一个文件 swing.properties。在这个文件中,将属性 swing, defaultlaf设置为所希望的观感类名。例如,
swing,defaultlaf=com.sun.java.swlng.plaf.motif.MotifLookAndFeel
注意, Metal 和 Nimbus 观感位于javax.swing 包中。其他的观感包位于 com.sun.java 包 中, 并且不是在每个 Java 实现中都提供。现在, 鉴于版权的原因, Windows 和 Macintosh 的 观感包只与 Windows 和 Macintosh 版本的 Java运行时环境一起发布。
由于属性文件中以 # 字符开始的行被忽略, 所以, 可以在 swing.properties 文件中 提供几种观感选择, 并通过增删 # 字符来切换选择:
#swing.defaultlaf=javax.swing.piaf.metal.MetalLookAndFeel

swing.default af=com.sun.java.swing.plaf.motif.MotifLookAndFeel

#swing.defaultlaf=com.sun.java.swing.plaf.windows.WindowsLookAndFeel
采用这种方式开启观感时必须重新启动程序。Swing 程序只在启动时读取一次 swing. properties 文件。
第二种方式是动态地改变观感。这需要调用静态的 UIManager.setLookAndFeel 方法,并 提供所想要的观感类名, 然后再调用静态方法 SwingUtilities.updateComponentTreeUI 来刷新 全部的组件集。这里需要向这个方法提供一个组件,并由此找到其他的所有组件。
下面是一个示例,它显示了如何用程序切换至 Motif 观感:
String className = "com.sun.java.swing.piaf.motif.MotifLookAndFeel":
try {
    UIManager.setLookAndFeel(className);
    SwingUtilities.updateComponentTreeUI(frame);
    pack(); } catch(Exception e) {
    e.printStackTrace();
}
程序清单 11-2 是一个完整的程序,它演示了如何切换观感的方式。这 个程序与程序清单 11-1 十分相似。我们遵循前一 节的建议, 使用辅助方法 makeButton 和匿名内部 类指定按钮动作, 即切换观感。
//程序清单 11-2 plaf/PlafFrame.java package plaf; import java.awt.event.*; import javax.swing.*; /** * A frame with a button panel for changing look and feel */ public class PlafFrame extends JFrame { private JPanel buttonPanel; public PlafFrame() { buttonPanel = new JPanel(); UIManager.LookAndFeelInfo[] infos = UIManager.getInstalledLookAndFeels(); for (UIManager.LookAndFeelInfo info : infos) makeButton(info.getName(), info.getClassName()); add(buttonPanel); pack(); } /** * Makes a button to change the pluggable look and feel. * @param name the button name * @param plafName the name of the look and feel class */ void makeButton(String name, final String plafName) { // add button to panel JButton button = new JButton(name); buttonPanel.add(button); // set button action button.addActionListener(new ActionListener() { public void actionPerformed(ActionEvent event) { // button action: switch to the new look and feel try { UIManager.setLookAndFeel(plafName); SwingUtilities.updateComponentTreeUI(PlafFrame.this); pack(); } catch (Exception e) { e.printStackTrace(); } } }); } }
适配器类
当程序用户试图关闭一个框架窗口时,JFrame 对象就是 WindowEvent 的事件源。 如果 希望捕获这个事件, 就必须有一个合适的监听器对象, 并将它添加到框架的窗口监听器列 表中。
WindowListener listener = . . . ;

frame.addWindowListener(listener);
窗口监听器必须是实现 WindowListener接口的类的一个对象。在 WindowListener 接口 中包含 7 个方法。当发生窗口事件时,框架将调用这些方法响应 7 个不同的事件。从它们 的名字就可以得知其作用, 唯一的例外是在 Windows 下,通常将 iconified (图标化)称为 minimized (最小化)。下面是完整的 WindowListener接口:
public interface WindowListener {
    void windowOpened(WindowEvent e);
    void windowClosing(WindowEvent e):
    void windowClosed(WindowEvent e);
    void windowlconified(WindowEvent e);
    void windowDeiconified(WindowEvent e);
    void windowActivated(WindowEvent e);
    void windowDeactivated(WindowEvent e);
}
鉴于简化的目的,每个含有 多个方法的 AWT 监听器接口都配有一个适配器(adapter) 类,这个类实现了接口中的所有方 法, 但每个方法没有做任何事情。这意味着适配器类自动地满足了 Java 实现相关监听器接口 的技术需求。可以通过扩展适配器类来指定对某些事件的响应动作,而不必实现接口中的每 个方法。
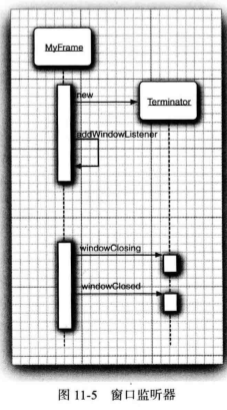
下面使用窗口适配器。首先定义一个 WindowAdapter 类的扩展类, 其中包含继承的 6 个没有 做任何事情的方法和一个覆盖的方法 windowClosing:
class Terminator extends WindowAdapter {
    public void windowCIosing(WindowEvent e) {
        if {useragrees)
            System.exit(0);
           }
    }
现在, 可以将一个 Terminator 对象注册为事件 监听器:
WindowListener listener = new Terminator();

frame.addWindowListener(listener);
只要框架产生了窗口事件, 就会通过调用 7 个方法之中的一个方法将事件传递给 listener 对象 (如图 11-5 所示),其中 6 个方法没有做任何事情; windowClosing方法调用 System.exit(0)终止应用程 序的执行。
动 作
无论改变背景颜色的命令是通过哪种方式下达的,是点击按钮、菜单选择,还是 按键 ’ 其处理都是一样的。
Swing包提供了一种非常实用的机制来封装命令,并将它们连接到多个事件源,这就是 Action 接口。一个动作是一个封装下列内容的对象:
•命令的说明(一个文本字符串和一个可选图标);
•执行命令所需要的参数(例如,在列举的例子中请求改变的颜色)。
Action 接口包含下列方法:
void actionPerformed(ActionEvent event)
void setEnabled(boolean b)
boolean isEnabled()
void putValue(String key, Object value)
Object getValue(String key)
void addPropertyChangeListener(PropertyChangeListener listener)
void removePropertyChangeListener(PropertyChangeListener listener)
第一个方法是 ActionListener接口中很熟悉的一个: 实际上,Action接口扩展于 Action Listener 接口,因此,可以在任何需要 ActionListener对象的地方使用 Action对象。
putValue 和 getvalue方法允许存储和检索动作对象中的任意名 / 值。有两个重要的预定 义字符串:Action.NAME 和 Action.SMALL_ICON,用于将动作的名字和图标存储到一个动作对象中:
action.putValue(Action._E, "Blue");

action.putValue(Action.SMALL_ICON, new ImageIcon("blue-ball.gif"));
表 11-1 给出了所有预定义的动作表名称。

Action 接口的最后两个方法能够让其他对象在动作对象的属性发生变化时得到通告,尤 其是菜单或工具栏触发的动作。例如, 如果增加一个菜单, 作为动作对象的属性变更监听 器, 而这个动作对象随后被禁用,菜单就会被调用,并将动作名称变为灰色。属性变更监听 器是一种常用的构造形式, 它是 JavaBeans组件模型的一部分。
下面总结一下用同一个动作响应按钮、菜单项或按键的方式:
1 ) 实现一个扩展于 AbstractAction类的类。多个相关的动作可以使用同一个类。
2 ) 构造一个动作类的对象。
3 ) 使用动作对象创建按钮或菜单项。构造器将从动作对象中读取标签文本和图标。
4 ) 为了能够通过按键触发动作, 必须额外地执行几步操作。首先定位顶层窗口组件, 例如,包含所有其他组件的面板。
5 ) 然后, 得到顶层组件的 WHEN_ANCESTOR_OF_FOCUS_COMPONENT 输入映射。 为需要的按键创建一个 KeyStrike 对象。创建一个描述动作字符串这样的动作键对象。将(按 键, 动作键)对添加到输人映射中。
6 ) 最后,得到顶层组件的动作映射。将(动作键,动作对象)添加到映射中。
程序清单 11-3 给出了将按钮和按键映射到动作对象的完整程序代码。 试试看, 点击按钮 或按下 CTRL+Y、 CTRL+B 或 CTRL+R 来改变面板颜色。
//程序清单 11-3 action/ActionFrame.java package action; import java.awt.*; import java.awt.event.*; import javax.swing.*; /** * A frame with a panel that demonstrates color change actions. */ public class ActionFrame extends JFrame { private JPanel buttonPanel; private static final int DEFAULT_WIDTH = 300; private static final int DEFAULT_HEIGHT = 200; public ActionFrame() { setSize(DEFAULT_WIDTH, DEFAULT_HEIGHT); buttonPanel = new JPanel(); // define actions Action yellowAction = new ColorAction("Yellow", new ImageIcon("yellow-ball.gif"), Color.YELLOW); Action blueAction = new ColorAction("Blue", new ImageIcon("blue-ball.gif"), Color.BLUE); Action redAction = new ColorAction("Red", new ImageIcon("red-ball.gif"), Color.RED); // add buttons for these actions buttonPanel.add(new JButton(yellowAction)); buttonPanel.add(new JButton(blueAction)); buttonPanel.add(new JButton(redAction)); // add panel to frame add(buttonPanel); // associate the Y, B, and R keys with names InputMap imap = buttonPanel.getInputMap(JComponent.WHEN_ANCESTOR_OF_FOCUSED_COMPONENT); imap.put(KeyStroke.getKeyStroke("ctrl Y"), "panel.yellow"); imap.put(KeyStroke.getKeyStroke("ctrl B"), "panel.blue"); imap.put(KeyStroke.getKeyStroke("ctrl R"), "panel.red"); // associate the names with actions ActionMap amap = buttonPanel.getActionMap(); amap.put("panel.yellow", yellowAction); amap.put("panel.blue", blueAction); amap.put("panel.red", redAction); } public class ColorAction extends AbstractAction { /** * Constructs a color action. * @param name the name to show on the button * @param icon the icon to display on the button * @param c the background color */ public ColorAction(String name, Icon icon, Color c) { putValue(Action.NAME, name); putValue(Action.SMALL_ICON, icon); putValue(Action.SHORT_DESCRIPTION, "Set panel color to " + name.toLowerCase()); putValue("color", c); } public void actionPerformed(ActionEvent event) { Color c = (Color) getValue("color"); buttonPanel.setBackground(c); } } }