Kubernetes实战入门
Kubernetes实战入门
Namespace
介绍
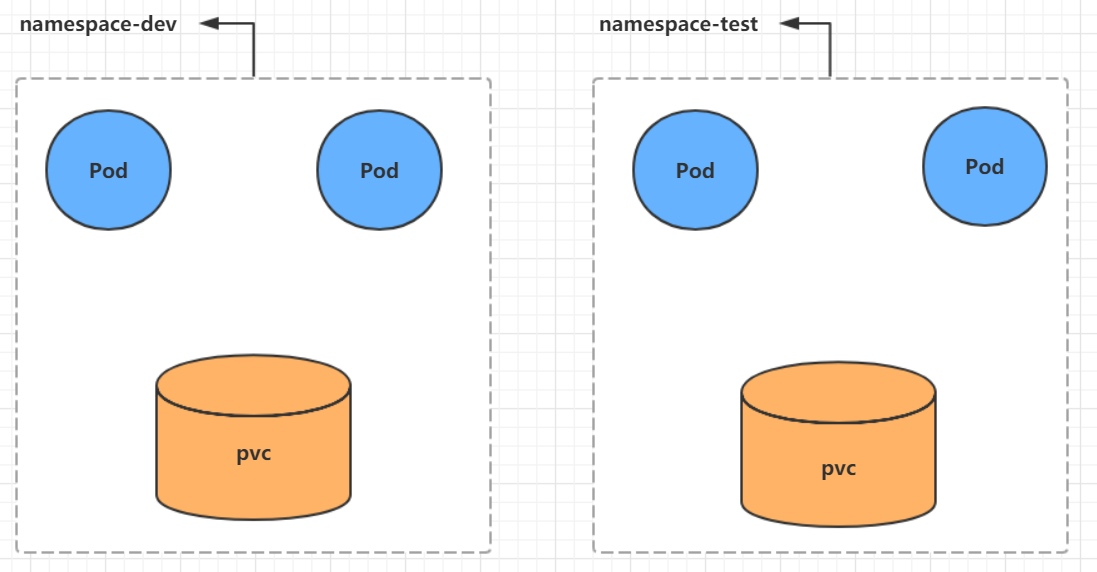
Namespace是kubernetes系统中的一种非常重要资源,它的主要作用是用来实现多套环境的资源隔离或者多租户的资源隔离。
默认情况下,kubernetes集群中的所有的Pod都是可以相互访问的。
测试:kubernetes集群中的所有的Pod都是可以相互访问的
进入容器:kubectl exec --help
Usage:
  kubectl exec (POD | TYPE/NAME) [-c CONTAINER] [flags] -- COMMAND [args...] [options]
[root@k8s-master ~]# kubectl get pods
NAME                     READY   STATUS    RESTARTS       AGE
apache-855464645-4zxf2   1/1     Running   2 (115m ago)   22h
[root@k8s-master ~]# kubectl exec apache-855464645-4zxf2 -it -- bash
root@apache-855464645-4zxf2:/usr/local/apache2# ls
bin    cgi-bin  error   icons    logs
build  conf     htdocs  include  modules
root@apache-855464645-4zxf2:/usr/local/apache2#

查看sleep在busybody里的位置
[root@k8s-node2 ~]# docker run -it --rm busybox
Unable to find image 'busybox:latest' locally
latest: Pulling from library/busybox
5cc84ad355aa: Pull complete
Digest: sha256:5acba83a746c7608ed544dc1533b87c737a0b0fb730301639a0179f9344b1678
Status: Downloaded newer image for busybox:latest
/ # which slep
/ # which sleep
/bin/sleep
/ # exit
[root@k8s-node2 ~]#

在容器里执行命令方法:
[root@k8s-master ~]# kubectl explain pods.spec.containers

    command: ["/bin/sleep","6000"]

[root@k8s-master ~]# cd manifest/
[root@k8s-master manifest]# ls
nginxpod.yml
[root@k8s-master manifest]# cp nginxpod.yml test.yml
[root@k8s-master manifest]# vim test.yml
[root@k8s-master manifest]# cat test.yml
apiVersion: v1
kind: Namespace
metadata:
  name: dev

---

apiVersion: v1
kind: Pod
metadata:
  name: nginx
  namespace: dev
spec:
  containers:
  - name: nginx-containers
    image: busybox
    command: ["/bin/sleep","6000"]

---

apiVersion: v1
kind: Pod
metadata:
  name: apache
spec:
  containers:
  - name: httpd
    image: busybox
    command: ["/bin/sleep","6000"]
[root@k8s-master manifest]#


运行命令
[root@k8s-master manifest]# kubectl apply -f test.yml
namespace/dev created
pod/nginx created
pod/apache created
[root@k8s-master manifest]# kubectl get -f test.yml
NAME            STATUS   AGE
namespace/dev   Active   17s

NAME         READY   STATUS    RESTARTS   AGE
pod/nginx    1/1     Running   0          17s
pod/apache   1/1     Running   0          17s
[root@k8s-master manifest]#
[root@k8s-master manifest]# kubectl exec apache -it -- sh
/ # ls
bin   dev   etc   home  proc  root  sys   tmp   usr   var
/ # ip a
1: lo: <LOOPBACK,UP,LOWER_UP> mtu 65536 qdisc noqueue qlen 1000
    link/loopback 00:00:00:00:00:00 brd 00:00:00:00:00:00
    inet 127.0.0.1/8 scope host lo
       valid_lft forever preferred_lft forever
    inet6 ::1/128 scope host
       valid_lft forever preferred_lft forever
3: eth0@if18: <BROADCAST,MULTICAST,UP,LOWER_UP,M-DOWN> mtu 1450 qdisc noqueue
    link/ether be:ab:f1:70:78:47 brd ff:ff:ff:ff:ff:ff
    inet 10.244.2.19/24 brd 10.244.2.255 scope global eth0
       valid_lft forever preferred_lft forever
    inet6 fe80::bcab:f1ff:fe70:7847/64 scope link
       valid_lft forever preferred_lft forever
/ #
/ # ping 10.244.2.18
PING 10.244.2.18 (10.244.2.18): 56 data bytes
64 bytes from 10.244.2.18: seq=0 ttl=64 time=0.117 ms
64 bytes from 10.244.2.18: seq=1 ttl=64 time=1.426 ms
64 bytes from 10.244.2.18: seq=2 ttl=64 time=0.078 ms
^C
--- 10.244.2.18 ping statistics ---
3 packets transmitted, 3 packets received, 0% packet loss
round-trip min/avg/max = 0.078/0.540/1.426 ms


[root@k8s-master ~]# kubectl exec nginx -itn dev -- sh
/ # ip a
1: lo: <LOOPBACK,UP,LOWER_UP> mtu 65536 qdisc noqueue qlen 1000
    link/loopback 00:00:00:00:00:00 brd 00:00:00:00:00:00
    inet 127.0.0.1/8 scope host lo
       valid_lft forever preferred_lft forever
    inet6 ::1/128 scope host
       valid_lft forever preferred_lft forever
3: eth0@if17: <BROADCAST,MULTICAST,UP,LOWER_UP,M-DOWN> mtu 1450 qdisc noqueue
    link/ether ca:ef:b8:81:d1:b5 brd ff:ff:ff:ff:ff:ff
    inet 10.244.2.18/24 brd 10.244.2.255 scope global eth0
       valid_lft forever preferred_lft forever
    inet6 fe80::c8ef:b8ff:fe81:d1b5/64 scope link
       valid_lft forever preferred_lft forever
/ # ping 10.244.2.19
PING 10.244.2.19 (10.244.2.19): 56 data bytes
64 bytes from 10.244.2.19: seq=0 ttl=64 time=0.065 ms
64 bytes from 10.244.2.19: seq=1 ttl=64 time=0.060 ms
^C
--- 10.244.2.19 ping statistics ---
2 packets transmitted, 2 packets received, 0% packet loss
round-trip min/avg/max = 0.060/0.062/0.065 ms
/ #
-
kubernetes集群中的所有的Pod都是可以相互访问的
-
但是在实际中,可能不想让两个Pod之间进行互相的访问,那此时就可以将两个Pod划分到不同的namespace下。kubernetes通过将集群内部的资源分配到不同的Namespace中,可以形成逻辑上的"组",以方便不同的组的资源进行隔离使用和管理
-
可以通过kubernetes的授权机制,将不同的namespace交给不同租户进行管理,这样就实现了多租户的资源隔离。此时还能结合kubernetes的资源配额机制,限定不同租户能占用的资源,例如CPU使用量、内存使用量等等,来实现租户可用资源的管理。
-
kubernetes在集群启动之后,会默认创建几个namespace
[root@k8s-master ~]# kubectl get ns
NAME              STATUS   AGE
default           Active   31h   #  所有未指定Namespace的对象都会被分配在default命名空间
kube-flannel      Active   30h
kube-node-lease   Active   31h  #  集群节点之间的心跳维护,v1.13开始引入
kube-public       Active   31h  #  此命名空间下的资源可以被所有人访问(包括未认证用户)
kube-system       Active   31h #  所有由Kubernetes系统创建的资源都处于这个命名空间
[root@k8s-master ~]#
namespace资源的具体操作:
查看
# 1 查看所有的ns  命令:kubectl get ns
[root@k8s-master ~]# kubectl get ns
NAME              STATUS   AGE
default           Active   31h
kube-flannel      Active   30h
kube-node-lease   Active   31h
kube-public       Active   31h
kube-system       Active   31h

# 2 查看指定的ns   命令:kubectl get ns ns名称
[root@k8s-master ~]# kubectl get ns default
NAME      STATUS   AGE
default   Active   31h
[root@k8s-master ~]#

# 3 指定输出格式  命令:kubectl get ns ns名称  -o 格式参数
# kubernetes支持的格式有很多,比较常见的是wide、json、yaml
[root@k8s-master ~]# kubectl get ns default -o yaml
apiVersion: v1
kind: Namespace
metadata:
  creationTimestamp: "2022-09-06T05:32:38Z"//创建时间戳,可写可不写
  labels://标签,可写可不写
    kubernetes.io/metadata.name: default
  name: default
  resourceVersion: "191"
  uid: f32a553e-48db-4bc0-ba7a-f3a999dca024
spec://可写可不写
  finalizers:
  - kubernetes
status:
  phase: Active//默认是激活的
[root@k8s-master ~]#

# 4 查看ns详情  命令:kubectl describe ns ns名称//[root@k8s-master ~]# kubectl describe pods apache-855464645-4zxf2

[root@k8s-master ~]# kubectl describe ns default
Name:         default
Labels:       kubernetes.io/metadata.name=default
Annotations:  <none>
Status:       Active  # Active 命名空间正在使用中  Terminating 正在删除命名空间
# ResourceQuota 针对namespace做的资源限制
# LimitRange针对namespace中的每个组件做的资源限制
No resource quota.

No LimitRange resource.
[root@k8s-master ~]#
创建
# 创建namespace
[root@k8s-master ~]# kubectl create ns dev
namespace/dev created
[root@k8s-master ~]# kubectl get ns
NAME              STATUS   AGE
default           Active   31h
dev               Active   6s
kube-flannel      Active   31h
kube-node-lease   Active   31h
kube-public       Active   31h
kube-system       Active   31h
[root@k8s-master ~]#
删除
# 删除namespace
[root@k8s-master ~]# kubectl delete ns dev
namespace "dev" deleted
[root@k8s-master ~]# kubectl get ns
NAME              STATUS   AGE
default           Active   31h
kube-flannel      Active   31h
kube-node-lease   Active   31h
kube-public       Active   31h
kube-system       Active   31h
[root@k8s-master ~]#
配置方式
首先准备一个yaml文件:ns-dev.yaml

apiVersion: v1
kind: Namespace
metadata:
  name: dev
然后就可以执行对应的创建和删除命令了:

创建:kubectl create -f ns-dev.yaml

删除:kubectl delete -f ns-dev.yaml
Pod
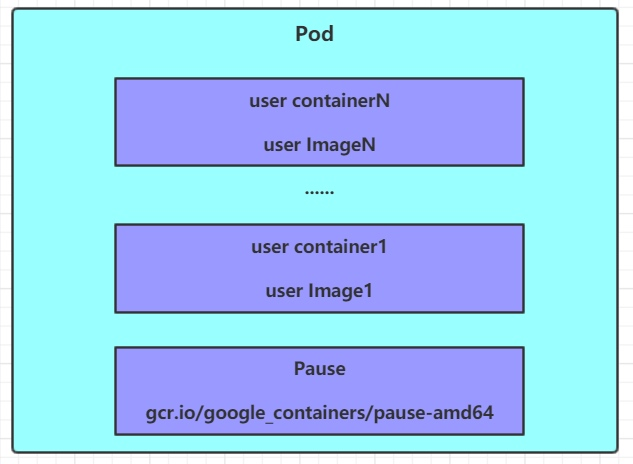
Pod是kubernetes集群进行管理的最小单元,程序要运行必须部署在容器中,而容器必须存在于Pod中。
Pod可以认为是容器的封装,一个Pod中可以存在一个或者多个容器。
- kubernetes在集群启动之后,集群中的各个组件也都是以Pod方式运行的。可以通过下面命令查看:
[root@k8s-master ~]# kubectl get pods -n kube-system
NAME                                 READY   STATUS    RESTARTS       AGE
coredns-c676cc86f-44bsf              1/1     Running   5 (143m ago)   32h
coredns-c676cc86f-fbb7f              1/1     Running   5 (143m ago)   32h
etcd-k8s-master                      1/1     Running   5 (143m ago)   32h
kube-apiserver-k8s-master            1/1     Running   5 (143m ago)   32h
kube-controller-manager-k8s-master   1/1     Running   7 (143m ago)   32h
kube-proxy-65lcn                     1/1     Running   5 (143m ago)   32h
kube-proxy-lw4z2                     1/1     Running   5 (143m ago)   26h
kube-proxy-zskvf                     1/1     Running   6 (143m ago)   26h
kube-scheduler-k8s-master            1/1     Running   8 (143m ago)   32h
[root@k8s-master ~]#
管理pod
** 创建并运行**
- kubernetes没有提供单独运行Pod的命令,都是通过Pod控制器来实现的
# 命令格式: kubectl run (pod控制器名称) [参数]
# --image  指定Pod的镜像
# --port   指定端口
# --namespace  指定namespace
[root@master ~]# kubectl run nginx --image=nginx:latest --port=80 --namespace dev
deployment.apps/nginx created

[root@k8s-master ~]# kubectl create ns dev
namespace/dev created
[root@k8s-master ~]# kubectl run nginx --image nginx --port 80 -n dev
pod/nginx created
查看pod信息
# 查看Pod基本信息
[root@k8s-master ~]# kubectl get pods -n dev
NAME    READY   STATUS    RESTARTS   AGE
nginx   1/1     Running   0          7m25s

# 查看Pod的详细信息
[root@k8s-master ~]# kubectl describe pod nginx -n dev
Name:             nginx
Namespace:        dev
Priority:         0
Service Account:  default
Node:             k8s-node2/192.168.232.134
Start Time:       Wed, 07 Sep 2022 21:47:22 +0800
Labels:           run=nginx
Annotations:      <none>
Status:           Running
IP:               10.244.2.14
IPs:
  IP:  10.244.2.14
Containers:
  nginx:
    Container ID:   containerd://c1a9c5d6c53c2888215fa88d513f926eeed1ab7bb2a0f769aee40a23a3e0a07e
    Image:          nginx
    Image ID:       docker.io/library/nginx@sha256:b95a99feebf7797479e0c5eb5ec0bdfa5d9f504bc94da550c2f58e839ea6914f
    Port:           80/TCP
    Host Port:      0/TCP
    State:          Running
      Started:      Wed, 07 Sep 2022 21:47:27 +0800
    Ready:          True
    Restart Count:  0
    Environment:    <none>
    Mounts:
      /var/run/secrets/kubernetes.io/serviceaccount from kube-api-access-sl4m5 (ro)
Conditions:
  Type              Status
  Initialized       True
  Ready             True
  ContainersReady   True
  PodScheduled      True
Volumes:
  kube-api-access-sl4m5:
    Type:                    Projected (a volume that contains injected data from multiple sources)
    TokenExpirationSeconds:  3607
    ConfigMapName:           kube-root-ca.crt
    ConfigMapOptional:       <nil>
    DownwardAPI:             true
QoS Class:                   BestEffort
Node-Selectors:              <none>
Tolerations:                 node.kubernetes.io/not-ready:NoExecute op=Exists for 300s
                             node.kubernetes.io/unreachable:NoExecute op=Exists for 300s
Events:
  Type    Reason     Age    From               Message
  ----    ------     ----   ----               -------
  Normal  Scheduled  8m11s  default-scheduler  Successfully assigned dev/nginx to k8s-node2
  Normal  Pulling    8m9s   kubelet            Pulling image "nginx"
  Normal  Pulled     8m5s   kubelet            Successfully pulled image "nginx" in 4.409994145s
  Normal  Created    8m5s   kubelet            Created container nginx
  Normal  Started    8m5s   kubelet            Started container nginx
[root@k8s-master ~]#


[root@k8s-master ~]# kubectl get svc
NAME         TYPE        CLUSTER-IP       EXTERNAL-IP   PORT(S)        AGE
apache       NodePort    10.100.81.244    <none>        80:31552/TCP   23h
kubernetes   ClusterIP   10.96.0.1        <none>        443/TCP        32h
nginx        NodePort    10.105.183.188   <none>        80:30735/TCP   26h
[root@k8s-master ~]#
      10.105.183.188:集群ip
访问Pod
# 获取podIP
[root@k8s-master ~]# kubectl get pods -n dev -o wide
NAME    READY   STATUS    RESTARTS   AGE   IP            NODE        NOMINATED NODE   READINESS GATES
nginx   1/1     Running   0          15m   10.244.2.14   k8s-node2   <none>           <none>
[root@k8s-master ~]#


#访问POD
[root@k8s-master ~]# curl 10.244.2.14
<!DOCTYPE html>
<html>
<head>
<title>Welcome to nginx!</title>
<style>
html { color-scheme: light dark; }
body { width: 35em; margin: 0 auto;
font-family: Tahoma, Verdana, Arial, sans-serif; }
</style>
</head>
<body>
<h1>Welcome to nginx!</h1>
<p>If you see this page, the nginx web server is successfully installed and
working. Further configuration is required.</p>

<p>For online documentation and support please refer to
<a href="http://nginx.org/">nginx.org</a>.<br/>
Commercial support is available at
<a href="http://nginx.com/">nginx.com</a>.</p>

<p><em>Thank you for using nginx.</em></p>
</body>
</html>
[root@k8s-master ~]#
[root@k8s-master ~]# kubectl run nginx1 --image nginx --port 80 -n dev
pod/nginx1 created
[root@k8s-master ~]# kubectl run nginx2 --image nginx --port 80 -n dev
pod/nginx2 created
[root@k8s-master ~]# kubectl run nginx3 --image nginx --port 80 -n dev
pod/nginx3 created
[root@k8s-master ~]#
[root@k8s-master ~]# kubectl get pods -n dev
NAME     READY   STATUS    RESTARTS   AGE
nginx    1/1     Running   0          22m
nginx1   1/1     Running   0          50s
nginx2   1/1     Running   0          46s
nginx3   1/1     Running   0          41s
[root@k8s-master ~]#
删除指定Pod
# 删除指定Pod
[root@k8s-master ~]# kubectl get pods -n dev
NAME     READY   STATUS    RESTARTS   AGE
nginx    1/1     Running   0          22m
nginx1   1/1     Running   0          50s
nginx2   1/1     Running   0          46s
nginx3   1/1     Running   0          41s
[root@k8s-master ~]# kubectl delete pod nginx -n dev
pod "nginx" deleted

# 先来查询一下当前namespace下的Pod控制器
[root@k8s-master ~]# kubectl get pods -n dev
NAME     READY   STATUS    RESTARTS   AGE
nginx1   1/1     Running   0          12m
nginx2   1/1     Running   0          12m
nginx3   1/1     Running   0          12m

# 接下来,删除此Pod控制器
-
配置操作
-
创建一个pod.yml,内容如下:
[root@k8s-master manifest]# vim pod.yml
[root@k8s-master manifest]# cat pod.yml
apiVersion: v1
kind: Namespace
metadata:
  name: dev

---
apiVersion: v1
kind: Pod
metadata:
  name: nginx
  namespace: dev
spec:
  containers:
  - image: nginx:latest
    name: pod
    ports:
    - name: nginx-port
      containerPort: 80
      protocol: TCP
[root@k8s-master manifest]#
[root@k8s-master manifest]# kubectl apply -f pod.yml
namespace/dev created
pod/nginx created
[root@k8s-master manifest]# kubectl get pods -n dev
NAME    READY   STATUS    RESTARTS   AGE
nginx   1/1     Running   0          12s
[root@k8s-master manifest]#
[root@k8s-master manifest]# kubectl get -f pod.yml
NAME            STATUS   AGE
namespace/dev   Active   33s

NAME        READY   STATUS    RESTARTS   AGE
pod/nginx   1/1     Running   0          33s
[root@k8s-master manifest]#
就可以执行对应的创建和删除命令了:
创建:kubectl create -f pod-nginx.yaml
删除:kubectl delete -f pod-nginx.yaml
Label
- Label是kubernetes系统中的一个重要概念。它的作用就是在资源上添加标识,用来对它们进行区分和选择。
Label的特点:
- 一个Label会以key/value键值对的形式附加到各种对象上,如Node、Pod、Service
- 一个资源对象可以定义任意数量的Label ,同一个Label也可以被添加到任意数量的资源对象上去
- Label通常在资源对象定义时确定,当然也可以在对象创建后动态添加或者删除
[root@k8s-master ~]# kubectl get svc
NAME         TYPE        CLUSTER-IP      EXTERNAL-IP   PORT(S)        AGE
apache       NodePort    10.100.81.244   <none>        80:31552/TCP   24h
kubernetes   ClusterIP   10.96.0.1       <none>        443/TCP        33h
[root@k8s-master ~]# kubectl describe svc apache
Name:                     apache
Namespace:                default
Labels:                   app=apache
Annotations:              <none>
Selector:                 app=apache
Type:                     NodePort
IP Family Policy:         SingleStack
IP Families:              IPv4
IP:                       10.100.81.244
IPs:                      10.100.81.244
Port:                     <unset>  80/TCP
TargetPort:               80/TCP
NodePort:                 <unset>  31552/TCP
Endpoints:                10.244.1.7:80
Session Affinity:         None
External Traffic Policy:  Cluster
Events:                   <none>
[root@k8s-master ~]#
  标签:
  Labels: app=apache key;app 值:等于多少
- 可以通过Label实现资源的多维度分组,以便灵活、方便地进行资源分配、调度、配置、部署等管理工作
一些常用的Label 示例如下:

版本标签:"version":"release", "version":"stable"......stable稳定版
环境标签:"environment":"dev","environment":"test","environment":"prod" dev开发环境,test,测试,prod,生产环境
架构标签:"tier":"frontend/前端","tier":"backend/后端"
标签定义完毕之后,还要考虑到标签的选择,这就要使用到Label Selector,即:
- Label用于给某个资源对象定义标识
- Label Selector用于查询和筛选拥有某些标签的资源对象
有两种Label Selector(选择器):
1. 基于等式的Label Selector

name = slave
选择所有包含Label中key="name"且value="slave"的对象

env != production:
选择所有包括Label中的key="env"且value不等于"production"的对象

2. 基于集合的Label Selector

name in (master, slave)
选择所有包含Label中的key="name"且value="master"或"slave"的对象(多个对象)

name not in (frontend)
选择所有包含Label中的key="name"且value不等于"frontend"的对象
- 标签的选择条件可以使用多个,此时将多个Label Selector进行组合,使用逗号","进行分隔即可。例如:
name=slave,env!=production

name not in (frontend),env!=production
标签选择器
-
当大量的pod运行在一个集群当中时,如何实现分类管理?比如想删除某一类pod,比如想让控制器去管理一部分pod,它怎么进行管理?如何挑选、检测出来这些pod呢?值得肯定的是,这么多的pod,我们不能通过pod的名称来识别容器,因为pod随时都会被创建和删除,当一个pod发生故障被删除后,重新生成的pod的名称与被删除的pod名称肯定是不一样的,只不过其内部运行的程序是—样的,所以我们不能靠pod的名称来识别。
-
同时我们有可能要将一类pod归组,比如创建4个nginx的pod,期望使用一个控制器对其进行统一管理,删除一个控制器就把这4个pod都删了,控制器还要保证这4个pod都处于运行状态,缺一个要补一个,多一个要多杀一个,精确符合我们期望的4个pod才行。
-
为了能够实现pod识别需要在pod之上附加一些元数据,类似dockerfle中的label标签的方式,比如在创建pod时为其附加一个名为app的key,然后将其值设为nginx,那么当我们在批量进行pod调度管理时,可以检查pod中是否有app这个key,且其值是否为nginx,通过此种方法来识别pod是否是我们想要控制的pod
-
标签是在k8s上管理大规模pod资源并且能够分类识别和管理的一个非常重要的途径,是一个识别资源重要的参数
-
通过标签选择器组件我们可以实现这个功能从众多的pod中筛选出我们想要的pod
-
标签选择器就是一种根据标签来过滤符合条件的资源对象的机制
使用命令方式打标签
先查看标签:
[root@k8s-master ~]# kubectl get pods -n devNAME    READY   STATUS    RESTARTS   AGE
nginx   1/1     Running   0          66m
[root@k8s-master ~]# kubectl describe pod nginx -n dev|grep -i label
Labels:           <none>
[root@k8s-master ~]#

[root@k8s-master ~]# kubectl get pods -n devNAME       READY   STATUS    RESTARTS   AGE
mynginx    1/1     Running   0          2m29s
nginx      1/1     Running   0          72m
nginx1     1/1     Running   0          2m48s
nginxpod   1/1     Running   0          4m4s
[root@k8s-master ~]#


# 为pod资源打标签
[root@k8s-master ~]# kubectl label pod nginx -n dev app=nginx
pod/nginx labeled
[root@k8s-master ~]#
[root@k8s-master ~]# kubectl label pod nginx1 -n dev app=nginx1
pod/nginx1 labeled
[root@k8s-master ~]# kubectl label pod nginxpod -n dev app=nginxpod
pod/nginxpod labeled
[root@k8s-master ~]# kubectl label pod mynginx -n dev app=mynginx
pod/mynginx labeled
[root@k8s-master ~]#


# 为pod资源更新标签
[root@k8s-master ~]# kubectl label pod nginx -n dev app=test
error: 'app' already has a value (nginx), and --overwrite is false
[root@k8s-master ~]# kubectl label pod nginx -n dev app=test --overwrite
pod/nginx labeled
[root@k8s-master ~]#

[root@k8s-master ~]# kubectl get pod nginx -n dev --show-labels
NAME    READY   STATUS    RESTARTS   AGE   LABELS
nginx   1/1     Running   0          74m   app=nginx
[root@k8s-master ~]# kubectl get pod nginx -n dev --show-labels
NAME    READY   STATUS    RESTARTS   AGE   LABELS
nginx   1/1     Running   0          74m   app=test
[root@k8s-master ~]#


# 查看标签
[root@k8s-master ~]# kubectl describe pod nginx -n dev|grep -i label
Labels:           app=nginx
[root@k8s-master ~]# kubectl get pod nginx -n dev --show-labels
NAME    READY   STATUS    RESTARTS   AGE   LABELS
nginx   1/1     Running   0          71m   app=nginx
[root@k8s-master ~]#

查看所有标签
[root@k8s-master ~]# kubectl get pods -n dev --show-labels
NAME       READY   STATUS    RESTARTS   AGE     LABELS
mynginx    1/1     Running   0          7m10s   app=mynginx
nginx      1/1     Running   0          76m     app=test
nginx1     1/1     Running   0          7m29s   app=nginx1
nginxpod   1/1     Running   0          8m45s   app=nginxpod
[root@k8s-master ~]#


# 筛选标签:kubectl get pods -n dev -l app=test --show-labels
[root@k8s-master ~]# kubectl get pods -n dev --show-labels
NAME       READY   STATUS    RESTARTS   AGE     LABELS
mynginx    1/1     Running   0          7m48s   app=mynginx
nginx      1/1     Running   0          77m     app=test
nginx1     1/1     Running   0          8m7s    app=nginx1
nginxpod   1/1     Running   0          9m23s   app=nginxpod
筛选某一个标签
[root@k8s-master ~]# kubectl get pods -n dev -l app=test --show-labels
NAME    READY   STATUS    RESTARTS   AGE   LABELS
nginx   1/1     Running   0          78m   app=test
[root@k8s-master ~]#
除了被筛选的
[root@k8s-master ~]# kubectl get pods -n dev -l app!=test --show-labels
NAME       READY   STATUS    RESTARTS   AGE   LABELS
mynginx    1/1     Running   0          10m   app=mynginx
nginx1     1/1     Running   0          10m   app=nginx1
nginxpod   1/1     Running   0          11m   app=nginxpod
[root@k8s-master ~]#


#删除标签
[root@k8s-master ~]# kubectl label pod nginx1 -n dev app-
pod/nginx1 unlabeled
[root@k8s-master ~]# kubectl get pods -n dev --show-labels
NAME       READY   STATUS    RESTARTS   AGE   LABELS
mynginx    1/1     Running   0          12m   app=mynginx
nginx      1/1     Running   0          81m   app=test
nginx1     1/1     Running   0          12m   <none>
nginxpod   1/1     Running   0          13m   app=nginxpod
[root@k8s-master ~]#

 浙公网安备 33010602011771号