


java——SpringBoot(3)
通过增删改查案例了解SpringBoot各种功能;
为了增加Mvc功能,我们会经常覆写 extends WebMvcConfigurationSupport、implements WebMvcConfigurer接口,需要注意的是: extends WebMvcConfigurationSupport将会覆盖原本的自动装配,即需要自己补充覆写所需要的功能,如访问静态文件等等,加上目前接口已有默认的方法了,所以建议还是直接implements WebMvcConfigurer接口,这样我们只需要覆写所增加的方法即可;而@EnableWebMvc实际上是引入一个DelegatingWebMvcConfiguration,而DelegatingWebMvcConfiguration继承了WebMvcConfigurationSupport,因此SpringBoot2.0版本不可再@EnableWebMvc,以上就是刚接触SpringBoot2.0所踩的坑;
进入主题首先我们可以覆写addViewControllers来简化访问对应的页面:
@Override
    public void addViewControllers(ViewControllerRegistry registry) {
        registry.addViewController("/login").setViewName("login");

    }
对页面进行国际化管理:
在resources下编写装换配置文件:
修改html文件,进行绑定:

SpringBoot自动配置好了管理国际化资源文件的组件;
国际化Locale(区域信息对象);LocaleResolver(获取区域信息对象);
覆写其方法返回类:
public class MyLocaleResolver implements LocaleResolver {

    @Override
    public Locale resolveLocale(HttpServletRequest request) {
        // TODO Auto-generated method stub
        Locale locale = Locale.getDefault();
        String l = request.getParameter("l");
        if(!StringUtils.isEmpty(l)) {
            String[] split = l.split("_");
            locale = new Locale(split[0],split[1]);
        }
        return locale;
    }

    @Override
    public void setLocale(HttpServletRequest request, HttpServletResponse response, Locale locale) {
        // TODO Auto-generated method stub

    }

}
要记得将修改类注入容器中:
public class MyMvcConfig extends WebMvcConfigurationSupport{
    @Bean
    public LocaleResolver localeResolver() {
        return new MyLocaleResolver();
    }
登录检验:
编写控制器:
@Controller
public class LoginController {
    @PostMapping(value = "/user/login")
    //@RequestMapping(value="/user/login",method = RequestMethod.POST)
    public String login(@RequestParam("username") String username,@RequestParam("password") String password,
                        Map<String,Object> map,HttpSession session) {
        if(!StringUtils.isEmpty(username) && "123456".equals(password)) {
            session.setAttribute("loginUser",username);
            return "redirect:/main.html";
        }else {
            map.put("msg","用户名密码错误");
            return "login";
        }

    }
}
这里的/main.html会映射到首页里;redirect:作用就是将返回变成一个访问路径/main.html而不是一个字符串;
对其他页面进行登录限制:
编写拦截器:
public class LoginHandlerIntercep implements HandlerInterceptor {

    @Override
    public boolean preHandle(HttpServletRequest request, HttpServletResponse response, Object handler)
            throws Exception {
        // TODO Auto-generated method stub
        Object user = request.getSession().getAttribute("loginUser");
        if(user == null) {
            request.setAttribute("msg", "未登录请先登录");
            request.getRequestDispatcher("/login").forward(request, response);
            return false;
        }else {
            return true;
        }


    }

    @Override
    public void postHandle(HttpServletRequest request, HttpServletResponse response, Object handler,
            ModelAndView modelAndView) throws Exception {
        // TODO Auto-generated method stub
        HandlerInterceptor.super.postHandle(request, response, handler, modelAndView);
    }

    @Override
    public void afterCompletion(HttpServletRequest request, HttpServletResponse response, Object handler, Exception ex)
            throws Exception {
        // TODO Auto-generated method stub
        HandlerInterceptor.super.afterCompletion(request, response, handler, ex);
    }

}
增加 拦截器并避免拦截静态资源:
@Override
    protected void addInterceptors(InterceptorRegistry registry) {
        // TODO Auto-generated method stub
        //super.addInterceptors(registry);
        registry.addInterceptor(new LoginHandlerIntercep()).addPathPatterns("/**").excludePathPatterns("/login","/user/login","/","/css/**","/js/**","/img/**");
    }
编写逻辑功能:

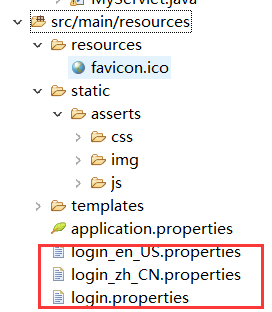
目录结构:
查询:
添加:先来到添加页面 ,按提交键进行提交:
修改:先来到修改页面: ,按修改键进行修改:
删除:删除也是post,相当于提交一次表单,为了避免每次删除都要编写一个<form>标签,我们可以把标签写在外面,通过js进行调用,页面的所有删除都调用这个表单就好:


在编写html页面需要注意的是:如果我们将增加和修改页面共用一页面的话,也就是add.html和change.heml共用,但需要他们的回显不能一样,增加页面回显的是默认的样例,而修改页面回显的是所选修改id对应的属性值:

这样如果emp有值的话说明调用的是修改页面,因为修改页面我们有返回一个emp对象,而增加页面是没有的;
控制类编写:
@Controller
public class EmployeeController {
    @Autowired
    DepartmentDao departmentDao;
    @Autowired
    EmployeeDao employeeDao;
    @GetMapping("/emps")
    public String list(Model model) {
        Collection<Employee> employees = employeeDao.getAll();
        model.addAttribute("emps", employees);
        return "emp/list";
    }
    @GetMapping("/emp")
    public String toAddPage(Model model) {
        Collection<Department> departments = departmentDao.getDepartments();
        model.addAttribute("depts", departments);
        return "emp/add";
    }
    @PostMapping("/emp")
    public String Addemp(Employee employee) {
        System.out.println(employee);
        employeeDao.save(employee);
        return "redirect:/emps";
    }

    @GetMapping("/emp/{id}")
    public String changePage(@PathVariable("id") Integer id, Model model) {
        Employee employee = employeeDao.get(id);
        model.addAttribute("emp", employee);
        Collection<Department> departments = departmentDao.getDepartments();
        model.addAttribute("depts", departments);
        return "emp/change";
    }
    @PutMapping("/emp")
    public String update(Employee employee) {
        employeeDao.save(employee);
        return "redirect:/emps";
    }
    @DeleteMapping("/emp/{id}")
    public String delete(@PathVariable("id") Integer id) {
        employeeDao.delete(id);
        return "redirect:/emps";
    }
}
错误处理机制:
可以参照ErrorMvcAutoConfiguration;
这个配置类加入了以下组件:
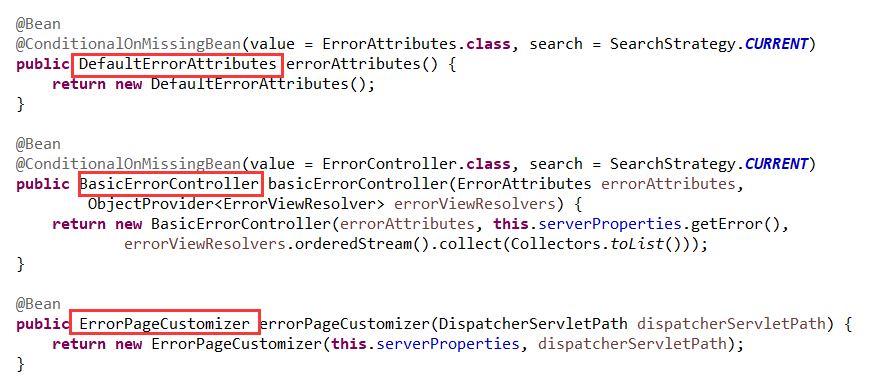

DefaultErrorAttributes:定制错误页面的共享信息;、BasicErrorController:处理默认/error请求(这里会根据请求的来源进行区分,如果是网页的会产生html类型数据返回,如果是客户端会返回json数据);
ErrorPageCustomizer:会产生/error(默认)请求然后交给BasicErrorController;DefaultErrorViewResolver:具体去到哪个页面,如error/4xx.html或者error/5xx.html
错误处理的自动配置;一但系统出现4xx或者5xx之类的错误;ErrorPageCustomizer就会生效(定制错误的响应规则);就会来到/error请求;就会被BasicErrorController处理;去哪个页面是由DefaultErrorViewResolver解析得到的;
因此我们如果只想改其网页显示只需在resources下建个errou目录然后创建4xx.html或者5xx.html即可;
自制错误页面:
首先设置好访问抛出异常路径:
@ResponseBody
    @RequestMapping("/hello")
    public String hello(@RequestParam("user") String user) {
        if(user.equals("aaa")) {
        throw new UserNotException();
    }else {
        return "hahahaha";
    }
    }
再来自定义UserNotException()类:
public class UserNotException extends RuntimeException {
    public UserNotException() {
        super("用户不存在");
    }
}
创建ExceptionHangder类处理controller类抛出的异常:
@ControllerAdvice
public class MyExceptionHandler {
    /***@ResponseBody
    @ExceptionHandler(UserNotException.class)
    public Map<String,Object> handleException(Exception e) {
        Map<String,Object> map = new HashMap();
        map.put("code","user.notexist");
        map.put("message",e.getMessage());
        return map;
    }***/
    @ExceptionHandler(UserNotException.class)
    public String handleException(Exception e,HttpServletRequest request) {
        Map<String,Object> map = new HashMap();
        request.setAttribute("javax.servlet.error.status_code", 401);
        map.put("code","user.notexist");
        map.put("message",e.getMessage());
        return "forward:/error";

}
}
此时我们访问/hello?user=aaa时就会抛出自定义好的异常,转到error/401.html页面上;
这里如果使用html静态页面:在resources/public/error/ 下定义;
如果使用模板引擎页面:在templates/error/下定义;
templates/error/ 这个的优先级比较 resources/public/error/高;
将我们的定制数据携带出去:
来编写一个ErrorController的实现类【或者是编写AbstractErrorController的子类】,放在容器中;
页面上能用的数据,或者是json返回能用的数据都是通过errorAttributes.getErrorAttributes得到;
容器中DefaultErrorAttributes.getErrorAttributes();默认进行数据处理的;
@Component
public class MyErrorAttributes extends DefaultErrorAttributes {
    @Override
    public Map<String, Object> getErrorAttributes(RequestAttributes requestAttributes,
boolean includeStackTrace) {
        Map<String, Object> map = super.getErrorAttributes(requestAttributes,
includeStackTrace);
        map.put("company","atguigu");
        return map;
    }
}
配置嵌入式Servlet容器:
由于SpringBoot默认是以jar包的方式启动嵌入式的Servlet容器来启动SpringBoot的web应用,没有web.xml文
件。
注册三大组件用以下方式:
过滤器:
public class MyFilter implements Filter {

    @Override
    public void init(FilterConfig filterConfig) throws ServletException {
        // TODO Auto-generated method stub
        Filter.super.init(filterConfig);
    }

    @Override
    public void doFilter(ServletRequest request, ServletResponse response, FilterChain chain)
            throws IOException, ServletException {
        // TODO Auto-generated method stub
        System.out.println("MyFilter");
        chain.doFilter(request, response);
    }

    @Override
    public void destroy() {
        // TODO Auto-generated method stub
        Filter.super.destroy();
    }

}
监听器:
public class MyListener implements  ServletContextListener{

    @Override
    public void contextInitialized(ServletContextEvent sce) {
        // TODO Auto-generated method stub
        System.out.println("Listener开启");
    }

    @Override
    public void contextDestroyed(ServletContextEvent sce) {
        // TODO Auto-generated method stub
        System.out.println("Listener关闭");
    }
}
Servlet:
public class MyServlet extends HttpServlet{

    @Override
    protected void doGet(HttpServletRequest req, HttpServletResponse resp) throws ServletException, IOException {
        // TODO Auto-generated method stub
        doPost(req, resp);
    }

    @Override
    protected void doPost(HttpServletRequest req, HttpServletResponse resp) throws ServletException, IOException {
        // TODO Auto-generated method stub
        resp.getWriter().write("Hello MyServlet!");
    }

}
将这3大组件分别注入:
@Configuration
public class MyServletConfig {
    @Bean
    public ServletRegistrationBean myServlets() {
        ServletRegistrationBean servletRegistrationBean = new ServletRegistrationBean(new MyServlet(),"/myServlet");
        return servletRegistrationBean;
    }
    @Bean
    public FilterRegistrationBean myFilter() {
        FilterRegistrationBean filterRegistrationBean=new FilterRegistrationBean();
        filterRegistrationBean.setFilter(new MyFilter());
        filterRegistrationBean.setUrlPatterns(Arrays.asList("/hello","/myServlet"));
        return filterRegistrationBean;
    }
    @Bean
    public ServletListenerRegistrationBean myListener() {
        ServletListenerRegistrationBean servletListenerRegistrationBean=new ServletListenerRegistrationBean(new MyListener());
        return servletListenerRegistrationBean;
    }

}
SpringBoot帮我们自动SpringMVC的时候,自动的注册SpringMVC的前端控制器;DIspatcherServlet;
DispatcherServletAutoConfiguration中:
@Bean(name = DEFAULT_DISPATCHER_SERVLET_REGISTRATION_BEAN_NAME)
@ConditionalOnBean(value = DispatcherServlet.class, name =
DEFAULT_DISPATCHER_SERVLET_BEAN_NAME)
public ServletRegistrationBean dispatcherServletRegistration(
      DispatcherServlet dispatcherServlet) {
   ServletRegistrationBean registration = new ServletRegistrationBean(
         dispatcherServlet, this.serverProperties.getServletMapping());
    //默认拦截: /  所有请求;包静态资源,但是不拦截jsp请求;   /*会拦截jsp
    //可以通过server.servletPath来修改SpringMVC前端控制器默认拦截的请求路径

   registration.setName(DEFAULT_DISPATCHER_SERVLET_BEAN_NAME);
   registration.setLoadOnStartup(
         this.webMvcProperties.getServlet().getLoadOnStartup());
   if (this.multipartConfig != null) {
      registration.setMultipartConfig(this.multipartConfig);
   }
   return registration;
}
替代为其他的Servlet容器:
tomcat为默认使用,在pom.xml文件中引入web模块默认就是使用嵌入式的Tomcat作为Servlet容器;
引入Jetty:
<!‐‐ 引入web模块 ‐‐>
<dependency>
   <groupId>org.springframework.boot</groupId>
   <artifactId>spring‐boot‐starter‐web</artifactId>
   <exclusions>
      <exclusion>
         <artifactId>spring‐boot‐starter‐tomcat</artifactId>
         <groupId>org.springframework.boot</groupId>
      </exclusion>
   </exclusions>
</dependency>
<!‐‐引入其他的Servlet容器‐‐>
<dependency>
   <artifactId>spring‐boot‐starter‐jetty</artifactId>
   <groupId>org.springframework.boot</groupId>
</dependency>
引入Undertow是同样的道理;
对于想改容器默认配置的有两种方法:一种是在配置文件通过属性server.xxx或server.tomcatxxx来修改;
另一种是实现实现WebServerFactoryCustomizer接口,重写它的customize()方法,对容器进行定制配置:
/***@Bean
    public WebServerFactoryCustomizer<ConfigurableWebServerFactory> webServerFactoryCustomizer(){
        return new WebServerFactoryCustomizer<ConfigurableWebServerFactory>() {
            @Override
            public void customize(ConfigurableWebServerFactory factory) {
                factory.setPort(8081);
            }
        };
    }***/
至于原理可看下面网站,该内容还是比较重要的,不可忽略;
嵌入式Servlet容器的自动装配原理:
可参考网站:https://www.jianshu.com/p/017a7f40efff
外置的Servlet容器:外面安装Tomcat---应用war包的方式打包;
步骤
1)、必须创建一个war项目;(利用idea创建好目录结构)
2)、将嵌入式的Tomcat指定为provided;
<dependency>
   <groupId>org.springframework.boot</groupId>
   <artifactId>spring‐boot‐starter‐tomcat</artifactId>
   <scope>provided</scope>
</dependency>
3)、必须编写一个SpringBootServletInitializer的子类,并调用configure方法
public class ServletInitializer extends SpringBootServletInitializer {
   @Override
   protected SpringApplicationBuilder configure(SpringApplicationBuilder application) {
       //传入SpringBoot应用的主程序
      return application.sources(SpringBoot04WebJspApplication.class);
   }
}
4)、启动服务器就可以使用;

 浙公网安备 33010602011771号