微信小程序开发完整流程
1. 注册小程序账号
1. 打开微信公众平台,找到注册入口
2.选择账号类型: 小程序
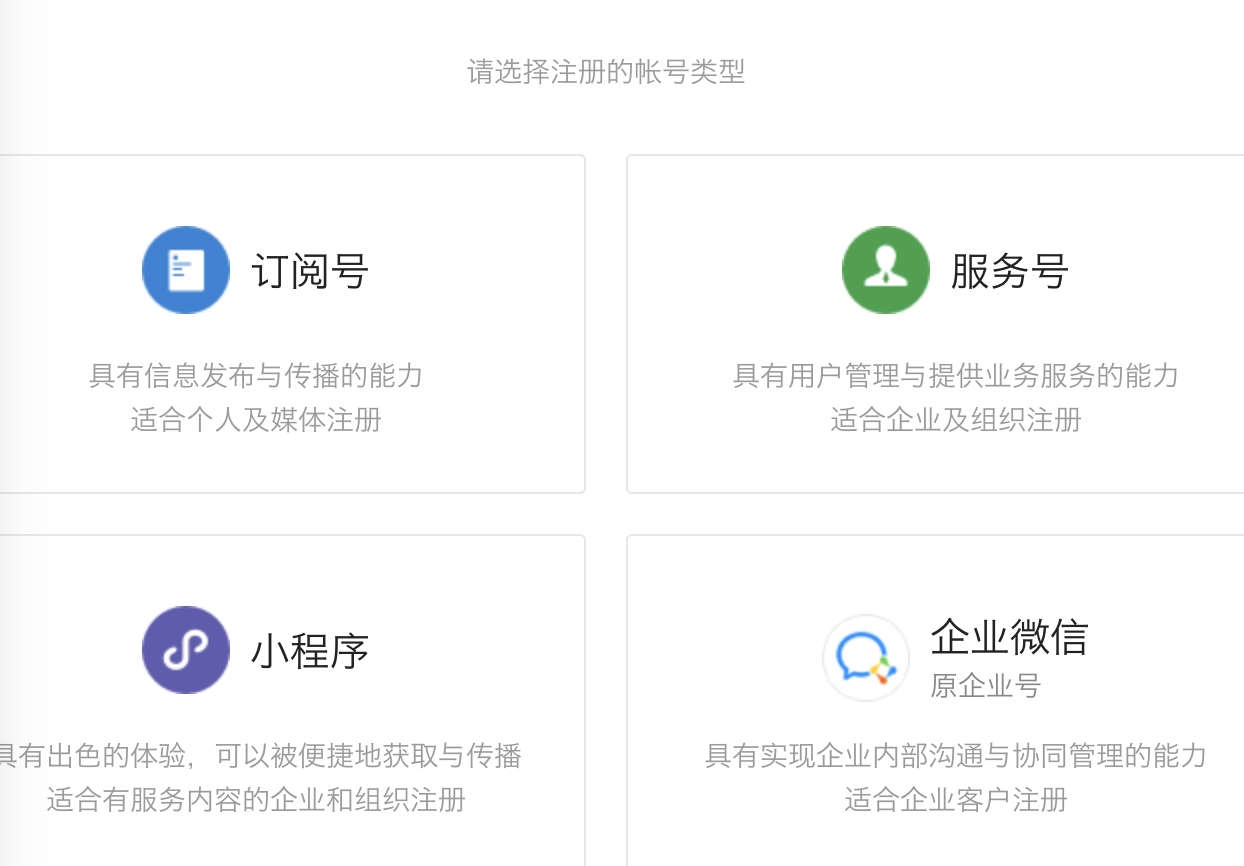
3. 填写注册信息-激活
4. 获取AppID,查看位置(小程序后台->开发)
2. 下载微信小程序开发工具
如果想要使用VSCode编写小程序的代码,需要安装“小程序助手”插件
3. 开发流程
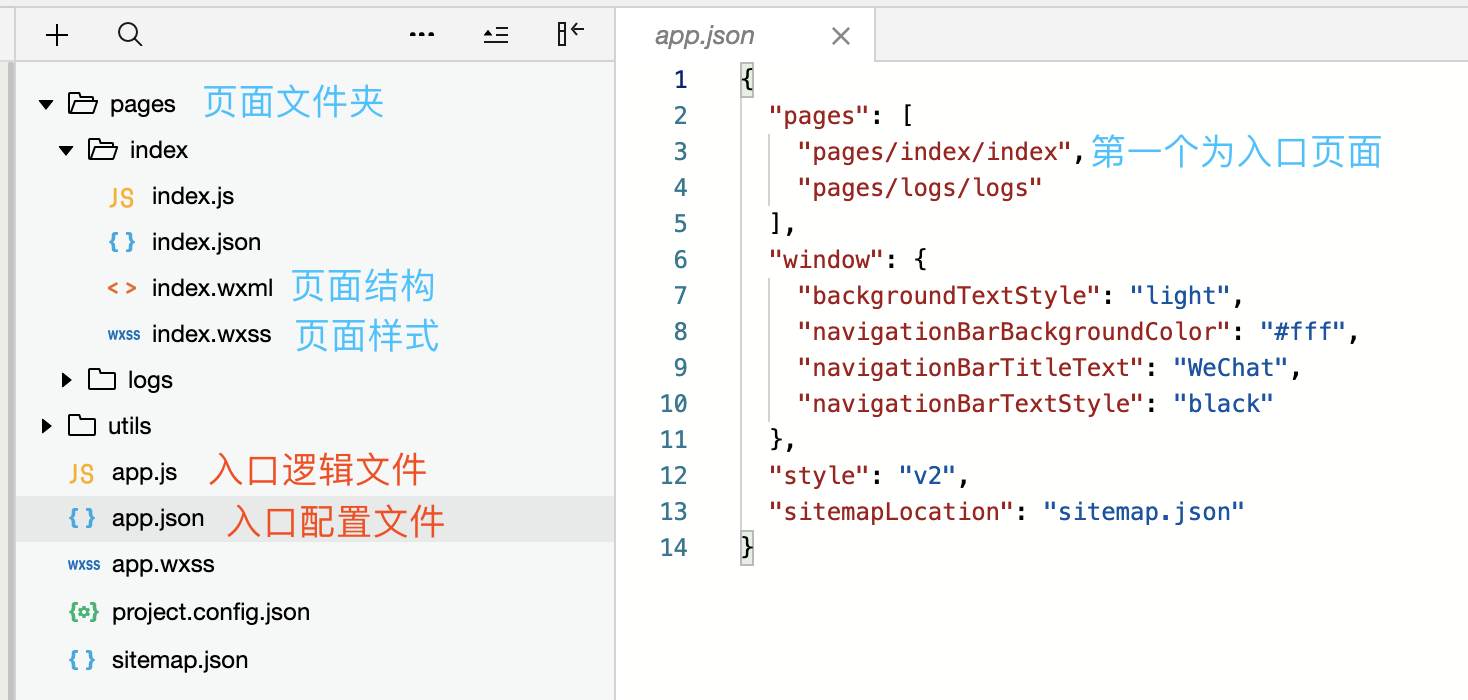
1. 目录结构
.wxml - weixin Markup Language;在.wxml中编写页面结构
<view></view>用于包含代码块
<text></text>包含的文字可以长按选中
2. 判断是否授权
App({
    // 判断是否授权
    wx.getSetting({
      success: res => {
        if (res.authSetting['scope.userInfo']) {
          // 已经授权,可以直接调用 getUserInfo 获取头像昵称,不会弹框
          wx.getUserInfo({
            success: res => {
              // 可以将 res 发送给后台解码出 unionId
              this.globalData.userInfo = res.userInfo

              // 由于 getUserInfo 是网络请求,可能会在 Page.onLoad 之后才返回
              // 所以此处加入 callback 以防止这种情况
              if (this.userInfoReadyCallback) {
                this.userInfoReadyCallback(res)
              }
            }
          })
        }
      }
    })
  },
  globalData: {
    userInfo: null
  }
})
3. 获取用户授权
1. 通过授权按钮申请用户授权
<!--index.wxml-->
<view class="container">
  <view class="userinfo">
    <!--如果已有用户信息则不可见或者用户默认授权-->
    <button wx:if="{{!hasUserInfo && canIUse}}" open-type="getUserInfo" bindgetuserinfo="getUserInfo">授权</button>
    <!--获取用户信息后展示用户头像和昵称-->
    <block wx:else>
      <image bindtap="bindViewTap" class="userinfo-avatar" src="{{userInfo.avatarUrl}}" mode="cover"></image>
      <text class="userinfo-nickname">{{userInfo.nickName}}</text>
    </block>
  </view>
</view>
2. 设置数据初始值
Page({
  data: {
    motto: 'Hello World',
    userInfo: {},
    hasUserInfo: false,
    canIUse: wx.canIUse('button.open-type.getUserInfo')
  }
})
3. 获取授权后给数据赋值
  getUserInfo: function(e) {
    console.log(e)
    app.globalData.userInfo = e.detail.userInfo
    this.setData({
      userInfo: e.detail.userInfo,
      hasUserInfo: true
    })
  }
4. 获取用户信息;兼容没有open-type="getUserInfo"的版本
Page({
  onLoad: function () {
    if (app.globalData.userInfo) {
      this.setData({
        userInfo: app.globalData.userInfo,
        hasUserInfo: true
      })
    } else if (this.data.canIUse){
      // 由于 getUserInfo 是网络请求,可能会在 Page.onLoad 之后才返回
      // 所以此处加入 callback 以防止这种情况
      app.userInfoReadyCallback = res => {
        this.setData({
          userInfo: res.userInfo,
          hasUserInfo: true
        })
      }
    } else {
      // 在没有 open-type=getUserInfo 版本的兼容处理
      wx.getUserInfo({
        success: res => {
          app.globalData.userInfo = res.userInfo
          this.setData({
            userInfo: res.userInfo,
            hasUserInfo: true
          })
        }
      })
    }
  },
})
4. 小程序语法
1. 条件渲染和block组件
block标签相当于ReactJS中的空标签(<></>),不会改变原有的代码结构。
block标签常和if/for联合使用。
示例:
    <button wx:if="{{1!==1}}">1</button>
    <!--else if-->
    <block wx:elif="{{1!==1}}">
      <text>2</text>
    </block>
    <text wx:else>3</text>
2. 事件绑定
  onTapOut(event) {
    console.log('--out--',event.target.id, '---dataset--',event.target.dataset);
    console.log('--out--',event.currentTarget.id, '---dataset--',event.currentTarget.dataset);
  },
  onTapIn(event) {
    console.log('--in--', event.target.id)
    console.log('--in--', event.currentTarget.id)
  },
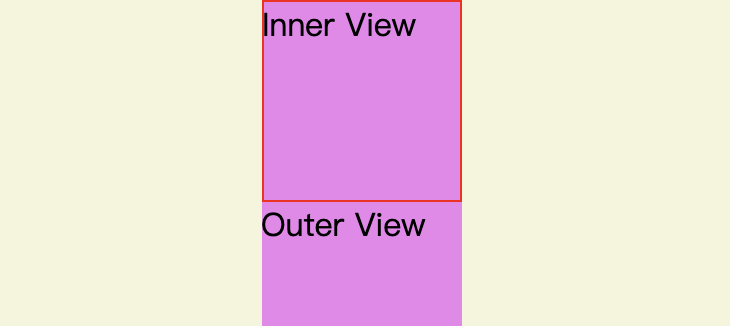
1. bind+事件名:不阻止事件冒泡
  <view data-out="1" id="out" class="test" bindtap="onTapOut">
    <view data-in="2" id="in" bindtap="onTapIn">Inner View</view>Outer View
  </view>
1) 单击Inner View
--in--in
--in--in
--out-- in --dataset-- {in: "2"}
--out-- out --dataset-- {out: "1"}
2) 单击Outer View
--out--out
--out--out
2. catch+事件名:阻止事件冒泡
  <view id="out" class="test" bindtap="onTapOut">
    <view id="in" catchtap="onTapIn">Inner View</view>Outer View
  </view>
1)单击Inner View
--in--in
--in--in
2)单击Outer View
--out--out
--out--out
3. 设置tabBar
在app.json中设置tabBar
  "tabBar": {
    "color": "#aaa", // tabBar默认字体颜色
    "selectedColor": "#333", // 字体选中颜色
    "backgroundColor": "#fff", // 背景颜色
    "borderStyle": "black", // 切换边框颜色;white/black
    "position": "top", // tabBar所处的位置;top/bottom
    "list": [{// 2-5个
      "pagePath": "pages/index/index",
      "text": "首页"
    }, {
      "pagePath": "pages/logs/logs",
      "text":"日志"
    }]
  },
4. 设置导航样式
// app.json中设置
"window": {
    "backgroundTextStyle": "light",
    "navigationBarBackgroundColor": "#fff",
    "navigationBarTitleText": "WeChat",
    "navigationBarTextStyle": "black"
  },
// window下的属性,可以在具体页面中覆盖
// 如:index.json中
{
   "navigationBarTitleText": "首页"
}
5. 轮播图
  <swiper id="swiper"><!--样式只能通过swiper设置-->
    <swiper-item>
      <image src="/images/1.jpg"></image>
    </swiper-item>
    <swiper-item>
      <image src="/images/2.jpg"></image>
    </swiper-item>
  </swiper>
6. 渲染列表
 <!--循环渲染列表时,必须添加key用于提高性能;
       如果列表项是不同的数字或者字符串,可以使用*this
       for-item指定item的变量
-->
 <block wx:key="*this" wx:for="{{logs}}" wx:for-item="log">
    <text class="log-item">{{index + 1}}. {{log}}</text>
  </block>
7. 页面跳转
    // 跳转后左上角带有返回按钮
    wx.navigateTo({
      url: '../logs/logs'
    })
    // 跳转后左上角是首页按钮
    wx.redirectTo({
      url: '../logs/logs',
    })
    // 跳转到tabBar的页面
    wx.switchTab({
      url: '../logs/logs',
    })
8. 页面生命周期
onLoad(options) { // 页面首次加载触发(只一次);可以接收页面跳转时携带的查询参数
}
onReady() { // 页面首次加载时触发(只一次)
}
onShow() {
 //每次显示该页面触发
}
onHide() {
 // 每次隐藏的时候触发
}
onPullDownRefresh() {
   // 监听用户下拉事件
}
onReachBottom() {
  // 监听上拉触底事件
}
// 设置该函数后,该页面存在分享功能
onShareAppMessage() {
  // 设置分享的具体信息
  return {
     title: "分享信息",
     imageUrl: '',
     path: ''
  }
}
4. 高级用法
1. wx.request的promise封装
import BASE_URL from './config.js';
export default function request(url, data, header, method) {
  return new Promise((resolve, reject) => {
    wx.request({
      url: BASE_URL + url,
      data,
      header,
      method,
      dataType: 'json',
      responseType: 'text',
      success: function(res) {
        console.log(res);
        if (res) {
          resolve(res.data)
          // 还需进行详细的状态码区分
        }
      },
      fail: function(res) {
        reject(res);
        // 请求接口失败,一般是网络异常等;404/500都是success回调返回的状态码
      },
      complete: function(res) {
        // 无论成功失败都会触发
      },
    })
  });
}
2. webView组件
<web-view src="{{h5Src}}"></web-view>
Page({
  data: {
    h5Src: ""
  },
  onLoad(options) {
    const { url } = options;
    this.setData({
      h5Src: decodeURIComponent(url)
    })
  }
})
跳转函数
  toView() {
    let url = "https://v.youku.com/v_show";
    wx.navigateTo({
      url: '/pages/webView/webView?url=' + encodeURIComponent(url),
    })
  },
3. 选择通信地址
    // 选择通信地址
    wx.chooseAddress({
      success(res) {
        console.log(res)
      }
    })
4. 选择/获取定位
  onChooseLocation() {
    // 弹出地图选择当前所在的位置
    wx.chooseLocation({
      success: function(res) {
      },
    })
  },
  onGetLocation() {
    // 获取位置坐标信息
    wx.getLocation({
      success: function(res) {
        console.log(res)
        // 在地图中定位当前位置
        wx.openLocation({
          latitude: res.latitude,
          longitude: res.longitude,
        })
      },
    })
  },

 浙公网安备 33010602011771号