上传图片获取base64编码、本地预览
一、读取文件的对象 — new FileReader()
上传图片接口参数有图片base64编码(数组, imgBase64List ),主要用到 读取文件的对象 【 new FileReader() 】
   //获取文件
    var file = $("#imgForm").find("input")[0].files[0];

    //创建读取文件的对象
    var reader = new FileReader();

    //创建文件读取相关的变量
    var imgFile;

    //为文件读取成功设置事件
    reader.onload=function(e) {
        alert('文件读取完成');
        imgFile = e.target.result;
        console.log(imgFile);
        $("#imgContent").attr('src', imgFile);  // 可以直接显示图片
    };

    //正式读取文件
    reader.readAsDataURL(file);
二、我的实例
1、页面上放上传按钮和图片预览区
<div class="row">
    <div class="col-md-6">
        <form name="form" id="formData">
             <strong>上传凭证:</strong>
             <input type="file" name="photo" id="photo" style="display:none;">
              <button type="button" class="btn btn-primary" ng-click="fileClick();">点击上传</button>
         </form>
     </div>
</div><br>
<div class="row" id="uploadPreview">

</div>
2、js实现
           /*订单,上传凭证*/
            var imgBase64Lists = [];  // imgBase64List 数组

            // 打开上传凭证模态框
            $scope.orderUploadModel = function ($index) {
                $scope.modalTitleShowSta = 8;
                $('#uploadPreview').empty('');
                imgBase64Lists = [];
                $scope.picUpload = $scope.orderInfoList[$index];  //当前订单信息
                $("#orderInfoDetailModel").modal("show");
            };

            // 模拟触发点击 隐藏的[type=file]按钮
            $scope.fileClick = function () {
                $('#photo').click();
            };

            // 每次选择图片都触发base64
            $('#photo').change(function () {
                dealWithPic('uploadPreview','photo');
            });

            function dealWithPic(preview,photo) {  // 预览框id , 上传按钮id
                var file = document.getElementById(photo).files[0];  //获取文件
                if (file) {
                    var reader = new FileReader();  //创建读取文件的对象
                    reader.onload = function(evt) {
                        $('#'+preview).append('<img src="' + evt.target.result + '" style="width: 200px;height: 200px;margin: 10px;"/>');
                       // imgBase64Lists.push(reader.result);
                       imgBase64Lists.push((reader.result).split(',')[1]);
                    };
                    reader.readAsDataURL(file);
               } else {
                    alert('上传失败,请重新上传!');
               }
           }
3、效果图
 点击上传图片:
4、查看图片的 base64 编码
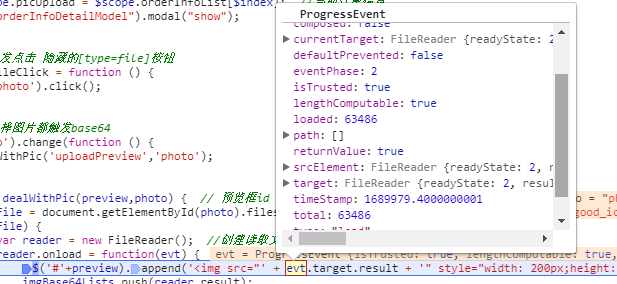 target 是当前图片的信息:
确定上传之后,可以看到传递过去的参数 imgBase64List(我上传了3张):

可以上网找在线的图片转base64的工具,我找到一个(http://imgbase64.duoshitong.com/),把我刚刚上传的图片放进去试了下,base64编码和请求里面的一样。
5、解决 下载接口返回的图片路径,显示“不支持的图片格式”
在 上面4 中我们也看了传过去的 base64 编码,但是貌似后台没有进行处理,是直接拿这个用的,所以就会导致 下载接口返回的图片路径,显示“不支持的图片格式”的问题,后来把 上面2 中 reader.result 截取一下,只传 ‘,’后面的编码,将后台返回的图片路径拼接上域名,在浏览器下载后双击图片展示出来,是我上传的图片,问题就解决了。。。

 浙公网安备 33010602011771号