

Springboot + Spring Security 最通俗易懂(傻瓜模式版)
- Springboot + Spring Security
Springboot + Spring Security
转载自https://blog.csdn.net/I_am_Hutengfei/article/details/100561564
第一次发布博客,虽然百分之90转载至置顶链接,百分之10对其中做了一点让自己舒服的修改!看过无数关于Spring Security的帖子和视频,觉得这个是最适合新手入门的一篇帖子,修正原博主数据库的字段和实体类属性名,也将自己学习原贴遇到的一些问题,在原贴上做了修改。文章几乎都是原贴的,只有列举的代码上有细微的差异!希望对大家学习有帮助!
一、准备工作
1、统一错误码枚举
/**
 * @Author: Hutengfei
 * @Description: 返回码定义
 * 规定:
 * #1表示成功
 * #1001~1999 区间表示参数错误
 * #2001~2999 区间表示用户错误
 * #3001~3999 区间表示接口异常
 * @Date Create in 2019/7/22 19:28
 */
public enum ResultCode {
    /* 成功 */
    SUCCESS(200, "成功"),

    /* 默认失败 */
    COMMON_FAIL(999, "失败"),

    /* 参数错误:1000~1999 */
    PARAM_NOT_VALID(1001, "参数无效"),
    PARAM_IS_BLANK(1002, "参数为空"),
    PARAM_TYPE_ERROR(1003, "参数类型错误"),
    PARAM_NOT_COMPLETE(1004, "参数缺失"),

    /* 用户错误 */
    USER_NOT_LOGIN(2001, "用户未登录"),
    USER_ACCOUNT_EXPIRED(2002, "账号已过期"),
    USER_CREDENTIALS_ERROR(2003, "密码错误"),
    USER_CREDENTIALS_EXPIRED(2004, "密码过期"),
    USER_ACCOUNT_DISABLE(2005, "账号不可用"),
    USER_ACCOUNT_LOCKED(2006, "账号被锁定"),
    USER_ACCOUNT_NOT_EXIST(2007, "账号不存在"),
    USER_ACCOUNT_ALREADY_EXIST(2008, "账号已存在"),
    USER_ACCOUNT_USE_BY_OTHERS(2009, "账号下线"),

    /* 业务错误 */
    NO_PERMISSION(3001, "没有权限");
    private Integer code;
    private String message;

    ResultCode(Integer code, String message) {
        this.code = code;
        this.message = message;
    }

    public Integer getCode() {
        return code;
    }

    public void setCode(Integer code) {
        this.code = code;
    }

    public String getMessage() {
        return message;
    }

    public void setMessage(String message) {
        this.message = message;
    }

    /**
     * 根据code获取message
     *
     * @param code
     * @return
     */
    public static String getMessageByCode(Integer code) {
        for (ResultCode ele : values()) {
            if (ele.getCode().equals(code)) {
                return ele.getMessage();
            }
        }
        return null;
    }
}
2、统一json返回体
/**
 * @Author: Hutengfei
 * @Description: 统一返回实体
 * @Date Create in 2019/7/22 19:20
 */
public class JsonResult<T> implements Serializable {

    private Boolean success;
    //异常编码
    private Integer errorCode;
    //异常提示
    private String errorMsg;
    //返回数据
    private T data;

    public JsonResult() {
    }

    public JsonResult(boolean success) {
        this.success = success;
        this.errorCode = success ? ResultCode.SUCCESS.getCode() : ResultCode.COMMON_FAIL.getCode();
        this.errorMsg = success ? ResultCode.SUCCESS.getMessage() : ResultCode.COMMON_FAIL.getMessage();
    }

    public JsonResult(boolean success, ResultCode resultEnum) {
        this.success = success;
        this.errorCode = success ? ResultCode.SUCCESS.getCode() : (resultEnum == null ? ResultCode.COMMON_FAIL.getCode() : resultEnum.getCode());
        this.errorMsg = success ? ResultCode.SUCCESS.getMessage() : (resultEnum == null ? ResultCode.COMMON_FAIL.getMessage() : resultEnum.getMessage());
    }

    public JsonResult(boolean success, T data) {
        this.success = success;
        this.errorCode = success ? ResultCode.SUCCESS.getCode() : ResultCode.COMMON_FAIL.getCode();
        this.errorMsg = success ? ResultCode.SUCCESS.getMessage() : ResultCode.COMMON_FAIL.getMessage();
        this.data = data;
    }

    public JsonResult(boolean success, ResultCode resultEnum, T data) {
        this.success = success;
        this.errorCode = success ? ResultCode.SUCCESS.getCode() : (resultEnum == null ? ResultCode.COMMON_FAIL.getCode() : resultEnum.getCode());
        this.errorMsg = success ? ResultCode.SUCCESS.getMessage() : (resultEnum == null ? ResultCode.COMMON_FAIL.getMessage() : resultEnum.getMessage());
        this.data = data;
    }

    public Boolean getSuccess() {
        return success;
    }

    public void setSuccess(Boolean success) {
        this.success = success;
    }

    public Integer getErrorCode() {
        return errorCode;
    }

    public void setErrorCode(Integer errorCode) {
        this.errorCode = errorCode;
    }

    public String getErrorMsg() {
        return errorMsg;
    }

    public void setErrorMsg(String errorMsg) {
        this.errorMsg = errorMsg;
    }

    public T getData() {
        return data;
    }

    public void setData(T data) {
        this.data = data;
    }
}
3、返回体构造工具
/**
 * @Author: Hutengfei
 * @Description:
 * @Date Create in 2019/7/22 19:52
 */
public class ResultTool {
    public static JsonResult success() {
        return new JsonResult(true);
    }

    public static <T> JsonResult<T> success(T data) {
        return new JsonResult(true, data);
    }

    public static JsonResult fail() {
        return new JsonResult(false);
    }

    public static JsonResult fail(ResultCode resultEnum) {
        return new JsonResult(false, resultEnum);
    }
}
4、pom
<dependencies>

		<dependency>
			<groupId>org.springframework.boot</groupId>
			<artifactId>spring-boot-starter-security</artifactId>
		</dependency>

		<dependency>
			<groupId>org.springframework.boot</groupId>
			<artifactId>spring-boot-starter-thymeleaf</artifactId>
		</dependency>

		<dependency>
			<groupId>org.springframework.boot</groupId>
			<artifactId>spring-boot-starter-web</artifactId>
		</dependency>

		<dependency>
			<groupId>org.mybatis.spring.boot</groupId>
			<artifactId>mybatis-spring-boot-starter</artifactId>
			<version>2.1.2</version>
		</dependency>

		<dependency>
			<groupId>mysql</groupId>
			<artifactId>mysql-connector-java</artifactId>
			<scope>runtime</scope>
		</dependency>

		<dependency>
			<groupId>org.projectlombok</groupId>
			<artifactId>lombok</artifactId>
			<optional>true</optional>
		</dependency>

		<!--JSON-->
		<dependency>
			<groupId>com.alibaba</groupId>
			<artifactId>fastjson</artifactId>
			<version>1.1.23</version>
		</dependency>

		<dependency>
			<groupId>org.springframework.boot</groupId>
			<artifactId>spring-boot-starter-test</artifactId>
			<scope>test</scope>
			<exclusions>
				<exclusion>
					<groupId>org.junit.vintage</groupId>
					<artifactId>junit-vintage-engine</artifactId>
				</exclusion>
			</exclusions>
		</dependency>
	</dependencies>
5、配置文件
spring:
  datasource:
    username: your username
    password: your password
    url: jdbc:mysql://localhost:3306/security?useUnicode=true&characterEncoding=UTF-8&serverTimezone=GMT%2B8
mybatis:
  type-aliases-package: com.lyn.security.pojo
  mapper-locations: classpath:mapper/*.xml
server:
  port: 8666
  compression:
    enabled: true
二、数据库表设计
建表及初始化数据语句
/*
 Navicat Premium Data Transfer

 Source Server         : lyn
 Source Server Type    : MySQL
 Source Server Version : 80019
 Source Host           : 139.9.199.5:3306
 Source Schema         : security

 Target Server Type    : MySQL
 Target Server Version : 80019
 File Encoding         : 65001

 Date: 27/04/2020 09:54:10
*/

SET NAMES utf8mb4;
SET FOREIGN_KEY_CHECKS = 0;

-- ----------------------------
-- Table structure for sys_permission 权限表
-- ----------------------------
DROP TABLE IF EXISTS `sys_permission`;
CREATE TABLE `sys_permission`  (
  `id` int(0) NOT NULL AUTO_INCREMENT COMMENT '主键id',
  `permission_code` varchar(32) CHARACTER SET utf8 COLLATE utf8_general_ci NULL DEFAULT NULL COMMENT '权限code',
  `permission_name` varchar(32) CHARACTER SET utf8 COLLATE utf8_general_ci NULL DEFAULT NULL COMMENT '权限名',
  PRIMARY KEY (`id`) USING BTREE
) ENGINE = InnoDB AUTO_INCREMENT = 5 CHARACTER SET = utf8 COLLATE = utf8_general_ci COMMENT = '权限表' ROW_FORMAT = Dynamic;

-- ----------------------------
-- Records of sys_permission 权限表数据
-- ----------------------------
INSERT INTO `sys_permission` VALUES (1, 'create_user', '创建用户');
INSERT INTO `sys_permission` VALUES (2, 'query_user', '查看用户');
INSERT INTO `sys_permission` VALUES (3, 'delete_user', '删除用户');
INSERT INTO `sys_permission` VALUES (4, 'modify_user', '修改用户');

-- ----------------------------
-- Table structure for sys_request_path 路径表
-- ----------------------------
DROP TABLE IF EXISTS `sys_request_path`;
CREATE TABLE `sys_request_path`  (
  `id` int(0) NOT NULL AUTO_INCREMENT COMMENT '主键id',
  `url` varchar(64) CHARACTER SET utf8 COLLATE utf8_general_ci NOT NULL COMMENT '请求路径',
  `description` varchar(128) CHARACTER SET utf8 COLLATE utf8_general_ci NULL DEFAULT NULL COMMENT '路径描述',
  PRIMARY KEY (`id`) USING BTREE
) ENGINE = InnoDB AUTO_INCREMENT = 2 CHARACTER SET = utf8 COLLATE = utf8_general_ci COMMENT = '请求路径' ROW_FORMAT = Dynamic;

-- ----------------------------
-- Records of sys_request_path 路径表数据
-- ----------------------------
INSERT INTO `sys_request_path` VALUES (1, '/getUser', '查询用户');

-- ----------------------------
-- Table structure for sys_request_path_permission_relation  权限路径中间表
-- ----------------------------
DROP TABLE IF EXISTS `sys_request_path_permission_relation`;
CREATE TABLE `sys_request_path_permission_relation`  (
  `id` int(0) NOT NULL AUTO_INCREMENT COMMENT '主键id',
  `url_id` int(0) NULL DEFAULT NULL COMMENT '请求路径id',
  `permission_id` int(0) NULL DEFAULT NULL COMMENT '权限id',
  PRIMARY KEY (`id`) USING BTREE
) ENGINE = InnoDB AUTO_INCREMENT = 2 CHARACTER SET = utf8 COLLATE = utf8_general_ci COMMENT = '路径权限关联表' ROW_FORMAT = Dynamic;

-- ----------------------------
-- Records of sys_request_path_permission_relation 权限路径中间表数据
-- ----------------------------
INSERT INTO `sys_request_path_permission_relation` VALUES (1, 1, 2);

-- ----------------------------
-- Table structure for sys_role 角色表
-- ----------------------------
DROP TABLE IF EXISTS `sys_role`;
CREATE TABLE `sys_role`  (
  `id` int(0) NOT NULL AUTO_INCREMENT COMMENT '主键id',
  `role_code` varchar(32) CHARACTER SET utf8 COLLATE utf8_general_ci NULL DEFAULT NULL,
  `role_name` varchar(32) CHARACTER SET utf8 COLLATE utf8_general_ci NULL DEFAULT NULL COMMENT '角色名',
  `role_description` varchar(64) CHARACTER SET utf8 COLLATE utf8_general_ci NULL DEFAULT NULL COMMENT '角色说明',
  PRIMARY KEY (`id`) USING BTREE
) ENGINE = InnoDB AUTO_INCREMENT = 3 CHARACTER SET = utf8 COLLATE = utf8_general_ci COMMENT = '用户角色表' ROW_FORMAT = Dynamic;

-- ----------------------------
-- Records of sys_role 角色表数据
-- ----------------------------
INSERT INTO `sys_role` VALUES (1, 'admin', '管理员', '管理员,拥有所有权限');
INSERT INTO `sys_role` VALUES (2, 'user', '普通用户', '普通用户,拥有部分权限');

-- ----------------------------
-- Table structure for sys_role_permission_relation 角色权限中间表
-- ----------------------------
DROP TABLE IF EXISTS `sys_role_permission_relation`;
CREATE TABLE `sys_role_permission_relation`  (
  `id` int(0) NOT NULL AUTO_INCREMENT COMMENT '主键id',
  `role_id` int(0) NULL DEFAULT NULL COMMENT '角色id',
  `permission_id` int(0) NULL DEFAULT NULL COMMENT '权限id',
  PRIMARY KEY (`id`) USING BTREE
) ENGINE = InnoDB AUTO_INCREMENT = 7 CHARACTER SET = utf8 COLLATE = utf8_general_ci COMMENT = '角色-权限关联关系表' ROW_FORMAT = Dynamic;

-- ----------------------------
-- Records of sys_role_permission_relation 角色权限中间表数据
-- ----------------------------
INSERT INTO `sys_role_permission_relation` VALUES (1, 1, 1);
INSERT INTO `sys_role_permission_relation` VALUES (2, 1, 2);
INSERT INTO `sys_role_permission_relation` VALUES (3, 1, 3);
INSERT INTO `sys_role_permission_relation` VALUES (4, 1, 4);
INSERT INTO `sys_role_permission_relation` VALUES (5, 2, 1);
INSERT INTO `sys_role_permission_relation` VALUES (6, 2, 2);

-- ----------------------------
-- Table structure for sys_user 用户表
-- ----------------------------
DROP TABLE IF EXISTS `sys_user`;
CREATE TABLE `sys_user`  (
  `id` int(0) NOT NULL AUTO_INCREMENT,
  `account` varchar(32) CHARACTER SET utf8 COLLATE utf8_general_ci NOT NULL COMMENT '账号',
  `user_name` varchar(32) CHARACTER SET utf8 COLLATE utf8_general_ci NOT NULL COMMENT '用户名',
  `password` varchar(64) CHARACTER SET utf8 COLLATE utf8_general_ci NULL DEFAULT NULL COMMENT '用户密码',
  `last_login_time` datetime(0) NULL DEFAULT NULL COMMENT '上一次登录时间',
  `enabled` tinyint(1) NULL DEFAULT 1 COMMENT '账号是否可用。默认为1(可用)',
  `account_non_expired` tinyint(1) NULL DEFAULT 1 COMMENT '是否过期。默认为1(没有过期)',
  `account_non_locked` tinyint(1) NULL DEFAULT 1 COMMENT '账号是否锁定。默认为1(没有锁定)',
  `credentials_non_expired` tinyint(1) NULL DEFAULT 1 COMMENT '证书(密码)是否过期。默认为1(没有过期)',
  `create_time` datetime(0) NULL DEFAULT NULL COMMENT '创建时间',
  `update_time` datetime(0) NULL DEFAULT NULL COMMENT '修改时间',
  `create_user` int(0) NULL DEFAULT NULL COMMENT '创建人',
  `update_user` int(0) NULL DEFAULT NULL COMMENT '修改人',
  PRIMARY KEY (`id`) USING BTREE
) ENGINE = InnoDB AUTO_INCREMENT = 3 CHARACTER SET = utf8 COLLATE = utf8_general_ci COMMENT = '用户表' ROW_FORMAT = Dynamic;

-- ----------------------------
-- Records of sys_user 用户表数据
-- ----------------------------
INSERT INTO `sys_user` VALUES (1, 'user1', '用户1', '$2a$10$47lsFAUlWixWG17Ca3M/r.EPJVIb7Tv26ZaxhzqN65nXVcAhHQM4i', '2019-09-04 20:25:36', 1, 1, 1, 1, '2019-08-29 06:28:36', '2019-09-04 20:25:36', 1, 1);
INSERT INTO `sys_user` VALUES (2, 'user2', '用户2', '$2a$10$uSLAeON6HWrPbPCtyqPRj.hvZfeM.tiVDZm24/gRqm4opVze1cVvC', '2019-09-05 00:07:12', 1, 1, 1, 1, '2019-08-29 06:29:24', '2019-09-05 00:07:12', 1, 2);

-- ----------------------------
-- Table structure for sys_user_role_relation 用户角色中间表
-- ----------------------------
DROP TABLE IF EXISTS `sys_user_role_relation`;
CREATE TABLE `sys_user_role_relation`  (
  `id` int(0) NOT NULL AUTO_INCREMENT COMMENT '主键id',
  `user_id` int(0) NULL DEFAULT NULL COMMENT '用户id',
  `role_id` int(0) NULL DEFAULT NULL COMMENT '角色id',
  PRIMARY KEY (`id`) USING BTREE
) ENGINE = InnoDB AUTO_INCREMENT = 3 CHARACTER SET = utf8 COLLATE = utf8_general_ci COMMENT = '用户角色关联关系表' ROW_FORMAT = Dynamic;

-- ----------------------------
-- Records of sys_user_role_relation 用户角色中间表数据
-- ----------------------------
INSERT INTO `sys_user_role_relation` VALUES (1, 1, 1);
INSERT INTO `sys_user_role_relation` VALUES (2, 2, 2);

SET FOREIGN_KEY_CHECKS = 1;
创建对应实体类
本文因为引用了lombok,所以所有的get/set都直接用@Data注解
/**
 * 用户表
 */
@Data
public class SysUser {

  private String id;

  private String account; //账号

  private String userName; //用户名

  private String password; //密码

  private String lastLoginTime;//上一次登录时间

  private boolean enabled;//账号是否可用。默认为1(可用)

  private boolean accountNonExpired;//是否过期。默认为1(没有过期)

  private boolean accountNonLocked;//账号是否锁定。默认为1(没有锁定)

  private boolean credentialsNonExpired;//证书(密码)是否过期。默认为1(没有过期)

  private String createTime;//创建时间

  private String updateTime;//修改时间

  private String createUser;//创建人

  private String updateUser;//修改人

}
/**
 * 角色表
 */
@Data
public class SysRole {

  private long id;

  private String roleCode;

  private String roleName;//角色名

  private String roleDescription;//角色说明

}
/**
 * 权限表
 */
@Data
public class SysPermission {

  private long id;

  private String permissionCode; //权限code

  private String permissionName; // 权限名
}
三、Spring Security核心配置:WebSecurityConfig
1、创建WebSecurityConfig继承WebSecurityConfigurerAdapter类,
2、实现configure(AuthenticationManagerBuilder auth)和 configure(HttpSecurity http)方法。后续我们会在里面加入一系列配置,包括配置认证方式、登入登出、异常处理、会话管理等。
@Configuration
@EnableWebSecurity
public class WebSecurityConfig extends WebSecurityConfigurerAdapter {
    @Override
    protected void configure(AuthenticationManagerBuilder auth) throws Exception {
        //配置认证方式等
        super.configure(auth);
    }

    @Override
    protected void configure(HttpSecurity http) throws Exception {
        //http相关的配置,包括登入登出、异常处理、会话管理等
        super.configure(http);
    }
}
四、用户登录认证逻辑:UserDetailsService
1、创建自定义的UserDetailsService
这是实现自定义用户认证的核心逻辑,loadUserByUsername(String username)的参数就是登录时提交的用户名,返回类型是一个叫UserDetails 的接口,需要在这里构造出他的一个实现类User,这是Spring security提供的用户信息实体。
public class UserDetailsServiceImpl  implements UserDetailsService {
    @Override
    public UserDetails loadUserByUsername(String username) throws UsernameNotFoundException {
        //需要构造出 org.springframework.security.core.userdetails.User 对象并返回
        return null;
    }
}
这里我们使用他的一个参数比较详细的构造函数,源码如下
User(String username, /* 用户名*/
     String password, /*密码*/
     boolean enabled, /*账号是否可用*/
     boolean accountNonExpired, /*账号是否过期*/
     boolean credentialsNonExpired, /*密码是否过期*/
     boolean accountNonLocked, /*账号是否锁定*/
     Collection<? extends GrantedAuthority> authorities)/*用户权限列表*/
这就与我们的创建的用户表的字段对应起来了,Spring security都为我们封装好了,如果用户信息的状态异常,登录时则会抛出相应的异常,根据捕获到的异常判断是什么原因(账号过期/密码过期/账号锁定等等…),进而就可以提示前台了。
我们就按照该参数列表构造出我们所需要的数据,然后返回,就完成了基于JDBC的自定义用户认证。
首先用户名密码以及用户状态信息都是从用户表里进行单表查询来的,而权限列表则是通过用户表、角色表以及权限表等关联查出来的,那么接下来就是准备service和dao层方法了
2、准备service和dao层方法
(1) 据用户名查询用户信息
dao层接口
@Mapper
public interface SysUserMapper {

    /**
     * 通过用户username查询用户
     * @param username
     * @return
     */
    SysUser selectByName(String username);

}
映射xml
<!--根据用户名查询用户-->
	<select id="selectByName" parameterType="String" resultMap="resultSysUserMap">
        select * from sys_user where account = #{userName};
    </select>
resultType可以把查询结果封装到pojo类型中,但必须pojo类的属性名和查询到的数据库表的字段名一致。
如果sql查询到的字段与pojo的属性名不一致,则需要使用resultMap将字段名和属性名对应起来,进行手动配置封装,将结果映射到pojo中
<resultMap id="resultSysUserMap" type="SysUser">
		<id property="id" column="id" />
		<result property="account" column="account" />
		<result property="userName" column="user_name" />
		<result property="password" column="password" />
		<result property="lastLoginTime" column="last_login_time" />
		<result property="enabled" column="enabled" />
		<result property="accountNonExpired" column="account_non_expired" />
		<result property="accountNonLocked" column="account_non_locked" />
		<result property="credentialsNonExpired" column="credentials_non_expired" />
		<result property="createTime" column="create_time" />
		<result property="updateTime" column="update_time" />
		<result property="createUser" column="create_user" />
		<result property="updateUser" column="update_user" />
	</resultMap>
service实现类
@Service
public class SysUserServiceImpl implements SysUserService {

    @Resource
    private SysUserMapper sysUserMapper;

    /**
     * 实现SysUserService接口根据用户名查询用户功能
     * @param userName
     * @return
     */
    @Override
    public SysUser selectByName(String userName) {
        return sysUserMapper.selectByName(userName);
    }

}
(2) 根据用户名查询用户的权限信息
dao层接口
@Mapper
public interface SysPermissionMapper {

    /**
     * 根据用户id查询
     * @param id
     * @return
     */
    List<SysPermission> selectListByUser(String id);

}
映射xml
<resultMap id="resultSysPermissionMap" type="SysPermission">
   <id property="id" column="id" />
   <result property="permissionCode" column="permission_code" />
   <result property="permissionName" column="permission_name" />
</resultMap>
<!--根据用户ID 查询所有权限-->
<select id="selectListByUser" parameterType="String" resultMap="resultSysPermissionMap">
         SELECT
            p.*
         FROM
            sys_user AS u
         LEFT JOIN
            sys_user_role_relation AS ur
         ON
            u.id = ur.user_id
         LEFT JOIN
            sys_role AS r
         ON
            r.id = ur.role_id
         LEFT JOIN
            sys_role_permission_relation AS rp
         ON
            r.id = rp.role_id
         LEFT JOIN
            sys_permission AS p
         ON
            p.id = rp.permission_id
         WHERE
            u.id = #{userId}
   </select>
@Service
public class SysPermissionServiceImpl implements SysPermissionService {

    @Resource
    private SysPermissionMapper sysPermissionMapper;

    /**
     * 实现接口查询用户的权限列表
     * @param userId
     * @return
     */
    @Override
    public List<SysPermission> selectListByUser(String userId) {
        return sysPermissionMapper.selectListByUser(use
    }
}
这样的话流程我们就理清楚了,首先根据用户名查出对应用户,再拿得到的用户的用户id去查询它所拥有的的权限列表,最后构造出我们需要的org.springframework.security.core.userdetails.User对象。
接下来改造一下刚刚自定义的UserDetailsService
@Service
public class UserDetailsServiceImpl  implements UserDetailsService {
    @Autowired
    private SysUserService sysUserService;
    @Autowired
    private SysPermissionService sysPermissionService;

    @Override
    public UserDetails loadUserByUsername(String username) throws UsernameNotFoundException {
        if (username == null || "".equals(username)) {
            throw new RuntimeException("用户不能为空");
        }
        //根据用户名查询用户
        SysUser sysUser = sysUserService.selectByName(username);
        if (sysUser == null) {
            throw new RuntimeException("用户不存在");
        }
        List<GrantedAuthority> grantedAuthorities = new ArrayList<>();
        if (sysUser != null) {
            //获取该用户所拥有的权限
            List<SysPermission> sysPermissions = sysPermissionService.selectListByUser(sysUser.getId());
            // 声明用户授权
            sysPermissions.forEach(sysPermission -> {
                GrantedAuthority grantedAuthority = new SimpleGrantedAuthority(sysPermission.getPermissionCode());
                grantedAuthorities.add(grantedAuthority);
            });
        }
        return new User(sysUser.getAccount(), sysUser.getPassword(), sysUser.isEnabled(), sysUser.isAccountNonExpired(), sysUser.isCredentialsNonExpired(), sysUser.isAccountNonLocked(), grantedAuthorities);
    }
}
然后将我们的自定义的基于JDBC的用户认证在之前创建的WebSecurityConfig 中得configure(AuthenticationManagerBuilder auth)中声明一下,到此自定义的基于JDBC的用户认证就完成了
    @Bean
    public UserDetailsService userDetailsService() {
        //获取用户账号密码及权限信息
        return new UserDetailsServiceImpl();
    }

    @Override
    protected void configure(AuthenticationManagerBuilder auth) throws Exception {
        //配置认证方式等
        auth.userDetailsService(userDetailsService());
    }
五、用户密码加密
新版本的Spring security规定必须设置一个默认的加密方式,不允许使用明文。这个加密方式是用于在登录时验证密码、注册时需要用到。
我们可以自己选择一种加密方式,Spring security为我们提供了多种加密方式,我们这里使用一种强hash方式进行加密。
在WebSecurityConfig 中注入(注入即可,不用声明使用),这样就会对提交的密码进行加密处理了,如果你没有注入加密方式,运行的时候会报错"There is no PasswordEncoder mapped for the id"错误。
六、屏蔽Spring Security默认重定向登录页面以实现前后端分离功能
在演示登录之前我们先编写一个查询接口"/getUser",并将"/getUser"接口规定为需要拥有"query_user"权限的用户可以访问,并在角色-权限关联关系表中给user1用户所属角色(role_id = 1)添加权限"query_user"
然后规定接口"/getUser"只能是拥有"query_user"权限的用户可以访问。后面我们基本都用这个查询接口作为演示,就叫它"资源接口"吧。
 	@Override
    protected void configure(HttpSecurity http) throws Exception {
        //http相关的配置,包括登入登出、异常处理、会话管理等
        http
                .authorizeRequests() //请求授权
                .antMatchers("/getUser").hasAuthority("query_user") //拥有query_user权限可以访问/getUser接口
                .anyRequest().permitAll()//其他求情  允许所有用户
                .and()
                //登录
                .formLogin()
                    .permitAll();//允许所有用户
    }
演示登录时,如果用户没有登录去请求资源接口就会提示未登录。
在前后端不分离的时候当用户未登录去访问资源时Spring security会重定向到默认的登录页面,返回的是一串html标签,这一串html标签其实就是登录页面的提交表单。如图所示。
而在前后端分离的情况下(比如前台使用VUE或JQ等)我们需要的是在前台接收到"用户未登录"的提示信息,所以我们接下来要做的就是屏蔽重定向的登录页面,并返回统一的json格式的返回体。而实现这一功能的核心就是实现AuthenticationEntryPoint并在WebSecurityConfig中注入,然后在configure(HttpSecurity http)方法中。AuthenticationEntryPoint主要是用来处理匿名用户访问无权限资源时的异常(即未登录,或者登录状态过期失效)
@Component
public class CustomizeAuthenticationEntryPoint implements AuthenticationEntryPoint {
    @Override
    public void commence(HttpServletRequest httpServletRequest, HttpServletResponse httpServletResponse, AuthenticationException e) throws IOException, ServletException {
        JsonResult result = ResultTool.fail(ResultCode.USER_NOT_LOGIN);
        httpServletResponse.setContentType("text/json;charset=utf-8");
        httpServletResponse.getWriter().write(JSON.toJSONString(result));
    }
}
在WebSecurityConfig中的configure(HttpSecurity http)方法中声明
//匿名用户访问无权限资源时的异常
@Autowired
private CustomizeAuthenticationEntryPoint authenticationEntryPoint;


@Override
protected void configure(HttpSecurity http) throws Exception {
    //http相关的配置,包括登入登出、异常处理、会话管理等
    http
        .authorizeRequests() //请求授权
        .antMatchers("/getUser").hasAuthority("query_user") //拥有query_user权限可以访问/getUser接口
        .anyRequest().permitAll()//其他求情  允许所有用户
        .and()
        //登录
        .formLogin()
        .permitAll()//允许所有用户
        //异常处理(权限拒绝、登录失效等)
        .and().exceptionHandling()
        .authenticationEntryPoint(authenticationEntryPoint);//匿名用户访问无权限资源时的异常处理

    }
再次请求资源接口
前台拿到这个错误时就可以做一些处理了,主要是退出到登录页面。
1、实现登录成功/失败、登出处理逻辑
首先需要明白一件事,对于登入登出我们都不需要自己编写controller接口,Spring Security为我们封装好了。默认登入路径:/login,登出路径:/logout。当然我们可以也修改默认的名字。登录成功失败和登出的后续处理逻辑如何编写会在后面慢慢解释。
当登录成功或登录失败都需要返回统一的json返回体给前台,前台才能知道对应的做什么处理。
而实现登录成功和失败的异常处理需要分别实现AuthenticationSuccessHandler和AuthenticationFailureHandler接口并在WebSecurityConfig中注入,然后在configure(HttpSecurity http)方法中然后声明
(1) 登录成功
@Component
public class CustomizeAuthenticationSuccessHandler implements AuthenticationSuccessHandler {
    @Autowired
    SysUserService sysUserService;

    @Override
    public void onAuthenticationSuccess(HttpServletRequest httpServletRequest, HttpServletResponse httpServletResponse, Authentication authentication) throws IOException, ServletException {
        //更新用户表上次登录时间、更新人、更新时间等字段
        User userDetails = (User) SecurityContextHolder.getContext().getAuthentication().getPrincipal();
        SysUser sysUser = sysUserService.selectByName(userDetails.getUsername());

        Date currentTime = new Date();
        SimpleDateFormat formatter = new SimpleDateFormat("yyyy-MM-dd HH:mm:ss");
        String dateString = formatter.format(currentTime);

        sysUser.setLastLoginTime(dateString);
        sysUser.setUpdateTime(dateString);
        sysUser.setUpdateUser(sysUser.getId());
        sysUserService.update(sysUser);

        //此处还可以进行一些处理,比如登录成功之后可能需要返回给前台当前用户有哪些菜单权限,
        //进而前台动态的控制菜单的显示等,具体根据自己的业务需求进行扩展

        //返回json数据
        JsonResult result = ResultTool.success();
       //处理编码方式,防止中文乱码的情况
        httpServletResponse.setContentType("text/json;charset=utf-8");
       //塞到HttpServletResponse中返回给前台
        httpServletResponse.getWriter().write(JSON.toJSONString(result));
    }
}
配上mybatis映射xml ,service,impl,dao就自己敲一下吧
<!--更新用户表上次登录时间、更新人、更新时间等字段-->
	<update id="update" parameterType="SysUser">
		update
			sys_user
		set
			last_login_time = #{lastLoginTime},
			update_time = #{updateTime},
			update_user = #{updateUser}
		where
			id = #{id}
	</update>
(2) 登录失败
登录失败处理器主要用来对登录失败的场景(密码错误、账号锁定等…)做统一处理并返回给前台统一的json返回体。还记得我们创建用户表的时候创建了账号过期、密码过期、账号锁定之类的字段吗,这里就可以派上用场了.
@Component
public class CustomizeAuthenticationFailureHandler implements AuthenticationFailureHandler {


    @Override
    public void onAuthenticationFailure(HttpServletRequest httpServletRequest, HttpServletResponse httpServletResponse, AuthenticationException e) throws IOException, ServletException {
        //返回json数据
        JsonResult result = null;
        if (e instanceof AccountExpiredException) {
            //账号过期
            result = ResultTool.fail(ResultCode.USER_ACCOUNT_EXPIRED);
        } else if (e instanceof BadCredentialsException) {
            //密码错误
            result = ResultTool.fail(ResultCode.USER_CREDENTIALS_ERROR);
        } else if (e instanceof CredentialsExpiredException) {
            //密码过期
            result = ResultTool.fail(ResultCode.USER_CREDENTIALS_EXPIRED);
        } else if (e instanceof DisabledException) {
            //账号不可用
            result = ResultTool.fail(ResultCode.USER_ACCOUNT_DISABLE);
        } else if (e instanceof LockedException) {
            //账号锁定
            result = ResultTool.fail(ResultCode.USER_ACCOUNT_LOCKED);
        } else if (e instanceof InternalAuthenticationServiceException) {
            //用户不存在
            result = ResultTool.fail(ResultCode.USER_ACCOUNT_NOT_EXIST);
        }else{
            //其他错误
            result = ResultTool.fail(ResultCode.COMMON_FAIL);
        }
       //处理编码方式,防止中文乱码的情况
        httpServletResponse.setContentType("text/json;charset=utf-8");
       //塞到HttpServletResponse中返回给前台
        httpServletResponse.getWriter().write(JSON.toJSONString(result));
    }
}
(3) 登出
同样的登出也要将登出成功时结果返回给前台,并且登出之后进行将cookie失效或删除
@Component
public class CustomizeLogoutSuccessHandler implements LogoutSuccessHandler {
    @Override
    public void onLogoutSuccess(HttpServletRequest httpServletRequest, HttpServletResponse httpServletResponse, Authentication authentication) throws IOException, ServletException {
        JsonResult result = ResultTool.success();
        httpServletResponse.setContentType("text/json;charset=utf-8");
        httpServletResponse.getWriter().write(JSON.toJSONString(result));
    }
}
2、在WebSecurityConfig中的configure(HttpSecurity http)方法中声明
此时WebSecurityConfig的完整页面为
@Configuration
@EnableWebSecurity
public class WebSecurityConfig extends WebSecurityConfigurerAdapter {

    //登录成功
    @Autowired
    private CustomizeAuthenticationSuccessHandler authenticationSuccessHandler;

    //登录失败
    @Autowired
    private CustomizeAuthenticationFailureHandler authenticationFailureHandler;

    //登出
    @Autowired
    private CustomizeLogoutSuccessHandler logoutSuccessHandler;

    //匿名用户访问无权限资源时的异常
    @Autowired
    private CustomizeAuthenticationEntryPoint authenticationEntryPoint;

    @Bean
    public BCryptPasswordEncoder passwordEncoder() {
        // 设置默认的加密方式(强hash方式加密)
        return new BCryptPasswordEncoder();
    }

    @Bean
    public UserDetailsService userDetailsService() {
        //获取用户账号密码及权限信息
        return new UserDetailsServiceImpl();
    }

    @Override
    protected void configure(AuthenticationManagerBuilder auth) throws Exception {
        //配置认证方式等
        auth.userDetailsService(userDetailsService());
    }


    @Override
    protected void configure(HttpSecurity http) throws Exception {
        //http相关的配置,包括登入登出、异常处理、会话管理等
        http
                .authorizeRequests() //请求授权
                .antMatchers("/getUser").hasAuthority("query_user") //拥有query_user权限可以访问/getUser接口
                .anyRequest().permitAll()//其他求情  允许所有用户
                .and()
                //登录
                .formLogin()
                    .loginProcessingUrl("/login")
                    .permitAll()//允许所有用户
                    .successHandler(authenticationSuccessHandler)//登录成功处理逻辑
                    .failureHandler(authenticationFailureHandler)//登录失败处理逻辑
                .and()
                //登出
                .logout()
                    .permitAll()
                    .logoutSuccessHandler(logoutSuccessHandler)
                    .deleteCookies("JSESSIONID")
                //异常处理(权限拒绝、登录失效等)
                .and().exceptionHandling()
                    .authenticationEntryPoint(authenticationEntryPoint)//匿名用户访问无权限资源时的异常处理
                .and()
                .csrf().disable();//关闭打开的csrf保护,允许跨域

    }
}
效果如图:
登录时密码错误
登录时账号被锁定
退出登录之后再次请求资源接口
七、会话管理(登录过时,限制单用户登录或多用户登录)
1、限制单用户登录
.and()
    .sessionManagement()
    .maximumSessions(1)//限制同一账号只能一个用户使用
2、处理账号被挤下线处理逻辑
同样的,当账号异地登录导致被挤下线时也要返回给前端json格式的数据,比如提示"账号下线"、"您的账号在异地登录,是否是您自己操作"或者"您的账号在异地登录,可能由于密码泄露,建议修改密码"等。这时就要实现SessionInformationExpiredStrategy(会话信息过期策略)来自定义会话过期时的处理逻辑。
@Component
public class CustomizeSessionInformationExpiredStrategy implements SessionInformationExpiredStrategy {
    @Override
    public void onExpiredSessionDetected(SessionInformationExpiredEvent sessionInformationExpiredEvent) throws IOException, ServletException {
        JsonResult result = ResultTool.fail(ResultCode.USER_ACCOUNT_USE_BY_OTHERS);
        HttpServletResponse httpServletResponse = sessionInformationExpiredEvent.getResponse();
        httpServletResponse.setContentType("text/json;charset=utf-8");
        httpServletResponse.getWriter().write(JSON.toJSONString(result));
    }
}
3、在WebSecurityConfig中声明
然后需要在WebSecurityConfig中注入,并在configure(HttpSecurity http)方法中然后声明,在配置同时登录用户数的配置下面再加一行 expiredSessionStrategy(sessionInformationExpiredStrategy)
//会话失效(账号被挤下线)处理逻辑(类中)
@Autowired
CustomizeSessionInformationExpiredStrategy sessionInformationExpiredStrategy;

/*有点懒了,能看到这肯定能看懂,分开写*/

//会话管理(configure函数中)
and().sessionManagement().
	maximumSessions(1).//同一账号同时登录最大用户数
	expiredSessionStrategy(sessionInformationExpiredStrategy);//会话信息过期策略会话信息过期策略(账号被挤下线)
效果演示步骤
工具:postman + 一个浏览器,或者两个浏览器,编写一个getUser方法,随便写方法只为测试
1、由于在上述功能中屏蔽了Spring Security的默认登录页面,所以没有前端的朋友们需要将其注释,效果如下
@Override
    protected void configure(HttpSecurity http) throws Exception {
        //http相关的配置,包括登入登出、异常处理、会话管理等
        http
                .csrf().disable()//关闭打开的csrf保护,允许跨域
                .authorizeRequests() //请求授权
                .antMatchers("/getUser").hasAuthority("query_user") //拥有query_user权限可以访问/getUser接口
                .anyRequest().permitAll()//其他求情  允许所有用户
                .and()
                //登录
                .formLogin()
                    .loginProcessingUrl("/dologin")
                    .permitAll()//允许所有用户
                    .successHandler(authenticationSuccessHandler)//登录成功处理逻辑
                    .failureHandler(authenticationFailureHandler)//登录失败处理逻辑
                .and()
                //登出
                .logout()
                    .permitAll()
                    .logoutSuccessHandler(logoutSuccessHandler)
                    .deleteCookies("JSESSIONID")
                //异常处理(权限拒绝、登录失效等)
//                .and().exceptionHandling()
//                    .authenticationEntryPoint(authenticationEntryPoint)//匿名用户访问无权限资源时的异常处理
                .and()
                .sessionManagement()
                    .maximumSessions(1)//限制同一账号只能一个用户使用
                    .expiredSessionStrategy(sessionInformationExpiredStrategy);//会话信息过期策略会话信息过期策略(账号被挤下线)
    }
2、在电脑上用postman登录
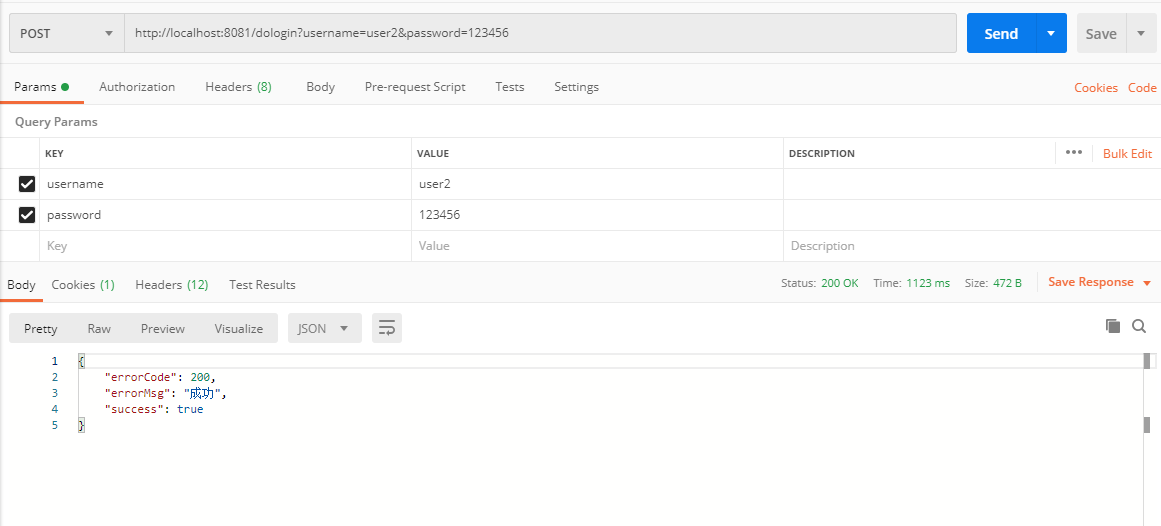
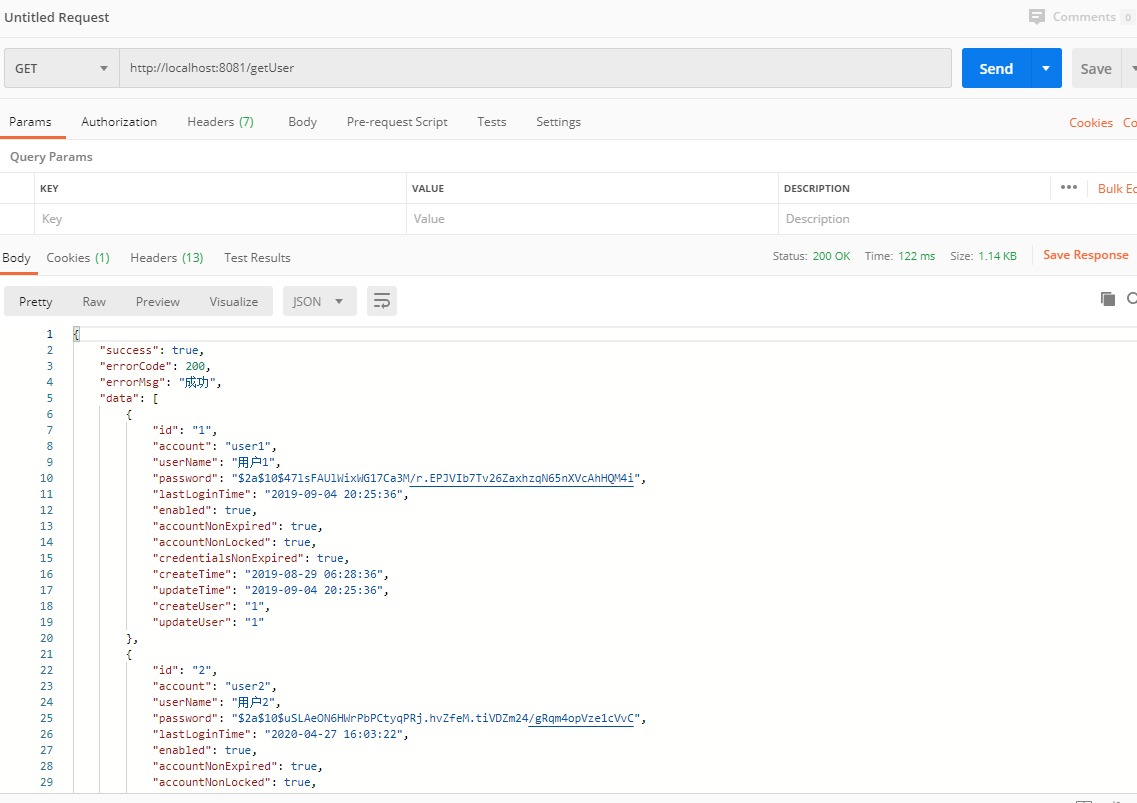
3、postman登录成功后,请求getUser方法 需要用get请求,POST会报错
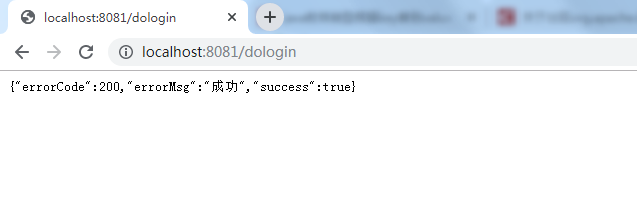
4、请求成功后,打开浏览器http://localhost:8081/login进行登录,最好不要用IE浏览器哦
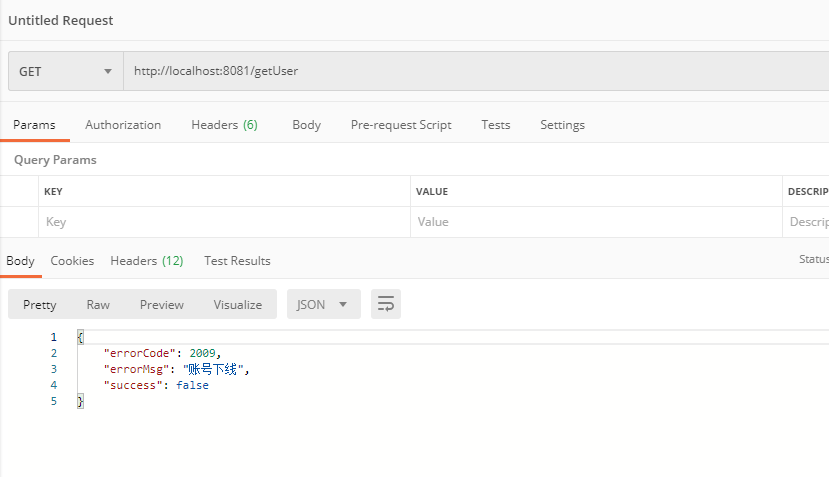
5、postman请求getUser方法,返回账号下线,成功
八、实现基于JDBC的动态权限控制
在之前的章节中我们配置了一个
antMatchers("/getUser").hasAuthority("query_user")
其实我们就已经实现了一个所谓的基于RBAC的权限控制,只不过我们是在WebSecurityConfig中写死的,但是在平时开发中,难道我们每增加一个需要访问权限控制的资源我们都要修改一下WebSecurityConfig增加一个antMatchers(…)吗,肯定是不合理的。因此我们现在要做的就是将需要权限控制的资源配到数据库中,当然也可以存储在其他地方,比如用一个枚举,只是我觉得存在数据库中更加灵活一点。
我们需要实现一个AccessDecisionManager(访问决策管理器),在里面我们对当前请求的资源进行权限判断,判断当前登录用户是否拥有该权限,如果有就放行,如果没有就抛出一个"权限不足"的异常。不过在实现AccessDecisionManager之前我们还需要做一件事,那就是拦截到当前的请求,并根据请求路径从数据库中查出当前资源路径需要哪些权限才能访问,然后将查出的需要的权限列表交给AccessDecisionManager去处理后续逻辑。那就是需要先实现一个SecurityMetadataSource,翻译过来是"安全元数据源",我们这里使用他的一个子类FilterInvocationSecurityMetadataSource。
在自定义的SecurityMetadataSource编写好之后,我们还要编写一个拦截器,增加到Spring security默认的拦截器链中,以达到拦截的目的。
同样的最后需要在WebSecurityConfig中注入,并在configure(HttpSecurity http)方法中然后声明
1、权限拦截器
@Component
public class CustomizeAbstractSecurityInterceptor extends AbstractSecurityInterceptor implements Filter {

    @Autowired
    private FilterInvocationSecurityMetadataSource securityMetadataSource;

    @Autowired
    public void setMyAccessDecisionManager(CustomizeAccessDecisionManager accessDecisionManager) {
        super.setAccessDecisionManager(accessDecisionManager);
    }

    @Override
    public Class<?> getSecureObjectClass() {
        return FilterInvocation.class;
    }

    @Override
    public SecurityMetadataSource obtainSecurityMetadataSource() {
        return this.securityMetadataSource;
    }

    @Override
    public void doFilter(ServletRequest servletRequest, ServletResponse servletResponse, FilterChain filterChain) throws IOException, ServletException {
        FilterInvocation fi = new FilterInvocation(servletRequest, servletResponse, filterChain);
        invoke(fi);
    }

    public void invoke(FilterInvocation fi) throws IOException, ServletException {
        //fi里面有一个被拦截的url
        //里面调用MyInvocationSecurityMetadataSource的getAttributes(Object object)这个方法获取fi对应的所有权限
        //再调用MyAccessDecisionManager的decide方法来校验用户的权限是否足够
        InterceptorStatusToken token = super.beforeInvocation(fi);
        try {
        //执行下一个拦截器
            fi.getChain().doFilter(fi.getRequest(), fi.getResponse());
        } finally {
            super.afterInvocation(token, null);
        }
    }
}
2、安全元数据源FilterInvocationSecurityMetadataSource
@Component
public class CustomizeFilterInvocationSecurityMetadataSource implements FilterInvocationSecurityMetadataSource {
    AntPathMatcher antPathMatcher = new AntPathMatcher();
    @Autowired
    SysPermissionService sysPermissionService;
    @Override
    public Collection<ConfigAttribute> getAttributes(Object o) throws IllegalArgumentException {

        //获取请求地址
        String requestUrl = ((FilterInvocation) o).getRequestUrl();

        //查询具体某个接口的权限
        List<SysPermission> permissionList =  sysPermissionService.selectListByPath(requestUrl);

        log.info("接口权限为:" + permissionList);

        if(permissionList == null || permissionList.size() == 0){
            //请求路径没有配置权限,表明该请求接口可以任意访问
            return null;
        }

        String[] attributes = new String[permissionList.size()];

        for(int i = 0;i<permissionList.size();i++){

            attributes[i] = permissionList.get(i).getPermissionCode();

        }
        return SecurityConfig.createList(attributes);
    }

    @Override
    public Collection<ConfigAttribute> getAllConfigAttributes() {
        return null;
    }

    @Override
    public boolean supports(Class<?> aClass) {
        return true;
    }
}
3、访问决策管理器AccessDecisionManager
@Component
public class CustomizeAccessDecisionManager implements AccessDecisionManager {
    @Override
    public void decide(Authentication authentication, Object o, Collection<ConfigAttribute> collection) throws AccessDeniedException, InsufficientAuthenticationException {
        Iterator<ConfigAttribute> iterator = collection.iterator();
        while (iterator.hasNext()) {
            ConfigAttribute ca = iterator.next();
            //当前请求需要的权限
            String needRole = ca.getAttribute();
            //当前用户所具有的权限
            Collection<? extends GrantedAuthority> authorities = authentication.getAuthorities();
            for (GrantedAuthority authority : authorities) {
                if (authority.getAuthority().equals(needRole)) {
                    return;
                }
            }
        }
        throw new AccessDeniedException("权限不足!");
    }

    @Override
    public boolean supports(ConfigAttribute configAttribute) {
        return true;
    }

    @Override
    public boolean supports(Class<?> aClass) {
        return true;
    }
}
4、在WebSecurityConfig中声明
 http.authorizeRequests().
                withObjectPostProcessor(new ObjectPostProcessor<FilterSecurityInterceptor>() {
                    @Override
                    public <O extends FilterSecurityInterceptor> O postProcess(O o) {
                        o.setAccessDecisionManager(accessDecisionManager);//访问决策管理器
                        o.setSecurityMetadataSource(securityMetadataSource);//安全元数据源
                        return o;
                    }
                });
        http.addFilterBefore(securityInterceptor, FilterSecurityInterceptor.class);//增加到默认拦截链
九、最终的WebSecurityConfig配置
@Configuration
@EnableWebSecurity
public class WebSecurityConfig extends WebSecurityConfigurerAdapter {

    //登录成功
    @Autowired
    private CustomizeAuthenticationSuccessHandler authenticationSuccessHandler;

    //登录失败
    @Autowired
    private CustomizeAuthenticationFailureHandler authenticationFailureHandler;

    //登出
    @Autowired
    private CustomizeLogoutSuccessHandler logoutSuccessHandler;

    //会话失效(账号被挤下线)处理逻辑
    @Autowired
    private CustomizeSessionInformationExpiredStrategy sessionInformationExpiredStrategy;

    //匿名用户访问无权限资源时的异常
    @Autowired
    private CustomizeAuthenticationEntryPoint authenticationEntryPoint;

    //访问决策管理器
    @Autowired
    private CustomizeAccessDecisionManager accessDecisionManager;

    //安全元数据源
    @Autowired
    private CustomizeFilterInvocationSecurityMetadataSource securityMetadataSource;

    //权限拦截器
    @Autowired
    private CustomizeAbstractSecurityInterceptor securityInterceptor;

    @Bean
    public BCryptPasswordEncoder passwordEncoder() {
        // 设置默认的加密方式(强hash方式加密)
        return new BCryptPasswordEncoder();
    }

    @Bean
    public UserDetailsService userDetailsService() {
        //获取用户账号密码及权限信息
        return new UserDetailsServiceImpl();
    }

    @Override
    protected void configure(AuthenticationManagerBuilder auth) throws Exception {
        //配置认证方式等
        auth.userDetailsService(userDetailsService());
    }


    @Override
    protected void configure(HttpSecurity http) throws Exception {
        //http相关的配置,包括登入登出、异常处理、会话管理等
        http
                .csrf().disable()//关闭打开的csrf保护,允许跨域
                .authorizeRequests() //请求授权

                .withObjectPostProcessor(new ObjectPostProcessor<FilterSecurityInterceptor>() {
                    @Override
                    public <O extends FilterSecurityInterceptor> O postProcess(O o) {
                        o.setAccessDecisionManager(accessDecisionManager);//决策管理器
                        o.setSecurityMetadataSource(securityMetadataSource);//安全元数据源
                        return o;
                    }
                })
                .and()
                //登录
                .formLogin()
                    .loginProcessingUrl("/dologin")
                    .permitAll()//允许所有用户
                    .successHandler(authenticationSuccessHandler)//登录成功处理逻辑
                    .failureHandler(authenticationFailureHandler)//登录失败处理逻辑
                .and()
                //登出
                .logout()
                    .permitAll()
                    .logoutSuccessHandler(logoutSuccessHandler)
                    .deleteCookies("JSESSIONID")
                //异常处理(权限拒绝、登录失效等)
                .and().exceptionHandling()
                    .authenticationEntryPoint(authenticationEntryPoint)//匿名用户访问无权限资源时的异常处理
                .and()
                .sessionManagement()
                    .maximumSessions(1)//限制同一账号只能一个用户使用
                    .expiredSessionStrategy(sessionInformationExpiredStrategy);//会话信息过期策略会话信息过期策略(账号被挤下线)
        //在FilterSecurityInterceptor之前添加 权限拦截器
        http.addFilterBefore(securityInterceptor, FilterSecurityInterceptor.class);
    }
}
十、结束语
到现在为止本文就基本结束了,在本文中我们利用Springboot+Spring security实现了前后端分离的用户登录认证和动态的权限访问控制。
希望在这里和大家一起学习进步!我还是个java初学者,一直不知道应该学习的方向,最近学习Spring security 看过无数帖子和视频,希望得到大牛们的指导。
附:前后端分离,后端获取前端登录json传值方法
因为先打大部分项目都是做前后端分离,而且前端传递数据类型大部分为JSON,看源码可知Security获取username和password用的request.getParameter(); 编写MyUsernamePasswordAuthenticationFilter继承UsernamePasswordAuthenticationFilter,重写ttemptAuthentication(HttpServletRequest request, HttpServletResponse response)方法。
/**
 * 重写UsernamePasswordAuthenticationFilter过滤器
 */
@Slf4j
public class MyUsernamePasswordAuthenticationFilter extends UsernamePasswordAuthenticationFilter {

    @Override
    public Authentication attemptAuthentication(HttpServletRequest request, HttpServletResponse response) throws AuthenticationException {

        if (!request.getMethod().equals("POST")) {
            throw new AuthenticationServiceException(
                    "Authentication method not supported: " + request.getMethod());
        }

        //当内容类型为json时尝试身份验证
        if(request.getContentType().equals(MediaType.APPLICATION_JSON_UTF8_VALUE)
                ||request.getContentType().equals(MediaType.APPLICATION_JSON_VALUE)) {
            log.info("-----------------------进入MyUsernamePasswordAuthenticationFilter.Authentication-----------------------");

            //使用jackson反序列化json
            ObjectMapper mapper = new ObjectMapper();

            //取authenticationBean
            Map<String, String> authenticationBean = null;

            UsernamePasswordAuthenticationToken authRequest = null;

            try(InputStream is = request.getInputStream()) {
                authenticationBean = mapper.readValue(is, Map.class);
            } catch (IOException e) {
                e.printStackTrace();
            }

            if (!authenticationBean.isEmpty()) {
                //获得账号、密码
                String username = authenticationBean.get(SPRING_SECURITY_FORM_USERNAME_KEY);
                String password = authenticationBean.get(SPRING_SECURITY_FORM_PASSWORD_KEY);
                //可以验证账号、密码
                log.info("-----------------------username = " + username + "-----------------------");
                log.info("-----------------------password = " + password + "-----------------------");
                authRequest = new UsernamePasswordAuthenticationToken(username, password);
            } else {
                authRequest = new UsernamePasswordAuthenticationToken("", "");
            }

            setDetails(request,authRequest);

            return this.getAuthenticationManager().authenticate(authRequest);

        }

        return super.attemptAuthentication(request, response);
    }
}
在WebSecurityConfig中注册
 @Bean
    MyUsernamePasswordAuthenticationFilter myUsernamePasswordAuthenticationFilter() throws Exception {
        MyUsernamePasswordAuthenticationFilter filter = new MyUsernamePasswordAuthenticationFilter();
        //成功后处理
        filter.setAuthenticationSuccessHandler(authenticationSuccessHandler);//登录成功处理逻辑
        //失败后处理
        filter.setAuthenticationFailureHandler(authenticationFailureHandler);//登录失败处理逻辑

        filter.setAuthenticationManager(authenticationManagerBean());
        return filter;
    }


//拦截账号、密码。覆盖 UsernamePasswordAuthenticationFilter过滤器(configure)中
        http.addFilterAt(myUsernamePasswordAuthenticationFilter(), UsernamePasswordAuthenticationFilter.class);
注:由于在UsernamePasswordAuthenticationFilter中添加了默认登录请求路径/login
public UsernamePasswordAuthenticationFilter() {
		super(new AntPathRequestMatcher("/login", "POST"));
}
所以请将登录请求路径改为默认,如果不是login将会进入UsernamePasswordAuthenticationFilter中 不会进入新编写的MyUsernamePasswordAuthenticationFilter中,至于为什么,我也不知道,有大神可以指导一下嘛,如何修改登录验证请求路径。
微信:316180414

 浙公网安备 33010602011771号