
kedao中间件-数据库安装篇
@
一、介绍
本文主要讲述在 Ubuntu24.04 下安装数据库,分别以 PostgreSQL 和 MySQL 为例介绍安装过程。
本文目的是为大多数新手或没有安装过数据库经验的人提供指引。
前提条件:已经安装好 Ubuntu24.04 操作系统。
注:本篇内容不涉及kedao中间件的内容。
kedao中间件官网:https://www.yckj-kedao.com
系列文章:
《kedao中间件-安装篇》
《kedao中间件-C++服务篇》
《kedao中间件-Java服务篇》
《kedao中间件-Vue开发篇》
《kedao中间件-集群及发布篇》
《kedao中间件-并发测试篇》
《kedao中间件-Linux系统安装篇》
二、安装 PostgreSQL
1、安装
打开PostgreSQL官网:https://www.postgresql.org/
进入到下载界面,如图:

1.1、Ubuntu 的默认版本
默认的版本可能较低,想安装指定的版本,采用1.2或1.3 的方式。
直接执行 sudo apt install postgresql 安装默认版本
postgres@kedao:~$ sudo apt install postgresql
1.2、通过设置自动存储库安装
1.2.1、设置自动存储库
kedao@kedao:~$ sudo apt install -y postgresql-common
kedao@kedao:~$ sudo /usr/share/postgresql-common/pgdg/apt.postgresql.org.sh

No VM guests are running outdated hypervisor (qemu) binaries on this host.
N: 忽略‘ubuntu.sources.backup’(于目录‘/etc/apt/sources.list.d/’),鉴于它的文件扩展名无效
kedao@kedao:~$ sudo /usr/share/postgresql-common/pgdg/apt.postgresql.org.sh
This script will enable the PostgreSQL APT repository on apt.postgresql.org on
your system. The distribution codename used will be noble-pgdg.

Press Enter to continue, or Ctrl-C to abort.
出现这个,回车 继续。
执行命令 sudo apt update 更新包
kedao@kedao:~$ sudo apt update
1.2.2、安装最新版本
安装最新的版本,执行 sudo apt -y install postgresql,可能会报错,如下:
kedao@kedao:~$ sudo apt -y install postgresql
正在读取软件包列表... 完成
正在分析软件包的依赖关系树... 完成
正在读取状态信息... 完成
将会同时安装下列软件:
  libio-pty-perl libipc-run-perl libllvm19 libpq5 postgresql-17 postgresql-client-17 postgresql-client-common postgresql-common postgresql-common-dev
建议安装:
  postgresql-doc postgresql-doc-17
下列【新】软件包将被安装:
  libio-pty-perl libipc-run-perl libllvm19 libpq5 postgresql postgresql-17 postgresql-client-17 postgresql-common-dev
下列软件包将被升级:
  postgresql-client-common postgresql-common
升级了 2 个软件包,新安装了 8 个软件包,要卸载 0 个软件包,有 6 个软件包未被升级。
需要下载 48.2 MB 的归档。
解压缩后会消耗 200 MB 的额外空间。

N: 忽略‘ubuntu.sources.backup’(于目录‘/etc/apt/sources.list.d/’),鉴于它的文件扩展名无效
E: 无法下载 https://apt.postgresql.org/pub/repos/apt/pool/main/p/postgresql-common/postgresql-common_277.pgdg24.04%2b1_all.deb  无法发起与 apt.postgresql.org:443 (2a04:4e42:200::820) 的连接 - connect (101: Network is unreachable) 无法发起与 apt.postgresql.org:443 (2a04:4e42:600::820) 的连接 - connect (101: Network is unreachable) 无法发起与 apt.postgresql.org:443 (2a04:4e42:400::820) 的连接 - connect (101: Network is unreachable) 无法发起与 apt.postgresql.org:443 (2a04:4e42::820) 的连接 - connect (101: Network is unreachable) 无法连接上 apt.postgresql.org:443 (151.101.195.52),连接超时 无法连接上 apt.postgresql.org:443 (151.101.67.52),连接超时 无法连接上 apt.postgresql.org:443 (151.101.3.52),连接超时 无法连接上 apt.postgresql.org:443 (151.101.131.52),连接超时
E: 无法下载 https://apt.postgresql.org/pub/repos/apt/pool/main/p/postgresql-common/postgresql-client-common_277.pgdg24.04%2b1_all.deb  无法发起与 apt.postgresql.org:443 (2a04:4e42:200::820) 的连接 - connect (101: Network is unreachable) 无法发起与 apt.postgresql.org:443 (2a04:4e42:600::820) 的连接 - connect (101: Network is unreachable) 无法发起与 apt.postgresql.org:443 (2a04:4e42:400::820) 的连接 - connect (101: Network is unreachable) 无法发起与 apt.postgresql.org:443 (2a04:4e42::820) 的连接 - connect (101: Network is unreachable)
E: 无法下载 https://apt.postgresql.org/pub/repos/apt/pool/main/p/postgresql-common/postgresql-common-dev_277.pgdg24.04%2b1_all.deb  无法发起与 apt.postgresql.org:443 (2a04:4e42:200::820) 的连接 - connect (101: Network is unreachable) 无法发起与 apt.postgresql.org:443 (2a04:4e42:600::820) 的连接 - connect (101: Network is unreachable) 无法发起与 apt.postgresql.org:443 (2a04:4e42:400::820) 的连接 - connect (101: Network is unreachable) 无法发起与 apt.postgresql.org:443 (2a04:4e42::820) 的连接 - connect (101: Network is unreachable)
E: 无法下载 https://apt.postgresql.org/pub/repos/apt/pool/main/p/postgresql-17/libpq5_17.4-1.pgdg24.04%2b2_amd64.deb  无法发起与 apt.postgresql.org:443 (2a04:4e42:200::820) 的连接 - connect (101: Network is unreachable) 无法发起与 apt.postgresql.org:443 (2a04:4e42:600::820) 的连接 - connect (101: Network is unreachable) 无法发起与 apt.postgresql.org:443 (2a04:4e42:400::820) 的连接 - connect (101: Network is unreachable) 无法发起与 apt.postgresql.org:443 (2a04:4e42::820) 的连接 - connect (101: Network is unreachable)
E: 无法下载 https://apt.postgresql.org/pub/repos/apt/pool/main/p/postgresql-17/postgresql-client-17_17.4-1.pgdg24.04%2b2_amd64.deb  无法发起与 apt.postgresql.org:443 (2a04:4e42:200::820) 的连接 - connect (101: Network is unreachable) 无法发起与 apt.postgresql.org:443 (2a04:4e42:600::820) 的连接 - connect (101: Network is unreachable) 无法发起与 apt.postgresql.org:443 (2a04:4e42:400::820) 的连接 - connect (101: Network is unreachable) 无法发起与 apt.postgresql.org:443 (2a04:4e42::820) 的连接 - connect (101: Network is unreachable)
E: 无法下载 https://apt.postgresql.org/pub/repos/apt/pool/main/p/postgresql-17/postgresql-17_17.4-1.pgdg24.04%2b2_amd64.deb  无法发起与 apt.postgresql.org:443 (2a04:4e42:200::820) 的连接 - connect (101: Network is unreachable) 无法发起与 apt.postgresql.org:443 (2a04:4e42:600::820) 的连接 - connect (101: Network is unreachable) 无法发起与 apt.postgresql.org:443 (2a04:4e42:400::820) 的连接 - connect (101: Network is unreachable) 无法发起与 apt.postgresql.org:443 (2a04:4e42::820) 的连接 - connect (101: Network is unreachable)
E: 无法下载 https://apt.postgresql.org/pub/repos/apt/pool/main/p/postgresql-common/postgresql_17%2b277.pgdg24.04%2b1_all.deb  无法发起与 apt.postgresql.org:443 (2a04:4e42:200::820) 的连接 - connect (101: Network is unreachable) 无法发起与 apt.postgresql.org:443 (2a04:4e42:600::820) 的连接 - connect (101: Network is unreachable) 无法发起与 apt.postgresql.org:443 (2a04:4e42:400::820) 的连接 - connect (101: Network is unreachable) 无法发起与 apt.postgresql.org:443 (2a04:4e42::820) 的连接 - connect (101: Network is unreachable)
E: 有几个软件包无法下载,要不运行 apt-get update 或者加上 --fix-missing 的选项再试试?
1.2.3、安装指定版本
安装指定的版本,比如 v17 版本,执行 sudo apt -y install postgresql-17,如下:
kedao@kedao:~$ sudo apt -y install postgresql-17
正在读取软件包列表... 完成
正在分析软件包的依赖关系树... 完成
正在读取状态信息... 完成
将会同时安装下列软件:
  libllvm19 libpq5 postgresql-client-17
建议安装:
  postgresql-doc-17
下列【新】软件包将被安装:
  libllvm19 libpq5 postgresql-17 postgresql-client-17
升级了 0 个软件包,新安装了 4 个软件包,要卸载 0 个软件包,有 8 个软件包未被升级。
需要下载 19.1 MB/47.8 MB 的归档。
解压缩后会消耗 199 MB 的额外空间。
获取:1 https://apt.postgresql.org/pub/repos/apt noble-pgdg/main amd64 libpq5 amd64 17.4-1.pgdg24.04+2 [226 kB]
忽略:1 https://apt.postgresql.org/pub/repos/apt noble-pgdg/main amd64 libpq5 amd64 17.4-1.pgdg24.04+2
获取:2 https://apt.postgresql.org/pub/repos/apt noble-pgdg/main amd64 postgresql-client-17 amd64 17.4-1.pgdg24.04+2 [2,022 kB]
获取:3 https://apt.postgresql.org/pub/repos/apt noble-pgdg/main amd64 postgresql-17 amd64 17.4-1.pgdg24.04+2 [16.8 MB]
获取:1 https://apt.postgresql.org/pub/repos/apt noble-pgdg/main amd64 libpq5 amd64 17.4-1.pgdg24.04+2 [226 kB]
已下载 18.9 MB,耗时 1分 56秒 (163 kB/s)
N: 忽略‘ubuntu.sources.backup’(于目录‘/etc/apt/sources.list.d/’),鉴于它的文件扩展名无效
正在预设定软件包 ...
正在选中未选择的软件包 libllvm19:amd64。
(正在读取数据库 ... 系统当前共安装有 87417 个文件和目录。)
准备解压 .../libllvm19_1%3a19.1.1-1ubuntu1~24.04.2_amd64.deb  ...
正在解压 libllvm19:amd64 (1:19.1.1-1ubuntu1~24.04.2) ...
正在选中未选择的软件包 libpq5:amd64。
准备解压 .../libpq5_17.4-1.pgdg24.04+2_amd64.deb  ...
正在解压 libpq5:amd64 (17.4-1.pgdg24.04+2) ...
正在选中未选择的软件包 postgresql-client-17。
准备解压 .../postgresql-client-17_17.4-1.pgdg24.04+2_amd64.deb  ...
正在解压 postgresql-client-17 (17.4-1.pgdg24.04+2) ...
正在选中未选择的软件包 postgresql-17。
准备解压 .../postgresql-17_17.4-1.pgdg24.04+2_amd64.deb  ...
正在解压 postgresql-17 (17.4-1.pgdg24.04+2) ...
正在设置 libllvm19:amd64 (1:19.1.1-1ubuntu1~24.04.2) ...
正在设置 libpq5:amd64 (17.4-1.pgdg24.04+2) ...
正在设置 postgresql-client-17 (17.4-1.pgdg24.04+2) ...
update-alternatives: 使用 /usr/share/postgresql/17/man/man1/psql.1.gz 来在自动模式中提供 /usr/share/man/man1/psql.1.gz (psql.1.gz)
正在设置 postgresql-17 (17.4-1.pgdg24.04+2) ...
Creating new PostgreSQL cluster 17/main ...
/usr/lib/postgresql/17/bin/initdb -D /var/lib/postgresql/17/main --auth-local peer --auth-host scram-sha-256 --no-instructions
The files belonging to this database system will be owned by user "postgres".
This user must also own the server process.

The database cluster will be initialized with locale "en_US.UTF-8".
The default database encoding has accordingly been set to "UTF8".
The default text search configuration will be set to "english".

Data page checksums are disabled.

fixing permissions on existing directory /var/lib/postgresql/17/main ... ok
creating subdirectories ... ok
selecting dynamic shared memory implementation ... posix
selecting default "max_connections" ... 100
selecting default "shared_buffers" ... 128MB
selecting default time zone ... Asia/Shanghai
creating configuration files ... ok
running bootstrap script ... ok
performing post-bootstrap initialization ... ok
syncing data to disk ... ok
正在处理用于 postgresql-common (257build1.1) 的触发器 ...
Building PostgreSQL dictionaries from installed myspell/hunspell packages...
Removing obsolete dictionary files:
正在处理用于 libc-bin (2.39-0ubuntu8.4) 的触发器 ...
Scanning processes...
Scanning candidates...
Scanning linux images...

Running kernel seems to be up-to-date.

Restarting services...

Service restarts being deferred:
 systemctl restart NetworkManager.service
 /etc/needrestart/restart.d/dbus.service
 systemctl restart systemd-logind.service
 systemctl restart unattended-upgrades.service
 systemctl restart wpa_supplicant.service

No containers need to be restarted.

User sessions running outdated binaries:
 kedao @ session #5: login[1755]
 kedao @ user manager service: systemd[1603]

No VM guests are running outdated hypervisor (qemu) binaries on this host.
N: 忽略‘ubuntu.sources.backup’(于目录‘/etc/apt/sources.list.d/’),鉴于它的文件扩展名无效
数据库安装完成。
1.2.4、查看数据库版本
执行命令 psql --version 查看数据库版本
kedao@kedao:~$ psql --version
psql (PostgreSQL) 17.4 (Ubuntu 17.4-1.pgdg24.04+2)
1.3、手动配置Apt存储库安装
1.2、1.3 选择其中一种方式就可以,不需两种方式同时操作。
1.3.1、导入存储库签名密钥
kedao@kedao:~$ sudo apt install curl ca-certificates
kedao@kedao:~$ sudo install -d /usr/share/postgresql-common/pgdg
kedao@kedao:~$ sudo curl -o /usr/share/postgresql-common/pgdg/apt.postgresql.org.asc --fail https://www.postgresql.org/media/keys/ACCC4CF8.asc
1.3.2、创建存储配置文件
. /etc/os-release
kedao@kedao:~$ sudo sh -c "echo 'deb [signed-by=/usr/share/postgresql-common/pgdg/apt.postgresql.org.asc] https://apt.postgresql.org/pub/repos/apt $VERSION_CODENAME-pgdg main' > /etc/apt/sources.list.d/pgdg.list"
1.3.3、执行 sudo apt update 更新包
kedao@kedao:~$ sudo apt update
1.3.4、安装指定的版本
比如 v17 版本,执行 sudo apt -y install postgresql-17,如下:
kedao@kedao:~$ sudo apt -y install postgresql-17
1.3.5、查看数据库版本
执行命令 psql --version 查看数据库版本
kedao@kedao:~$ psql --version
psql (PostgreSQL) 17.4 (Ubuntu 17.4-1.pgdg24.04+2)
2、配置数据库参数
2.1 设置 postgres 用户的密码
执行命令 sudo passwd postgres 设置密码:
kedao@kedao:~$ sudo passwd postgres
New password:
Retype new password:
passwd: password updated successfully
2.2 切换到 postgres 用户
执行命令 su - postgres
kedao@kedao:~$ su - postgres
Password:
2.3 进入 psql
执行命令 psql
postgres@kedao:~$ psql
psql (17.4 (Ubuntu 17.4-1.pgdg24.04+2))
输入 "help" 来获取帮助信息.

postgres=#
2.4 设置数据库密码
输入 \password postgres
postgres=# \password postgres
Enter new password for user "postgres":
再输入一遍:
2.5 查看配置文件的路径
输入 SHOW config_file;
postgres=# SHOW config_file;
               config_file
-----------------------------------------
 /etc/postgresql/17/main/postgresql.conf
(1 行记录)
配置文件路径:/etc/postgresql/17/main/postgresql.conf
2.6 设置允许远程访问
2.6.1 设置监听地址
执行命令 sudo vi /etc/postgresql/17/main/postgresql.conf 修改 postgresql.conf 文件
kedao@kedao:~$ sudo vi /etc/postgresql/17/main/postgresql.conf
修改 listen_addresses = '*'

从上图还可以看到:
默认的端口 port = 5432
最大连接数 max_connections = 100
数据存储文件路径 data_directory = '/var/lib/postgresql/17/main'
基于主机的认证文件路径 hba_file = '/etc/postgresql/17/main/pg_hba.conf'
2.6.2 设置IP地址
执行命令 sudo vi /etc/postgresql/17/main/pg_hba.conf,修改 pg_hba.conf 文件
kedao@kedao:~$ sudo vi /etc/postgresql/17/main/pg_hba.conf
修改 IPv4 下面的行为: host all all 0.0.0.0/0 scram-sha-256
修改 IPv6 下面的行为: host all all ::/0 scram-sha-256
# Database administrative login by Unix domain socket
local   all             postgres                                peer

# TYPE  DATABASE        USER            ADDRESS                 METHOD

# "local" is for Unix domain socket connections only
local   all             all                                     peer
# IPv4 local connections:
host    all             all             0.0.0.0/0            scram-sha-256
# IPv6 local connections:
host    all             all             ::/0                 scram-sha-256
# Allow replication connections from localhost, by a user with the
# replication privilege.
local   replication     all                                     peer
host    replication     all             127.0.0.1/32            scram-sha-256
host    replication     all             ::1/128                 scram-sha-256
修改完成后,需要重启数据库加载配置
2.7 启停数据库
停止数据库
kedao@kedao: sudo systemctl stop postgresql
启动数据库
kedao@kedao: sudo systemctl start postgresql
重启数据库
kedao@kedao: sudo systemctl restart postgresql
重新加载配置文件而不是完全重启服务
kedao@kedao: sudo systemctl reload postgresql
2.8、使用管理工具连接数据库
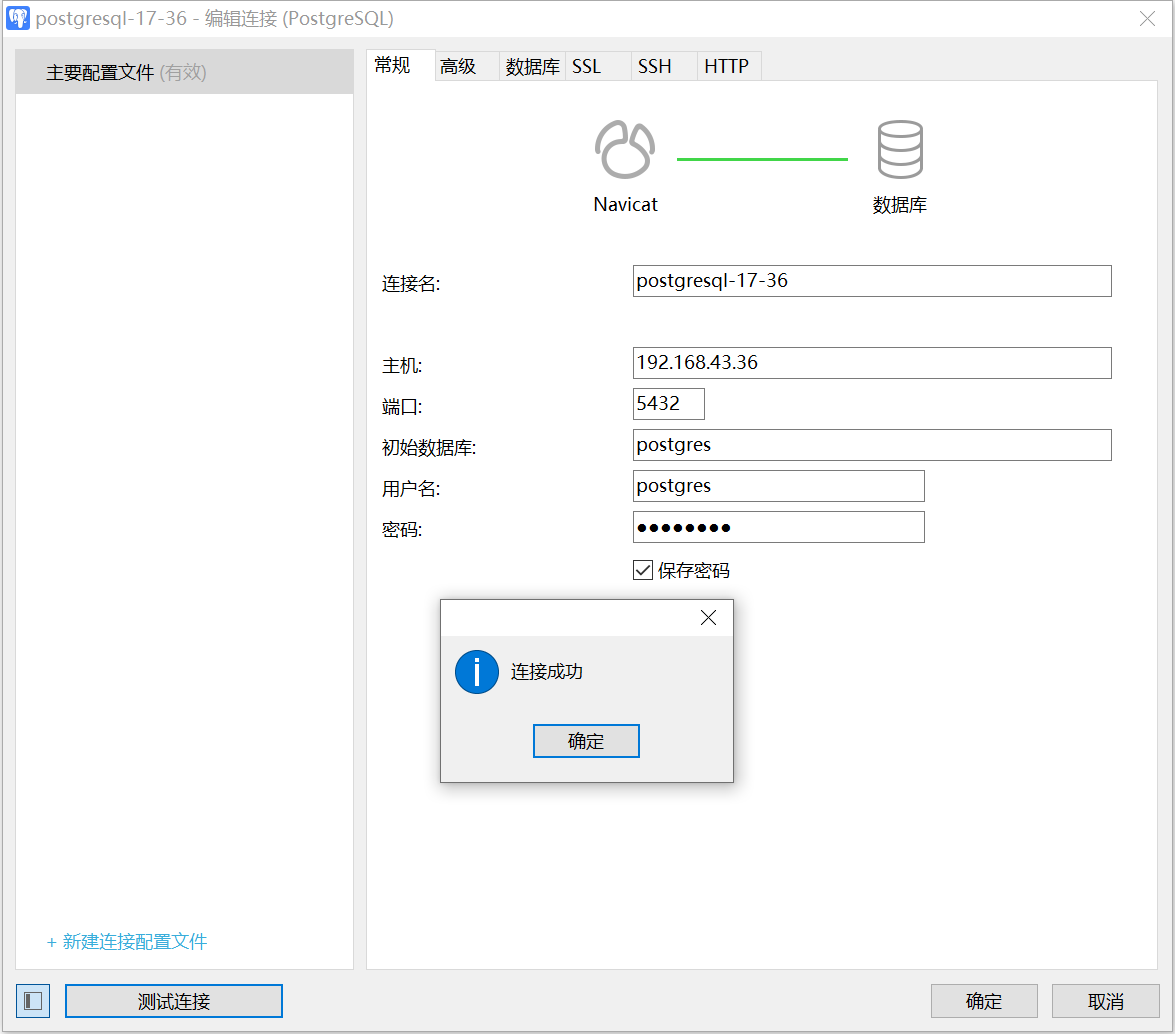
2.8.1、使用 Navicat-16 连接数据库
使用 Navicat-15 连接 PostgreSQL-16及以上版本会报错:
column “datlastsysoid“ does not exist
Line1:SELECT DISTINCT datalastsysoid FROM pg_database
新建连接,输入主机IP,端口,数据库用户名和密码,测试连接,如下图:
2.8.2、创建数据库
连接数据后,创建数据库,如图:
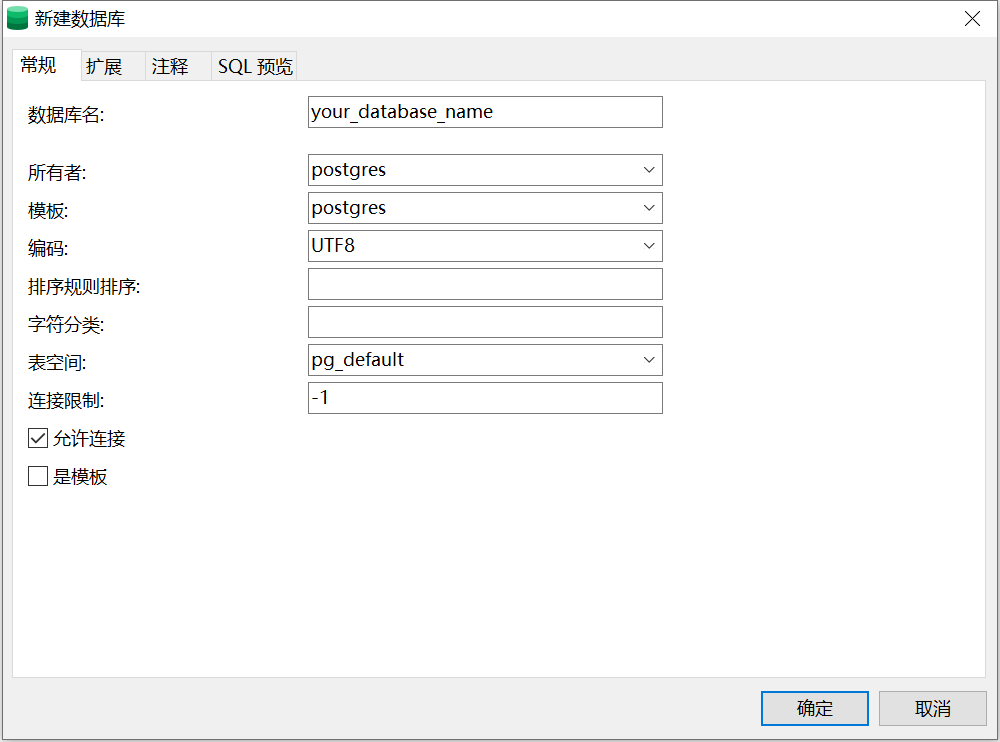
创建数据库后,就可以正常使用数据库了。
PostgreSQL安装完成。
二、安装 MySQL
1、安装
安装 Ubuntu 默认版本
更新 apt 源
kedao@kedao:~$ sudo apt update
执行命令 查看 MySQL 的版本
kedao@kedao:~$ sudo apt search mysql-server
[sudo] password for kedao:
Sorting... Done
Full Text Search... Done
default-mysql-server/noble 1.1.0build1 all
  MySQL database server binaries and system database setup (metapackage)

default-mysql-server-core/noble 1.1.0build1 all
  MySQL database server binaries (metapackage)

mysql-server/noble-updates,noble-security 8.0.41-0ubuntu0.24.04.1 all
  MySQL database server (metapackage depending on the latest version)

mysql-server-8.0/noble-updates,noble-security 8.0.41-0ubuntu0.24.04.1 amd64
  MySQL database server binaries and system database setup

mysql-server-core-8.0/noble-updates,noble-security 8.0.41-0ubuntu0.24.04.1 amd64
  MySQL database server binaries
版本是 8.0,执行命令 sudo apt install mysql-server 进行安装:
kedao@kedao:~$ sudo apt install mysql-server

升级了 0 个软件包,新安装了 28 个软件包,要卸载 0 个软件包,有 8 个软件包未被升级。
需要下载 29.6 MB 的归档。
解压缩后会消耗 242 MB 的额外空间。
N: 忽略‘ubuntu.sources.backup’(于目录‘/etc/apt/sources.list.d/’),鉴于它的文件扩展名无效
您希望继续执行吗? [Y/n] y
遇到提示输入 y 回车确认。
2、安全配置
执行命令 sudo mysql_secure_installation 进行安全设置。执行命令过程中会有一系列问题要确认设置,其中密码强度验证策略输入 0,其余通通输入 y 回车确认就好:
kedao@kedao:~$ sudo mysql_secure_installation

Securing the MySQL server deployment.

Connecting to MySQL using a blank password.

VALIDATE PASSWORD COMPONENT can be used to test passwords
and improve security. It checks the strength of password
and allows the users to set only those passwords which are
secure enough. Would you like to setup VALIDATE PASSWORD component?

Press y|Y for Yes, any other key for No: y

There are three levels of password validation policy:

LOW    Length >= 8
MEDIUM Length >= 8, numeric, mixed case, and special characters
STRONG Length >= 8, numeric, mixed case, special characters and dictionary                  file

Please enter 0 = LOW, 1 = MEDIUM and 2 = STRONG: 0

Skipping password set for root as authentication with auth_socket is used by default.
If you would like to use password authentication instead, this can be done with the "ALTER_USER" command.
See https://dev.mysql.com/doc/refman/8.0/en/alter-user.html#alter-user-password-management for more information.

By default, a MySQL installation has an anonymous user,
allowing anyone to log into MySQL without having to have
a user account created for them. This is intended only for
testing, and to make the installation go a bit smoother.
You should remove them before moving into a production
environment.

Remove anonymous users? (Press y|Y for Yes, any other key for No) : y
Success.


Normally, root should only be allowed to connect from
'localhost'. This ensures that someone cannot guess at
the root password from the network.

Disallow root login remotely? (Press y|Y for Yes, any other key for No) : y
Success.

By default, MySQL comes with a database named 'test' that
anyone can access. This is also intended only for testing,
and should be removed before moving into a production
environment.


Remove test database and access to it? (Press y|Y for Yes, any other key for No) : y
 - Dropping test database...
Success.

 - Removing privileges on test database...
Success.

Reloading the privilege tables will ensure that all changes
made so far will take effect immediately.

Reload privilege tables now? (Press y|Y for Yes, any other key for No) : y
Success.

All done!
3、启动数据库
执行命令 sudo systemctl start mysql 启动 MySQL 数据库服务
kedao@kedao:~$ sudo systemctl start mysql
查看服务状态
kedao@kedao:~$ sudo systemctl status mysql
停止服务
kedao@kedao:~$ sudo systemctl stop mysql
重启服务
kedao@kedao:~$ sudo systemctl restart mysql
4、设置开机启动
执行命令 sudo systemctl enable mysql 设置开机启动:
kedao@kedao:~$ sudo systemctl enable mysql
Synchronizing state of mysql.service with SysV service script with /usr/lib/systemd/systemd-sysv-install.
Executing: /usr/lib/systemd/systemd-sysv-install enable mysql
5、登录数据库
默认情况下没有设置用户密码,执行命令 sudo mysql -uroot -p ,密码直接回车,进行登录:
kedao@kedao:~$ sudo mysql -uroot -p
Enter password:
Welcome to the MySQL monitor.  Commands end with ; or \g.
Your MySQL connection id is 12
Server version: 8.0.41-0ubuntu0.24.04.1 (Ubuntu)

Copyright (c) 2000, 2025, Oracle and/or its affiliates.

Oracle is a registered trademark of Oracle Corporation and/or its
affiliates. Other names may be trademarks of their respective
owners.

Type 'help;' or '\h' for help. Type '\c' to clear the current input statement.

mysql>
6、设置密码
执行SQL语句,设置root用户的密码,这里的密码为 your_password(自行设置) :
mysql> ALTER USER 'root'@'localhost' IDENTIFIED WITH mysql_native_password BY 'your_password';
Query OK, 0 rows affected (0.01 sec)
注意:语句中的 'root'@'localhost' ,表示只能在服务器上登录,如果要允许在其他电脑上也可以登录,需要将 localhost 改成 %,如 :'root'@'%'
执行SQL语句 flush privileges; 刷新设置:
mysql> flush privileges;
Query OK, 0 rows affected (0.00 sec)
使用数据库 mysql
mysql> use mysql;
执行SQL语句 UPDATE user SET Host='%' WHERE User='root'; 修改 Host,允许 root 用户远程登录:
mysql> UPDATE user SET Host='%' WHERE User='root';
Query OK, 1 row affected (0.01 sec)
Rows matched: 1  Changed: 1  Warnings: 0
执行SQL语句 flush privileges; 刷新设置:
mysql> flush privileges;
Query OK, 0 rows affected (0.00 sec)
mysql> quit;
退出数据库连接:
mysql> quit;
7、设置 bind-address
执行命令 sudo vi /etc/mysql/mysql.conf.d/mysqld.cnf 修改文件
kedao@kedao:~$ sudo vi /etc/mysql/mysql.conf.d/mysqld.cnf
将 bind-address 的值由 127.0.0.1 修改为 0.0.0.0,允许所有IP连接数据库:
bind-address = 0.0.0.0
重启数据库
kedao@kedao:~$ sudo systemctl restart mysql
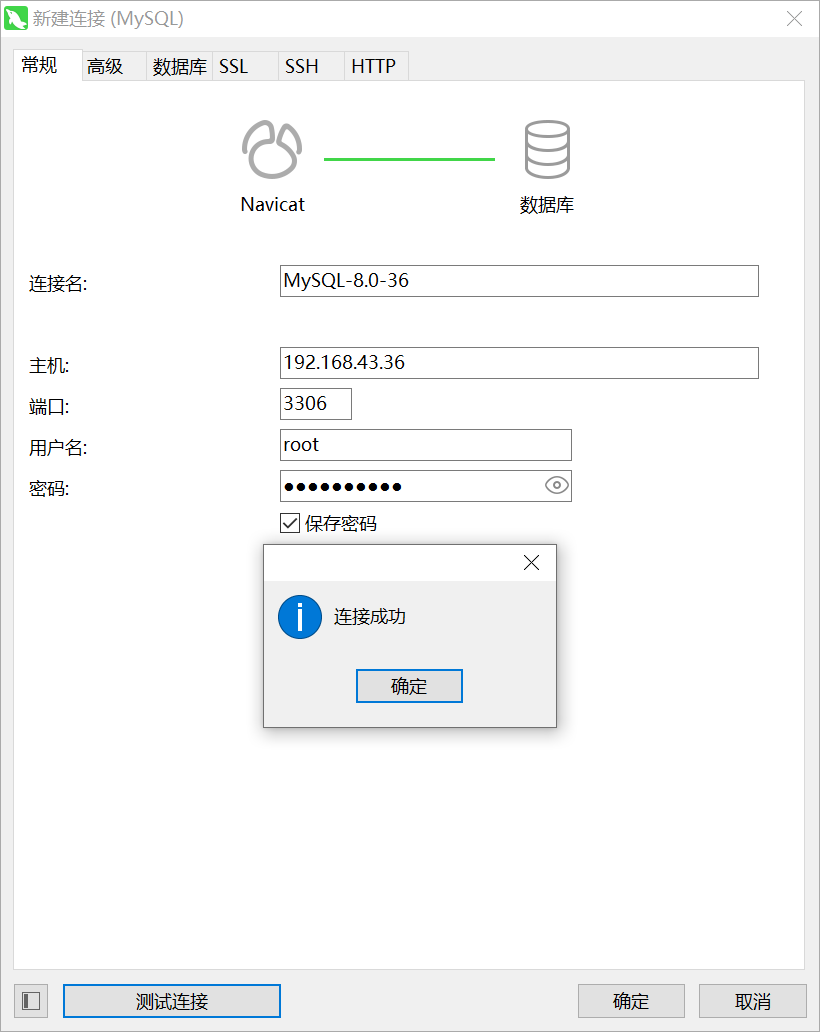
7、使用管理工具连接数据库
7.1 建立连接
使用 Navicat-16 连接,创建连接,输入数据库服务器IP,端口,用户和密码,如图:
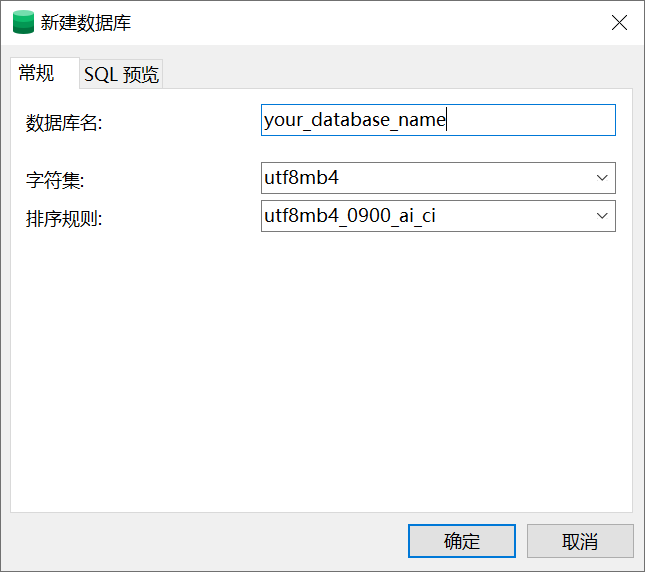
7.2 创建数据库
字符集选择 utf8mb4, 支持4个字节的utf-8字符集,能支持更多的字符
排序规则选择 utf8mb4_0900_ai_ci,区分大小写(非常重要),utf8mb4_0900_ai_ci是 MySQL 8.0 引入的新的排序规则系列,能够提供更好的兼容性和排序性能。

 浙公网安备 33010602011771号