Java SE11_网络编程笔记
网络编程
1 概述
网络编程的目的就是传播交流信息、数据交换、通信;达到的效果是需要如何准确定位到网络上的一台主机(IP、端口、资源),对主机进行数据传输。
计算机网络是指将地理位置不同的具有独立功能的多台计算机及其外部设备,通过通信线路连接起来,在网络操作系统,网络管理软件及网络通信协议的管理和协调下,实现资源共享和信息传递的计算机系统。
与JAVAweb网页编程的B/S架构不同,网络编程是通过Tcp/Ip协议的C/S架构。
2 网络通信的要素
如何实现网络的通信?
- 通信双方的ip、端口号
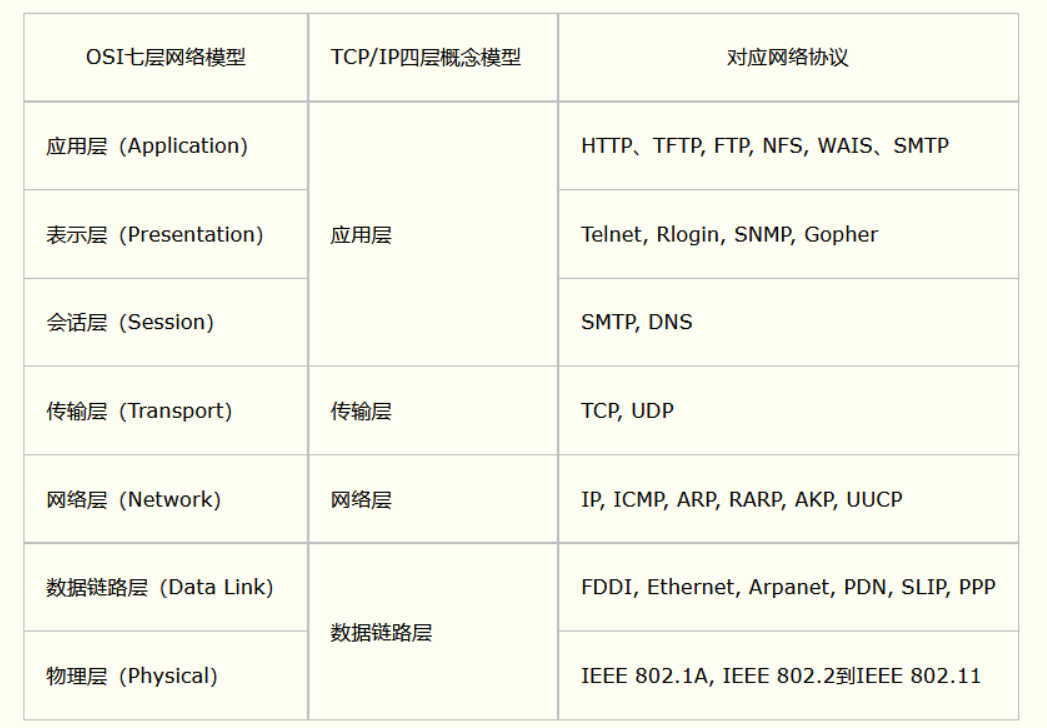
- 规则:TCP/IP 、OSI
小结:
- 网络编程中两个主要的问题
- 如何准确定位到网络上一台或多台主机
- 找到主机之后如何进行通信
- 网络编程中的要素
- IP和端口号
- 网络通信协议 UDP TCP
- 万物皆对象
3 IP地址
ip地址:InetAddress
-
唯一定位一台网络上的计算机
-
127.0.0.1 本机localhost
-
ip地址的分类
-
ipv4 / ipv6
-
IPV4 127.0.0.1 四个字节组成 0-255 已被用尽
-
IPV6 128位、8个无符号整数组成 abcdef
1111:aaaa:aabb:00aa:0000:2222:3333:aa11
-
-
公网 (互联网)- 私网(局域网)
-
ABCD类地址
-
192.168.xx.xx 局域网内部地址
-
-
域名:记忆IP问题
代码演示:获取相关信息
//测试ip
public class TestAddress {
    public static void main(String[] args) {
        try {
            //查询本机地址
            InetAddress inetAddress1 = InetAddress.getByName("127.0.0.1");//
            System.out.println(inetAddress1); // /127.0.0.1
            InetAddress inetAddress3 = InetAddress.getByName("localhost");
            System.out.println(inetAddress3); // localhost/127.0.0.1
            InetAddress inetAddress4 = InetAddress.getLocalHost();
            System.out.println(inetAddress4); // 主机名/192.168.255.1

            //查询网络地址
            InetAddress inetAddress2 = InetAddress.getByName("www.baidu.com");
            System.out.println(inetAddress2); // www.baidu.com/183.232.231.174

            //常用方法
//            System.out.println(inetAddress2.getAddress());
            System.out.println(inetAddress2.getCanonicalHostName()); //规范名字
            System.out.println(inetAddress2.getHostAddress()); //ip
            System.out.println(inetAddress2.getHostName()); //域名或者主机名
        } catch (UnknownHostException e) {
            e.printStackTrace();
        }
    }
}
4 端口
端口表示计算机上的一个程序的进程
-
不同的进程有不同的端口号,用来区分软件
-
被规定 0 - 65535
-
TCP,UDP 65535*2 单个协议下,端口号不能冲突
-
端口分类
- 公有端口 0 - 1023
- HTTP:80
- HTTPS:443
- FTP:21
- TELENT:23
- 程序注册接口 1024 - 49151分配用户或者程序
- Tomcat:8080
- MySQL:3306
- Oracle:1521
- 动态、私有 49152 - 65535(尽量不使用)
- 公有端口 0 - 1023
-
dos命令
netstat -ano #查看所有端口 netstat -ano|findstr "****" #查看指定端口 tasklist|findstr "****" #查看指定端口的进程 -
Ctrl + Shift + Esc直接打开任务管理器===Ctrl + Alt + Del间接打开任务管理器
C:\Windows\System32\drivers\etc\hosts:本地host文件路径
代码演示:
public class TestInetSocketAddress {
    public static void main(String[] args) {
        InetSocketAddress socketAddress = new InetSocketAddress("127.0.0.1", 8080);
        InetSocketAddress socketAddress2 = new InetSocketAddress("localhost", 8080);
        System.out.println(socketAddress);// /127.0.0.1:8080
        System.out.println(socketAddress2);// localhost/127.0.0.1:8080

        System.out.println(socketAddress.getAddress());// /127.0.0.1
        System.out.println(socketAddress.getHostName());// 地址
        System.out.println(socketAddress.getPort());// 8080
    }
}
5 通信协议
协议:约定俗称的语音、符号
网络通信协议:速率、传输码率、代码结构、传输控制...
TCP/IP协议簇(一组协议)
- TCP:用户传输协议 提供不可靠的IP服务,并提供一种可靠的传输层服务
- UDP:用户数据报协议 为应用程序发送和接收数据报,和TCP不同,UDP是不可靠的
- IP:网络互连协议 同时被TCP和UDP使用
- ICMP:是IP协议的附属协议
TCP/UDP对比
-
TCP:连接稳定、
三次握手四次挥手、客户端与服务端、传输完成需要释放连接,效率低 -
UDP:不连接不稳定、客户端服务端无明确界限、无需准备、导弹、DDOS泛洪攻击
6 TCP实现聊天
6.1 客户端
-
连接服务器 Socket
-
发送消息
代码演示:
//客户端
public class TcpClientDemo01 {
    public static void main(String[] args) {
        Socket socket = null;
        OutputStream os = null;
        try {
            //1.要知道服务器的地址,端口号
            InetAddress serverIp = InetAddress.getByName("127.0.0.1");
            int port = 9999;
            //2.创建一个socket连接
            socket = new Socket(serverIp, port);
            //3.发送消息 IO流
            os = socket.getOutputStream();
            os.write("hello world!".getBytes());
            os.close();
        } catch (Exception e) {
            e.printStackTrace();
        }finally {
            if(os != null){
                try {
                    os.close();
                } catch (IOException e) {
                    e.printStackTrace();
                }
            }
            if(socket != null){
                try {
                    socket.close();
                } catch (IOException e) {
                    e.printStackTrace();
                }
            }
        }
    }
}
6.2 服务端
服务器
- 建立服务的端口 ServerSocket
- 等待用户的链接 accept
- 接收用户的消息
代码演示:
//服务端
public class TcpServerDemo01 {
    public static void main(String[] args) {
        ServerSocket serverSocket = null;
        Socket socket = null;
        InputStream is = null;
        ByteArrayOutputStream baos = null;
        try {
            //1.创建一个地址
            serverSocket = new ServerSocket(9999);
            //2.等待客户端连接
            socket = serverSocket.accept();
            //3.读取客户端的消息
            is = socket.getInputStream();

            //管道流
            baos = new ByteArrayOutputStream();
            byte[] buf = new byte[1024];
            int len = 0;
            while((len = is.read(buf)) != -1){
                baos.write(buf, 0 , len);
            }
            System.out.println(baos.toString());
        } catch (IOException e) {
            e.printStackTrace();
        } finally {
            //关闭资源
            if(baos != null){
                try {
                    baos.close();
                } catch (IOException e) {
                    e.printStackTrace();
                }
            }
            if(is != null){
                try {
                    is.close();
                } catch (IOException e) {
                    e.printStackTrace();
                }
            }
            if(socket != null){
                try {
                    socket.close();
                } catch (IOException e) {
                    e.printStackTrace();
                }
            }
            if(serverSocket != null){
                try {
                    serverSocket.close();
                } catch (IOException e) {
                    e.printStackTrace();
                }
            }
        }
    }
}
7 TCP实现文件上传
7.1 客户端
代码演示:
public class TcpClientDemo02 {
    public static void main(String[] args) throws Exception {
        //1.创建一个Socket连接
        Socket socket = new Socket(InetAddress.getByName("127.0.0.1"),9000);
        //2.创建一个输入流
        OutputStream os = socket.getOutputStream();
        //3.文件流
        FileInputStream fis = new FileInputStream("E:\\newstart\\linshi\\1.jpg");
        //4.写出文件
        byte[] buf = new byte[1024];
        int len = 0;
        while((len = fis.read(buf)) != -1){
            os.write(buf, 0, len);
        }

        //通知服务器我已经发送完了
        socket.shutdownOutput();

        //确定服务器接受完毕,才能断开连接
        InputStream is = socket.getInputStream();
        ByteArrayOutputStream baos = new ByteArrayOutputStream();
        byte[] buf2 = new byte[1024];
        int len2 = 0;
        while((len2 = is.read(buf2)) != -1){
            baos.write(buf2, 0, len2);
        }
        System.out.println(baos.toString());

        //5.关闭资源
        baos.close();
        is.close();
        fis.close();
        os.close();
        socket.close();
    }
}
7.2 服务端
代码演示:
public class TcpServerDemo02 {
    public static void main(String[] args) throws Exception {
        //1.创建服务
        ServerSocket serverSocket = new ServerSocket(9000);
        //2.监听客户端的连接
        Socket socket = serverSocket.accept();//阻塞式监听,会一直等待客户端连接
        //3.获取输入流
        InputStream is = socket.getInputStream();
        //4.文件输出
        FileOutputStream fos = new FileOutputStream(new File("E:\\newstart\\linshi\\file\\2.jpg"));
        byte[] buf = new byte[1024];
        int len = 0;
        while((len = is.read(buf)) != -1){
            fos.write(buf, 0, len);
        }

        //通知客户端接收到了
        OutputStream os = socket.getOutputStream();
        os.write("我接收到了,你可以断开了".getBytes());

        //5.关闭资源
        os.close();
        fos.close();
        is.close();
        socket.close();
        serverSocket.close();
    }
}
8 Tomcat
服务端
- 自定义 S
- Tomcat服务器 S : JAVA后台开发
客户端
- 自定义 C
- 浏览器 B
默认为UTF-8,但是电脑默认GBK,可修改配置文件apache-tomcat-7.0.103\conf\
9 UDP
9.1 UDP发送消息
发送端
代码演示:
//不需要连接服务器
public class UdpClientDemo01 {
    public static void main(String[] args) throws Exception{
        //1.建立一个Socket
        DatagramSocket socket = new DatagramSocket();

        //2.建包
        String msg = "hello world!";
        InetAddress localhost = InetAddress.getByName("localhost");
        int port = 9090;
        //参数:数据 数据的起始位置 数据的长度 发送的地址 发送的端口
        DatagramPacket packet = new DatagramPacket(msg.getBytes(), 0, msg.getBytes().length, localhost, port);

        //3.发包
        socket.send(packet);

        //4.关闭
        socket.close();
    }
}
接收端
代码演示:
//还是要等待客户端的连接
public class UdpServerDemo01 {
    public static void main(String[] args) throws Exception {
        //1.开放端口
        DatagramSocket socket = new DatagramSocket(9090);
        //2.接收数据包
        byte[] buf = new byte[1024];
        DatagramPacket packet = new DatagramPacket(buf, 0, buf.length);// 接收
        socket.receive(packet); //阻塞接收

        System.out.println(packet.getAddress().getHostAddress());
        System.out.println(new String(packet.getData(), 0, packet.getLength()));
        //3.关闭连接
        socket.close();
    }
}
9.2 UPD聊天
发送方
代码演示:
public class UdpSenderDemo {
    public static void main(String[] args) throws Exception {
        DatagramSocket socket = new DatagramSocket(8888);

        //准备数据:控制台读取System.in
        BufferedReader reader = new BufferedReader(new InputStreamReader(System.in));

        while(true) {
            String data = reader.readLine();
            byte[] datas = data.getBytes();
            DatagramPacket packet = new DatagramPacket(datas, 0, datas.length, new InetSocketAddress("localhost", 6666));

            socket.send(packet);
            if(data.equals("bye")){
                break;
            }
        }
        socket.close();
    }
}
接收方
代码演示:
public class UdpReceiveDemo {
    public static void main(String[] args) throws Exception {
        DatagramSocket socket = new DatagramSocket(6666);

        while(true){
            //准备接受包裹
            byte[] container = new byte[1024];
            DatagramPacket packet = new DatagramPacket(container, 0, container.length);
            socket.receive(packet); //阻塞式接受包裹

            //断开连接 bye
            byte[] data = packet.getData();
            String receiveDate = new String(data, 0, data.length);
            System.out.println(receiveDate);
            if(receiveDate.trim().equals("bye")){
                break;
            }
        }
        socket.close();
    }
}
9.3 UDP多线程在线咨询
9.3.1 发送方
代码演示:
public class TalkSend implements Runnable {
    DatagramSocket socket = null;
    BufferedReader reader = null;

    private int formPort;
    private String toIp;
    private int toPort;

    public TalkSend(){}

    public TalkSend(int formPort, String toIp, int toPort) {
        this.formPort = formPort;
        this.toIp = toIp;
        this.toPort = toPort;
        try {
            socket = new DatagramSocket(formPort);
            reader = new BufferedReader(new InputStreamReader(System.in));
        } catch (SocketException e) {
            e.printStackTrace();
        }
    }

    @Override
    public void run() {
        String data = null;
        while(true) {
            try {
                data = reader.readLine();
                byte[] datas = data.getBytes();
                DatagramPacket packet = new DatagramPacket(datas, 0, datas.length, new InetSocketAddress(this.toIp, this.toPort));

                socket.send(packet);
                if(data.equals("bye")){
                    break;
                }
            } catch (Exception e) {
                e.printStackTrace();
            }
        }
        socket.close();
    }
}
9.3.2 发送方
代码演示:
public class TalkReceive implements Runnable {
    DatagramSocket socket = null;
    private int port;
    private String msgFrom;

    public TalkReceive(int port, String msgFrom) {
        this.port = port;
        this.msgFrom = msgFrom;
        try {
            socket = new DatagramSocket(port);
        } catch (SocketException e) {
            e.printStackTrace();
        }
    }

    @Override
    public void run() {

        while(true){
            try {
                //准备接受包裹
                byte[] container = new byte[1024];
                DatagramPacket packet = new DatagramPacket(container, 0, container.length);
                socket.receive(packet); //阻塞式接受包裹

                //断开连接 bye
                byte[] data = packet.getData();
                String receiveDate = new String(data, 0, data.length);
                System.out.println(msgFrom + ":" + receiveDate);
                if(receiveDate.trim().equals("bye")){
                    break;
                }
            } catch (Exception e) {
                e.printStackTrace();
            }
        }
        socket.close();
    }
}
9.3.3 多线程启动
代码演示:
//老师端
public class TalkTeacher {
    public static void main(String[] args) {
        //开启两个线程
        new Thread(new TalkSend(5555, "localhost", 8888)).start();
        new Thread(new TalkReceive(9999, "学生")).start();
    }
}
//学生端
public class TalkStudent {
    public static void main(String[] args) {
        //开启两个线程
        new Thread(new TalkSend(7777, "localhost", 9999)).start();
        new Thread(new TalkReceive(8888, "老师")).start();
    }
}
10 URL统一资源定位符
统一资源定位符:定位资源,定位互联网上的某一个资源
DNS域名解析
协议:// ip地址:端口/ 项目名 / 资源
代码演示:下载网络资源
public class UrlDown {
    public static void main(String[] args) throws Exception {
        //1.下载地址
        URL url = new URL("url资源地址");

        //2.连接到这个资源 HTTP
        HttpURLConnection urlConnection = (HttpURLConnection)url.openConnection();

        InputStream is = urlConnection.getInputStream();
        FileOutputStream fos = new FileOutputStream("本地地址\\文件名.文件格式");
        byte[] buf = new byte[1024];
        int len = 0;
        while((len = is.read(buf)) != -1){
            fos.write(buf, 0, len);//写出该数据
        }
        fos.close();
        is.close();
        urlConnection.disconnect();//断开连接
    }
}

 浙公网安备 33010602011771号