
SSM整合(SSM的简单整合、逆向工程、分页插件的使用)
1.SSM整合初体验
1.导包:
1).Spring
a.IOC核心包
- commons-logging-1.1.3.jar
- spring-aop-4.0.0.RELEASE.jar
- spring-beans-4.0.0.RELEASE.jar
- spring-context-4.0.0.RELEASE.jar
- spring-core-4.0.0.RELEASE.jar
- spring-expression-4.0.0.RELEASE.jar
b.jdbc核心包
- spring-jdbc-4.0.0.RELEASE.jar
- spring-orm-4.0.0.RELEASE.jar
- spring-tx-4.0.0.RELEASE.jar
c.测试核心包
- spring-test-4.0.0.RELEASE.jar
d.aop核心包
- com.springsource.net.sf.cglib-2.2.0.jar
- com.springsource.org.aopalliance-1.0.0.jar
- com.springsource.org.aspectj.weaver-1.6.8.RELEASE.jar
- spring-aspects-4.0.0.RELEASE.jar
2).SpringMVC
a.SpringMVC核心
- spring-web-4.0.0.RELEASE.jar
- spring-webmvc-4.0.0.RELEASE.jar
b.上传下载
- commons-fileupload-1.2.1.jar
- commons-io-2.0.jar
c.jstl-jsp标准标签库
- jstl.jar
- standard.jar
d.数据校验
- hibernate-validator-5.0.0.CR2.jar
- hibernate-validator-annotation-processor-5.0.0.CR2.jar
e.ajax
- jackson-annotations-2.1.5.jar
- jackson-core-2.1.5.jar
- jackson-databind-2.1.5.jar
3).MyBatis
a.核心包
- mybatis-3.4.1.jar
b.ehcache整合
- ehcache-core-2.6.8.jar
- mybatis-ehcache-1.0.3.jar
- log4j-1.2.17.jar
- slf4j-api-1.6.1.jar
- slf4j-log4j12-1.6.2.jar
4).其他的包
a.数据源
- mysql-connector-java-8.0.17.jar
- c3p0-0.9.5.2.jar
- mchange-commons-java-0.2.12.jar
b.spring与mybatis的整合包
- mybatis-spring-1.3.0.jar
2.写配置
0).web.xml配置
代码示例:
1).Spring配置
<context:component-scan base-package="com.luyi">
<context:exclude-filter type="annotation" expression="org.springframework.stereotype.Controller"/>
</context:component-scan>
<context:property-placeholder location="classpath:dbconfig.properties"/>
aop:config
<aop:pointcut expression="execution(* com.lui.service..(..))" id="txPoint"/>
<aop:advisor advice-ref="myTx" pointcut-ref="txPoint"/>
</aop:config>
<tx:advice id="myTx" transaction-manager="tm">
tx:attributes
<tx:method name="" rollback-for="java.lang.Exception"/>
<tx:method name="get" read-only="true"/>
</tx:attributes>
</tx:advice>
2).SpringMVC配置
代码示例:
<context:component-scan base-package="com.luyi" use-default-filters="false">
<context:include-filter type="annotation" expression="org.springframework.stereotype.Controller"/>
</context:component-scan>
mvc:default-servlet-handler/
mvc:annotation-driven</mvc:annotation-driven>
3).MyBatis配置
全局配置文件:
SQL映射配置文件:
4).其他小框架的 配置
properties配置sql连接:
jdbc.username=root
jdbc.password=123
jdbc.jdbcurl=jdbc:mysql://localhost:3306/my?serverTimezone=UTC
jdbc.driverclass=com.mysql.cj.jdbc.Driver
log4j.xml文件:
<log4j:configuration xmlns:log4j="http://jakarta.apache.org/log4j/">
</log4j:configuration>
3.测试
为了完成我们对ssm整合的测试除了以上的配置文件以外,还需要一些环境的搭建:
数据库的设计(只有一个表):
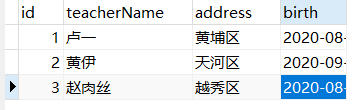
与数据库对应的POJO:
//Teacher.java
package com.luyi.bean;
import java.util.Date;
public class Teacher{
private Integer id;
private String teacherName;
private String address;
private Date birth;
public Integer getId() {
return id;
}
public void setId(Integer id) {
this.id = id;
}
public String getTeacherName() {
return teacherName;
}
public void setTeacherName(String teacherName) {
this.teacherName = teacherName;
}
public String getAddress() {
return address;
}
public void setAddress(String address) {
this.address = address;
}
public Date getBirth() {
return birth;
}
public void setBirth(Date birth) {
this.birth = birth;
}
@Override
public String toString() {
return "Teacher [id=" + id + ", teacherName=" + teacherName
+ ", address=" + address + ", birth=" + birth + "]";
}
}
提供操作数据库的接口:
//TeacherDao.java
package com.luyi.dao;
import com.luyi.bean.Teacher;
public interface TeacherDao {
public Teacher getTeacherById(Integer id);
}
操作数据库的文件:
//TeacherService.java
package com.luyi.service;
import org.springframework.beans.factory.annotation.Autowired;
import org.springframework.stereotype.Service;
import com.luyi.bean.Teacher;
import com.luyi.dao.TeacherDao;
@Service
public class TeacherService {
@Autowired
private TeacherDao teacherDao;
public Teacher getTeacher(Integer id) {
Teacher t = teacherDao.getTeacherById(id);
return t;
}
}
控制请求转发的文件:
//TeacherController.java
package com.luyi.controller;
import org.springframework.beans.factory.annotation.Autowired;
import org.springframework.stereotype.Controller;
import org.springframework.ui.Model;
import org.springframework.web.bind.annotation.RequestMapping;
import org.springframework.web.bind.annotation.RequestParam;
import com.luyi.bean.Teacher;
import com.luyi.service.TeacherService;
@Controller
public class TeacherController {
@Autowired
TeacherService teacherService;
@RequestMapping("/getTeacher")
public String getTeacher(@RequestParam(value="id", defaultValue="1")Integer id, Model model){
Teacher t = teacherService.getTeacher(id);
model.addAttribute("teacher", t);
return "success";
}
}
请求发起后的成功页面:
// /WEB-INF/page/success.jsp
<%@ page language="java" contentType="text/html; charset=UTF-8"
pageEncoding="UTF-8"%>
SUCCESS
${teacher}
环境部署好了,那我们就开始测试吧!测试文件(index.jsp):
<%@ page language="java" contentType="text/html; charset=UTF-8"
pageEncoding="UTF-8"%>
获取教师信息
2.MBG
概述:MBG,全称为MyBatis Generator,也就是MyBatis的代码生成器,通过这个生成器,可以帮我们生成代码,缩短开发时间,这个过程被称为逆向工程何为逆向工程呢?逆向工程就是根据数据库表,逆向分析数据表,自动生成javaBean,dao接口,SQL映射等文件,而正向工程就是我们平时开发时的做法,根据数据表,创建对应的javaBean,然后写dao接口等等
MBG实现的步骤
- 导包
- 写配置
- 生成代码
代码实现:
1.导包:mybatis-generator-core-1.3.2.jar
2.写配置
3.通过写java代码生成代码:
//MBGTest.java
package com.luyi.test;
import java.io.File;
import java.io.IOException;
import java.sql.SQLException;
import java.util.ArrayList;
import java.util.List;
import org.mybatis.generator.api.MyBatisGenerator;
import org.mybatis.generator.config.Configuration;
import org.mybatis.generator.config.xml.ConfigurationParser;
import org.mybatis.generator.exception.InvalidConfigurationException;
import org.mybatis.generator.exception.XMLParserException;
import org.mybatis.generator.internal.DefaultShellCallback;
public class MBGTest {
public static void main(String[] args) throws IOException, XMLParserException, InvalidConfigurationException, SQLException, InterruptedException {
List
boolean overwrite = true;
File configFile = new File("mbg.xml");
ConfigurationParser cp = new ConfigurationParser(warnings);
Configuration config = cp.parseConfiguration(configFile);
DefaultShellCallback callback = new DefaultShellCallback(overwrite);
MyBatisGenerator myBatisGenerator = new MyBatisGenerator(config, callback, warnings);
myBatisGenerator.generate(null);
System.out.println("代码生成了");
}
}
3.分页插件的使用
使用步骤
1.导包
- pagehelper-5.1.0.jar
- jsqlparser-1.0.jar
2.写配置
在mybatis-config.xml追加一个插件配置:
3.测试:
在我们的第一个SSM整合文件中进行一些小修改即可完成我们的测试:
dao包下的文件:
package com.luyi.dao;
import java.util.List;
import com.luyi.bean.Teacher;
public interface TeacherDao {
public Teacher getTeacherById(Integer id);
public List
}
service包下的文件:
package com.luyi.service;
import java.util.List;
import org.springframework.beans.factory.annotation.Autowired;
import org.springframework.stereotype.Service;
import com.luyi.bean.Teacher;
import com.luyi.dao.TeacherDao;
@Service
public class TeacherService {
@Autowired
private TeacherDao teacherDao;
public Teacher getTeacher(Integer id) {
Teacher t = teacherDao.getTeacherById(id);
return t;
}
public List
return teacherDao.getAll();
}
}
controller包下的文件:
package com.luyi.controller;
import java.util.List;
import org.springframework.beans.factory.annotation.Autowired;
import org.springframework.stereotype.Controller;
import org.springframework.ui.Model;
import org.springframework.web.bind.annotation.RequestMapping;
import org.springframework.web.bind.annotation.RequestParam;
import com.github.pagehelper.PageHelper;
import com.github.pagehelper.PageInfo;
import com.luyi.bean.Teacher;
import com.luyi.service.TeacherService;
@Controller
public class TeacherController {
@Autowired
TeacherService teacherService;
@RequestMapping("/getTeacher")
public String getTeacher(@RequestParam(value="id", defaultValue="1")Integer id, Model model){
Teacher t = teacherService.getTeacher(id);
model.addAttribute("teacher", t);
return "success";
}
@RequestMapping("/getAllTeachers")
public String getAllTeacher(@RequestParam(value="pn", defaultValue="1") Integer pn, Model model){
//紧跟他的查询就是一个分页查询
PageHelper.startPage(pn, 5);
List
//我们可以把我们的查询结果放在pageinfo中的,这个pageInfo对象就有非常多的方法供我们使用
PageInfo
System.out.println(info.getPageNum());
System.out.println(info.getPageSize());
model.addAttribute("info", info);
return "success";
}
}
success.jsp文件:
<%@ page language="java" contentType="text/html; charset=UTF-8"
pageEncoding="UTF-8"%>
<%@taglib prefix="c" uri="http://java.sun.com/jsp/jstl/core" %>
SUCCESS
${teacher}
<c:forEach items="${info.list}" var="teacher">
</c:forEach>
| id | teacherName | address | birth |
| ${teacher.id} | ${teacher.teacherName} | ${teacher.address} | ${teacher.birth} |
首页上一页 <c:forEach items="${info.navigatepageNums}" var="number"> </c:forEach> |
|||
index.jsp(测试文件,程序入口):
<%@ page language="java" contentType="text/html; charset=UTF-8"
pageEncoding="UTF-8"%>
获取教师信息
获取所有老师的信息
作者:卢一
出处:http://www.cnblogs.com/luyi001/
本文版权归作者和博客园共有,欢迎转载,但未经作者同意必须保留此段声明,且在文章页面明显位置给出原文连接,否则保留追究法律责任的权利。

 浙公网安备 33010602011771号