spring框架(IOC&AOP)
1.spring框架
框架概述:框架是一个半成品软件,他是高度抽取可重用代码的一种设计,高度的通用性,形成一个某个领域的整体解决方案
spring框架概述:
1.Spring是一个开源框架
2.Spring为简化企业级开发而生,使用Spring,JavaBean就可以实现很多以前要靠EJB才能实现的功能。同样的功能,在EJB中要通过繁琐的配置和复杂的代码才能够实现,而在Spring中却非常的优雅和简洁。
3.Spring是一个IOC(DI)和AOP容器框架。
4.Spring的优良特性
1)非侵入式:基于Spring开发的应用中的对象可以不依赖于Spring的API
2)依赖注入:DI——Dependency Injection,反转控制(IOC)最经典的实现。
3)面向切面编程:Aspect Oriented Programming——AOP
4)容器:Spring是一个容器,因为它包含并且管理应用对象的生命周期
5)组件化:Spring实现了使用简单的组件配置组合成一个复杂的应用。在 Spring 中可以使用XML和Java注解组合这些对象。
6)一站式:在IOC和AOP的基础上可以整合各种企业应用的开源框架和优秀的第三方类库(实际上Spring 自身也提供了表述层的SpringMVC和持久层的Spring JDBC)。
spring框架的模块划分图:一个绿色的框框就代表一个模块
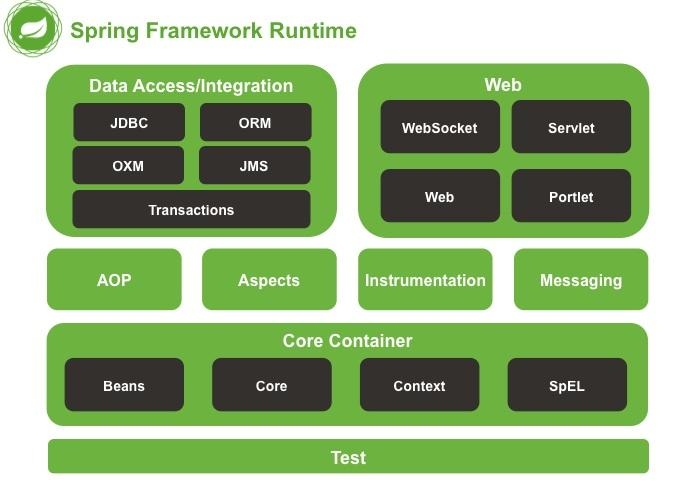
1.Test:spring的单元测试模块
- spring-test-4.0.0.RELEASE.jar
2.Core Container:核心容器(IOC)模块,黑色的框框代表这部分的功能由哪些jar包组成,要使用这个部分的完整功能,这些jar包都需要导入
- spring-beans-4.0.0.RELEASE.jar
- spring-core-4.0.0.RELEASE.jar
- spring-context-4.0.0.RELEASE.jar
- spring-expression-4.0.0.RELEASE.jar
3.AOP+Aspects(面向切面编程模块)
- spring-aop-4.0.0.RELEASE.jar
- spring-aspects-4.0.0.RELEASE.jar
4.Data Access/Integration(数据访问/集成模块):与数据库访问相关
- spring-jdbc-4.0.0.RELEASE.jar
- spring-orm-4.0.0.RELEASE.jar
- spring-oxm-4.0.0.RELEASE.jar
- spring-jms-4.0.0.RELEASE.jar
- spring-tx-4.0.0.RELEASE.jar
5.Web:Spring开发web应用的模块
- spring-websocket-4.0.0.RELEASE.jar
- spring-web-4.0.0.RELEASE.jar(Servlet)
- spring-webmvc-4.0.0.RELEASE.jar(Web)
- spring-webmvc-portlet-4.0.0.RELEASE.jar
建议用哪个模块就导入哪个模块对应的包
安装Spring插件
概述:我们使用spring框架时,可以安装spring插件,使得我们的操作变得简单,这个插件就是springsource-tool-suite-3.4.0.RELEASE-e4.3.1-updatesite.zip,安装后我们创建一个spring配置文件只需要new一个Spring Bean Configuration File文件即可在里面进行相应的配置了
2. IOC和DI
IOC概述:
IOC就是Inversion Of Control(控制反转),那么控制是什么呢,反转又是什么呢?
控制就是资源的获取方式,资源的获取方式可以分为主动式和被动式,主动式就是要什么资源都自己创建,也就是自己new对象,而被动式则相反,资源的获取不是我们自己创建,而是交给一个容器来创建和设置,那么,容器又是什么呢?
容器就是管理所有组件(有功能的类)的,是用map来保存我们的组件的,并提供外界获取这些组件的功能,假设,BookServlet的使用需要依赖BookService对象,而BookServlet受容器管理,BookService也受容器管理,容器可以自动的探查出哪些组件(类)需要用到另一个组件(类),容器帮我们创建BookService对象,并把BookService对象赋值过去,这样BookServlet就可以使用了;容器使得主动new资源变为被动的接收资源
而反转指的就是资源的获取方式由原来的主动new资源,反转为被动接收资源
DI概述
DI就是Dependency Injection(依赖注入),容器能知道哪个组件(类)运行的时候,需要另一个组件(类),容器通过反射的形式,将容器中准备好的BookService对象注入(利用反射给属性赋值)到BookServlet
3.实现第一个Spring框架程序
步骤
1.导包(核心容器包)
- spring-beans-4.0.0.RELEASE.jar
- spring-core-4.0.0.RELEASE.jar
- spring-context-4.0.0.RELEASE.jar
- spring-expression-4.0.0.RELEASE.jar
- commons-logging-1.1.3.jar
2.写配置
先创建一个Person类:
package com.luyi.bean;
public class Person {
private String name;
private int age;
private String sex;
public String getName() {
return name;
}
public void setName(String name) {
this.name = name;
}
public int getAge() {
return age;
}
public void setAge(int age) {
this.age = age;
}
public String getSex() {
return sex;
}
public void setSex(String sex) {
this.sex = sex;
}
@Override
public String toString() {
return "Person [name=" + name + ", age=" + age + ", sex=" + sex + "]";
}
}
再创建一个Spring Bean Configuration File
3.测试
package com.luyi.test;
import org.junit.Test;
import org.springframework.context.ApplicationContext;
import org.springframework.context.support.ClassPathXmlApplicationContext;
import com.luyi.bean.Person;
public class IOCTest {
/**
* 从容器中拿组件
*/
@Test
public void test() {
//ApplicationContext接口作为一个容器
ApplicationContext ioc = new ClassPathXmlApplicationContext("ioc.xml");
//根据spring的配置文件里的id配置得到ioc容器对象
Person bean = (Person) ioc.getBean("person01");
System.out.println(bean);
}
}
注意事项
1.src是源码包开始的路径,称为类路径的开始,所有源码包里面的东西都会被合并放在类路径里面
2.要记得导包commons-logging-1.1.3.jar
3.先导包再创建配置文件
几个细节
1.给容器中注册一个组件,组件(Person对象)的创建工作是由容器完成的,对象的创建在容器创建完成的时候就已经创建准备好了
2.同一个组件在容器中是单例的
3.容器中如果没有这个组件,然后去获取这个组件,就会报错
4.容器在创建这个组件对象的时候,(配置文件里的property标签)会利用setter方法为javaBean的属性进行赋值,因此我们的setter方法必须按照规范的来(setXxx),最好是由eclise自动生成
4.几个配置文件的知识点
我们通过编写代码并测试来学习这些知识点吧!
两个bean组件:
package com.luyi.bean;
public class Car{
/**
* 汽车类
*/
private String name;
private String color;
public String getName() {
return name;
}
public void setName(String name) {
this.name = name;
}
public String getColor() {
return color;
}
public void setColor(String color) {
this.color = color;
}
//bean生命周期的初始化方法(不能带参数)
public void myInit(){
System.out.println("调用初始化方法了");
}
//bean生命周期的销毁方法(不能带参数)
public void myDestory(){
System.out.println("调用销毁方法了");
}
@Override
public String toString() {
return "Car [name=" + name + ", color=" + color + "]";
}
}
package com.luyi.bean;
import java.util.List;
import java.util.Map;
import java.util.Properties;
public class Person {
/**
* 人类
*/
private String name;
private int age;
private String sex;
private Car car;
private List
private Map<String, Object> map;
private Properties properties;
public Person(){
System.out.println("调用了无参构造器");
};
public Person(String name, int age, String sex) {
System.out.println("调用了有参构造器");
this.name = name;
this.age = age;
this.sex = sex;
}
public String getName() {
return name;
}
public void setName(String name) {
System.out.println("调用了setter方法");
this.name = name;
}
public int getAge() {
return age;
}
public void setAge(int age) {
this.age = age;
}
public String getSex() {
return sex;
}
public void setSex(String sex) {
this.sex = sex;
}
public Car getCar() {
return car;
}
public void setCar(Car car) {
this.car = car;
}
public List
return list;
}
public void setList(List
this.list = list;
}
public Map<String, Object> getMap() {
return map;
}
public void setMap(Map<String, Object> map) {
this.map = map;
}
public Properties getProperties() {
return properties;
}
public void setProperties(Properties properties) {
this.properties = properties;
}
@Override
public String toString() {
return "Person [name=" + name + ", age=" + age + ", sex=" + sex
+ ", car=" + car + ", list=" + list + ", map=" + map
+ ", properties=" + properties + "]";
}
}
静态工厂,实例工厂以及实现了FactoryBean接口的工厂:
package com.luyi.factory;
/**
* 创建car的静态工厂
*/
import com.luyi.bean.Car;
public class CarFactory {
public static Car getCar(String name){
Car car = new Car();
car.setName(name);
car.setColor("white");
return car;
}
}
package com.luyi.factory;
import com.luyi.bean.Car;
public class CarInstanceFactory {
public Car getCar(String name){
Car car = new Car();
car.setName(name);
car.setColor("white");
return car;
}
}
package com.luyi.factory;
import org.springframework.beans.factory.FactoryBean;
import com.luyi.bean.Car;
public class MyFactoryBeanImpl implements FactoryBean
@Override
public Car getObject() throws Exception {
Car car = new Car();
car.setName("陆虎");
car.setColor("green");
return car;
}
@Override
public Class<?> getObjectType() {
return Car.class;
}
//true代表是单例,false代表是多实例的
@Override
public boolean isSingleton() {
return false;
}
}
spring配置文件:
<util:list id="myList">
</util:list>
<!-- 第11个知识点
bean的作用域,分别创建单例和多实例的bean
prototype:多实例的
1)容器启动默认不会去创建多实例bean
2)获取的时候创建这个bean
3)每次获取都会创建一个新的对象
singleton:单实例的
1)在容器启动完成之前已经创建好对象,保存在容器中
2)任何获取都是获取之前创建好的那个对象
-->
<!-- FactoryBean(是spring规定的一个接口),
只要是这接口的实现类,spring都认为是一个工厂
1.ioc容器启动的时候不会创建实例
2.FactoryBean的接口实现类获取的时候才创建对象
-->
测试文件:
package com.luyi.test;
import org.junit.Test;
import org.springframework.context.ApplicationContext;
import org.springframework.context.ConfigurableApplicationContext;
import org.springframework.context.support.ClassPathXmlApplicationContext;
import com.luyi.bean.Person;
import com.luyi.bean.Car;
public class IOCTest {
//ApplicationContext接口作为一个容器
private ApplicationContext ioc = new ClassPathXmlApplicationContext("ioc.xml");
/**
* 从容器中拿组件(通过id获取组件)
*/
@Test
public void test() {
//根据spring的配置文件里的id配置得到ioc容器对象
Person bean = (Person) ioc.getBean("person01");
System.out.println(bean);
}
/**
* 从容器中拿组件(通过bean的类名获取组件)
*/
@Test
public void test2() {
//根据spring的配置文件里的id配置得到ioc容器对象
//Person bean = ioc.getBean(Person.class);//适用于ioc容器中只有一个bean的时候
//System.out.println(bean);
//如果ioc容器有多个bean,则可用以下方式获取
Person bean2 = ioc.getBean("person02", Person.class);
System.out.println(bean2);
}
@Test
public void test3() {
Person bean3 = ioc.getBean("person03", Person.class);
System.out.println(bean3);
}
@Test
public void test4() {
Person bean4 = ioc.getBean("person04", Person.class);
System.out.println(bean4);
}
@Test
public void test5() {
Person bean5 = ioc.getBean("person05", Person.class);
System.out.println(bean5);
Car beanCar1 = (Car)ioc.getBean("car01");
Car beanCar2 = bean5.getCar();
System.out.println(beanCar1==beanCar2);//true
}
@Test
public void test6() {
Person bean6 = ioc.getBean("person06", Person.class);
System.out.println(bean6);
}
@Test
public void test7() {
Person bean7 = ioc.getBean("person07", Person.class);
System.out.println(bean7);
}
@Test
public void test8() {
Person bean8 = ioc.getBean("person08", Person.class);
System.out.println(bean8);
}
@Test
public void test9() {
Person bean9 = ioc.getBean("person09", Person.class);
System.out.println(bean9);
}
@Test
public void test10() {
Person bean10 = ioc.getBean("person10", Person.class);
System.out.println(bean10);
}
@Test
public void test11() {
Person bean11 = ioc.getBean("person11", Person.class);
Person bean111 = ioc.getBean("person11", Person.class);
System.out.println(bean11);
System.out.println(bean11==bean111);//false
}
@Test
public void test12() {
//静态工厂创建的car
Car bean12 = ioc.getBean("car02", Car.class);
System.out.println(bean12);
//实例工厂创建的car
Car beanInstance12 = ioc.getBean("car03", Car.class);
System.out.println(beanInstance12);
Car beanFactoryBean12 = ioc.getBean("car04", Car.class);
System.out.println(beanFactoryBean12);
}
@Test
public void test13() {
ConfigurableApplicationContext ioc2 = new ClassPathXmlApplicationContext("ioc.xml");
System.out.println("容器关闭了...");
ioc2.close();
}
}
5.bean的后置处理器
概述:bean的后置处理器就是实现了BeanPostProcessor接口的类,然后这个类里有两个方法,分别是bean初始化前和bean初始化后的方法
使用步骤:
- 编写后置处理器的实现类
- 将后置处理器注册在配置文件中
加上后置处理器之后的bean的生命周期
单例(多实例也类似,只是没了销毁过程):
(容器启动)构造器-->后置处理器before--->初始化方法-->后置处理器after-->销毁方法
代码示例:
BeanPostProcessor的实现类:
package com.luyi.bean;
import org.springframework.beans.BeansException;
import org.springframework.beans.factory.config.BeanPostProcessor;
public class MyBeanPostProcessor implements BeanPostProcessor {
/**
* 调用初始化方法之前调用
* Object bean代表将要初始化的bean,beanName就是在xml中配置的id
*/
@Override
public Object postProcessBeforeInitialization(Object bean, String beanName)
throws BeansException {
System.out.println(beanName + " bean将要调用初始化方法..这个bean是" + bean );
return bean;
}
/**
* 调用初始化方法之后调用
*/
@Override
public Object postProcessAfterInitialization(Object bean, String beanName)
throws BeansException {
System.out.println(beanName + " bean已经调用了初始化方法..这个bean是" + bean );
return bean;
}
}
Car类:
package com.luyi.bean;
public class Car{
/**
* 汽车类
*/
private String name;
private String color;
public String getName() {
return name;
}
public void setName(String name) {
this.name = name;
}
public String getColor() {
return color;
}
public void setColor(String color) {
this.color = color;
}
//bean生命周期的初始化方法(不能带参数)
public void myInit(){
System.out.println("调用初始化方法了");
}
//bean生命周期的销毁方法(不能带参数)
public void myDestory(){
System.out.println("调用销毁方法了");
}
@Override
public String toString() {
return "Car [name=" + name + ", color=" + color + "]";
}
}
配置文件:
测试文件:
package com.luyi.test;
import org.junit.Test;
import org.springframework.context.ConfigurableApplicationContext;
import org.springframework.context.support.ClassPathXmlApplicationContext;
import com.luyi.bean.Car;
public class IOCTest {
private ConfigurableApplicationContext ioc = new ClassPathXmlApplicationContext("ioc.xml");
@Test
public void test() {
Car car = ioc.getBean("car01", Car.class);
ioc.close();
}
}
6.spring管理数据库连接池
代码示例:
//IOCTest.java
package com.luyi.test;
import java.sql.SQLException;
import javax.sql.DataSource;
import org.junit.Test;
import org.springframework.context.ConfigurableApplicationContext;
import org.springframework.context.support.ClassPathXmlApplicationContext;
public class IOCTest {
private ConfigurableApplicationContext ioc = new ClassPathXmlApplicationContext("ioc2.xml");
@Test
public void test() {
//从容器中拿到连接池
//按照类型获取组件,可以获取到这个类型下的所有实现类子类
DataSource bean = ioc.getBean(DataSource.class);
try {
System.out.println(bean.getConnection());
} catch (SQLException e) {
e.printStackTrace();
}
}
}
注意事项:我们的jdk版本跟我们的mysql驱动包的兼容问题:
- jdk7 + 老版5.0驱动com/mysql/jdbc/Driver
- jdk8 + 老版6.0驱动com/mysql/cj/jdbc/Driver
引用属性文件版本的spring管理连接池实现:
jdbc.user=root
jdbc.password=123
jdbc.jdbcUrl=jdbc:mysql://localhost:3306/my
jdbc.driverClass=com.mysql.cj.jdbc.Driver?&serverTimezone=UTC
<context:property-placeholder location="classpath:dbconfig.properties"/>
//IOCTest.java
package com.luyi.test;
import java.sql.SQLException;
import javax.sql.DataSource;
import org.junit.Test;
import org.springframework.context.ConfigurableApplicationContext;
import org.springframework.context.support.ClassPathXmlApplicationContext;
public class IOCTest {
private ConfigurableApplicationContext ioc = new ClassPathXmlApplicationContext("ioc2.xml");
@Test
public void test() {
//从容器中拿到连接池
//按照类型获取组件,可以获取到这个类型下的所有实现类子类
DataSource bean = ioc.getBean(DataSource.class);
try {
System.out.println(bean.getConnection());
} catch (SQLException e) {
e.printStackTrace();
}
}
}
7.自动装配
概述:自动转配就是配置文件会自动的为某个bean自动装配上属性的值,但是自动装配只对自定义类型的属性有效
按照某种规则自动装配:
1.autowire="default/no":不自动装配
2..autowire="byName":按照id自动装配
- 以属性名作为id去容器中找到这个组件,给他赋值,如果找不到就装配null上去
3.autowire="byType":
- 以属性的类型作为查找依据去容器中找到这个组件,如果容器中有多个这个类的组件,就会报错
4.autowire="constructor":按照构造器进行赋值
- 先按照有惨构造器参数的类型进行装配(成功就赋值),没有就直接为组件装配为null
- 如果按照类型找到了多个,也装配为null
代码示例:
package com.luyi.bean;
import java.util.List;
import java.util.Map;
import java.util.Properties;
public class Person {
/**
* 人类
*/
private String name;
private int age;
private String sex;
private Car car;
private List
public String getName() {
return name;
}
public void setName(String name) {
System.out.println("调用了setter方法");
this.name = name;
}
public int getAge() {
return age;
}
public void setAge(int age) {
this.age = age;
}
public String getSex() {
return sex;
}
public void setSex(String sex) {
this.sex = sex;
}
public Car getCar() {
return car;
}
public void setCar(Car car) {
this.car = car;
}
public List
return list;
}
public void setList(List
this.list = list;
}
@Override
public String toString() {
return "Person [name=" + name + ", age=" + age + ", sex=" + sex
+ ", car=" + car + ", list=" + list + "]";
}
}
package com.luyi.bean;
public class Book {
private String bookName;
private String author;
public String getBookName() {
return bookName;
}
public void setBookName(String bookName) {
this.bookName = bookName;
}
public String getAuthor() {
return author;
}
public void setAuthor(String author) {
this.author = author;
}
@Override
public String toString() {
return "Book [bookName=" + bookName + ", author=" + author + "]";
}
}
package com.luyi.bean;
public class Car{
/**
* 汽车类
*/
private String name;
private String color;
public String getName() {
return name;
}
public void setName(String name) {
this.name = name;
}
public String getColor() {
return color;
}
public void setColor(String color) {
this.color = color;
}
//bean生命周期的初始化方法(不能带参数)
public void myInit(){
System.out.println("调用初始化方法了");
}
//bean生命周期的销毁方法(不能带参数)
public void myDestory(){
System.out.println("调用销毁方法了");
}
@Override
public String toString() {
return "Car [name=" + name + ", color=" + color + "]";
}
}
package com.luyi.test;
import org.junit.Test;
import org.springframework.context.ConfigurableApplicationContext;
import org.springframework.context.support.ClassPathXmlApplicationContext;
import com.luyi.bean.Person;
public class IOCTest3 {
private ConfigurableApplicationContext ioc = new ClassPathXmlApplicationContext("ioc3.xml");
@Test
public void test() {
Person bean01 = ioc.getBean("person01", Person.class);
System.out.println(bean01);
/结果:Person [name=null, age=0, sex=null, car=Car [name=奥迪, color=red],
list=[Book [bookName=西游记, author=吴承恩], Book [bookName=三国演义, author=罗贯中], Book [bookName=红楼梦, author=曹雪芹]]]/
}
}
8.spEL
概述:spEL就是Spring Expression Language(Spring表达式语言)
语法:#{}
使用:
- 在spEL中使用字面量
- 引用其他bean
- 引用其他bean的某个属性值
- 使用运算符
- 调用非静态方法
- 调用静态方法
9.通过注解快速把bean加入到ioc容器中
概述:某一个类上添加任何一个注解都能快速的将这个组件加入到ioc容器的管理中
spring的四个注解:
- @Controller:控制器,我们推荐这个注解给控制层(Servlet包下的这些组件)添加这个注解
- @Service:业务逻辑,我们推荐业务逻辑层的组件添加这个注释
- @Repository:给数据层(持久层)的组件添加这个注释
- @Component:给不属于上面的这几层的组件添加这个注释
注意:注释可以随便加,Spring底层不会去验证你的这个组件是否如注解所说就是一个持久层或者业务逻辑层的组件,推荐各自层加各自注解,这是为了可以给程序员看的
使用注解将组件将组件快速的加入到容器的步骤:
- 给要添加到容器的组件上标志上四个注解的任何一个
- 告诉spring去自动扫描注解了的组件,依赖context名称空间
- 导入aop包(spring-aop-4.0.0.RELEASE.jar),支持注解模式
代码示例:
package com.luyi.bean;
import org.springframework.stereotype.Component;
@Component("myCar")
public class Car{
/**
* 汽车类
*/
private String name;
private String color;
public String getName() {
return name;
}
public void setName(String name) {
this.name = name;
}
public String getColor() {
return color;
}
public void setColor(String color) {
this.color = color;
}
//bean生命周期的初始化方法(不能带参数)
public void myInit(){
System.out.println("调用初始化方法了");
}
//bean生命周期的销毁方法(不能带参数)
public void myDestory(){
System.out.println("调用销毁方法了");
}
@Override
public String toString() {
return "Car [name=" + name + ", color=" + color + "]";
}
}
package com.luyi.dao;
import org.springframework.stereotype.Component;
@Repository
public class Book {
private String bookName;
private String author;
private Double price;
public String getBookName() {
return bookName;
}
public void setBookName(String bookName) {
this.bookName = bookName;
}
public String getAuthor() {
return author;
}
public void setAuthor(String author) {
this.author = author;
}
public Double getPrice() {
return price;
}
public void setPrice(Double price) {
this.price = price;
}
@Override
public String toString() {
return "Book [bookName=" + bookName + ", author=" + author + ", price="
+ price + "]";
}
}
<context:component-scan base-package="com.luyi" use-default-filters="false">
<!-- type="annotation":指定排除规则按照注解进行排除,标注了指定注解的组件不要
expression是注解的全类名;
type="assignable":指定排除某个类,按照类排除
expression是类的全类名
<context:exclude-filter type="annotation" expression="org.springframework.stereotype.Component"/>
-->
<context:include-filter type="annotation" expression="org.springframework.stereotype.Repository"/>
</context:component-scan>
package com.luyi.test;
import org.junit.Test;
import org.springframework.context.ApplicationContext;
import org.springframework.context.support.ClassPathXmlApplicationContext;
import com.luyi.dao.Book;
public class IOCTest4 {
/**
* id名字就是类名首字母小写
*/
@Test
public void test() {
ApplicationContext ioc = new ClassPathXmlApplicationContext("ioc4.xml");
Book book01 = ioc.getBean("book", Book.class);
System.out.println(book01);
Car car01 = ioc.getBean("myCar", Car.class);//报错
System.out.println(car01);
}
}
注意事项:
1.ioc4.xml文件中没有配置我们的id名的,所以我们的id名默认是首字母小写后的类名,如果你想自定义id名,可以在注解后面加个小括号,然后写上你自定义的名字即可,如@Component("mybook")
2.我们还可以通过@Autowired注解实现根据类型实现自动装配,也就是你需要用到一个实例的时候,你就在直接定一个这个实例,然后在他上面加个注解@Autowired,这样他就会自动转配好一个实例给你,如@Autowired private Car car;
Autowired注解的的原理:
假如加上这个注解的代码是:
private BookService bookService
原理:先按照类型去容器中找到对应的组件
- 找到一个,找到就赋值
- 没找到就抛出异常
- 找到多个,就装配上,怎么装配呢?(如BookService, BookServiceExt(继承自BookService))
- 按照变量名作为id继续匹配,谁的id为这个变量名,就装配上谁的(这里匹配上的自然就是BookService这个类),如果没有匹配上,就报错,原因是因为我们按照变量名作为id继续匹配的;为了解决这个问题,我们有了一个新的注解@Qualifier注解明确指定目标bean的id,找得到就匹配,找不到就报错,为了这个时候不报错,可以把Autowired的require参数赋值为false,此时他找不到就赋值为null
代码示例:
package com.luyi.dao;
import org.springframework.stereotype.Component;
@Component
public class BookService {
public void show(){
System.out.println("这里是BookService的show方法");
}
}
package com.luyi.dao;
import org.springframework.beans.factory.annotation.Autowired;
import org.springframework.beans.factory.annotation.Qualifier;
import org.springframework.stereotype.Component;
@Component
public class BookServlet {
@Qualifier("bookService")
//设置找得到这个bean的类型,但是找不到id时对应的组件就赋值为null,而不是报错
@Autowired(required=false)
//这里的示例不用自己new了,直接 通过这个注解就可以创建这个实例了
private BookService bookService;
public void doGet(){
bookService.show();
}
}
<context:component-scan base-package="com.luyi"></context:component-scan>
package com.luyi.test;
import org.junit.Test;
import org.springframework.context.ApplicationContext;
import org.springframework.context.support.ClassPathXmlApplicationContext;
import com.luyi.dao.BookServlet;
public class IOCTest5 {
@Test
public void test() {
ApplicationContext ioc = new ClassPathXmlApplicationContext("ioc5.xml");
BookServlet bean01 = ioc.getBean(BookServlet.class);
bean01.doGet();
}
}
注意:
1.@Autowired还可以加在方法上,加在方法上时,这个方法也会在bean创建时自动运行,这个方法上的每一个参数都会自动注入值(@Autowired还可以加在构造器,参数上)
2.除了@Autowired之外,@Resource也是自动装配的意思
- @Autowired与@Resource的区别:
- @Autowired是spring自己的注解,功能比较强大
- @Resource是java标准的注解,他的扩展性更强,如果切换成另一个容器框架,@Resource还是可以使用的,@Autowired就不行了
Spring的单元测试
使用spring单元测试的好处:我们不用ioc.getBean()来获取组件了,直接Autowired注解组件,spring为我们自动装配
使用spring的单元测试的步骤:
1.导包:spring单元测试包spring-test-4.0.0.RELEASE.jar
2.@ContextConfiguration(locations="")使用它来指定Spring的配置文件的位置
3.@RunWith指定用哪种驱动进行单元测试,默认就是junit
- @RunWith(SpringJUnit4ClassRunner.class),使用spring的单元测试模块来执行标了@Test注解的测试方法,以前@Test注解只是由Junit执行
代码示例:
package com.luyi.dao;
import org.springframework.stereotype.Component;
@Component
public class BookServlet {
}
package com.luyi.test;
import org.junit.Test;
import org.junit.runner.RunWith;
import org.springframework.beans.factory.annotation.Autowired;
import org.springframework.context.ApplicationContext;
import org.springframework.test.context.ContextConfiguration;
import org.springframework.test.context.junit4.SpringJUnit4ClassRunner;
import com.luyi.dao.BookServlet;
@ContextConfiguration(locations="classpath:ioc5.xml")
@RunWith(SpringJUnit4ClassRunner.class)
public class IOCTest5 {
ApplicationContext ioc =null;
@Autowired
BookServlet bookServlet;
@Test
public void test() {
System.out.println(bookServlet);
}
}
10.泛型依赖注入
概述:泛型依赖注入是spring4之后的新特性,子类之间的依赖关系,由其父类的泛型以及父类之间的依赖关系确定,父类的泛型为必须同一类型;即在父类中建立的依赖关系,在子类继承父类时,传入同一泛型类型的成员变量,然后子类就可以继承父类之间的依赖关系
泛型依赖注入的原理:极大地简化代码,减少配置,提高开发效率
泛型依赖的代码示例:
依赖的jar包:
- spring-beans-4.0.0.RELEASE.jar
- spring-core-4.0.0.RELEASE.jar
- spring-context-4.0.0.RELEASE.jar
- spring-expression-4.0.0.RELEASE.jar
- spring-aop-4.0.0.RELEASE.jar
- commons-logging-1.1.3.jar
com.luyi.bean包下的文件:
package com.luyi.bean;
public class Book {
}
package com.luyi.bean;
public class User {
}
con.luyi.dao包下的文件:
package com.luyi.dao;
public abstract class BaseDao
abstract public void save();
}
package com.luyi.dao;
import org.springframework.stereotype.Repository;
import com.luyi.bean.Book;
@Repository
public class BookDao extends BaseDao
@Override
public void save() {
System.out.println("BookDao保存图书。。。");
}
}
package com.luyi.dao;
import org.springframework.stereotype.Repository;
import com.luyi.bean.User;
@Repository
public class UserDao extends BaseDao
@Override
public void save() {
System.out.println("UserDao保存了用户");
}
}
package com.luyi.service;
import org.springframework.beans.factory.annotation.Autowired;
import com.luyi.dao.BaseDao;
public class BaseService
//这里写注解是为了继承这个类的组件要调用实例时可以被自动装配进容器中
@Autowired
BaseDao
public void save(){
System.out.println("自动注入的dao" + baseDao);
baseDao.save();
}
}
package com.luyi.service;
import org.springframework.stereotype.Service;
import com.luyi.bean.Book;
@Service
public class BookService extends BaseService
}
package com.luyi.service;
import org.springframework.stereotype.Service;
import com.luyi.bean.User;
@Service
public class UserService extends BaseService
}
spring的配置文件:
<context:component-scan base-package="com.luyi"></context:component-scan>
com.luyi.test包下的文件:
//IOCTest
package com.luyi.test;
import org.junit.Test;
import org.springframework.context.ApplicationContext;
import org.springframework.context.support.ClassPathXmlApplicationContext;
import com.luyi.service.BookService;
import com.luyi.service.UserService;
public class IOCTest {
private ApplicationContext ioc = new ClassPathXmlApplicationContext("ioc.xml");
@Test
public void test() {
BookService bookService = ioc.getBean(BookService.class);
UserService userService = ioc.getBean(UserService.class);
bookService.save();
userService.save();
}
}
11.AOP
前面我们已经讲了spring的一大特性,IOC,接下来我们就来讲讲spring的另一大特性,AOP
概述:AOP就是Aspect Oriented Programming(面向切面编程),是基于OOP(Object Oriented Programming)基础之上的新的编程思想,指在程序运行期间,将某段代码动态的切入到指定方法的指定位置进行运行的这种编程方式,动态代理就是面向切面编程的一个体现,而其实我们的spring的AOP底层的实现原理就是动态代理,spring的出现可以一句代码都不用写就可以去创建动态代理,而如果我们手动写动态代理,写起来比较麻烦,而且目标对象必须实现某一个接口,才能代理
AOP的几个专业术语
- 横切关注点
- 通知方法
- 切面类
- 连接点
- 切入点
- 切入点表达式
基于注解的AOP的使用步骤
1.导包
- spring-beans-4.0.0.RELEASE.jar
- spring-core-4.0.0.RELEASE.jar
- spring-context-4.0.0.RELEASE.jar
- spring-expression-4.0.0.RELEASE.jar
- spring-aop-4.0.0.RELEASE.jar
- commons-logging-1.1.3.jar
- spring-aspects-4.0.0.RELEASE.jar(AOP的基础包)
- com.springsource.net.sf.cglib-2.2.0.jar(AOP的加强包)
- com.springsource.org.aopalliance-1.0.0.jar(AOP的加强包)
- com.springsource.org.aspectj.weaver-1.6.8.RELEASE.jar(AOP的加强包)
2.基于注解写配置
- 将目标类和切面类(封装了通知方法(在目标方法执行前后执行的方法))加入到ioc容器中
- 告诉spring到底哪个是切面类@Aspect
- 告诉spring,切面类里面的每一个通知方法,都是何时何地运行,还需要告诉spring目标方法是哪些,通过切入点表达式来告诉,格式为execution(访问权限 返回类型 方法的全类名称)
- 开启基于注解的AOP(在spring配置文件中配置,需要aop名称空间)
3.测试
代码示例:
目标类:
package com.luyi.source;
import org.springframework.stereotype.Component;
import com.luyi.impl.Calculator;
/**
* 目标类
* @author luyi
*
*/
@Component
public class CalculatorImpl implements Calculator{
@Override
public int add(int a, int b) {
return a + b;
}
@Override
public int sub(int a, int b) {
return a - b;
}
@Override
public int mul(int a, int b) {
return a * b;
}
@Override
public int div(int a, int b) {
return a / b;
}
}
目标类的实现接口:
package com.luyi.impl;
public interface Calculator {
public int add(int a, int b);
public int sub(int a, int b);
public int mul(int a, int b);
public int div(int a, int b);
}
切面类:
package com.luyi.aop;
import java.util.Arrays;
import org.aspectj.lang.JoinPoint;
import org.aspectj.lang.ProceedingJoinPoint;
import org.aspectj.lang.Signature;
import org.aspectj.lang.annotation.After;
import org.aspectj.lang.annotation.AfterReturning;
import org.aspectj.lang.annotation.AfterThrowing;
import org.aspectj.lang.annotation.Around;
import org.aspectj.lang.annotation.Aspect;
import org.aspectj.lang.annotation.Before;
import org.aspectj.lang.annotation.Pointcut;
import org.springframework.stereotype.Component;
/**
* 切面类(封装了通知方法(在目标方法执行前后执行的方法))
* @author luyi
*
*/
@Aspect//标注了这个类就是切面类
@Component
public class Log {
@Pointcut("execution(public int com.luyi.source.CalculatorImpl.*(int, int))")
public void MyPoint(){};
/在目标方法执行前执行,后面execution就是切入点表达式,
格式为execution(访问权限 返回类型 方法的全类名称)/
//前置通知
@Before("execution(public int com.luyi.source.CalculatorImpl.(int, int))")
public void logBefore(JoinPoint joinPoint){
//获取目标方法运行使用的参数
Object[] args = joinPoint.getArgs();
//获取目标方法签名
Signature signature = joinPoint.getSignature();
String name = signature.getName();
System.out.println("[普通前置通知]" + name + "方法开始执行了,执行参数为" + Arrays.asList(args));
}
//返回通知
@AfterReturning(value="execution(public int com.luyi.source.CalculatorImpl.(int, int))",returning="result")
public void logReturn(JoinPoint joinPoint, Object result){
//获取目标方法运行使用的参数
Object[] args = joinPoint.getArgs();
//获取目标方法签名
Signature signature = joinPoint.getSignature();
String name = signature.getName();
System.out.println("[普通返回通知]" +name + "方法执行成功,执行参数为" + Arrays.asList(args)+"返回了返回值" + result);
}
//异常通知
@AfterThrowing(value="execution(public int com.luyi.source.CalculatorImpl.(int, int))", throwing="exception")
public void logException(JoinPoint joinPoint, Exception exception){
//获取目标方法运行使用的参数
Object[] args = joinPoint.getArgs();
//获取目标方法签名
Signature signature = joinPoint.getSignature();
String name = signature.getName();
System.out.println("[普通异常通知]" +name + "方法执行出现了异常" + "异常为" + exception);
}
//后置通知
@After("execution(public int com.luyi.source.CalculatorImpl.(int, int))")
public void logAfter(){
System.out.println("[普通后置通知]" +"方法执行完了");
}
@Around("MyPoint()")
public Object myAround(ProceedingJoinPoint pjp)throws Throwable{
Object[] args = pjp.getArgs();
//这一句代码利用反射调用了目标方法,相当于动态代理的method.invoke(obj,args);
Object proceed = null;
try{
System.out.println("[环绕前置通知]");
proceed = pjp.proceed(args);
System.out.println("[环绕返回值通知]");
}catch(Exception e){
System.out.println("[环绕异常通知]");
}finally{
System.out.println("[环绕后置通知]");
}
//反射调用后的返回值一定要返回出去
return proceed;
}
}
spring配置文件:
<context:component-scan base-package="com.luyi"></context:component-scan>
aop:aspectj-autoproxy</aop:aspectj-autoproxy>
测试类:
//AOPTest.java
package com.luyi.test;
import org.junit.Test;
import org.springframework.context.ApplicationContext;
import org.springframework.context.support.ClassPathXmlApplicationContext;
import com.luyi.impl.Calculator;
public class AOPTest {
private ApplicationContext ioc = new ClassPathXmlApplicationContext("applicationConfig.xml");
@Test
public void test() {
/*从ioc容器中拿到目标对象,注意:如果想要用类型,一定用它的接口类型,不能用它本类;
* 如果没有接口,就写为本类类型;当然,我们也可以通过id来获取这个组件
*/
Calculator bean = ioc.getBean(Calculator.class);
bean.add(1, 2);
bean.div(1, 0);
}
}
五个通知注解:
- @Before:在目标方法之前运行(前置通知)
- @After:在目标方法之后运行(后置通知)
- @AfterReturning:在目标方法正常返回之后运行(返回通知)
- AfterThrowing:在目标方法抛出异常之后运行(异常通知)
- Around:环绕通知(spring最强大的通知)
环绕通知:环绕通知里面就可以包含前面这四种通知了
代码示例:
@Around("MyPoint()")
public Object myAround(ProceedingJoinPoint pjp)throws Throwable{
Object[] args = pjp.getArgs();
//这一句代码利用反射调用了目标方法,相当于动态代理的method.invoke(obj,args);
Object proceed = null;
try{
System.out.println("[环绕前置通知]");
proceed = pjp.proceed(args);
System.out.println("[环绕返回值通知]");
}catch(Exception e){
System.out.println("[环绕异常通知]");
}finally{
System.out.println("[环绕后置通知]");
}
//反射调用后的返回值一定要返回出去
return proceed;
}
注意:环绕通知是优于普通通知执行的,如果有四个普通通知以及环绕通知同时存在时,执行顺序:环绕前置--》普通前置--》环绕正常返回/出现异常--》环绕后置--》普通后置--》普通返回/出现异常
切入点表达式写法
语法:execution(访问权限 返回类型 方法的全类名称)
两个通配符:* 和 ..
1."*"
- 匹配一个或者多个字符
- 匹配任意一个参数
- 只能匹配一层路径
- 权限位置不能用*代替,权限位置不写就是默认的public
2.".."
- 匹配任意多个参数:任意类型参数
- 匹配任意多层路径:如execution(public int com.luyi..sour.(..))
切入点表达式还可以使用“&&”,“||”和“!”来连接表达式,分别代表与,或,非
切入表达式也可以抽取出来使用:
- 随便声明一个没有实现的返回void的空方法
- 给方法上标注@Pointcut注解
抽取可重用的切入点表达式的代码示例:
@Pointcut("execution(public int com.luyi.source.CalculatorImpl.*(int, int))")
public void MyPoint(){};
通知方法的执行顺序
正常执行:@before(前置通知)--》@After(后置通知)--》@AfterReturing(正常返回)
异常执行::@before(前置通知)--》@After(后置通知)--》@AfterThrowing(方法异常)
获取目标方法的信息
概述:我们可以在通知方法运行的时候,拿到目标方法的详细信息,
1.获得这个目标方法的方法名和参数就可以通过JoinPoint对象获得(传入JoinPoint对象的参数)
代码示例:
@Before("execution(public int com.luyi.source.CalculatorImpl.*(int, int))")
public void logBefore(JoinPoint joinPoint){
//获取目标方法运行使用的参数
Object[] args = joinPoint.getArgs();
//获取目标方法签名
Signature signature = joinPoint.getSignature();
String name = signature.getName();
System.out.println(name + "方法开始执行了,执行参数为" + Arrays.asList(args));
}
2.获取目标方法的异常信息和返回值(传入参数,并在注释后面的属性中添加上这个参数,以告诉spring哪个参数就是返回值,哪个参数就是异常)
代码示例:
//返回通知
@AfterReturning(value="execution(public int com.luyi.source.CalculatorImpl.(int, int))",returning="result")
public void logReturn(JoinPoint joinPoint, Object result){
//获取目标方法运行使用的参数
Object[] args = joinPoint.getArgs();
//获取目标方法签名
Signature signature = joinPoint.getSignature();
String name = signature.getName();
System.out.println(name + "方法执行成功,执行参数为" + Arrays.asList(args)+"返回了返回值" + result);
}
//异常通知
@AfterThrowing(value="execution(public int com.luyi.source.CalculatorImpl.(int, int))", throwing="exception")
public void logException(JoinPoint joinPoint, Exception exception){
//获取目标方法运行使用的参数
Object[] args = joinPoint.getArgs();
//获取目标方法签名
Signature signature = joinPoint.getSignature();
String name = signature.getName();
System.out.println(name + "方法执行出现了异常" + "异常为" + exception);
}
多切面的运行顺序
多切面指的就是多个切面类,他的执行顺序是这样的(假如是两个切面类):
1.都是普通通知的情况:
第一个切面类的前置通知(默认按首字母的顺序来决定谁是第一个切面类,也可以通知@order注解来决定谁先谁后)--》第二个切面类的前置通知--》第二个切面类的后置通知--》第二个切面类的返回通知/异常通知--》第一个切面类的后置通知--》第一个切面类的返回通知/异常通知
2.环绕通知加在第一个切面类上的情况:
环绕的前置通知--》第一个切面类的前置通知--》第二个切面类的前置通知--》第二个切面类的后置通知--》第二个切面类的返回/异常通知--》环绕返回/异常通知--》环绕的后置通知--》第一个切面类的后置通知--》第一个切面类的返回/异常通知
AOP的应用场景
- AOP加日志保存到数据库
- AOP做权限功能
- AOP做安全检查
- AOP做事务控制
基于配置的AOP
代码示例(与上面基于注解的AOP等价):
aop:config
<aop:aspect ref="log">
<aop:pointcut expression="execution(public int com.luyi.source.CalculatorImpl.(int, int))" id="myPoint"/>
<aop:before method="logBefore" pointcut="execution(public int com.luyi.source.CalculatorImpl.(int, int))"/>
<aop:after-returning method="logReturn" pointcut-ref="myPoint" returning="result"/>
<aop:after-throwing method="logException" pointcut-ref="myPoint" throwing="exception"/>
<aop:after method="logAfter" pointcut-ref="myPoint"/>
</aop:aspect>
</aop:config>
12.jdbcTemplate
概述:spring为我们提供了jdbcTemplate能快捷的操作数据库
13.声明式事务
概述:与之相对的是编程式事务,以前通过复杂的编程来编写一个事务,替换为只需要告诉spring哪个方法是事务方法即可;
编程式事务其实也是一个AOP思想(可通过环绕通知实现):
- //获取连接
- //设置非自动提交
- 目标代码执行
- //正常提交
- //异常回滚
- //最终关闭
事务管理代码的固定模式作为一种横切关注点,可以通过AOP方法模块化,进而借助spring AOP框架实现声明式事务管理,如果自己要写这个切面还是很麻烦的,而spring已经为我们提供了这个切面,这个切面就是事务切面,也就是事务管理器
快速的为某个方法添加事务的步骤:
- 配置数据源
- 配置jdbcTemplate
- 事务控制
- 配置事务管理器让其进行事务控制(需要导入面向切面编程的几个包)
- 开启基于注解的事务控制模式,依赖tx名称空间
- 给事务方法加注解
代码示例:
1).环境部署
数据库和数据库表的创建:
创建数据库
create database my;
创建数据库表
create table account(
nid int not null auto_increment PRIMARY key,
name varchar(10),
money int
)
导包:
- spring-beans-4.0.0.RELEASE.jar
- spring-core-4.0.0.RELEASE.jar
- spring-context-4.0.0.RELEASE.jar
- spring-expression-4.0.0.RELEASE.jar
- spring-aop-4.0.0.RELEASE.jar
- commons-logging-1.1.3.jar
- spring-aspects-4.0.0.RELEASE.jar(AOP的基础包)
- com.springsource.net.sf.cglib-2.2.0.jar(AOP的加强包)
- com.springsource.org.aopalliance-1.0.0.jar(AOP的加强包)
- com.springsource.org.aspectj.weaver-1.6.8.RELEASE.jar(AOP的加强包)
- spring-jdbc-4.0.0.RELEASE.jar
- spring-orm-4.0.0.RELEASE.jar
- spring-tx-4.0.0.RELEASE.jar
- c3p0-0.9.5.2.jar
- mchange-commons-java-0.2.12.jar
- mysql-connector-java-8.0.17.jar
2)代码实现
//Account.java
package com.luyi.bean;
public class Account {
private String name;
private int money;
public String getName() {
return name;
}
public void setName(String name) {
this.name = name;
}
public int getMoney() {
return money;
}
public void setMoney(int money) {
this.money = money;
}
}
//AccountDao
package com.luyi.dao;
import org.springframework.beans.factory.annotation.Autowired;
import org.springframework.jdbc.core.JdbcTemplate;
import org.springframework.stereotype.Repository;
@Repository
public class AccountDao {
@Autowired
JdbcTemplate jdbcTemplate;
/**
* 转账用户减去余额
*/
public void subMoney(String name, int money){
//这里sql语句故意出错,测试事务是否回滚
String sql = "UPDATEE account set money = money - ? where name = ?";
jdbcTemplate.update(sql, money, name);
}
/**
*接受转账的用户加上余额
*/
public void addMoney(String name, int money){
String sql = "UPDATE account set money = money + ? where name = ?";
jdbcTemplate.update(sql, money, name);
}
}
//AccountService
package com.luyi.service;
import org.springframework.beans.factory.annotation.Autowired;
import org.springframework.stereotype.Service;
import org.springframework.transaction.annotation.Transactional;
import com.luyi.dao.AccountDao;
@Service
public class AccountService {
@Autowired
private AccountDao accountDao;
//给事务方法加上了注解
@Transactional
public void transferAccount(String transferName, String receiveName, int money){
accountDao.addMoney(receiveName, money);
accountDao.subMoney(transferName, money);
}
}
配置文件:
jdbc.username=root
jdbc.password=123
jdbc.jdbcUrl=jdbc:mysql://localhost:3306/my?&serverTimezone=UTC
jdbc.driverClass=com.mysql.cj.jdbc.Driver
<context:component-scan base-package="com.luyi"></context:component-scan>
<context:property-placeholder location="classpath:dbconfig.properties"/>
<tx:annotation-driven transaction-manager="tm"/>
测试代码:
//SpringTxTest.java
package com.luyi.test;
import org.junit.Test;
import org.springframework.context.ApplicationContext;
import org.springframework.context.support.ClassPathXmlApplicationContext;
import com.luyi.service.AccountService;
public class SpringTxTest {
private ApplicationContext ioc = new ClassPathXmlApplicationContext("tx.xml");
@Test
public void test() {
AccountService accountService = ioc.getBean(AccountService.class);
accountService.transferAccount("luyi", "luer", 100);
System.out.println("转账完成");
}
}
注意:事务操作过程中出现异常时,运行时异常默认都会回滚,而编译时异常默认不回滚
Transaction注解的属性
- isolation--这个属性的值可以为Isolation类型,调整隔离级别(读未提交(UNCOMMITTED,会有脏读)--》读已提交(READ COMMITTED,避免了脏读,但没有避免不可重复读)--》可重复度(REPEATABLE READ,避免了所有问题)--》可串行化(SERIALIZABLE,不常用))
- propagation--这个属性的值可以为Propagation类型,事务的传播行为(传播行为有REQUIRED(使用当前事务,事务的属性都是继承于大事务的,如果当前没有事务,则新建事务),REQUIRES_NEW(不使用当前事务,自己新开一个事务))
- noRollbackFor--这个属性的值可以为Class[]类型,指定哪些异常发生时不回滚事务
- noRollbackForClassName--这个属性的值可以为String[]类型,这个要写全类名,不使用它
- rollbackFor--这个属性的值可以为Class[]类型,指定让哪些事务回滚,如编译时异常不回滚,可以指定其回滚
- rollbackForClassName--这个属性的值可以为String[]类型
- readOnly--这个属性的值可以为boolean类型,设置事务只读,可以加快查询速度,不用管事务那一堆操纵了
- timeout--这个属性的值可以为int类型,设置事务操作超时时间,一旦超时,自动回滚
基于xml配置的事务控制
代码示例:
<context:component-scan base-package="com.luyi"></context:component-scan>
<context:property-placeholder location="classpath:dbconfig.properties"/>
aop:config
<aop:pointcut expression="execution(* com.luyi.ser..*(..))" id="txPoint"/>
<aop:advisor advice-ref="myAdvice" pointcut-ref="txPoint"/>
</aop:config>
<tx:advice id="myAdvice" transaction-manager="transactionManager">
tx:attributes
<tx:method name="transferAccount" timeout="-1" />
</tx:attributes>
</tx:advice>
补充:从Spring源码看ApplicationContext和BeanFactory的区别:
- ApplicationContext是BeanFactory的子接口
- BeanFactory:bean工厂接口,负责创建bean实例,容器里面保存的所单例bean其实是一个map;BeanFactory是spring最底层的接口
- ApplicationContext:是留给程序员使用的ioc容器接口,更多的负责容器功能的实现(可以基于beanFactory创建好的对象之上完成强大的容器);容器可以从map获取这个bean,并且aop,di,在ApplicationContext接口下的这些类里面
补充:Spring里面最大的模式就是工厂模式
作者:卢一
出处:http://www.cnblogs.com/luyi001/
本文版权归作者和博客园共有,欢迎转载,但未经作者同意必须保留此段声明,且在文章页面明显位置给出原文连接,否则保留追究法律责任的权利。

 浙公网安备 33010602011771号