2. Sentinel源码分析—Sentinel是如何进行流量统计的?
这一篇我还是继续上一篇没有讲完的内容,先上一个例子:
private static final int threadCount = 100;

public static void main(String[] args) {
    initFlowRule();

    for (int i = 0; i < threadCount; i++) {
        Thread entryThread = new Thread(new Runnable() {
            @Override
            public void run() {
                while (true) {
                    Entry methodA = null;
                    try {
                        TimeUnit.MILLISECONDS.sleep(5);
                        methodA = SphU.entry("methodA");
                    } catch (BlockException e1) {
                        // Block exception
                    } catch (Exception e2) {
                        // biz exception
                    } finally {
                        if (methodA != null) {
                            methodA.exit();
                        }
                    }
                }
            }
        });
        entryThread.setName("working thread");
        entryThread.start();
    }
}


private static void initFlowRule() {
    List<FlowRule> rules = new ArrayList<FlowRule>();
    FlowRule rule1 = new FlowRule();
    rule1.setResource("methodA");
    // set limit concurrent thread for 'methodA' to 20
    rule1.setCount(20);
    rule1.setGrade(RuleConstant.FLOW_GRADE_THREAD);
    rule1.setLimitApp("default");

    rules.add(rule1);
    FlowRuleManager.loadRules(rules);
}
SphU#entry
我先把例子放上来
Entry methodA = null;
try {
    methodA = SphU.entry("methodA");
	  // dosomething
} catch (BlockException e1) {
    block.incrementAndGet();
} catch (Exception e2) {
    // biz exception
} finally {
    total.incrementAndGet();
    if (methodA != null) {
        methodA.exit();
    }
}
我们先进入到entry方法里面:
SphU#entry
public static Entry entry(String name) throws BlockException {
    return Env.sph.entry(name, EntryType.OUT, 1, OBJECTS0);
}
这个方法里面会调用Env的sph静态方法,我们进入到Env里面看看
public class Env {

    public static final Sph sph = new CtSph();

    static {
        // If init fails, the process will exit.
        InitExecutor.doInit();
    }
}
这个方法初始化的时候会调用InitExecutor.doInit()
InitExecutor#doInit
public static void doInit() {
    //InitExecutor只会初始化一次,并且初始化失败会退出
    if (!initialized.compareAndSet(false, true)) {
        return;
    }
    try {
        //通过spi加载InitFunc子类,默认是MetricCallbackInit
        ServiceLoader<InitFunc> loader = ServiceLoader.load(InitFunc.class);
        List<OrderWrapper> initList = new ArrayList<OrderWrapper>();
        for (InitFunc initFunc : loader) {
            RecordLog.info("[InitExecutor] Found init func: " + initFunc.getClass().getCanonicalName());
            //由于这里只有一个loader里面只有一个子类,那么直接就返回initList里面包含一个元素的集合
            insertSorted(initList, initFunc);
        }
        for (OrderWrapper w : initList) {
            //这里调用MetricCallbackInit的init方法
            w.func.init();
            RecordLog.info(String.format("[InitExecutor] Executing %s with order %d",
                w.func.getClass().getCanonicalName(), w.order));
        }
    } catch (Exception ex) {
        RecordLog.warn("[InitExecutor] WARN: Initialization failed", ex);
        ex.printStackTrace();
    } catch (Error error) {
        RecordLog.warn("[InitExecutor] ERROR: Initialization failed with fatal error", error);
        error.printStackTrace();
    }
}
这个方法主要是通过spi加载InitFunc 的子类,默认是MetricCallbackInit。
然后会将MetricCallbackInit封装成OrderWrapper实例,然后遍历,调用
MetricCallbackInit的init方法:
MetricCallbackInit#init
public void init() throws Exception {
    //添加回调函数
    //key是com.alibaba.csp.sentinel.metric.extension.callback.MetricEntryCallback
    StatisticSlotCallbackRegistry.addEntryCallback(MetricEntryCallback.class.getCanonicalName(),
            new MetricEntryCallback());
    //key是com.alibaba.csp.sentinel.metric.extension.callback.MetricExitCallback
StatisticSlotCallbackRegistry.addExitCallback(MetricExitCallback.class.getCanonicalName(),
            new MetricExitCallback());
}
这个init方法就是注册了两个回调实例MetricEntryCallback和MetricExitCallback。
然后会通过调用Env.sph.entry会最后调用到CtSph的entry方法:
public Entry entry(String name, EntryType type, int count, Object... args) throws BlockException {
    //这里name是Resource,type是out
    StringResourceWrapper resource = new StringResourceWrapper(name, type);
    //count是1 ,args是一个空数组
    return entry(resource, count, args);
}
这个方法会将resource和type封装成StringResourceWrapper实例,然后调用entry重载方法追踪到CtSph的entryWithPriority方法。
//这里传入得参数count是1,prioritized=false,args是容量为1的空数组
private Entry entryWithPriority(ResourceWrapper resourceWrapper, int count, boolean prioritized, Object... args)
        throws BlockException {
    //获取当前线程的上下文
    Context context = ContextUtil.getContext();
    if (context instanceof NullContext) {
        // The {@link NullContext} indicates that the amount of context has exceeded the threshold,
        // so here init the entry only. No rule checking will be done.
        return new CtEntry(resourceWrapper, null, context);
    }
    //为空的话,创建一个默认的context
    if (context == null) { //1
        // Using default context.
        context = MyContextUtil.myEnter(Constants.CONTEXT_DEFAULT_NAME, "", resourceWrapper.getType());
    }

    // Global switch is close, no rule checking will do.
    if (!Constants.ON) {//这里会返回false
        return new CtEntry(resourceWrapper, null, context);
    }
	  //2
    //创建一系列功能插槽
    ProcessorSlot<Object> chain = lookProcessChain(resourceWrapper);

    /*
     * Means amount of resources (slot chain) exceeds {@link Constants.MAX_SLOT_CHAIN_SIZE},
     * so no rule checking will be done.
     */
    //如果超过了插槽的最大数量,那么会返回null
    if (chain == null) {
        return new CtEntry(resourceWrapper, null, context);
    }

    Entry e = new CtEntry(resourceWrapper, chain, context);
    try {
		  //3
        //调用责任链
        chain.entry(context, resourceWrapper, null, count, prioritized, args);
    } catch (BlockException e1) {
        e.exit(count, args);
        throw e1;
    } catch (Throwable e1) {
        // This should not happen, unless there are errors existing in Sentinel internal.
        RecordLog.info("Sentinel unexpected exception", e1);
    }
    return e;
}
这个方法是最核心的方法,主要做了三件事:
- 如果context为null则创建一个新的
- 通过责任链方式创建功能插槽
- 调用责任链插槽
在讲创建context之前我们先看一下ContextUtil这个类初始化的时候会做什么
ContextUtil
/**
 * Holds all {@link EntranceNode}. Each {@link EntranceNode} is associated with a distinct context name.
 */
private static volatile Map<String, DefaultNode> contextNameNodeMap = new HashMap<>();
static {
    // Cache the entrance node for default context.
    initDefaultContext();
}

private static void initDefaultContext() {
    String defaultContextName = Constants.CONTEXT_DEFAULT_NAME;
    //初始化一个sentinel_default_context,type为in的队形
    EntranceNode node = new EntranceNode(new StringResourceWrapper(defaultContextName, EntryType.IN), null);
    //Constants.ROOT会初始化一个name是machine-root,type=IN的对象
    Constants.ROOT.addChild(node);
    //所以现在map里面有一个key=CONTEXT_DEFAULT_NAME的对象
    contextNameNodeMap.put(defaultContextName, node);
}
ContextUtil在初始化的时候会先调用initDefaultContext方法。通过Constants.ROOT创建一个root节点,然后将创建的node作为root的子节点入队,然后将node节点put到contextNameNodeMap中
结构如下:
Constants.ROOT:
					machine-root(EntryType#IN)
						/
					  /
			sentinel_default_context(EntryType#IN)
现在我们再回到entryWithPriority方法中:
if (context == null) {//1
    // Using default context.
    context = MyContextUtil.myEnter(Constants.CONTEXT_DEFAULT_NAME, "", resourceWrapper.getType());
}
如果context为空,那么会调用MyContextUtil.myEnter创建一个新的context,这个方法最后会调用到ContextUtil.trueEnter方法中进行创建。
protected static Context trueEnter(String name, String origin) {
    Context context = contextHolder.get();
    if (context == null) {
        Map<String, DefaultNode> localCacheNameMap = contextNameNodeMap;
        DefaultNode node = localCacheNameMap.get(name);
        if (node == null) {
            //如果为null的话,检查contextNameNodeMap的size是不是超过2000
            if (localCacheNameMap.size() > Constants.MAX_CONTEXT_NAME_SIZE) {
                setNullContext();
                return NULL_CONTEXT;
            } else {
                // 重复initDefaultContext方法的内容
                try {
                    LOCK.lock();
                    node = contextNameNodeMap.get(name);
                    if (node == null) {
                        if (contextNameNodeMap.size() > Constants.MAX_CONTEXT_NAME_SIZE) {
                            setNullContext();
                            return NULL_CONTEXT;
                        } else {
                            node = new EntranceNode(new StringResourceWrapper(name, EntryType.IN), null);
                            // Add entrance node.
                            Constants.ROOT.addChild(node);

                            Map<String, DefaultNode> newMap = new HashMap<>(contextNameNodeMap.size() + 1);
                            newMap.putAll(contextNameNodeMap);
                            newMap.put(name, node);
                            contextNameNodeMap = newMap;
                        }
                    }
                } finally {
                    LOCK.unlock();
                }
            }
        }
        context = new Context(node, name);
        context.setOrigin(origin);
        contextHolder.set(context);
    }

    return context;
}
在trueEnter方法中会做一个校验,如果contextNameNodeMap中的数量已经超过了2000,那么会返回一个NULL_CONTEXT。由于我们在initDefaultContext中已经初始化过了node节点,所以这个时候直接根据name获取node节点放入到contextHolder中。
创建完了context之后我们再回到entryWithPriority方法中继续往下走:
//创建一系列功能插槽
ProcessorSlot<Object> chain = lookProcessChain(resourceWrapper);
通过调用lookProcessChain方法会创建功能插槽
CtSph#lookProcessChain
ProcessorSlot<Object> lookProcessChain(ResourceWrapper resourceWrapper) {
    //根据resourceWrapper初始化插槽
    ProcessorSlotChain chain = chainMap.get(resourceWrapper);
    if (chain == null) {
        synchronized (LOCK) {
            chain = chainMap.get(resourceWrapper);
            if (chain == null) {
                // Entry size limit.最大插槽数量为6000
                if (chainMap.size() >= Constants.MAX_SLOT_CHAIN_SIZE) {
                    return null;
                }
                //初始化新的插槽
                chain = SlotChainProvider.newSlotChain();
                Map<ResourceWrapper, ProcessorSlotChain> newMap = new HashMap<ResourceWrapper, ProcessorSlotChain>(
                        chainMap.size() + 1);
                newMap.putAll(chainMap);
                newMap.put(resourceWrapper, chain);
                chainMap = newMap;
            }
        }
    }
    return chain;
}
这里会调用SlotChainProvider.newSlotChain进行插槽的初始化。
SlotChainProvider#newSlotChain
public static ProcessorSlotChain newSlotChain() {
    if (slotChainBuilder != null) {
        return slotChainBuilder.build();
    }
    //根据spi初始化slotChainBuilder,默认是DefaultSlotChainBuilder
    resolveSlotChainBuilder();

    if (slotChainBuilder == null) {
        RecordLog.warn("[SlotChainProvider] Wrong state when resolving slot chain builder, using default");
        slotChainBuilder = new DefaultSlotChainBuilder();
    }
    return slotChainBuilder.build();
}
默认调用DefaultSlotChainBuilder的build方法进行初始化
DefaultSlotChainBuilder#build
public ProcessorSlotChain build() {
    ProcessorSlotChain chain = new DefaultProcessorSlotChain();
    //创建Node节点
    chain.addLast(new NodeSelectorSlot());
    //用于构建资源的 ClusterNode
    chain.addLast(new ClusterBuilderSlot());
    chain.addLast(new LogSlot());
    //用于统计实时的调用数据
    chain.addLast(new StatisticSlot());
    //用于对入口的资源进行调配
    chain.addLast(new SystemSlot());
    chain.addLast(new AuthoritySlot());
    //用于限流
    chain.addLast(new FlowSlot());
    //用于降级
    chain.addLast(new DegradeSlot());
    return chain;
}
DefaultProcessorSlotChain里面会创建一个头节点,然后把其他节点通过addLast串成一个链表:
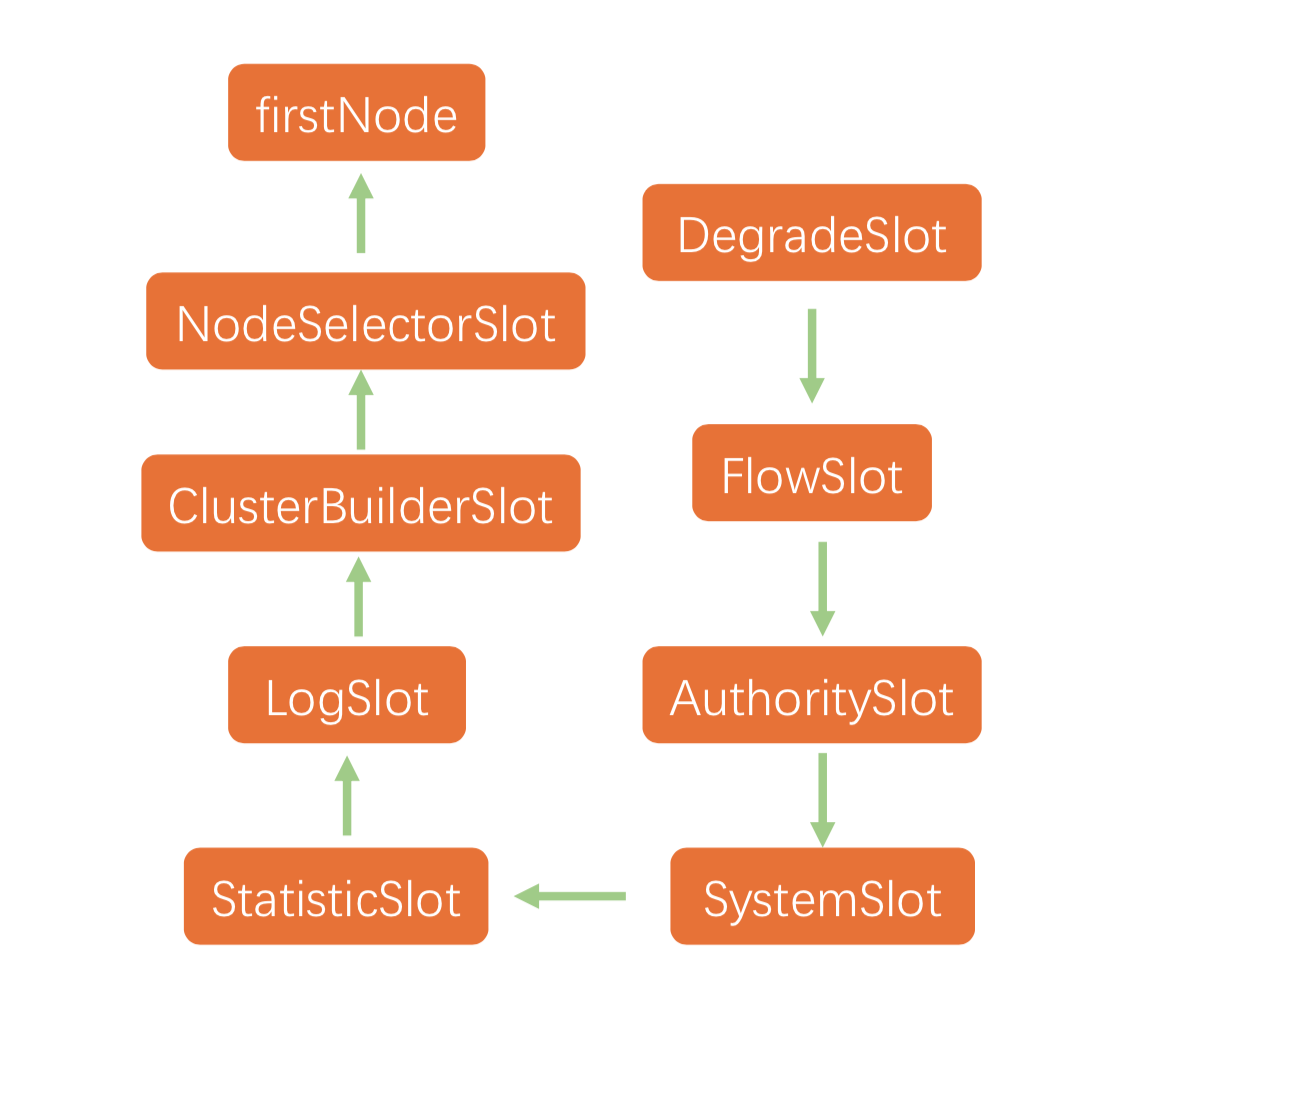
最后我们再回到CtSph的entryWithPriority方法中,往下走调用chain.entry方法触发调用链。
Context
在往下看Slot插槽之前,我们先总结一下Context是怎样的一个结构:

在Sentinel中,所有的统计操作都是基于context来进行的。context会通过ContextUtil的trueEnter方法进行创建,会根据context的不同的name来组装不同的Node来实现数据的统计。
在经过NodeSelectorSlot的时候会根据传入的不同的context的name字段来获取不同的DefaultNode对象,然后设置到context的curEntry实例的curNode属性中。
NodeSelectorSlot#entry
public void entry(Context context, ResourceWrapper resourceWrapper, Object obj, int count, boolean prioritized, Object... args)
    throws Throwable {
    DefaultNode node = map.get(context.getName());
    if (node == null) {
        synchronized (this) {
            node = map.get(context.getName());
            if (node == null) {
                node = new DefaultNode(resourceWrapper, null);
                HashMap<String, DefaultNode> cacheMap = new HashMap<String, DefaultNode>(map.size());
                cacheMap.putAll(map);
                cacheMap.put(context.getName(), node);
                map = cacheMap;
                // Build invocation tree
                ((DefaultNode) context.getLastNode()).addChild(node);
            }

        }
    }
	 //设置到context的curEntry实例的curNode属性中
    context.setCurNode(node);
    fireEntry(context, resourceWrapper, node, count, prioritized, args);
}
然后再经过ClusterBuilderSlot槽位在初始化的时候会初始化一个静态的全局clusterNodeMap用来记录所有的ClusterNode,维度是ResourceWrapper。每次调用entry方法的时候会先去全局的clusterNodeMap,找不到就会创建一个新的clusterNode,放入到node的ClusterNode属性中,用来统计ResourceWrapper维度下面的所有数据。
//此变量是静态的,所以只会初始化一次,存有所有的ResourceWrapper维度下的数据
private static volatile Map<ResourceWrapper, ClusterNode> clusterNodeMap = new HashMap<>();

public void entry(Context context, ResourceWrapper resourceWrapper, DefaultNode node, int count,
                  boolean prioritized, Object... args)
    throws Throwable {
    if (clusterNode == null) {
        synchronized (lock) {
            if (clusterNode == null) {
                // Create the cluster node.
                clusterNode = new ClusterNode();
                HashMap<ResourceWrapper, ClusterNode> newMap = new HashMap<>(Math.max(clusterNodeMap.size(), 16));
                newMap.putAll(clusterNodeMap);
                newMap.put(node.getId(), clusterNode);

                clusterNodeMap = newMap;
            }
        }
    }
    node.setClusterNode(clusterNode);

    if (!"".equals(context.getOrigin())) {
        Node originNode = node.getClusterNode().getOrCreateOriginNode(context.getOrigin());
        context.getCurEntry().setOriginNode(originNode);
    }
    fireEntry(context, resourceWrapper, node, count, prioritized, args);
}
StatisticSlot
public void entry(Context context, ResourceWrapper resourceWrapper, DefaultNode node, int count,
                  boolean prioritized, Object... args) throws Throwable {
    try {
        //先直接往下调用,如果没有报错则进行统计
        // Do some checking.
        fireEntry(context, resourceWrapper, node, count, prioritized, args);

        //当前线程数加1
        // Request passed, add thread count and pass count.
        node.increaseThreadNum();
        //通过的请求加上count
        node.addPassRequest(count);
 			...
    } catch (PriorityWaitException ex) {
        node.increaseThreadNum();
			...
    } catch (BlockException e) {
        //设置错误信息
        // Blocked, set block exception to current entry.
        context.getCurEntry().setError(e);
			...
        //设置被阻塞的次数
        // Add block count.
        node.increaseBlockQps(count);
			...
        throw e;
    } catch (Throwable e) {
        // Unexpected error, set error to current entry.
        context.getCurEntry().setError(e);

        //设置异常的次数
        // This should not happen.
        node.increaseExceptionQps(count);
			...
        throw e;
    }
}
这段代码中,我把不相关的代码都省略了,不影响我们的主流程。
在entry方法里面,首先是往下继续调用,根据其他的节点的情况来进行统计,比如抛出异常,那么就统计ExceptionQps,被阻塞那么就统计BlockQps,直接通过,那么就统计PassRequest。
我们先看一下线程数是如何统计的:node.increaseThreadNum()
DefaultNode#increaseThreadNum
我们先看一下DefaultNode的继承关系:
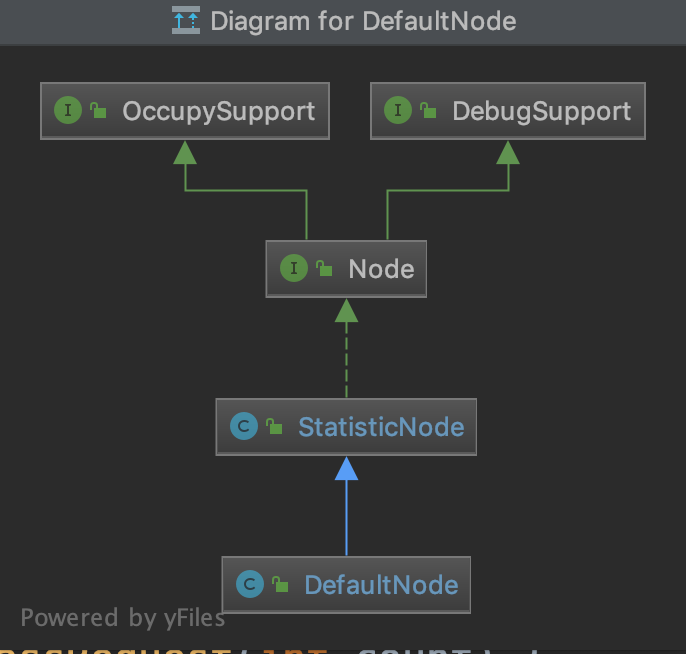
public void increaseThreadNum() {
    super.increaseThreadNum();
    this.clusterNode.increaseThreadNum();
}
所以super.increaseThreadNum是调用到了父类的increaseThreadNum方法。
this.clusterNode.increaseThreadNum()这句代码和super.increaseThreadNum是一样的使用方式,所以看看StatisticNode的increaseThreadNum方法就好了
StatisticNode#increaseThreadNum
private LongAdder curThreadNum = new LongAdder();

public void decreaseThreadNum() {
    curThreadNum.increment();
}
这个方法很简单,每次都直接使用LongAdder的api加1就好了,最后会在退出的时候减1,使用LongAdder也保证了原子性。
如果请求通过的时候会继续往下调用node.addPassRequest:
DefaultNode#addPassRequest
public void addPassRequest(int count) {
    super.addPassRequest(count);
    this.clusterNode.addPassRequest(count);
}
这句代码也是调用了StatisticNode的addPassRequest方法进行统计的。
StatisticNode#addPassRequest
public void addPassRequest(int count) {
    rollingCounterInSecond.addPass(count);
    rollingCounterInMinute.addPass(count);
}
这段代码里面有两个调用,一个是按分钟统计的,一个是按秒统计的。因为我们这里是使用的FlowRuleManager所以是会记录按分钟统计的。具体是怎么初始化,以及怎么打印统计日志的可以看看我上一篇分析:1.Sentinel源码分析—FlowRuleManager加载规则做了什么?,我这里不再赘述。
所以我们直接看看rollingCounterInMinute.addPass(count)这句代码就好了,这句代码会直接调用ArrayMetric的addPass方法。
ArrayMetric#addPass
public void addPass(int count) {
    //获取当前的时间窗口
    WindowWrap<MetricBucket> wrap = data.currentWindow();
    //窗口内的pass加1
    wrap.value().addPass(count);
}
这里会首先调用currentWindow获取当前的时间窗口WindowWrap,然后调用调用窗口内的MetricBucket的addPass方法加1,我继续拿我上一篇文章的图过来说明:
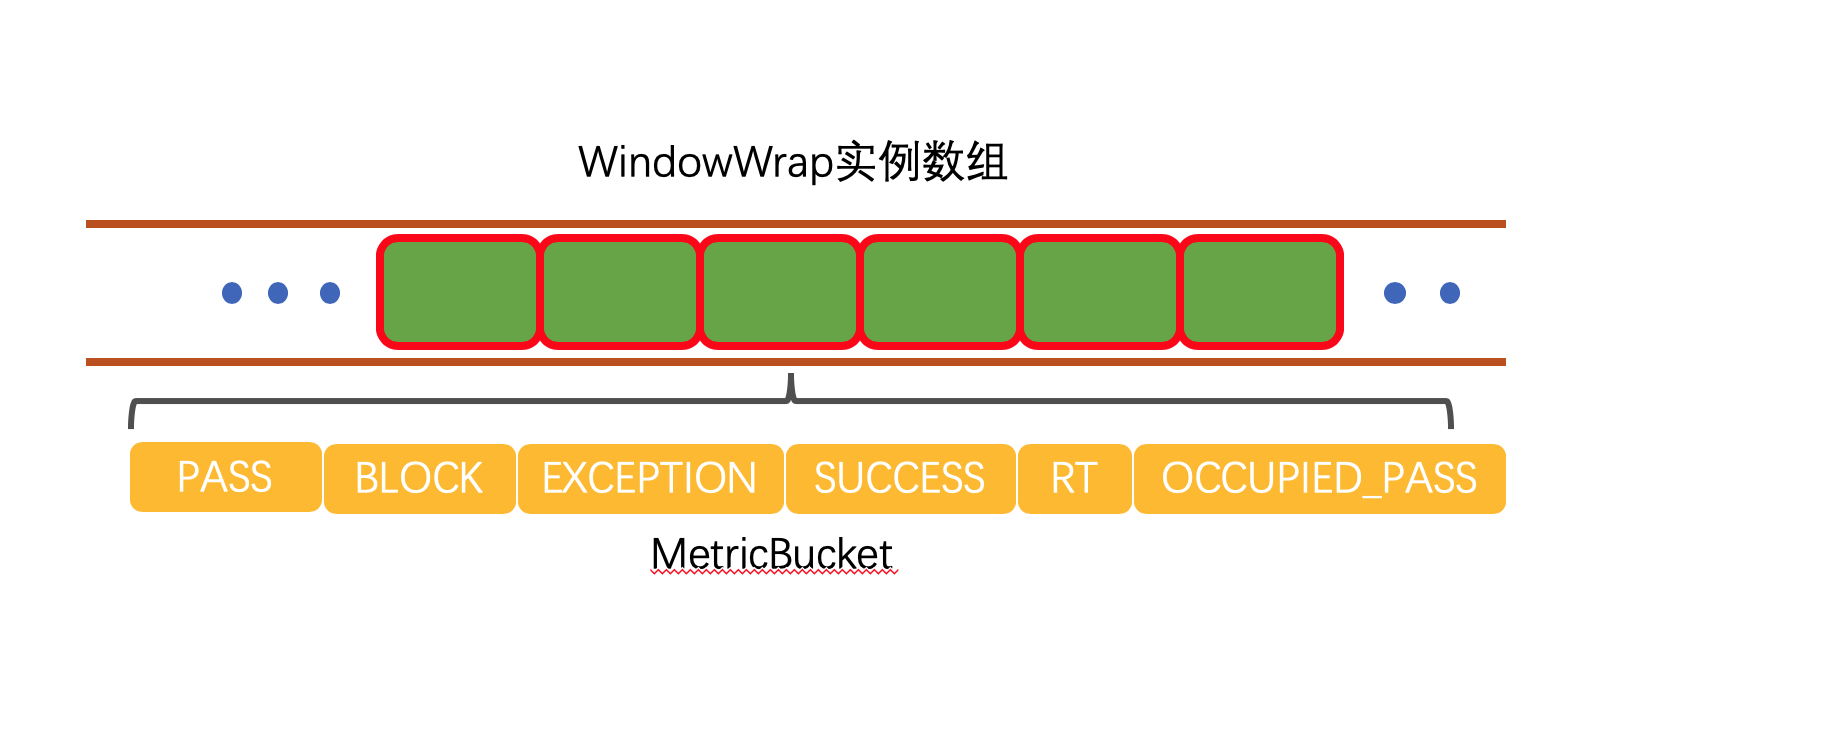
我面来到MetricBucket的addPass方法:
MetricBucket#addPass
public void addPass(int n) {
    add(MetricEvent.PASS, n);
}

public MetricBucket add(MetricEvent event, long n) {
    counters[event.ordinal()].add(n);
    return this;
}
addPass方法会使用枚举类然后将counters数组内的pass槽位的值加n;counters数组是LongAdder数组,所以也不会有线程安全问题。
node.increaseBlockQps和node.increaseExceptionQps代码也是一样的,大家可以自行去看看。
FlowSlot
FlowSlot可以根据预先设置的规则来判断一个请求是否应该被通过。
FlowSlot
private final FlowRuleChecker checker;

public FlowSlot() {
    this(new FlowRuleChecker());
}

public void entry(Context context, ResourceWrapper resourceWrapper, DefaultNode node, int count,
                  boolean prioritized, Object... args) throws Throwable {
    checkFlow(resourceWrapper, context, node, count, prioritized);

    fireEntry(context, resourceWrapper, node, count, prioritized, args);
}

void checkFlow(ResourceWrapper resource, Context context, DefaultNode node, int count, boolean prioritized)
    throws BlockException {
    checker.checkFlow(ruleProvider, resource, context, node, count, prioritized);
}
FlowSlot在实例化的时候会设置一个规则检查器,然后在调用entry方法的时候会调用规则检查器的checkFlow方法
我们进入到FlowRuleChecker的checkFlow 方法中:
FlowRuleChecker#checkFlow
public void checkFlow(Function<String, Collection<FlowRule>> ruleProvider, ResourceWrapper resource,
                      Context context, DefaultNode node, int count, boolean prioritized) throws BlockException {
    if (ruleProvider == null || resource == null) {
        return;
    }
    //返回FlowRuleManager里面注册的所有规则
    Collection<FlowRule> rules = ruleProvider.apply(resource.getName());
    if (rules != null) {
        for (FlowRule rule : rules) {
            //如果当前的请求不能通过,那么就抛出FlowException异常
            if (!canPassCheck(rule, context, node, count, prioritized)) {
                throw new FlowException(rule.getLimitApp(), rule);
            }
        }
    }
}

private final Function<String, Collection<FlowRule>> ruleProvider = new Function<String, Collection<FlowRule>>() {
    @Override
    public Collection<FlowRule> apply(String resource) {
        // Flow rule map should not be null.
        Map<String, List<FlowRule>> flowRules = FlowRuleManager.getFlowRuleMap();
        return flowRules.get(resource);
    }
};
checkFlow这个方法就是过去所有的规则然后根据规则进行过滤。主要的过滤操作是在canPassCheck中进行的。
FlowRuleChecker#canPassCheck
public boolean canPassCheck(/*@NonNull*/ FlowRule rule, Context context, DefaultNode node, int acquireCount,
                                         boolean prioritized) {
    //如果没有设置limitapp,那么不进行校验,默认会给个defualt
    String limitApp = rule.getLimitApp();
    if (limitApp == null) {
        return true;
    }
    //集群模式
    if (rule.isClusterMode()) {
        return passClusterCheck(rule, context, node, acquireCount, prioritized);
    }
    //本地模式
    return passLocalCheck(rule, context, node, acquireCount, prioritized);
}
这个方法首先会校验limitApp,然后判断是集群模式还是本地模式,我们这里暂时分析本地模式。
FlowRuleChecker#passLocalCheck
private static boolean passLocalCheck(FlowRule rule, Context context, DefaultNode node, int acquireCount,
                                      boolean prioritized) {
    //节点选择
    Node selectedNode = selectNodeByRequesterAndStrategy(rule, context, node);
    if (selectedNode == null) {
        return true;
    }
    //根据设置的规则来拦截
    return rule.getRater().canPass(selectedNode, acquireCount, prioritized);
}
本地模式中,首先会调用selectNodeByRequesterAndStrategy进行节点选择,根据不同的模式选择不同的节点,然后调用规则控制器的canPass方法进行拦截。
FlowRuleChecker#selectNodeByRequesterAndStrategy
static Node selectNodeByRequesterAndStrategy(/*@NonNull*/ FlowRule rule, Context context, DefaultNode node) {
    // The limit app should not be empty.
    String limitApp = rule.getLimitApp();
    //关系限流策略
    int strategy = rule.getStrategy();

    String origin = context.getOrigin();
    //origin不为`default` or `other`,并且limitApp和origin相等
    if (limitApp.equals(origin) && filterOrigin(origin)) {//1
        if (strategy == RuleConstant.STRATEGY_DIRECT) {
            // Matches limit origin, return origin statistic node.
            return context.getOriginNode();
        }
        //关系限流策略为关联或者链路的处理
        return selectReferenceNode(rule, context, node);
    } else if (RuleConstant.LIMIT_APP_DEFAULT.equals(limitApp)) {//2
        if (strategy == RuleConstant.STRATEGY_DIRECT) {
            //这里返回ClusterNode,表示所有应用对该资源的所有请求情况
            // Return the cluster node.
            return node.getClusterNode();
        }
        //关系限流策略为关联或者链路的处理
        return selectReferenceNode(rule, context, node);
    } else if (RuleConstant.LIMIT_APP_OTHER.equals(limitApp)
        && FlowRuleManager.isOtherOrigin(origin, rule.getResource())) {//3
        if (strategy == RuleConstant.STRATEGY_DIRECT) {
            return context.getOriginNode();
        }
        //关系限流策略为关联或者链路的处理
        return selectReferenceNode(rule, context, node);
    }

    return null;
}
这个方法主要是用来根据控制根据不同的规则,获取不同的node进行数据的统计。
- 在标记1中表示,如果流控规则配置了来源应用且不是"default"或者"other"这种特殊值,那么这种时候该规则就只对配置的来源应用生效。
- 在标记2中表示,limitApp是"default",代表针对所有应用进行统计。
- 标记7中,这个是"other"值的处理,假设当前请求来源不在当前规则的limitApp中,则进行下面的处理。
我这里引用官方文档的一段话进行解释:
default:表示不区分调用者,来自任何调用者的请求都将进行限流统计。如果这个资源名的调用总和超过了这条规则定义的阈值,则触发限流。

{some_origin_name}:表示针对特定的调用者,只有来自这个调用者的请求才会进行流量控制。例如 NodeA 配置了一条针对调用者caller1的规则,那么当且仅当来自 caller1 对 NodeA 的请求才会触发流量控制。

other:表示针对除 {some_origin_name} 以外的其余调用方的流量进行流量控制。例如,资源NodeA配置了一条针对调用者 caller1 的限流规则,同时又配置了一条调用者为 other 的规则,那么任意来自非 caller1 对 NodeA 的调用,都不能超过 other 这条规则定义的阈值

同一个资源名可以配置多条规则,规则的生效顺序为:{some_origin_name} > other > default
然后返回到passLocalCheck方法中,继续往下走,调用rule.getRater(),我们这里没有指定特殊的rater,所以返回的是DefaultController。
DefaultController#canPass
public boolean canPass(Node node, int acquireCount, boolean prioritized) {
    //判断是限流还是限制并发数量,然后获取流量或并发数量
    int curCount = avgUsedTokens(node);
    //如果两者相加大于限定的并发数
    if (curCount + acquireCount > count) {
        ...
        return false;
    }
    return true;
}
这里首先调用avgUsedTokens,根据grade判断当前的规则是QPS限流还是线程数限流,如果两者之和大于count,那么返回false。
返回false之后会回到FlowRuleChecker的checkFlow方法,抛出FlowException异常。
到这里Sentinel的主流程就分析完毕了。

 浙公网安备 33010602011771号