
Dynamics CRM通过定制应用程序功能区为符合条件的实体表单增加按钮
关注本人微信和易信公众号: 微软动态CRM专家罗勇 ,回复167或者20151029可方便获取本文,同时可以在第一时间得到我发布的最新的博文信息,follow me!
前面的博文都是为一个实体添加按钮,如果我要为一批具有某些特征的实体添加一样的按钮呢?难道一个一个实体去添加?当然不是这样。有简便的方法的,这个也是本文要介绍内容,follow me。为了更好的阐述本博文要讲解的内容,我们模拟一个场景,就是启用了注释功能的实体,在表单界面增加一个名称为点赞的按钮,点击后执行一个JavaScript函数。
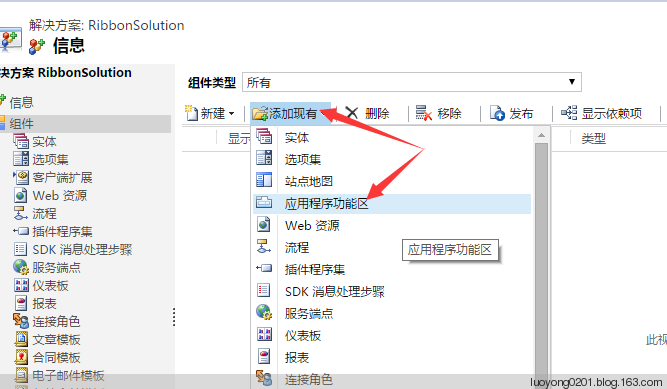
首先还是要将 应用程序功能区 加入到我们之前建立好的一个解决方案,只要这个组件,其余不需要。
然后将其作为非托管解决方案导出,凡是和前面博文类似的操作这里就不详述了,请各位看官先看前面博文。解压后我们还是用Visual Studio 来打开编辑其中的 customizations.xml 文件,并为它指定使用名称为 CustomizationsSolution.xsd 的架构文件辅助进行编辑。因为我没有对应用程序功能区做过定制,所以这个文件还是原始的,字符也是很少的,全部字符如下:
<ImportExportXml xmlns:xsi="http://www.w3.org/2001/XMLSchema-instance">
  <Entities></Entities>
  <Roles></Roles>
  <Workflows></Workflows>
  <FieldSecurityProfiles></FieldSecurityProfiles>
  <Templates />
  <RibbonDiffXml>
    <CustomActions />
    <Templates>
      <RibbonTemplates Id="Mscrm.Templates"></RibbonTemplates>
    </Templates>
    <CommandDefinitions />
    <RuleDefinitions>
      <TabDisplayRules />
      <DisplayRules />
      <EnableRules />
    </RuleDefinitions>
    <LocLabels />
  </RibbonDiffXml>
  <EntityMaps />
  <EntityRelationships />
  <OrganizationSettings />
  <optionsets />
  <Languages>
    <Language>2052</Language>
    <Language>1033</Language>
  </Languages>
</ImportExportXml>
还是一样,我们添加的元素内容都必须位于 RibbonDiffXml 这个元素之间。我们先来准备按钮旁边显示的文本吧。文本应该放到 LocLabels 元素中,正如你知道的是支持多语言的,我们这里配置简体中文和英文吧,这里主要参考SDK中的 Use localized labels with ribbons 章节。
    <LocLabels>
      <LocLabel Id="LuoYong.Common.LikeIt.LabelText">
        <Titles>
          <Title languagecode="2052" description="点赞" />
          <Title languagecode="1033" description="Like it"/>
        </Titles>
      </LocLabel>
      <LocLabel Id="LuoYong.Common.LikeIt.ToolTip">
        <Titles>
          <Title languagecode="2052" description="喜欢就点赞吧!"/>
          <Title languagecode="1033" description="I like it!" />
        </Titles>
      </LocLabel>
    </LocLabels>
  </RibbonDiffXml>
出了按钮显示的文字,我们知道按钮旁边还有图标,这个图标我的做法简单,一般用现有的图标,去哪里找现有的图标,我一般在 SDK\Resources\Images\Ribbon 中找,比如我这次喜欢这个笑脸图标 Entity16_8006.png ,就用它了,到时候16*16大小的图标(也就是button元素的Image16by16属性)配置为 /_imgs/ribbon/Entity16_8006.png 即可,当然我一般也会同时配置 32*32大小的图标(也就是button元素的Image32by32属性)。
命令一般还可以使用一个或者多个Enable Rule,这个是要定义在在元素 /RuleDefinitions/EnableRules 下面定义一个EnableRule元素,命令和它关联则是通过在 /CommandDefinitions/CommandDefinition/EnableRules 下面定义EnalbleRule 元素来关联。对于Enable Rule来说,在Dynamics CRM 2011的时候可能显示一个禁用的按钮,但是对于 Dynamics CRM 2013以后的版本,禁用的按钮不会显示,效果和Display Rule差不多。
命令一般还可以使用一个或者多个 Display Rule,这个是要定义在 /RuleDefinitions/DisplayRules 下面定义个一个DisplayRule元素,命令和它关联则是通过在 /CommandDefinitions/CommandDefinition/DisplayRules 下面定义EnalbleRule 元素来关联。
我这里分别定义了一个Enable Rule和Display Rule,如下:这个手写也简单,因为有智能提示。
    <RuleDefinitions>
      <TabDisplayRules />
      <DisplayRules>
        <DisplayRule Id="LuoYong.Common.DisplayRules.EntityPropertyHasNotes">
          <EntityPropertyRule AppliesTo="PrimaryEntity" PropertyName="HasNotes" PropertyValue="true"/>
        </DisplayRule>
      </DisplayRules>
      <EnableRules>
        <EnableRule Id="LuoYong.Common.EnableRules.FormStateExisting">
          <FormStateRule State="Existing"/>
        </EnableRule>
      </EnableRules>
    </RuleDefinitions>
我们定义这些Display Rule和Enable Rule是要和命令关联的,所以我们来定义一个命令,命令定义在 CommandDefinitions 元素中。CommandDefinition下面主要要定义三个元素,分别是EnableRules,DisplayRules,和 Actions ,前两者的含义很清楚啦,Actions就是点击按钮要执行的操作。主要分成两种,一种是打开一个网页,另外一种是执行一个JavaScript函数,执行的JavaScript代码一般在Web资源中,引用Web要以这种形式引用:Library="$webresource:new_/common/js/RibbonScript.js" ,也就是Web资源的名称前面要加上$webresource: ,当然可以给执行的Action传递参数,我这里传递了两个参数,当前记录的逻辑架构名称和记录的ID。我这里定义的完整命令如下:
    <CommandDefinitions>
      <CommandDefinition Id="Mscrm.Form.{!EntityLogicalName}.MainTab.Save.LikeIt.Command">
        <EnableRules>
          <EnableRule Id="LuoYong.Common.EnableRules.FormStateExisting"/>
        </EnableRules>
        <DisplayRules>
          <DisplayRule Id="LuoYong.Common.DisplayRules.EntityPropertyHasNotes"/>
        </DisplayRules>
        <Actions>
          <JavaScriptFunction FunctionName="LikeIt" Library="$webresource:new_/common/js/RibbonScript.js">
            <CrmParameter Value="PrimaryEntityTypeName" />
            <CrmParameter Value="FirstPrimaryItemId" />
          </JavaScriptFunction>
        </Actions>
      </CommandDefinition>
    </CommandDefinitions>
命令定义了,它要和按钮关联才行。按钮需要定义在 CustomActions/CustomAction/CommandUIDefinition 元素下,按钮的元素名当然是Button了,这个元素通过 Command 属性和前面定义的命令关联起来,通过 LabelText 属性和 ToolTipTitle 属性和前面定义的文本关联起来,和文本关联的时候需要以类似这种形式 LabelText="$LocLabels:LuoYong.Common.LikeIt.LabelText" ,也就是属性值要以 $LocLabels: 开头。通过Image16by16属性和Image32by32属性来定义按钮显示的图片。按钮元素也有个 Sequence 属性,这个要赋予一个整数值,它值越大就越在这些按钮组中靠后。比如我要放在 激活按钮的前面,从 applicationRibbon.xml 中我们知道 Mscrm.Form.{!EntityLogicalName}.Activate 是激活按钮,这个按钮的 Sequence 属性是50,如果我自己添加的按钮的 Sequence 设置为49,就会显示在这个按钮的前面。
定义上面这些就行了?NO!如果你只定义这些导入的话会报错 Object reference not set to an instance of an object. 后来我明白了是哪里还需要定义。就是 CustomAction 元素的Id,Location 和 Sequence 属性也要定义。特别是这个Location要注意,比如我会放在 Mscrm.Form.{!EntityLogicalName}.Activate 按钮的旁边,那就是这个按钮所在的按钮组了,在 applicationRibbon.xml 中可以知道是 Mscrm.Form.{!EntityLogicalName}.MainTab.Save 这个Group,那么你设置的 Location属性的值为这个以外还要加上 .Controls._children ,比如我设置的就是 Mscrm.Form.{!EntityLogicalName}.MainTab.Save.Controls._children 。这个CustomAction元素也有Sequence 属性,这个一般设置为刚才这个按钮组的Sequence 属性值就可以,从 applicationRibbon.xml 中可以知道这个属性值是10,所以我也设置为 10。当然这些东西自己去找applicationRibbon这个接近8000行的文件很难,我的建议是使用 CRM 2011 Visual Ribbon Editor 来辅助查看,应该用它也可以直接修改,它支持Dynamics CRM 2015。我这里
这个CustomAction 元素的设置如下:
      <CustomAction Id="Mscrm.Form.{!EntityLogicalName}.MainTab.Save.LikeIt.CustomAction" Location="Mscrm.Form.{!EntityLogicalName}.MainTab.Save.Controls._children" Sequence="10">
        <CommandUIDefinition>
          <Button Id="Mscrm.Form.{!EntityLogicalName}.MainTab.Save.LikeIt" Command="Mscrm.Form.{!EntityLogicalName}.MainTab.Save.LikeIt.Command" Sequence="48" LabelText="$LocLabels:LuoYong.Common.LikeIt.LabelText" ToolTipTitle="$LocLabels:LuoYong.Common.LikeIt.ToolTip" Image16by16="/_imgs/ribbon/Entity16_8006.png" Image32by32="/_imgs/ribbon/Entity32_8006.png" />
        </CommandUIDefinition>
      </CustomAction>
整个 customizations.xml文件的 RibbonDiffXml 元素的值如下,我们所有修改的内容都在这个元素下:
 <RibbonDiffXml>
    <CustomActions>
      <CustomAction Id="Mscrm.Form.{!EntityLogicalName}.MainTab.Save.LikeIt.CustomAction" Location="Mscrm.Form.{!EntityLogicalName}.MainTab.Save.Controls._children" Sequence="10">
        <CommandUIDefinition>
          <Button Id="Mscrm.Form.{!EntityLogicalName}.MainTab.Save.LikeIt" Command="Mscrm.Form.{!EntityLogicalName}.MainTab.Save.LikeIt.Command" Sequence="48" LabelText="$LocLabels:LuoYong.Common.LikeIt.LabelText" ToolTipTitle="$LocLabels:LuoYong.Common.LikeIt.ToolTip" Image16by16="/_imgs/ribbon/Entity16_8006.png" Image32by32="/_imgs/ribbon/Entity32_8006.png" />
        </CommandUIDefinition>
      </CustomAction>
    </CustomActions>
    <Templates>
      <RibbonTemplates Id="Mscrm.Templates"></RibbonTemplates>
    </Templates>
    <CommandDefinitions>
      <CommandDefinition Id="Mscrm.Form.{!EntityLogicalName}.MainTab.Save.LikeIt.Command">
        <EnableRules>
          <EnableRule Id="LuoYong.Common.EnableRules.FormStateExisting"/>
        </EnableRules>
        <DisplayRules>
          <DisplayRule Id="LuoYong.Common.DisplayRules.EntityPropertyHasNotes"/>
        </DisplayRules>
        <Actions>
          <JavaScriptFunction FunctionName="LikeIt" Library="$webresource:new_/common/js/RibbonScript.js">
            <CrmParameter Value="PrimaryEntityTypeName" />
            <CrmParameter Value="FirstPrimaryItemId" />
          </JavaScriptFunction>
        </Actions>
      </CommandDefinition>
    </CommandDefinitions>
    <RuleDefinitions>
      <TabDisplayRules />
      <DisplayRules>
        <DisplayRule Id="LuoYong.Common.DisplayRules.EntityPropertyHasNotes">
          <EntityPropertyRule AppliesTo="PrimaryEntity" PropertyName="HasNotes" PropertyValue="true"/>
        </DisplayRule>
      </DisplayRules>
      <EnableRules>
        <EnableRule Id="LuoYong.Common.EnableRules.FormStateExisting">
          <FormStateRule State="Existing"/>
        </EnableRule>
      </EnableRules>
    </RuleDefinitions>
    <LocLabels>
      <LocLabel Id="LuoYong.Common.LikeIt.LabelText">
        <Titles>
          <Title languagecode="2052" description="点赞" />
          <Title languagecode="1033" description="Like it"/>
        </Titles>
      </LocLabel>
      <LocLabel Id="LuoYong.Common.LikeIt.ToolTip">
        <Titles>
          <Title languagecode="2052" description="喜欢就点赞吧!"/>
          <Title languagecode="1033" description="I like it!" />
        </Titles>
      </LocLabel>
    </LocLabels>
  </RibbonDiffXml>
我使用的Web资源的JavaScript代码如下:
function LikeIt(EntityName, EntityId) {
    Xrm.Utility.alertDialog("感谢用户 " + Xrm.Page.context.getUserName() + " 对实体逻辑名称为" + EntityName + ",Id为" + EntityId + ",主要属性值为" + Xrm.Page.data.entity.getPrimaryAttributeValue() + "的记录点赞!");
}
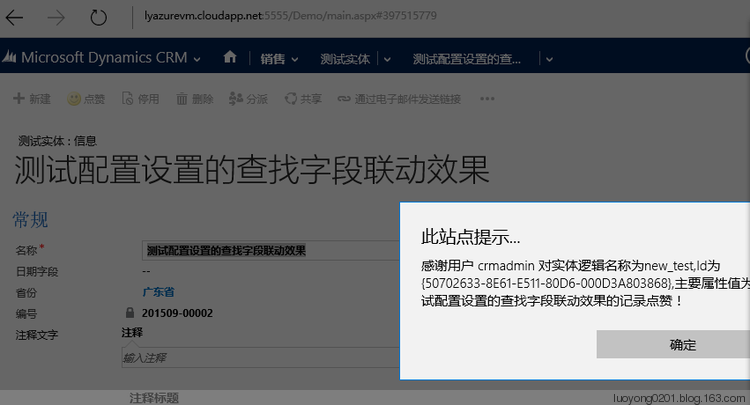
保存,压缩后将解决方案导入系统,发布所有自定义项后我们去看效果:打开客户这个实体的记录,可以看到点赞这个按钮在我指定的位置,显示文本和提示和我设置的一样,点击后有我预料的效果。

去自定义的一个启用了注释的测试实体看看,也有:
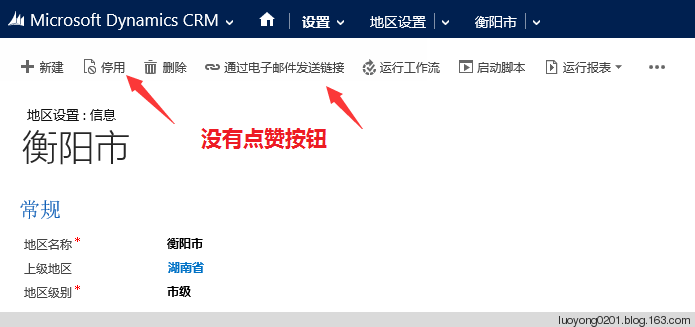
但是我如果去一个我没有启用注释功能的实体看看,则是没有这个按钮的,当然新建记录时候也是没有的。
测试基本满足要求,搞定。话说点赞容易,当面赞难。各位看官下次看见我的时候当面赞一下,看看是不是很难。

 浙公网安备 33010602011771号