

Spring学习
1.Spring介绍
Spring是个开源框架,可简化JavaEE开发同时降低耦合度,可以非常方便的整合其他框架,无入侵式的进行功能增强。
Spring的核心就是 控制反转(IoC)和面向切面(AOP)。
2.控制反转(IoC)
2.1 概念
控制反转,之前对象的控制权在类的手上,现在反转后到了Spring手上。
容器负责提供 所需的方法,这就是反转,不是你给我什么我用什么,而是我问你要什么你给什么。
2.2 入门案例
①导入依赖
导入SpringIOC相关依赖
       <dependency>
            <groupId>org.springframework</groupId>
            <artifactId>spring-context</artifactId>
            <version>5.1.9.RELEASE</version>
        </dependency>
②编写配置文件
在resources目录下创建applicationContext.xml文件,文件名可以任意取。但是建议叫applicationContext。
(ps:在IDEA中提供了这个配置文件,右键New →XML Configuragtion File→Spring Config)
内容如下
<?xml version="1.0" encoding="UTF-8"?>
<beans xmlns="http://www.springframework.org/schema/beans"
       xmlns:xsi="http://www.w3.org/2001/XMLSchema-instance"
       xsi:schemaLocation="http://www.springframework.org/schema/beans http://www.springframework.org/schema/beans/spring-beans.xsd">
    <!--class指的是 接口实现方法,id指 接口 -->
    <bean class="com.xuexispringIOC.dao.impl.StudentDaoImpl" id="studentDao"></bean>
</beans>
③创建容器从容器中获取对象并测试
    public static void main(String[] args) {
        //创建容器,通过Spring配置文件创建容器
        ClassPathXmlApplicationContext app=new ClassPathXmlApplicationContext("applicationContext.xml");
        //获取对象,提过Bean的唯一标识符id,来获取对象
        StudentDao studentDao= (StudentDao) app.getBean("studentDao");
        //通过对象调用方法
        System.out.println(studentDao.getStudentById(1));
    }
2.3 Bean的常用属性配置
2.3.1 id
Bean的唯一标识符,同一个Spring 容器中不允许重复
2.3.2 class
全类名,用于反射创建对象
2.3.3 scope
scope主要有两个值:singleton和prototype
如果设置为singleton则一个容器中只会有这个一个bean对象。默认容器创建的时候就会创建该对象。
如果设置为prototype则一个容器中会有多个该bean对象。每次调用getBean方法获取时都会创建一个新对象。
3.DI依赖注入
依赖注入可以理解成IoC的一种应用场景,反转的是对象间依赖关系维护权。
其中常用的是set方法注入、有参构造注入、复杂类型属性注入等。
3.1 set方法注入
在要注入属性的bean标签中进行配置。前提是该类有提供属性对应的set方法。
package com.sangeng.domain; public class Student { private String name; private int id; private int age; private Dog dog; public Dog getDog() { return dog; } public void setDog(Dog dog) { this.dog = dog; } @Override public String toString() { return "Student{" + "name='" + name + '\'' + ", id=" + id + ", age=" + age + '}'; } public Student() { } public Student(String name, int id, int age) { this.name = name; this.id = id; this.age = age; } public String getName() { return name; } public void setName(String name) { this.name = name; } public int getId() { return id; } public void setId(int id) { this.id = id; } public int getAge() { return age; } public void setAge(int age) { this.age = age; } } <bean class="com.sangeng.domain.Dog" id="dog"> <property name="name" value="小白"></property> <property name="age" value="6"></property> </bean> <bean class="com.sangeng.domain.Student" id="student" > <!-- name属性用来指定要设置哪个属性 value属性用来设置要设置的值 ref属性用来给引用类型的属性设置值,可以写上Spring容器中bean的id --> <property name="name" value="东南枝"></property> <property name="age" value="20"></property> <property name="id" value="1"></property> <property name="dog" ref="dog"></property> </bean>
3.2 有参构造注入
在要注入属性的bean标签中进行配置。前提是该类有提供对应的有参构造。
public class Student { private String name; private int id; private int age; private Dog dog; public Student(String name, int id, int age, Dog dog) { this.name = name; this.id = id; this.age = age; this.dog = dog; } //.....省略其他 } <!--使用有参构造进行注入--> <bean class="com.sangeng.domain.Student" id="student2" > <constructor-arg name="name" value="自挂东南枝"></constructor-arg> <constructor-arg name="age" value="20"></constructor-arg> <constructor-arg name="id" value="30"></constructor-arg> <constructor-arg name="dog" ref="dog"></constructor-arg> </bean>
3.3 复杂类型属性注入
实体类如下:
@Data @NoArgsConstructor @AllArgsConstructor public class User { private int age; private String name; private Phone phone; private List<String> list; private List<Phone> phones; private Set<String> set; private Map<String, Phone> map; private int[] arr; private Properties properties; } @Data @NoArgsConstructor @AllArgsConstructor public class Phone { private double price; private String name; private String password; private String path; }
配置如下:
<?xml version="1.0" encoding="UTF-8"?> <beans xmlns="http://www.springframework.org/schema/beans" xmlns:xsi="http://www.w3.org/2001/XMLSchema-instance" xsi:schemaLocation="http://www.springframework.org/schema/beans http://www.springframework.org/schema/beans/spring-beans.xsd"> <bean class="com.sangeng.domain.Phone" id="phone"> <property name="price" value="3999"></property> <property name="name" value="黑米"></property> <property name="password" value="123"></property> <property name="path" value="qqqq"></property> </bean> <bean class="com.sangeng.domain.User" id="user"> <property name="age" value="10"></property> <property name="name" value="大队长"></property> <property name="phone" ref="phone"></property> <property name="list"> <list> <value>张三</value> <value>西施</value> </list> </property> <property name="phones"> <list> <ref bean="phone"></ref> </list> </property> <property name="set"> <set> <value>setEle1</value> <value>setEle2</value> </set> </property> <property name="map"> <map> <entry key="k1" value-ref="phone"></entry> <entry key="k2" value-ref="phone"></entry> </map> </property> <property name="arr"> <array> <value>10</value> <value>11</value> </array> </property> <property name="properties"> <props> <prop key="k1">v1</prop> <prop key="k2">v2</prop> </props> </property> </bean> </beans>
但最重要的是利用插件进行辅助即可。
4.Lombok(消除get\set)
① 导入依赖
        <dependency>
            <groupId>org.projectlombok</groupId>
            <artifactId>lombok</artifactId>
            <version>1.18.16</version>
        </dependency>
② IDEA添加Lombok插件插件
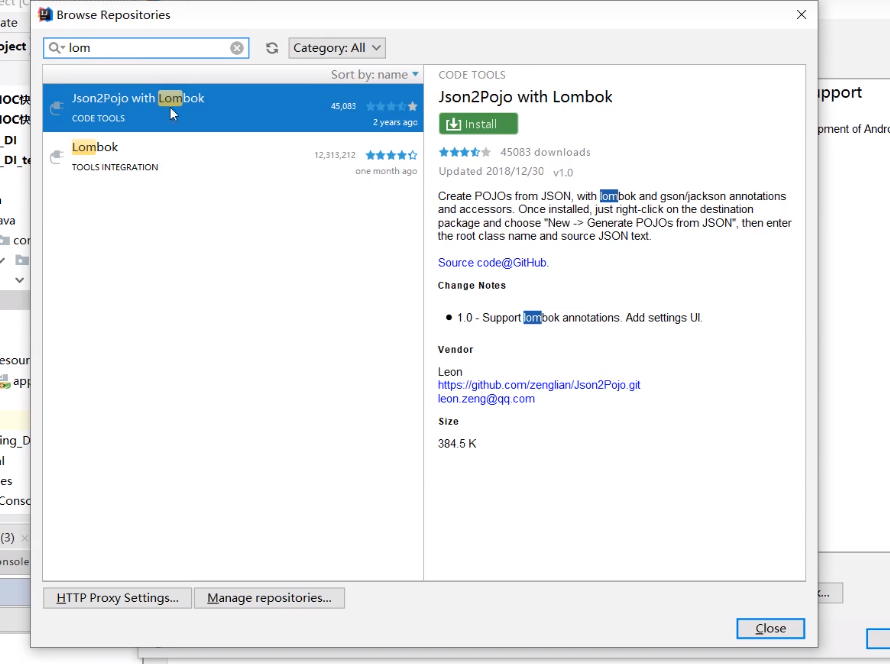
③ 增加注解
@Data //根据属性生成set,get方法 @NoArgsConstructor //生成空参构造 @AllArgsConstructor //生成全参构造 public class Phone { private double price; private String name; private String password; private String path; }
5.SPEL
我们可以再配置文件中使用SPEL表达式。写法如下:
        <property name="age" value="#{20}"/>
        <property name="car" value="#{car}"/>

 浙公网安备 33010602011771号