

安装ElasticSearch-RPM
Architecture: x86-64
内存: 2GB
Operating System: Alibaba Cloud Linux 3 (Soaring Falcon)
Kernel: Linux 5.10.134-15.al8.x86_64
elasticsearch-8.9.0
--
序章
elastic.io 官网:elasticsearch
https://www.elastic.co/cn/elasticsearch
下载页面:
https://www.elastic.co/downloads/elasticsearch

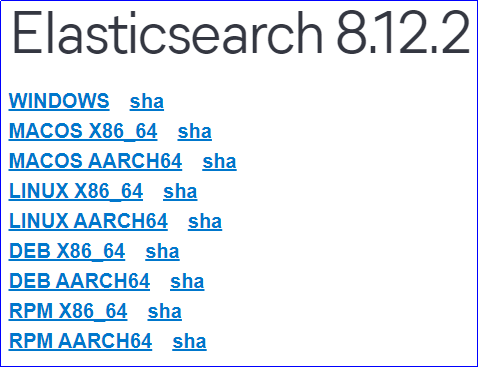
240316 最新版本:8.12.2
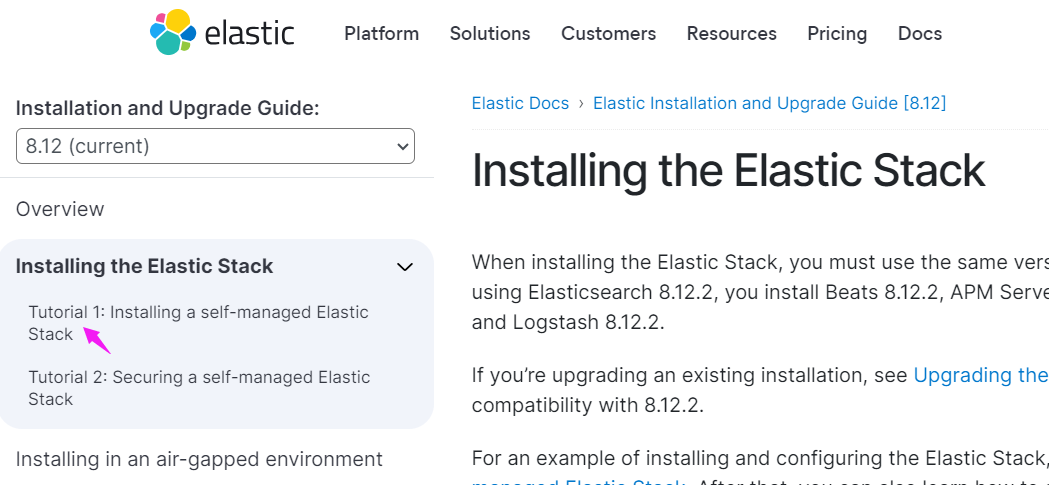
官文:
Elastic Installation and Upgrade Guide
https://www.elastic.co/guide/en/elastic-stack/current/index.html
Installing the Elastic Stack
https://www.elastic.co/guide/en/elastic-stack/current/installing-elastic-stack.html
Network requirements:一些端口,确保不要被占用。
|
Default port Component Enterprise Search 5044 Elastic Agent → Logstash 5601 Kibana 8220 Elastic Agent → Fleet Server 9200-9300 Elasticsearch REST API 9300-9400 Elasticsearch node transport and communication 9600-9700 Logstash REST API |
Install Elasticsearch with RPM
https://www.elastic.co/guide/en/elasticsearch/reference/8.12/rpm.html
该文档的目录:
| Import the Elasticsearch GPG Key Installing from the RPM repository Download and install the RPM manually Start Elasticsearch with security enabled Reconfigure a node to join an existing cluster Enable automatic creation of system indices Running Elasticsearch with systemd Check that Elasticsearch is running Configuring Elasticsearch Connect clients to Elasticsearch Directory layout of RPM Security certificates and keys Next steps |
其中,Download and install the RPM manually 的命令如下:
| wget https://artifacts.elastic.co/downloads/elasticsearch/elasticsearch-8.12.2-x86_64.rpm wget https://artifacts.elastic.co/downloads/elasticsearch/elasticsearch-8.12.2-x86_64.rpm.sha512 shasum -a 512 -c elasticsearch-8.12.2-x86_64.rpm.sha512 sudo rpm --install elasticsearch-8.12.2-x86_64.rpm |
更多信息请查看官文。
注,wget 的速度不是太快,下载 500MB+ 的 RPM 需要 近半小时(资讯后发现,可以通过 阿里云镜像下载,超快)。
![]()
注,Installing from the RPM repository 的方式 未尝试。
阿里云镜像:elasticsearch
为了更快的下载速度。
网址:
https://developer.aliyun.com/mirror/elasticstack/
下载地址:https://mirrors.aliyun.com/elasticstack/

安装步骤
注意,安装前确保主机有足够的内存,至少2GB。
安装步骤很简单🀄
说明,安装全程使用 root 账号——所以,命令没有使用 sudo。
说明,启动 ElasticSearch 使用的是其 自带的 JDK。
下载
进入 阿里云的 elasticsearch 镜像下载地址:
https://mirrors.aliyun.com/elasticstack/
选择需要安装的版本:elasticsearch-8.9.0-x86_64.rpm
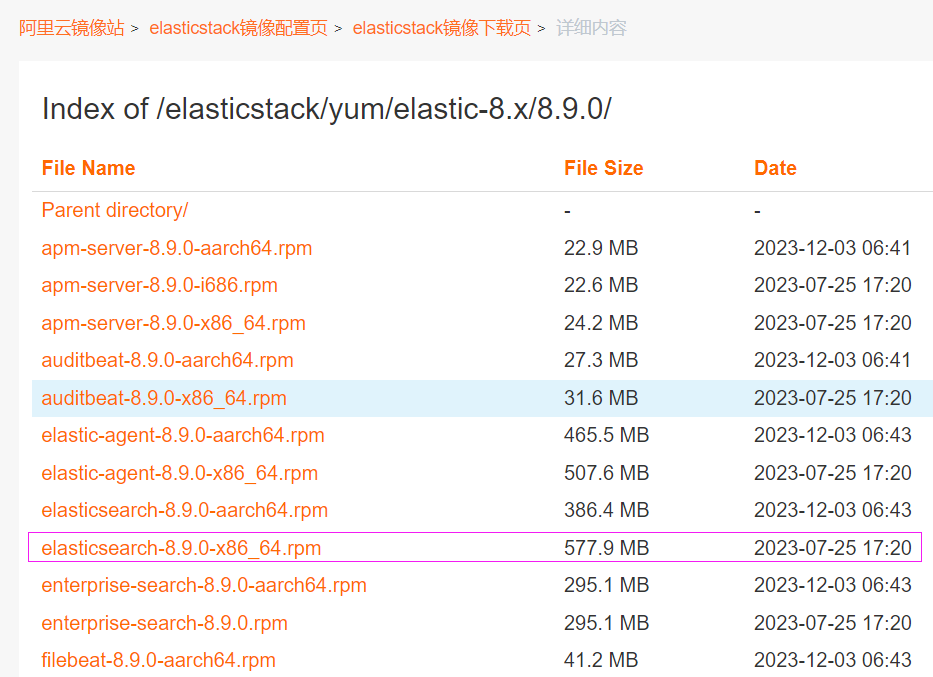
复制 该 rpm文件的地址:
https://mirrors.aliyun.com/elasticstack/yum/elastic-8.x/8.9.0/elasticsearch-8.9.0-x86_64.rpm
登录 ECS,使用 wget 命令下载:速度 十几MBPS,快太多了。
![]()
下载完毕:
| -rw-r--r-- 1 root root 605947433 Jul 25 2023 elasticsearch-8.9.0-x86_64.rpm |
安装&启动
使用命令:
| # rpm --install elasticsearch-8.9.0-x86_64.rpm |
安装完毕,显示如下信息:

此时,安装成功,不过,服务还没有启动。ben发布于博客园
注意,上面给 内置账号 elastic(默认) 生成了密码:
| The generated password for the elastic built-in superuser is : RF+C=orFFKtC49rHeNWn |
下面 测试时会用到。
还需执行(官文还要加 sudo):
| systemctl daemon-reload systemctl enable elasticsearch.service |
启动、停止 ES 服务:
| systemctl start elasticsearch.service systemctl stop elasticsearch.service |
注意,启动前,检查主机的 内存(memory) 够不够!(free 命令)
![]()
free 是 1166080(1.1GB),够了。
ben发布于博客园
启动 ES 服务:
# sudo systemctl start elasticsearch.service
启动后,使用 ps 命令检查 服务是否启动:
# ps -ef | grep elas
可以看到 3个 Java进程:

文字版:
|
/usr/share/elasticsearch/jdk/bin/java -Xms4m -Xmx64m -XX:+UseSerialGC -Dcli.name=server -Dcli.script=/usr/share/elasticsearch/bin/elasticsearch -Dcli.libs=lib/tools/server-cli -Des.path.home=/usr/share/elasticsearch -Des.path.conf=/etc/elasticsearch -Des.distribution.type=rpm -cp /usr/share/elasticsearch/lib/*:/usr/share/elasticsearch/lib/cli-launcher/* org.elasticsearch.launcher.CliToolLauncher -p /var/run/elasticsearch/elasticsearch.pid --quiet
/usr/share/elasticsearch/jdk/bin/java -Des.networkaddress.cache.ttl=60 -Des.networkaddress.cache.negative.ttl=10 -Djava.security.manager=allow -XX:+AlwaysPreTouch -Xss1m -Djava.awt.headless=true -Dfile.encoding=UTF-8 -Djna.nosys=true -XX:-OmitStackTraceInFastThrow -Dio.netty.noUnsafe=true -Dio.netty.noKeySetOptimization=true -Dio.netty.recycler.maxCapacityPerThread=0 -Dlog4j.shutdownHookEnabled=false -Dlog4j2.disable.jmx=true -Dlog4j2.formatMsgNoLookups=true -Djava.locale.providers=SPI,COMPAT --add-opens=java.base/java.io=org.elasticsearch.preallocate -XX:+UseG1GC -Djava.io.tmpdir=/tmp/elasticsearch-8240227414755309209 --add-modules=jdk.incubator.vector -XX:+HeapDumpOnOutOfMemoryError -XX:+ExitOnOutOfMemoryError -XX:HeapDumpPath=/var/lib/elasticsearch -XX:ErrorFile=/var/log/elasticsearch/hs_err_pid%p.log -Xlog:gc*,gc+age=trace,safepoint:file=/var/log/elasticsearch/gc.log:utctime,level,pid,tags:filecount=32,filesize=64m -Xms943m -Xmx943m -XX:MaxDirectMemorySize=494927872 -XX:G1HeapRegionSize=4m -XX:InitiatingHeapOccupancyPercent=30 -XX:G1ReservePercent=15 -Des.distribution.type=rpm --module-path /usr/share/elasticsearch/lib --add-modules=jdk.net --add-modules=org.elasticsearch.preallocate -m org.elasticsearch.server/org.elasticsearch.bootstrap.Elasticsearch
/usr/share/elasticsearch/modules/x-pack-ml/platform/linux-x86_64/bin/controller |
说明,这里的 java 命令是 elasticsearch 自带的。
说明,第二个进程 设置了 943MB 的内存。
启动后,检查内存:大为减少!
top命令查看:

测试
找到 上面 安装过程中产生的密码,执行 官方文档 下面的命令 即可:
|
curl --cacert /etc/elasticsearch/certs/http_ca.crt -u elastic:$ELASTIC_PASSWORD https://localhost:9200 $ELASTIC_PASSWORD 改为 RF+C=orFFKtC49rHeNWn |
执行后返回:

说明,一定要认真看 官方文档。
进一步学习
官文:Quick start
https://www.elastic.co/guide/en/elasticsearch/reference/current/getting-started.html
发布博文时是 8.12 的。
其它
查看 rpm 安装后的位置
执行命令:
| # rpm -qpl elasticsearch-8.9.0-x86_64.rpm | more |

---END---
ben发布于博客园
本文链接:
https://www.cnblogs.com/luo630/p/18077518
ben发布于博客园
参考资料
1、
ben发布于博客园
ben发布于博客园

 浙公网安备 33010602011771号