Spring Boot事件(Events)及监听器(Listeners)
JAVA 8
Spring Boot 2.5.3
---
序章
Spring Boot 可以通过 【发布事件、监听事件、执行业务】 来进行通信。ben发布于博客园
在官方文档的 “SpringApplication 》 Application Events and Listeners”一节可以看到详情,本文参考该文档进行演示。
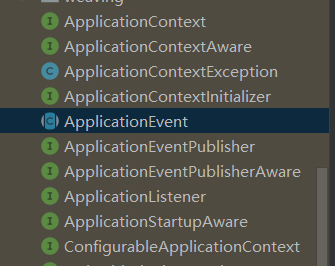
关键类或接口:
// 事件
public abstract class ApplicationEvent extends EventObject {
}

// 事件发布者
@FunctionalInterface
public interface ApplicationEventPublisher {
}

// 事件发布者Aware
public interface ApplicationEventPublisherAware extends Aware {
}

// 事件监听器
@FunctionalInterface
public interface ApplicationListener<E extends ApplicationEvent> extends EventListener {
}
以上接口或类来自 spring-context 包中,其实,这是 spring framework 提供的功能。ben发布于博客园
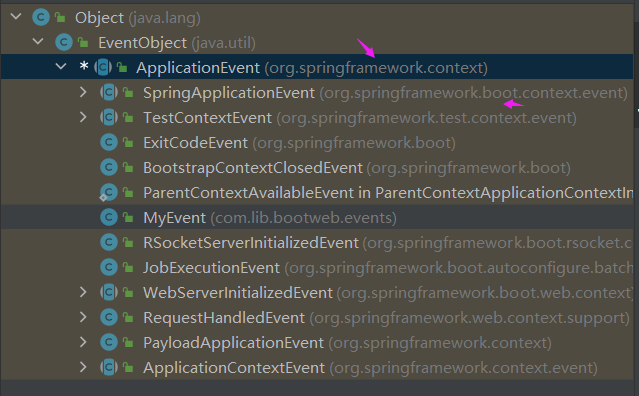
ApplicationEvent 的子类:
ApplicationEventPublisher 的子类:ben发布于博客园
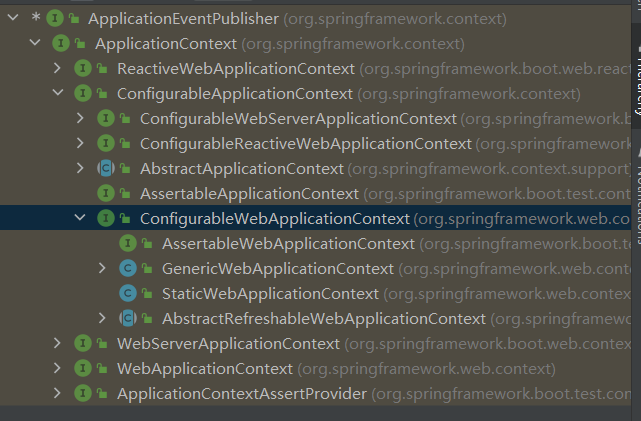
其它类或接口的层次关系,请自行在IDE中查看。
Spring Boot 启动事件
这些事件都是 ApplicationEvent 的子类的子类,比如,ApplicationReadyEvent。ben发布于博客园

自定义事件
除了框架中的事件,也可以通过继承 ApplicationEvent 创建自己业务需要的事件。
比如,前面图中的 MyEvent(也是本文测试的 事件):
public class MyEvent extends ApplicationEvent {
    public String getContent() {
        return content;
    }

    private String content;

    public MyEvent(Object source, String content) {
        super(source);
        this.content = content;
    }

}
官文中提到的 添加事件监听器的方式:ben发布于博客园
SpringApplication.addListeners(…)

SpringApplicationBuilder.listeners(…)

META-INF/spring.factories 中 org.springframework.context.ApplicationListener
试验:发布事件并处理
使用前面的 MyEvent。
实现 ApplicationEventPublisherAware 接口 创建 事件发布者。
import lombok.extern.slf4j.Slf4j;
import org.springframework.context.ApplicationEvent;
import org.springframework.context.ApplicationEventPublisher;
import org.springframework.context.ApplicationEventPublisherAware;
import org.springframework.stereotype.Component;

// 1、事件发布者组件
@Component
@Slf4j
public class AppEventPublisher implements ApplicationEventPublisherAware {
    private ApplicationEventPublisher applicationEventPublisher;

    @Override
    public void setApplicationEventPublisher(ApplicationEventPublisher applicationEventPublisher) {
        this.applicationEventPublisher = applicationEventPublisher;
        log.info("applicationEventPublisher 设置完毕");
    }

    // 2、发布事件
    public boolean sendEvent(ApplicationEvent event) {
        applicationEventPublisher.publishEvent(event);
        return true;
    }

}
实现 ApplicationListener 接口 创建 事件监听器:
import lombok.extern.slf4j.Slf4j;
import org.springframework.context.ApplicationListener;

@Slf4j
public class MyEventListener implements ApplicationListener<MyEvent> {
    @Override
    public void onApplicationEvent(MyEvent event) {
        log.info("MyEventListener 处理事件 MyEvent event={}, source={}, content={}",
                event, event.getSource(), event.getContent());
    }
}
建立 第二个 事件监听器:ben发布于博客园
import lombok.extern.slf4j.Slf4j;
import org.springframework.context.ApplicationListener;

@Slf4j
public class MyEventListener2 implements ApplicationListener<MyEvent> {
    @Override
    public void onApplicationEvent(MyEvent event) {
        log.info("MyEventListener2 处理事件 MyEvent event={}, source={}, content={}",
                event, event.getSource(), event.getContent());
    }
}
项目启动时,注册 事件监听器:
	public static void main(String[] args) {
		SpringApplication app = new SpringApplication(BootwebApplication.class);

		app.setBannerMode(Banner.Mode.OFF);

		// 1、单个监听器
		app.addListeners(new MyEventListener());

		// 2、多个监听器:相同类型
//		app.addListeners(new MyEventListener(), new MyEventListener());

		// 3、多个监听器:不同类型
//		app.addListeners(new MyEventListener(), new MyEventListener2());

		ConfigurableApplicationContext ctx = app.run(args);

		log.info("----BootwebApplication已启动----");
	}
对 上面的 1、2、3 进行测试。ben发布于博客园
测试接口:/api/appEvent/send
@RestController
@RequestMapping(value = "/api/appEvent")
@RequiredArgsConstructor
@Slf4j
public class AppEventController {

    private final AppEventPublisher appEventPublisher;

    @GetMapping(value = "send")
    public boolean sendEvent(@RequestParam String content) {
        appEventPublisher.sendEvent(new MyEvent(this.appEventPublisher, content));
        log.info("MyEvent 发送完成:content={}", content);
        return true;
    }

}
测试方式:
启动后,调用接口发送事件。ben发布于博客园
测试1:单个监听器
结果1:
2023-02-06 19:50:09.257  INFO 21072 --- [nio-8080-exec-2] com.lib.bootweb.events.MyEventListener   :
MyEventListener 处理事件 MyEvent event=com.lib.bootweb.events.MyEvent[source=com.lib.bootweb.events.AppEventPublisher@1483bdad],
source=com.lib.bootweb.events.AppEventPublisher@1483bdad, content=abcde
2023-02-06 19:50:09.258  INFO 21072 --- [nio-8080-exec-2] com.lib.bootweb.api.AppEventController   :
MyEvent 发送完成:content=abcde
测试2:多个相同类型监听器
结果2:
2023-02-06 19:52:32.834  INFO 31280 --- [nio-8080-exec-1] com.lib.bootweb.events.MyEventListener   :
MyEventListener 处理事件 MyEvent event=com.lib.bootweb.events.MyEvent[source=com.lib.bootweb.events.AppEventPublisher@2915626e],
source=com.lib.bootweb.events.AppEventPublisher@2915626e, content=dddddd
2023-02-06 19:52:32.835  INFO 31280 --- [nio-8080-exec-1] com.lib.bootweb.events.MyEventListener   :
MyEventListener 处理事件 MyEvent event=com.lib.bootweb.events.MyEvent[source=com.lib.bootweb.events.AppEventPublisher@2915626e],
source=com.lib.bootweb.events.AppEventPublisher@2915626e, content=dddddd
2023-02-06 19:52:32.835  INFO 31280 --- [nio-8080-exec-1] com.lib.bootweb.api.AppEventController   :
MyEvent 发送完成:content=dddddd
测试3:多个不同类型监听器
结果3:ben发布于博客园
2023-02-06 19:53:38.173  INFO 11068 --- [nio-8080-exec-2] com.lib.bootweb.events.MyEventListener   :
MyEventListener 处理事件 MyEvent event=com.lib.bootweb.events.MyEvent[source=com.lib.bootweb.events.AppEventPublisher@1e9b970e],
source=com.lib.bootweb.events.AppEventPublisher@1e9b970e, content=zzzzz
2023-02-06 19:53:38.174  INFO 11068 --- [nio-8080-exec-2] com.lib.bootweb.events.MyEventListener2  :
MyEventListener2 处理事件 MyEvent event=com.lib.bootweb.events.MyEvent[source=com.lib.bootweb.events.AppEventPublisher@1e9b970e],
source=com.lib.bootweb.events.AppEventPublisher@1e9b970e, content=zzzzz
2023-02-06 19:53:38.174  INFO 11068 --- [nio-8080-exec-2] com.lib.bootweb.api.AppEventController   : MyEvent 发送完成:content=zzzzz
小结
三种方式发送事件,事件都被正确处理了。
不过,这里存在一个问题:接口调用和事件处理是同步进行的,因为 AppEventPublisher#sendEvent 有返回值——boolean。ben发布于博客园
添加无返回指定 AppEventPublisher#sendEventAsync (使用 @EnableAsync、@Async 注解)即可实现异步处理事件——接口调用完即返回:
    @Async
    public void sendEventAsync(ApplicationEvent event) {
        applicationEventPublisher.publishEvent(event);
        log.info("事件发送完毕:event={}", event);
    }
在接口中调用 sendEventAsync:
// 异步
appEventPublisher.sendEventAsync(new MyEvent(this.appEventPublisher, content));
测试结果:接口第一时间返回了,线程名称不同了,事件被异步处理了
2023-02-06 19:59:07.033  INFO 23592 --- [nio-8080-exec-1] com.lib.bootweb.api.AppEventController   :
MyEvent 发送完成:content=async
2023-02-06 19:59:07.044  INFO 23592 --- [         task-1] com.lib.bootweb.events.MyEventListener   :
MyEventListener 处理事件 MyEvent event=com.lib.bootweb.events.MyEvent[source=com.lib.bootweb.events.AppEventPublisher@7052f2b2],
source=com.lib.bootweb.events.AppEventPublisher@7052f2b2, content=async
2023-02-06 19:59:07.044  INFO 23592 --- [         task-1] com.lib.bootweb.events.MyEventListener2  :
MyEventListener2 处理事件 MyEvent event=com.lib.bootweb.events.MyEvent[source=com.lib.bootweb.events.AppEventPublisher@7052f2b2],
source=com.lib.bootweb.events.AppEventPublisher@7052f2b2, content=async
2023-02-06 19:59:07.045  INFO 23592 --- [         task-1] c.lib.bootweb.events.AppEventPublisher   :
事件发送完毕:event=com.lib.bootweb.events.MyEvent[source=com.lib.bootweb.events.AppEventPublisher@7052f2b2]
试验:使用 @EventListener 注解监听并处理事件
监听自定义 MyEvent
处理上面的 MyEvent 事件:
import lombok.extern.slf4j.Slf4j;
import org.springframework.context.annotation.Configuration;
import org.springframework.context.event.EventListener;

// 1、@Configuration 必须
@Configuration
@Slf4j
public class AppEventConfig {

    // 2、定义事件监听器
    @EventListener
    public void listenMyEvent(MyEvent myEvent) {
        log.info("在 AppEventConfig#listenMyEvent 方法处理事件:myEvent={}, {}",
                myEvent.getSource(), myEvent.getContent());
    }

}
注释掉 启动类中使用 addListeners 方法 添加的监听器,执行测试——调用接口。ben发布于博客园
测试结果:“@EventListener” 为 请求参数 content 的值
2023-02-06 20:08:57.176  INFO 3020 --- [nio-8080-exec-3] com.lib.bootweb.api.AppEventController   :
MyEvent 发送完成:content=@EventListener
2023-02-06 20:08:57.185  INFO 3020 --- [         task-1] com.lib.bootweb.events.AppEventConfig    :
在 AppEventConfig#listenMyEvent 方法处理事件:myEvent=com.lib.bootweb.events.AppEventPublisher@41dc5ca0, @EventListener
2023-02-06 20:08:57.185  INFO 3020 --- [         task-1] c.lib.bootweb.events.AppEventPublisher   :
事件发送完毕:event=com.lib.bootweb.events.MyEvent[source=com.lib.bootweb.events.AppEventPublisher@41dc5ca0]
监听更多事件
@EventListener 注解源码 有一些参数,其中,value(同 classes) 可以 设置多个 监听事件:ben发布于博客园
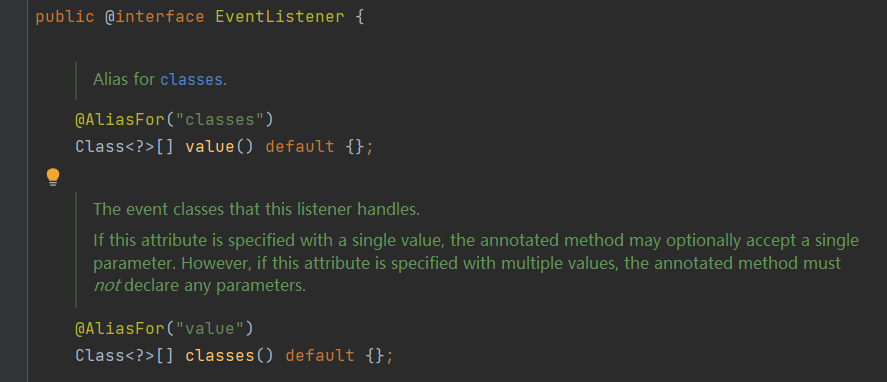
注,还有其它属性 condition、id。
测试代码:
    @EventListener(value = {ApplicationStartingEvent.class,
            ApplicationEnvironmentPreparedEvent.class,
            ApplicationPreparedEvent.class,
            ApplicationStartedEvent.class,
            ApplicationReadyEvent.class,
            ApplicationFailedEvent.class,
            WebServerInitializedEvent.class,
            ContextRefreshedEvent.class,
            MyEvent.class
    })
    public void listenMyEvent2(ApplicationEvent event) {
        log.info("在 AppEventConfig#listenMyEvent2 方法处理事件:event={}, class={}",
                event.getSource(), event.getClass());
}测试结果:ben发布于博客园
// 启动Web应用:ServletWebServerInitializedEvent、ContextRefreshedEvent、ApplicationStartedEvent、ApplicationReadyEvent
[           main] com.lib.bootweb.events.AppEventConfig    : 在 AppEventConfig#listenMyEvent2 方法处理事件:
event=org.springframework.boot.web.embedded.tomcat.TomcatWebServer@78010562,
class=class org.springframework.boot.web.servlet.context.ServletWebServerInitializedEvent
[           main] com.lib.bootweb.events.AppEventConfig    : 在 AppEventConfig#listenMyEvent2 方法处理事件:
event=org.springframework.boot.web.servlet.context.AnnotationConfigServletWebServerApplicationContext@65f095f8,
started on Tue Feb 07 20:20:55 CST 2023,
class=class org.springframework.context.event.ContextRefreshedEvent
[           main] com.lib.bootweb.BootwebApplication       : Started BootwebApplication in 3.471 seconds (JVM running for 3.883)
[           main] com.lib.bootweb.events.AppEventConfig    : 在 AppEventConfig#listenMyEvent2 方法处理事件:
event=org.springframework.boot.SpringApplication@35eb4a3b, class=class org.springframework.boot.context.event.ApplicationStartedEvent
[           main] c.l.b.config.ModifyObjectMapperRunner    : ModifyObjectMapperRunner END
[           main] com.lib.bootweb.events.AppEventConfig    : 在 AppEventConfig#listenMyEvent2 方法处理事件:
event=org.springframework.boot.SpringApplication@35eb4a3b, class=class org.springframework.boot.context.event.ApplicationReadyEvent
[           main] com.lib.bootweb.BootwebApplication       : ----BootwebApplication已启动----

[nio-8080-exec-1] o.a.c.c.C.[Tomcat].[localhost].[/]       : Initializing Spring DispatcherServlet 'dispatcherServlet'
[nio-8080-exec-1] o.s.web.servlet.DispatcherServlet        : Initializing Servlet 'dispatcherServlet'
[nio-8080-exec-1] o.s.web.servlet.DispatcherServlet        : Completed initialization in 1 ms

// 调用接口
[nio-8080-exec-1] com.lib.bootweb.api.AppEventController   : MyEvent 发送完成:content=listenMyEvent2
[         task-1] com.lib.bootweb.events.AppEventConfig    : 在 AppEventConfig#listenMyEvent 方法处理事件:
myEvent=com.lib.bootweb.events.AppEventPublisher@1140a495, listenMyEvent2
[         task-1] com.lib.bootweb.events.AppEventConfig    : 在 AppEventConfig#listenMyEvent2 方法处理事件:
event=com.lib.bootweb.events.AppEventPublisher@1140a495, class=class com.lib.bootweb.events.MyEvent
[         task-1] c.lib.bootweb.events.AppEventPublisher   : 事件发送完毕:
event=com.lib.bootweb.events.MyEvent[source=com.lib.bootweb.events.AppEventPublisher@1140a495]
小结
从这里可以看到,使用 @EventListener 监听事件会更方便。
AppEventConfig 除了使用 @Configuration 注解,也可以使用 @Component 注解。
ApplicationEvent 来自 Spring框架!
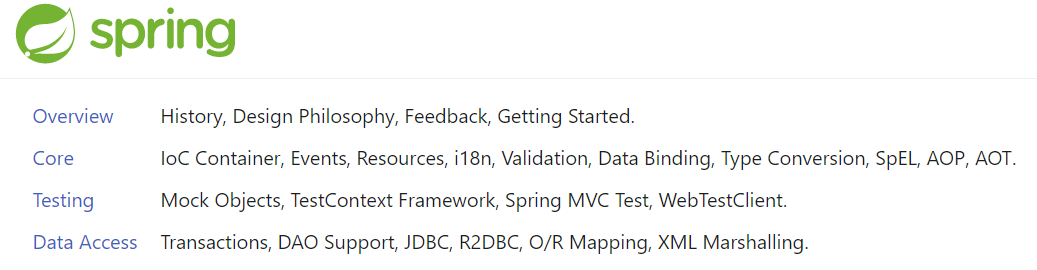
一直奇怪 @EventListener 在 spring boot 的文档中 怎么没有详细说明,原来,它们是来自 spring 框架。
在 spring framework 官文的 core 部分可以找到相关内容:
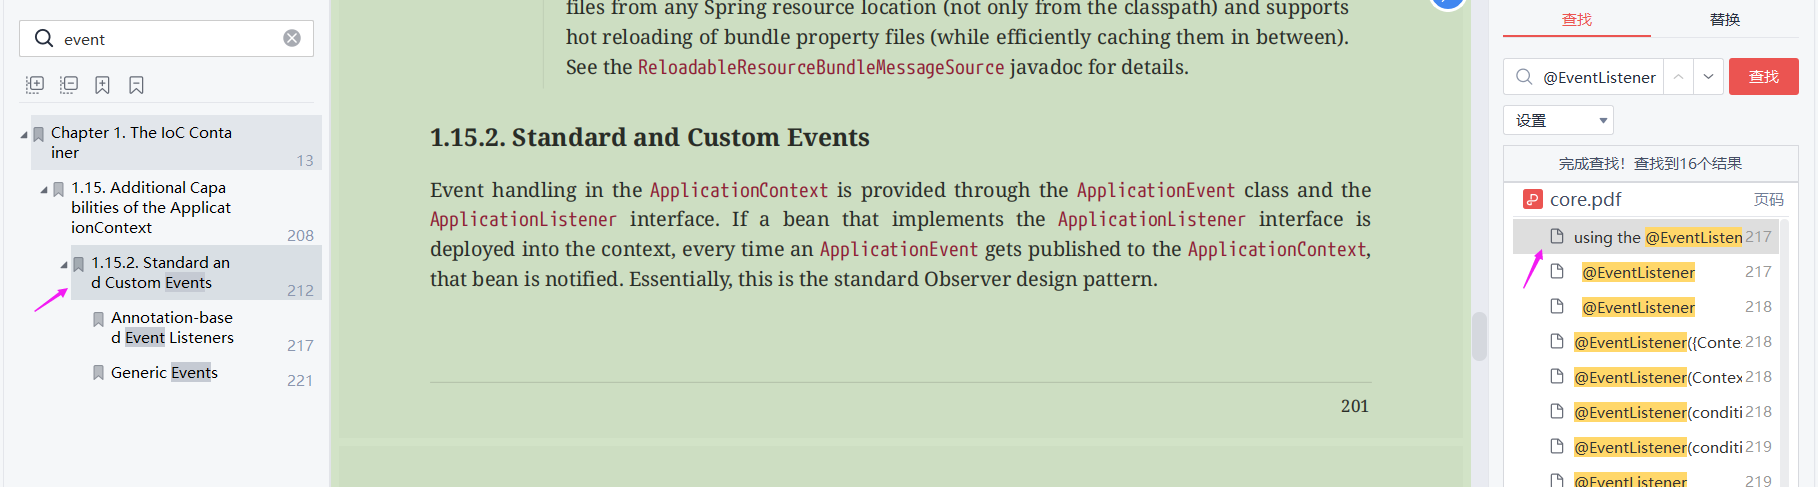
在 该官文中,有关于 事件 的详尽描述,包括 @EventListener注解的使用。
https://spring.io/projects/spring-framework
下图是 官文的 html版本,可以下载其 pdf版本:
https://docs.spring.io/spring-framework/docs/current/reference/

注,本文作者未看完。
注意 spring framework 中 ApplicationContextEvent 的几个子类:做一些监听会很有用。
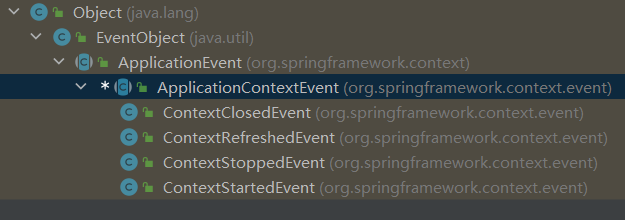
比如,应该关闭时调用 ContextClosedEvent 事件。
---END---
本文链接:
https://www.cnblogs.com/luo630/p/17090167.html
ben发布于博客园
参考资料
1、Spring中的Aware解析理解
by Young丶
于 2020-09-09 14:33:05 发布
原文链接:https://blog.csdn.net/agonie201218/article/details/108489141
关于Spring中 Aware 的使用,还需探究——用处颇大。
2、
ben发布于博客园

 浙公网安备 33010602011771号