spring cloud项目02:中心化配置-P01
Java 8
spring boot 2.5.2
spring cloud 2020.0.3
---
spring.io guide:Centralized Configuration
https://spring.io/guides/gs/centralized-configuration/
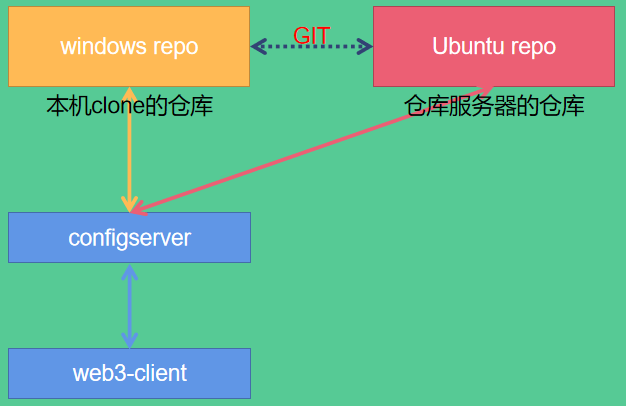
本文基于上面的官方Guide的练习编写,涉及两个项目:
configserver、web3-client
前者为配置中心服务。
配置存放在本地家目录下的git仓库中:git\configserver
期间解决了 获取中文配置显示乱码的问题。
目录
Ubuntu虚拟机执行:
$ git init --bare configserver.git
Windows上clone仓库:
# 进入家目录,执行(mylinux是配置了 hosts文件的)
> git clone git@mylinux:/home/git/gitrepo/configserver.git
添加项目web3-client需要用到的配置文件 web3-client.properties:

web3-client.properties 的内容(后面会更改,更改后要让配置立即生效):来自cnblogs.com
hello=lib
todo=work
message=hello world!
国家=中国
执行 git add、commit、push 将 配置文件 提交到远程仓库(这个过程在开发期间会 执行多次):
C:\Users\Mi\git\configserver>git add web3-client.properties

C:\Users\Mi\git\configserver>git commit -m "修改web3-client 1230"
[master c4b43ea] 修改web3-client 1230
 1 file changed, 2 insertions(+), 1 deletion(-)

C:\Users\Mi\git\configserver>git push origin master
git@mylinux's password:
Enumerating objects: 5, done.
Counting objects: 100% (5/5), done.
Delta compression using up to 8 threads
Compressing objects: 100% (3/3), done.
Writing objects: 100% (3/3), 318 bytes | 318.00 KiB/s, done.
Total 3 (delta 0), reused 0 (delta 0), pack-reused 0
To mylinux:/home/git/gitrepo/configserver.git
   cccbaac..c4b43ea  master -> master
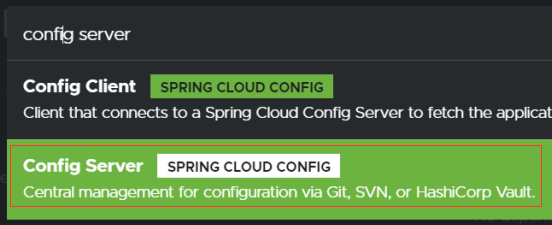
访问 https://start.spring.io/ ,添加依赖 spring-cloud-config-server:
在入口类ConfigserverApplication 添加 @EnableConfigServer 注解:
@EnableConfigServer
@SpringBootApplication
public class ConfigserverApplication {

	public static void main(String[] args) {
修改 application.properties:
server.port=10000

spring.application.name=configserver

# 本地仓库
spring.cloud.config.server.git.uri=c:/Users/Mi/git/configserver
准备完毕,启动 configserver,启动后使用端口 10000。 来自cnblogs.com
访问 https://start.spring.io/ ,添加依赖 spring-cloud-starter-config等:
	<dependencies>
		<dependency>
			<groupId>org.springframework.boot</groupId>
			<artifactId>spring-boot-starter-actuator</artifactId>
		</dependency>
		<dependency>
			<groupId>org.springframework.boot</groupId>
			<artifactId>spring-boot-starter-web</artifactId>
		</dependency>
		<dependency>
			<groupId>org.springframework.cloud</groupId>
			<artifactId>spring-cloud-starter-config</artifactId>
		</dependency>
注:依赖 spring-boot-starter-actuator 是为了 使用其 refresh端点 及时刷新配置。来自cnblogs.com
配置application.properties:
server.port=8083

# 必须:项目就是根据这个去 配置服务 获取其配置信息的!
spring.application.name=web3-client

# 配置服务器的地址,这里用的是 localhost
spring.config.import=optional:configserver:http://localhost:10000/

# 暴露actuator中的所有端点,包括/refresh
management.endpoints.web.exposure.include=*
添加控制器获取配置:
@RestController
@RequestMapping(value="hello")
class HelloController {

	@Value("${message}")
	private String message;

	@Autowired
	private Environment env;

    // 方式1
	@GetMapping(value="getMessage")
	public String getMessage() {
		return message;
	}

	// 方式2
	@GetMapping(value="getMessage2")
	public String getMessage2() {
		return env.getProperty("message");
	}

    // 方式2:综合
	@GetMapping(value="getByKey")
	public String getByKey(@RequestParam String key) {
		return env.getProperty(key);
	}

}
启动 web3-client 项目,访问上面三个接口:
# Postman进行测试
localhost:8083/hello/getMessage
hello world!

localhost:8083/hello/getMessage2
hello world!

localhost:8083/hello/getByKey?key=message
hello world!

localhost:8083/hello/getByKey?key=国家
错误:什么也没有返回读取到了配置,但是,key为“国家”的没有获取成功——Java可是支持中文的。来自cnblogs.com
修改仓库文件中message为“欢迎来到地球”,并提交。
hello=lib
todo=work
message=欢迎来到地球!
国家=中国配置没有自动更新,此时,执行 web3-client服务的 /refresh端点:
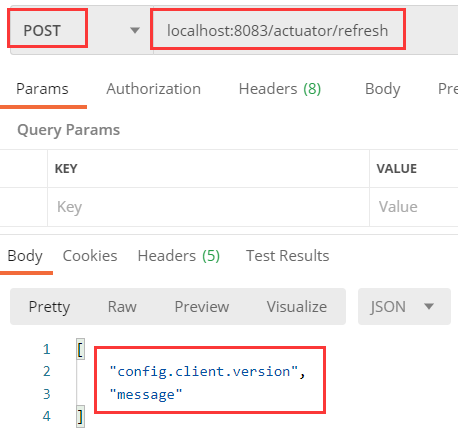
再次访问3个接口:来自cnblogs.com
localhost:8083/hello/getMessage
hello world!
localhost:8083/hello/getMessage2
欢è¿æ¥å°å°çï¼
localhost:8083/hello/getByKey?key=message
欢è¿æ¥å°å°çï¼第一个url的结果没有更新,其使用 @Value注解 获取的数据(官方Guide 说 使用 @RefreshScope 注解解决——亲测有效),而后面两个出现了乱码。
只需要在 配置服务器项目 configserver 上更改即可。来自cnblogs.com
参考文档2 的 前三步 即可解决问题,但参考文档2 中第一步的 loadProperties 需要修改。
因此,修改后的 MyPropertiesHandler 如下:来自cnblogs.com
MyPropertiesHandler
package org.lib.configserver;

import java.io.IOException;
import java.util.Collections;
import java.util.HashMap;
import java.util.List;
import java.util.Map;

import org.lib.configserver.OriginTrackedPropertiesLoader.Document;
import org.springframework.boot.env.OriginTrackedMapPropertySource;
import org.springframework.boot.env.PropertySourceLoader;
import org.springframework.core.env.PropertySource;
import org.springframework.core.io.Resource;
import org.springframework.core.io.support.PropertiesLoaderUtils;

public class MyPropertiesHandler implements PropertySourceLoader {

	@Override
	public String[] getFileExtensions() {
		return new String[]{"properties", "xml"};
	}

	@Override
	public List<PropertySource<?>> load(String name, Resource resource) throws IOException {
		Map<String, ?> properties = loadProperties(resource);
        if (properties.isEmpty()) {
            return Collections.emptyList();
        }
        return Collections.singletonList(new OriginTrackedMapPropertySource(name, properties));
	}

	private Map<String, ?> loadProperties(Resource resource) throws IOException {
        String filename = resource.getFilename();
        if (filename != null && filename.endsWith(".xml")) {
            return (Map) PropertiesLoaderUtils.loadProperties(resource);
        }

        // 更改:解决返回值类型错误问题(或可再研究,再改进)
        List<Document> doclist = new OriginTrackedPropertiesLoader(resource).load();
        System.out.println("doclist.size=" + doclist.size());
        Map<String, Object> retmap = new HashMap<>(32);
        doclist.forEach(doc->{
        	retmap.putAll(doc.asMap());
        });
        System.out.println("retmap=" + retmap);
        return retmap;
    }

}注意,MyPropertiesHandler中有两个 System.out.println输出!来自cnblogs.com
拷贝 OriginTrackedPropertiesLoader 到项目,并修改其中的 202行的字符集 为 StandardCharsets.UTF_8:

在 resources下新建 META-INF 文件夹,新建一个 spring.factories 文件,内容:
org.springframework.boot.env.PropertySourceLoader=org.lib.configserver.MyPropertiesHandler
重启 configserver、web3-client,再次测试web3-client的接口,结果如下:
localhost:8083/hello/getMessage
欢迎来到地球!

localhost:8083/hello/getMessage
欢迎来到地球!

localhost:8083/hello/getByKey?key=message
欢迎来到地球!

localhost:8083/hello/getByKey?key=国家
中国
一切正常,乱码问题解决了!😬来自cnblogs.com
注:启动web3-client时,configserver输出了下面的日志(前两个是 MyPropertiesHandler 中的 输出信息,使用时需要 去掉):
doclist.size=1
retmap={message=欢迎来到地球!, todo=work, 国家=中国, hello=lib}
2021-07-28 14:52:42.684  INFO 16084 --- [io-10000-exec-5] o.s.c.c.s.e.NativeEnvironmentRepository  :
Adding property source: Config resource 'file [C:\Users\Mi\AppData\Local\Temp\config-repo-1438464604143936187\
web3-client.properties]' via location 'file:/C:/Users/Mi/AppData/Local/Temp/config-repo-1438464604143936187/'
/META-INF/spring.factories 有什么用?
在入口类执行 run(...) 函数时调试,可以找到:

public final class SpringFactoriesLoader {

	/**
	 * The location to look for factories.
	 * <p>Can be present in multiple JAR files.
	 */
	public static final String FACTORIES_RESOURCE_LOCATION = "META-INF/spring.factories";
在 configserver 打包后,可以在其中找到这个文件——classpath下:

spring boot、spring cloud的官方文档中会有详细的结束,用处很大。
修改项目configserver中的application.properties:
# 本地仓库
#spring.cloud.config.server.git.uri=c:/Users/Mi/git/configserver

# 远程仓库:Ubuntu中(mylinux是hosts中配置的域名)
spring.cloud.config.server.git.uri=git@mylinux:/home/git/gitrepo/configserver.git
spring.cloud.config.server.git.username=git
spring.cloud.config.server.git.password=git
配置完毕,重启两个服务,再次测试:成功获取配置。
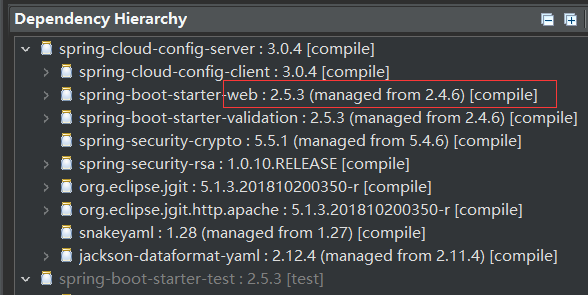
spring-cloud-config-server包结构展示:
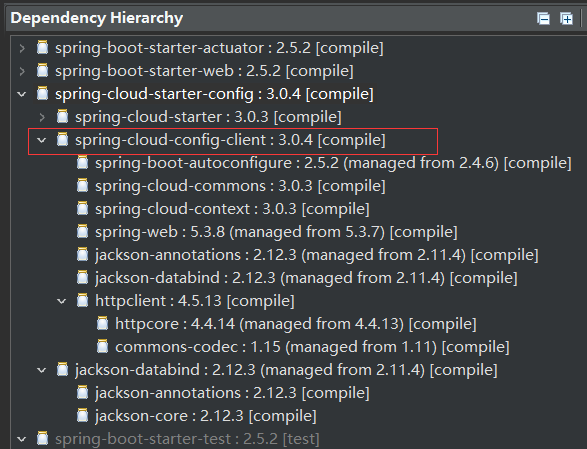
spring-cloud-starter-config包结构展示:
更进一步:
1、结合服务注册中心使用 配置服务,单点的配置服务用于生产环境肯定是有风险的,至少双点才行;
2、项目目前是从master获取配置,那么,不同环境的配置在 git中怎么存储呢?客户端又要怎么获取呢?服务器又要做什么配置呢?
2、springcloud config自动刷新中文乱码问题
4、SpringBoot配置分析、获取到SpringBoot配置文件信息以及几种获取配置文件信息的方式
5、

 浙公网安备 33010602011771号