

Nginx常用功能实践配置
一、规范优化Nginx配置文件(主要使用参数include)
[root@web1 conf]# cat -n nginx.conf #查看Nginx的配置文件
1 worker_processes 1;
2 events {
3 worker_connections 1024;
4 }
5 http {
6 include mime.types;
7 default_type application/octet-stream;
8 sendfile on;
9 keepalive_timeout 65;
10 server {
11 listen 192.168.23.110:80;
12 server_name www.etiantian.org;
13 location / {
14 root html/www;
15 index index.html index.htm;
16 }
17 }
18 server {
19 listen 192.168.23.111:80;
20 server_name bbs.etiantian.org;
21 location / {
22 root html/bbs;
23 index index.html index.htm;
24 }
25 }
26 server {
27 listen 192.168.23.112:80;
28 server_name blog.etiantian.org;
29 location / {
30 root html/blog;
31 index index.html index.htm;
32 }
33 }
34 }
[root@web1 conf]# mkdir extra #创建目录用于存放虚拟主机的配置文件
[root@web1 conf]# sed -n '10,17p' nginx.conf >extra/01_www.conf #将配置文件中10-17 行的内容写到extra目录下的01_www.conf 文件中
[root@web1 conf]# sed -n '18,25p' nginx.conf >extra/01_bbs.conf
[root@web1 conf]# sed -n '26,33p' nginx.conf >extra/01_blog.conf
[root@web1 conf]# cd extra #进入目录
[root@web1 extra]# ls #查看文件
01_bbs.conf 01_blog.conf 01_www.conf
[root@web1 extra]# cd ..
[root@web1 conf]# sed -i '10,33d' nginx.conf #删除配置文件中10-33行的内容
[root@web1 conf]# cat -n nginx.conf #发现删除了原本文件的10-33 行
1 worker_processes 1;
2 events {
3 worker_connections 1024;
4 }
5 http {
6 include mime.types;
7 default_type application/octet-stream;
8 sendfile on;
9 keepalive_timeout 65;
10 }
[root@web1 conf]# sed -i '10 i include extra/01_www.conf;\ninclude extra/01_bbs.conf;\ninclude extra/01_blog.conf;' nginx.conf #在nginx.conf 文件中加入蓝色底纹的内容
[root@web1 conf]# cat -n nginx.conf
1 worker_processes 1;
2 events {
3 worker_connections 1024;
4 }
5 http {
6 include mime.types;
7 default_type application/octet-stream;
8 sendfile on;
9 keepalive_timeout 65;
10 include extra/01_www.conf;
11 include extra/01_bbs.conf;
12 include extra/01_blog.conf;
13 }
[root@web1 conf]# nginx -t
nginx: the configuration file /application/nginx-1.16.0//conf/nginx.conf syntax is ok
nginx: [emerg] bind() to 192.168.23.111:80 failed (99: Cannot assign requested address)
nginx: configuration file /application/nginx-1.16.0//conf/nginx.conf test failed #出现报错,解决办法如下
[root@web1 conf]# vim /etc/sysctl.conf #添加最后一行内容
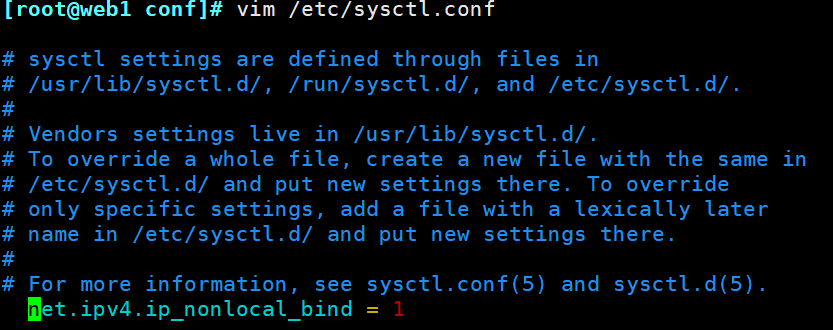
[root@web1 conf]# sysctl -p /etc/sysctl.conf #加载此文件,并重启系统
net.ipv4.ip_nonlocal_bind = 1
重新检查语法错误,发现都正常了
[root@web1 conf]# nginx -t
nginx: the configuration file /application/nginx-1.16.0//conf/nginx.conf syntax is ok
nginx: configuration file /application/nginx-1.16.0//conf/nginx.conf test is successful
对Nginx进行平滑启动,并查看文件/ets/hosts,
[root@web1 conf]# nginx -s reload
[root@web1 conf]# tail -1 /etc/hosts
192.168.23.110 www.etiantian.org bbs.etiantian.org blog.etiantian.org
[root@web1 conf]# curl www.etiantian.org #访问网站,测试更改后的效果
http://www.etiantian.org
[root@web1 conf]# curl bbs.etiantian.org
http://www.etiantian.org
[root@web1 conf]# curl blog.etiantian.org
http://www.etiantian.org
我们优化Nginx配置文件后的网站访问,发现一切正常!!!
二、配置Nginx的虚拟主机的别名
所谓虚拟主机的别名就是,除了为主机设置一个主域名以外,还可以为其设置其他的域名,这样就能实现用户访问多个域名能对应同一个虚拟主机网站的功能。
[root@web1 conf]# vim extra/01_www.conf
server {
listen 192.168.23.110:80;
server_name www.etiantian.org etiantian.org; #新增的内容
location / {
root html/www;
index index.html index.htm;
}
}
[root@web1 conf]# nginx -t #修改完配置文件要记得检查语法错误,并进行平滑启动
nginx: the configuration file /application/nginx-1.16.0//conf/nginx.conf syntax is ok
nginx: configuration file /application/nginx-1.16.0//conf/nginx.conf test is successful
[root@web1 conf]# nginx -s reload
[root@web1 conf]# vim /etc/hosts #在配置文件中增加了别名,记得在/etc/hosts中也要修改,还要测试。
[root@web1 conf]# tail -1 /etc/hosts
192.168.23.110 www.etiantian.org bbs.etiantian.org blog.etiantian.org etiantian.org
[root@web1 conf]# ping etiantian.org
PING www.etiantian.org (192.168.23.110) 56(84) bytes of data.
64 bytes from www.etiantian.org (192.168.23.110): icmp_seq=1 ttl=64 time=0.133 ms
64 bytes from www.etiantian.org (192.168.23.110): icmp_seq=2 ttl=64 time=0.105 ms
^C
--- www.etiantian.org ping statistics ---
2 packets transmitted, 2 received, 0% packet loss, time 1000ms
rtt min/avg/max/mdev = 0.105/0.119/0.133/0.014 ms
[root@web1 conf]# curl etiantian.org #测试访问结果
http://www.etiantian.org
[root@web1 conf]# curl www.etiantian.org
http://www.etiantian.org
三、Nginx状态信息功能实战
Nginx软件功能模块中有一个ngx_http_stub_status_module 模块(见下面版本信息紫色底纹部分),这个模块的主要功能是记录Nginx的基本访问状态信息,让大家了解Nginx的工作状态,如连接数等。
[root@web1 conf]# nginx -V #注意这里使用的是V,大写的,会查到下面的内容
nginx version: nginx/1.16.0
built by gcc 4.8.5 20150623 (Red Hat 4.8.5-44) (GCC)
built with OpenSSL 1.0.2k-fips 26 Jan 2017
TLS SNI support enabled
configure arguments: --user=nginx --group=nginx --prefix=/application/nginx-1.16.0/ --with-http_stub_status_module --with-http_ssl_module
配置Nginx status具体过程如下:
[root@web1 conf]# cat >>/application/nginx/conf/extra/01_status.conf #在目录extra下的文件01_status.conf写入下面内容
> #status
> server{
> listen 80;
> server_name status.etiantian.org
> location / {
> stub_status on;
> access_log off;
> }
> }
> EOF
[root@web1 conf]# sed -i '13 i include extra/01_status.conf;' nginx.conf #在配置文件中填入黄色底纹的内容
[root@web1 conf]# cat nginx.conf
worker_processes 1;
events {
worker_connections 1024;
}
http {
include mime.types;
default_type application/octet-stream;
sendfile on;
keepalive_timeout 65;
include extra/01_www.conf;
include extra/01_bbs.conf;
include extra/01_blog.conf;
include extra/01_status.conf;
}
检查并重启
[root@web1 conf]# nginx -t
nginx: the configuration file /application/nginx-1.16.0//conf/nginx.conf syntax is ok
nginx: configuration file /application/nginx-1.16.0//conf/nginx.conf test is successful
[root@web1 conf]# nginx -s reload
编辑hosts解析,并进行访问测试即可。
[root@web1 conf]# cat /etc/hosts
127.0.0.1 localhost localhost.localdomain localhost4 localhost4.localdomain4
::1 localhost localhost.localdomain localhost6 localhost6.localdomain6
192.168.23.110 www.etiantian.org bbs.etiantian.org blog.etiantian.org etiantian.org status.etiantian.org
[root@web1 conf]# curl status.etiantian.org
Active connections: 1
server accepts handled requests
11 11 11
Reading: 0 Writing: 1 Waiting: 0
四、配置错误日志
[root@web1 conf]# vim nginx.conf
[root@web1 conf]# cat -n nginx.conf
1 worker_processes 1;
2 error_log logs/error.log;
3 events {
4 worker_connections 1024;
5 }
6 http {
7 include mime.types;
8 default_type application/octet-stream;
9 sendfile on;
10 keepalive_timeout 65;
11 include extra/01_www.conf;
12 include extra/01_bbs.conf;
13 include extra/01_blog.conf;
14 include extra/01_status.conf;
15 }
五、配置访问日志实战
[root@web1 conf]# sed -n '21,23 s/#//gp' nginx.conf.default #将下面的内容写入配置文件中
log_format main '$remote_addr - $remote_user [$time_local] "$request" '
'$status $body_bytes_sent "$http_referer" '
'"$http_user_agent" "$http_x_forwarded_for"';
[root@web1 conf]# vim nginx.conf
[root@web1 conf]# cat -n nginx.conf
1 worker_processes 1;
2 error_log logs/error.log;
3 events {
4 worker_connections 1024;
5 }
6 http {
7 include mime.types;
8 default_type application/octet-stream;
9 sendfile on;
10 keepalive_timeout 65;
11 log_format main '$remote_addr - $remote_user [$time_local] "$request" '
12 '$status $body_bytes_sent "$http_referer" '
13 '"$http_user_agent" "$http_x_forwarded_for"';
14 include extra/01_www.conf;
15 include extra/01_bbs.conf;
16 include extra/01_blog.conf;
17 include extra/01_status.conf;
18 }
[root@web1 conf]# cat extra/01_www.conf
server {
listen 80;
server_name www.etiantian.org etiantian.org;
location / {
root html/www;
index index.html index.htm;
}
access_log logs/access_www.log main;
}
检查语法并进行平滑启动后进行访问测试
[root@web1 conf]# nginx -t
nginx: the configuration file /application/nginx-1.16.0//conf/nginx.conf syntax is ok
nginx: configuration file /application/nginx-1.16.0//conf/nginx.conf test is successful
[root@web1 conf]# nginx -s reload
[root@web1 conf]# curl www.etiantian.org
http://www.etiantian.org
[root@web1 conf]# cat /application/nginx/logs/access_www.log #查看日志文件 如果在第一次查看日志文件的时候为空,记得先将Nginx停掉,在重启,查看日志即可。
192.168.23.110 - - [05/Jun/2021:21:29:45 +0800] "GET / HTTP/1.1" 200 25 "-" "curl/7.29.0" "-"
192.168.23.110 - - [06/Jun/2021:10:19:47 +0800] "GET / HTTP/1.1" 200 25 "-" "curl/7.29.0" "-"
[root@web1 conf]# curl 192.168.23.110
http://www.etiantian.org
[root@web1 conf]# cat /application/nginx/logs/access_www.log
192.168.23.110 - - [05/Jun/2021:21:29:45 +0800] "GET / HTTP/1.1" 200 25 "-" "curl/7.29.0" "-"
192.168.23.110 - - [06/Jun/2021:10:19:47 +0800] "GET / HTTP/1.1" 200 25 "-" "curl/7.29.0" "-"
192.168.23.110 - - [06/Jun/2021:10:21:10 +0800] "GET / HTTP/1.1" 200 25 "-" "curl/7.29.0" "-"
针对日志的配置,可以进行进一步的配置,为其加上buffer与flush选项,这样在高并发的情况下可以提升网站的访问性能。具体配置如下
[root@web1 extra]# cat 01_www.conf
server {
listen 80;
server_name www.etiantian.org etiantian.org;
location / {
root html/www;
index index.html index.htm;
}
access_log logs/access_www.log main gzip buffer=32k flush=5s; #新加入的内容
}
六、Nginx Location 的作用域配置
location指令的作用是可以根据用户请求URI来执行不同的应用
location的匹配示例
[root@web1 conf]# vim extra/01_www.conf #首先编辑文件
[root@web1 conf]# cat -n extra/01_www.conf
1 server {
2 listen 80;
3 server_name www.etiantian.org etiantian.org;
4 root html/www;
5 location / {
6 return 401;
7 }
8 location = / {
9 return 402;
10 }
11 location /documents/ {
12 return 403;
13 }
14 location ^~ /images/ {
15 return 404;
16 }
17 location ~* \.(gif|jpg|jpeg)$ {
18 return 500;
19 }
20 }
21 access_log logs/access_www.log main gzip buffer=32k flush=5s;
进行检查并平滑启动
[root@web1 conf]# nginx -t(如果此处出现警告也没关系)
nginx: the configuration file /application/nginx-1.16.0//conf/nginx.conf syntax is ok
nginx: configuration file /application/nginx-1.16.0//conf/nginx.conf test is successful
[root@web1 conf]# nginx -s reload
对上述的location进行真实测试,首先要查看/etc/hosts,解析文件,然后利用域名进行验证
[root@web1 conf]# tail -1 /etc/hosts
192.168.23.110 etiantian.org status.etiantian.org
[root@web1 conf]# curl -s -o /dev/null -I -w "%{http_code}\n" http://etiantian.org
402
[root@web1 conf]# curl -s -o /dev/null -I -w "%{http_code}\n" http://etiantian.org/
402
[root@web1 conf]# curl -s -o /dev/null -I -w "%{http_code}\n" http://etiantian.org/index.html
401
[root@web1 conf]# curl -s -o /dev/null -I -w "%{http_code}\n" http://etiantian.org/documents/document.hyml
403
[root@web1 conf]# curl -s -o /dev/null -I -w "%{http_code}\n" http://etiantian.org/abc/
401
[root@web1 conf]# curl -s -o /dev/null -I -w "%{http_code}\n" http://etiantian.org/images/
404
[root@web1 conf]# curl -s -o /dev/null -I -w "%{http_code}\n" http://www.etiantian.org/documents/1.jpg
500
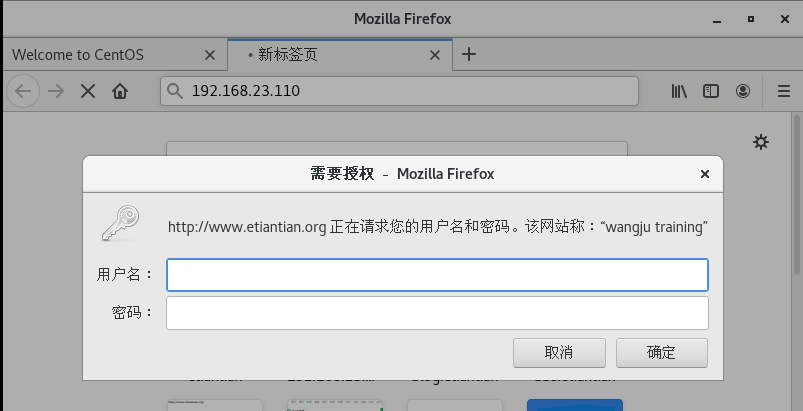
七、Nginx的访问认证
在实际工作中企业要求我们为网站设计访问账号与密码权限,这样操作后,只有拥有网站账号与密码的人才能访问网站内容。具体配置如下:
首先使用vim编辑配置文件01_www.conf
[root@web1 extra]# vim 01_www.conf
[root@web1 extra]# cat -n 01_www.conf
1 server {
2 listen 80;
3 server_name www.etiantian.org etiantian.org;
4 location / {
5 root html/www;
6 index index.html index.htm;
7 auth_basic "wangju training"; #设置默认提示字符串wangju training
8 auth_basic_user_file /application/nginx/conf/htpasswd; #设置认证的密码文件,即用户输入账户密码后,Nginx回去对比文件与用户输入的是否正确,继而决定是否允许用户访问。
10 access_log logs/access_www.log main gzip buffer=32k flush=5s;
11 }
生成认证账号和密码的步骤如下:
首先获取htpassswd设置账号密码命令。
[root@web1 extra]# yum install httpd-tools -y
已加载插件:fastestmirror, langpacks
Loading mirror speeds from cached hostfile
* base: mirrors.aliyun.com
* extras: mirrors.aliyun.com
* updates: mirrors.aliyun.com
base | 3.6 kB 00:00:00
------------------------------------------------------------------------------
省略部分输出
------------------------------------------------------------------------------
[root@web1 extra]# which htpasswd
/usr/bin/htpasswd
其次创建账号密码,此账号密码就是访问网页时需要输入的
[root@web1 extra]# htpasswd -bc /application/nginx/conf/htpasswd wangju 123456 创建账户及密码
Adding password for user wangju
[root@web1 extra]# chmod 400 /application/nginx/conf/htpasswd #设置密码文件的权限
[root@web1 extra]# chown nginx /application/nginx/conf/htpasswd #设置密码文件的属主
[root@web1 extra]# cat /application/nginx/conf/htpasswd #查看密码文件,此时已经加密
wangju:$apr1$V7nfwHRO$QMgqMUPdI0vB6UQsPA/Wc1
重新加载,使得Nginx配置生效
[root@web1 extra]# nginx -t
nginx: the configuration file /application/nginx-1.16.0//conf/nginx.conf syntax is ok
nginx: configuration file /application/nginx-1.16.0//conf/nginx.conf test is successful
[root@web1 extra]# nginx -s reload
进行浏览器访问测试,浏览器中输入网址http://192.168.23.110或者http://www.etiantian.org
到这里Nginx常用功能实践就介绍完了,(#^.^#) (*^▽^*)!!!

 浙公网安备 33010602011771号