

[spring]spring静态代理和aop
10.代理模式
代理模式的分类:
- 静态代理
- 动态代理
关系分析
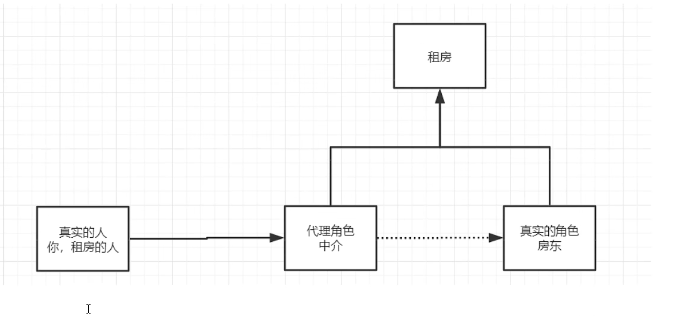
抽象角色:一般会使用接口或者抽象类
真实角色:被代理的角色
代理角色:代理真实的角色,做一些附属的操作
客户:访问代理对象的人
静态代理
步骤:
抽象角色:
/**
 * @author panglili
 * @create 2022-07-24-15:00
 */
public interface Rent {
    public void rent();
}
真实角色:
/**
 * @author panglili
 * @create 2022-07-24-15:01
 */
public class Host implements Rent {
    public void rent() {
        System.out.println("host would rent house");

    }
}
代理角色:
/**
 * @author panglili
 * @create 2022-07-24-15:02
 */
public class Proxy implements Rent {

    private Host host;
    public Proxy(){

    }

    public Proxy(Host host){
        this.host=host;
    }

    public void rent() {
        host.rent();
        seeHouse();
    }

    //look house
    public void seeHouse(){
        System.out.println("look House");
    }
}
客户:
/**
 * @author panglili
 * @create 2022-07-24-15:02
 */
public class Client  {
    public static void main(String[] args) {
        Host host = new Host();
        Proxy proxy = new Proxy(host);
        proxy .rent();
    }
}
动态代理
- 和静态代理的角色一样
- 动态生成,不是我们直接写好了的
- 动态代理分为两大类:基于接口的动态代理和基于类的动态代理
- 基于接口——jdbc
- 基于类——cglib
- 基于字节码
11.AOP切面编程
使用aop植入,需要导入一个依赖包
<dependency>
    <groupId>org.aspectj</groupId>
    <artifactId>aspectjweaver</artifactId>
    <version>1.9.7</version>
</dependency>
- 横切关注点
- 切面
- 通知
- 目标
- 代理
- 切入点
- 连接点
在执行的方法前动态的添加一个日志输出
方法一使用spring类实现
(1)接口
package service;

/**
 * @author panglili
 * @create 2022-07-24-16:09
 */
public interface Service {
    public void add();
    public void delete();
    public void update();
    public void select();
}
(2)要代理的实现类
package service;

/**
 * @author panglili
 * @create 2022-07-24-16:09
 */
public class ServiceImpl implements Service {
    public void add() {
        System.out.println("add");
    }

    public void delete() {
        System.out.println("delete");
    }

    public void update() {
        System.out.println("update");
    }

    public void select() {
        System.out.println("select");
    }
}
(3)代理商
package log;

import org.springframework.aop.MethodBeforeAdvice;

import java.lang.reflect.Method;

/**
 * @author panglili
 * @create 2022-07-24-16:11
 */
public class Log implements MethodBeforeAdvice {
    public void before(Method method, Object[] args, Object target) throws Throwable {
        System.out.println("excutor"+method.getName()+target);
    }
}
<!--注册bean -->
<bean id="userSer" class="service.ServiceImpl"/>
  <bean id="log" class="log.Log"/>

  <!--方式一:使用原生的spring api接口 -->
  <aop:config>
      <!-- 切入点expression要切入的位置-->
      <aop:pointcut id="pointcut" expression="execution(* service.ServiceImpl.*(..))"/>

       <!--执行环绕增加 -->
      <aop:advisor advice-ref="log" pointcut-ref="pointcut"/>

  </aop:config>
(4)客户调用
import org.springframework.context.ApplicationContext;
import org.springframework.context.support.ClassPathXmlApplicationContext;
import service.Service;

/**
 * @author panglili
 * @create 2022-07-24-16:28
 */
public class MyTest  {
    public static void main(String[] args) {
      ApplicationContext context = new ClassPathXmlApplicationContext("application.xml");
        //注意,代理的是接口类型
        Service ser = (Service) context.getBean("userSer");
        ser.add();

    }
}
方法二 使用自定义类实现
(1)自定义一个类,是被横切进去的内容
package dir;

/**
 * @author panglili
 * @create 2022-07-24-17:00
 */
public class PointMethod {
    public void after(){
        System.out.println("执行方法之后切入……");
    }
    public void before(){
        System.out.println("执行方法之前切入……");
    }
}
(2)在配置文件中使用aop切入
<!--方式二 自定义类切入 -->
<bean id="in" class="dir.PointMethod"/>
<aop:config>
    <!--自定义切面 -->
    <aop:aspect ref="in">
        <aop:pointcut id="point" expression="execution(* service.ServiceImpl.*(..))"/>
        <aop:after method="after" pointcut-ref="point"/>
        <aop:before method="before" pointcut-ref="point"/>
    </aop:aspect>
</aop:config>
(3)测试
import org.springframework.context.ApplicationContext;
import org.springframework.context.support.ClassPathXmlApplicationContext;
import service.Service;

/**
 * @author panglili
 * @create 2022-07-24-16:28
 */
public class MyTest  {
    public static void main(String[] args) {
      ApplicationContext context = new ClassPathXmlApplicationContext("application.xml");
        //注意,代理的是接口类型
        Service ser = (Service) context.getBean("userSer");
        ser.add();

    }
}

方式三 使用注解实现aop
(1)在要被切入的地方使用@Aspect和@After等注解标识切面和切点等
package dir;

import org.aspectj.lang.annotation.After;
import org.aspectj.lang.annotation.Aspect;
import org.aspectj.lang.annotation.Before;

/**
 * @author panglili
 * @create 2022-07-24-17:00
 */
@Aspect
public class PointMethod {
    @After("execution(* service.ServiceImpl.*(..))")
    public void after(){
        System.out.println("执行方法之后切入……");
    }
    @Before("execution(* service.ServiceImpl.*(..))")
    public void before(){
        System.out.println("执行方法之前切入……");
    }
}
(2)将此类配置到spring中,别忘了开启注解支持
<!--方式三 注解 -->
<bean id="in1" class="dir.PointMethod"/>
<!--一定要开启 否则注解不生效 -->
<aop:aspectj-autoproxy/>
(3)测试
同上面一样的测试,不再赘述

 浙公网安备 33010602011771号