
一. system_server进程和Zygote进程
system_server进程:是用于管理整个Java framework层,包含ActivityManager,PowerManager等各种系统服务;Zygote进程:是Android系统的首个Java进程,Zygote是所有Java进程的父进程,包括system_server进程以及所有的App进程都是Zygote的子进程。
进程创建图
对于大多数的应用开发者来说创建线程比较熟悉,而对于创建进程并没有太多的概念。对于系统工程师或者高级开发者,还是有很必要了解Android系统是如何一步步地创建出一个进程的。先来看一张进程创建过程的简要图:
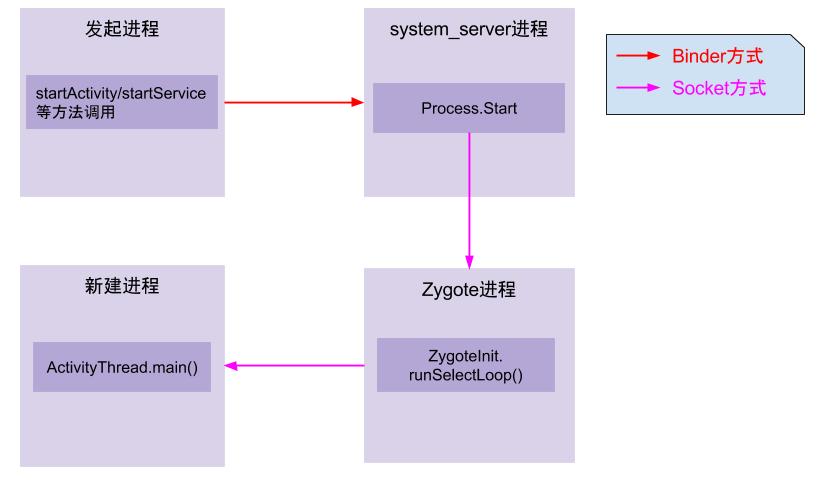
图解:
- App发起进程:当从桌面启动应用,则发起进程便是Launcher所在进程;当从某App内启动远程进程,则发送进程便是该App所在进程。发起进程先通过binder发送消息给system_server进程;
- system_server进程:调用Process.start()方法,通过socket向zygote进程发送创建新进程的请求;
- zygote进程:在执行
ZygoteInit.main()后便进入runSelectLoop()循环体内,当有客户端连接时便会执行ZygoteConnection.runOnce()方法,再经过层层调用后fork出新的应用进程; - 新进程:执行handleChildProc方法,最后调用ActivityThread.main()方法。
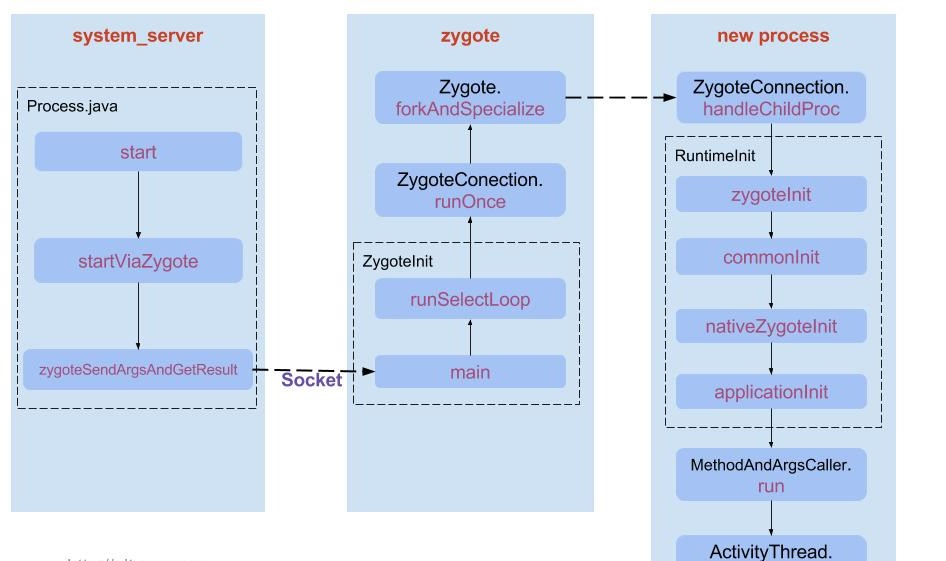
接下来,依次从system_server进程发起请求到Zygote创建进程,再到新进程的运行这3大块展开讲解进程创建是一个怎样的过程。
二. system_server发起请求
ActivityManagerService.java
private boolean startProcessLocked(String hostingType, String hostingNameStr, String entryPoint,
            ProcessRecord app, int uid, int[] gids, int runtimeFlags, int mountExternal,
            String seInfo, String requiredAbi, String instructionSet, String invokeWith,
            long startTime) {
......... startResult = Process.start(entryPoint,
app.processName, uid, uid, gids, runtimeFlags, mountExternal,
app.info.targetSdkVersion, seInfo, requiredAbi, instructionSet,
app.info.dataDir, invokeWith,new String[] {PROC_START_SEQ_IDENT + app.startSeq}); ........ }
AMS通过调用startProcessLocked方法向Zygote进程发送请求
1.获取要创建的应用程序进程的用户id
2.创建用户组id并赋值
3.若字符串entryPoint为null,则将其赋值为”android.app.ActivityThread”, 该值为应用程序进程主线程的类名
1. Process.start
[-> Process.java]
public static final ProcessStartResult start(final String processClass, final String niceName, int uid, int gid, int[] gids, int debugFlags, int mountExternal, int targetSdkVersion, String seInfo, String abi, String instructionSet, String appDataDir, String[] zygoteArgs) {
    try {
        return startViaZygote(processClass, niceName, uid, gid, gids,
                debugFlags, mountExternal, targetSdkVersion, seInfo,
                abi, instructionSet, appDataDir, zygoteArgs);
    } catch (ZygoteStartFailedEx ex) {
        throw new RuntimeException("");
    }
}
2. startViaZygote
[-> Process.java]
private static ProcessStartResult startViaZygote(final String processClass, final String niceName, final int uid, final int gid, final int[] gids, int debugFlags, int mountExternal, int targetSdkVersion, String seInfo, String abi, String instructionSet, String appDataDir, String[] extraArgs) throws ZygoteStartFailedEx {
    synchronized(Process.class) {
        ArrayList<String> argsForZygote = new ArrayList<String>();

        argsForZygote.add("--runtime-args");
        argsForZygote.add("--setuid=" + uid);
        argsForZygote.add("--setgid=" + gid);
        argsForZygote.add("--target-sdk-version=" + targetSdkVersion);

        if (niceName != null) {
            argsForZygote.add("--nice-name=" + niceName);
        }
        if (appDataDir != null) {
            argsForZygote.add("--app-data-dir=" + appDataDir);
        }
        argsForZygote.add(processClass);

        if (extraArgs != null) {
            for (String arg : extraArgs) {
                argsForZygote.add(arg);
            }
        }
        return zygoteSendArgsAndGetResult(openZygoteSocketIfNeeded(abi), argsForZygote);
    }
}
 1.创建ArrayList对象,保存应用进程的启动参数
 2.调用openZygoteSocketIfNeeded方法获取ZygoteSocket对象
      1).调用ZygoteState的connect方法与Zygote进程建立主模式的Socket连接,返回ZygoteState对象。mSocket=”zygote”
      2).判断主模式返回的ZygoteState对象是否与启动应用程序进程所需的ABI匹配,若匹配,则返回
      3).若不匹配,调用ZygoteState的connect方法与Zygote进程建立辅模式的Socket连接,返回ZygoteState对象。mSecondarySocket=”zygote_secondary”
      4). 判断辅模式返回的ZygoteState对象是否与启动应用程序进程所需的ABI匹配,若匹配,则返回。若不匹配,则抛出ZygoteStartFailedEx异常
 3.调用zygoteSendArgsAndGetResult方法,传入ArrayList对象和ZygoteSocket对象作为参数
该过程主要工作是生成argsForZygote数组,该数组保存了进程的uid、gid、groups、target-sdk、nice-name等一系列的参数。
3. zygoteSendArgsAndGetResult
[-> Process.java]
private static ProcessStartResult zygoteSendArgsAndGetResult( ZygoteState zygoteState, ArrayList<String> args) throws ZygoteStartFailedEx {
    try {
        //将保存在ArrayList中的启动参数写入ZygoteState对象中。
          ZygoteState是ZygoteProcess的静态内部类,用于表示Zygote进程的通信状态。
        final BufferedWriter writer = zygoteState.writer;
        final DataInputStream inputStream = zygoteState.inputStream;

        writer.write(Integer.toString(args.size()));
        writer.newLine();

        int sz = args.size();
        for (int i = 0; i < sz; i++) {
            String arg = args.get(i);
            if (arg.indexOf('\n') >= 0) {
                throw new ZygoteStartFailedEx(
                        "embedded newlines not allowed");
            }
            writer.write(arg);
            writer.newLine();
        }

        writer.flush();

        ProcessStartResult result = new ProcessStartResult();
        //等待socket服务端(即zygote)返回新创建的进程pid;
        //对于等待时长问题,Google正在考虑此处是否应该有一个timeout,但目前是没有的。
        result.pid = inputStream.readInt();
        if (result.pid < 0) {
            throw new ZygoteStartFailedEx("fork() failed");
        }
        result.usingWrapper = inputStream.readBoolean();
        return result;
    } catch (IOException ex) {
        zygoteState.close();
        throw new ZygoteStartFailedEx(ex);
    }
}
这个方法的主要功能是通过socket通道向Zygote进程发送一个参数列表,然后进入阻塞等待状态,直到远端的socket服务端发送回来新创建的进程pid才返回。
在Zygote进程启动后,会调用ZygoteServer对象的runSelectLoop方法,循环等待AMS的请求。此时,通过zygoteSendArgsAndGetResult方法,将保存在ArrayList中的启动参数写入ZygoteState对象中。Zygote进程会收到创建新的应用程序的请求。当Zygote进程收到创建新的应用程序的请求时,在runSelectLoop方法中会调用对应ZygoteConnection对象的runOnce方法。
4. openZygoteSocketIfNeeded
private static ZygoteState openZygoteSocketIfNeeded(String abi) throws ZygoteStartFailedEx {
    if (primaryZygoteState == null || primaryZygoteState.isClosed()) {
        try {
            //向主zygote发起connect()操作
            primaryZygoteState = ZygoteState.connect(ZYGOTE_SOCKET);
        } catch (IOException ioe) {
            ...
        }
    }

    if (primaryZygoteState.matches(abi)) {
        return primaryZygoteState;
    }

    if (secondaryZygoteState == null || secondaryZygoteState.isClosed()) {
        //当主zygote没能匹配成功,则采用第二个zygote,发起connect()操作
        secondaryZygoteState = ZygoteState.connect(SECONDARY_ZYGOTE_SOCKET);
    }

    if (secondaryZygoteState.matches(abi)) {
        return secondaryZygoteState;
    }
    ...
}
openZygoteSocketIfNeeded(abi)方法是根据当前的abi来选择与zygote还是zygote64来进行通信。
三. Zygote创建进程
既然system_server进程的zygoteSendArgsAndGetResult()方法通过socket向Zygote进程发送消息,这是便会唤醒Zygote进程,来响应socket客户端的请求(即system_server端),接下来的操作便是在Zygote来创建进程。Zygote进程是由由init进程而创建的,进程启动之后调用ZygoteInit.main()方法,经过创建socket管道,预加载资源后,便进程runSelectLoop()方法。
5. ZygoteInit.main
[–>ZygoteInit.java]
public static void main(String argv[]) {
    try {
        runSelectLoop(abiList);
        ....
    } catch (MethodAndArgsCaller caller) {
        caller.run();
    } catch (RuntimeException ex) {
        closeServerSocket();
        throw ex;
    }
}
之后runSelectLoop()方法会抛出异常MethodAndArgsCaller,从而进入caller.run()方法。
6. runSelectLoop
[-> ZygoteInit.java]
private static void runSelectLoop(String abiList) throws MethodAndArgsCaller {
    ArrayList<FileDescriptor> fds = new ArrayList<FileDescriptor>();
    ArrayList<ZygoteConnection> peers = new ArrayList<ZygoteConnection>();
    //sServerSocket是socket通信中的服务端,即zygote进程。保存到fds[0]
    fds.add(sServerSocket.getFileDescriptor());
    peers.add(null);

    while (true) {
        StructPollfd[] pollFds = new StructPollfd[fds.size()];
        for (int i = 0; i < pollFds.length; ++i) {
            pollFds[i] = new StructPollfd();
            pollFds[i].fd = fds.get(i);
            pollFds[i].events = (short) POLLIN;
        }
        try {
             //处理轮询状态,当pollFds有事件到来则往下执行,否则阻塞在这里
            Os.poll(pollFds, -1);
        } catch (ErrnoException ex) {
            ...
        }

        for (int i = pollFds.length - 1; i >= 0; --i) {
            //采用I/O多路复用机制,当接收到客户端发出连接请求 或者数据处理请求到来,则往下执行;
            // 否则进入continue,跳出本次循环。
            if ((pollFds[i].revents & POLLIN) == 0) {
                continue;
            }
            if (i == 0) {
                //即fds[0],代表的是sServerSocket,则意味着有客户端连接请求;
                // 则创建ZygoteConnection对象,并添加到fds。
                ZygoteConnection newPeer = acceptCommandPeer(abiList);
                peers.add(newPeer);
                fds.add(newPeer.getFileDesciptor()); //添加到fds.
            } else {
                //i>0,则代表通过socket接收来自对端的数据,并执行相应操作
                boolean done = peers.get(i).runOnce();
                if (done) {
                    peers.remove(i);
                    fds.remove(i); //处理完则从fds中移除该文件描述符
                }
            }
        }
    }
}
该方法主要功能:
- 客户端通过openZygoteSocketIfNeeded()来跟zygote进程建立连接。zygote进程收到客户端连接请求后执行accept();然后再创建ZygoteConnection对象,并添加到fds数组列表;
- 建立连接之后,可以跟客户端通信,进入runOnce()方法来接收客户端数据,并执行进程创建工作。
7. acceptCommandPeer
[-> ZygoteInit.java]
private static ZygoteConnection acceptCommandPeer(String abiList) {
    try {
        return new ZygoteConnection(sServerSocket.accept(), abiList);
    } catch (IOException ex) {
        ...
    }
}
接收客户端发送过来的connect()操作,Zygote作为服务端执行accept()操作。 再后面客户端调用write()写数据,Zygote进程调用read()读数据。
没有连接请求时会进入休眠状态,当有创建新进程的连接请求时,唤醒Zygote进程,创建Socket通道ZygoteConnection,然后执行ZygoteConnection的runOnce()方法。
8. runOnce
[-> ZygoteConnection.java]
boolean runOnce() throws ZygoteInit.MethodAndArgsCaller {

    String args[];
    Arguments parsedArgs = null;
    FileDescriptor[] descriptors;

    try {
        //读取socket客户端发送过来的参数列表
        args = readArgumentList();
        descriptors = mSocket.getAncillaryFileDescriptors();
    } catch (IOException ex) {
        closeSocket();
        return true;
    }

    PrintStream newStderr = null;
    if (descriptors != null && descriptors.length >= 3) {
        newStderr = new PrintStream(new FileOutputStream(descriptors[2]));
    }

    int pid = -1;
    FileDescriptor childPipeFd = null;
    FileDescriptor serverPipeFd = null;

    try {
        //将binder客户端传递过来的参数,解析成Arguments对象格式
        parsedArgs = new Arguments(args);
        ...

        int [] fdsToClose = { -1, -1 };
        FileDescriptor fd = mSocket.getFileDescriptor();
        if (fd != null) {
            fdsToClose[0] = fd.getInt$();
        }

        fd = ZygoteInit.getServerSocketFileDescriptor();
        if (fd != null) {
            fdsToClose[1] = fd.getInt$();
        }
        fd = null;

        pid = Zygote.forkAndSpecialize(parsedArgs.uid, parsedArgs.gid, parsedArgs.gids,
                parsedArgs.debugFlags, rlimits, parsedArgs.mountExternal, parsedArgs.seInfo,
                parsedArgs.niceName, fdsToClose, parsedArgs.instructionSet,
                parsedArgs.appDataDir);
    } catch (Exception e) {
        ...
    }

    try {
        if (pid == 0) {
            //子进程执行
            IoUtils.closeQuietly(serverPipeFd);
            serverPipeFd = null;

            handleChildProc(parsedArgs, descriptors, childPipeFd, newStderr);

            //子进程预期的是抛出异常ZygoteInit.MethodAndArgsCaller或者执行exec().
            return true;
        } else {
            //父进程执行
            IoUtils.closeQuietly(childPipeFd);
            childPipeFd = null;
            return handleParentProc(pid, descriptors, serverPipeFd, parsedArgs);
        }
    } finally {
        IoUtils.closeQuietly(childPipeFd);
        IoUtils.closeQuietly(serverPipeFd);
    }
}
runOnce方法的执行过程
1.调用readArgumentList方法获取String[]类型的启动参数
2.将String[]类型的启动参数封装成Arguments类型的对象
3.调用Zygote的forkAndSpecialize方法,传入Arguments对象作为参数创建应用程序进程。返回值为pid
4.由于当前代码逻辑运行在新建的子进程中,所以pid为0。 由于pid为0,会调用handleChildProc方法对应用程序进程进行处理
9. forkAndSpecialize
[-> Zygote.java]
public static int forkAndSpecialize(int uid, int gid, int[] gids, int debugFlags, int[][] rlimits, int mountExternal, String seInfo, String niceName, int[] fdsToClose, String instructionSet, String appDataDir) {
    VM_HOOKS.preFork();
    int pid = nativeForkAndSpecialize(
              uid, gid, gids, debugFlags, rlimits, mountExternal, seInfo, niceName, fdsToClose,
              instructionSet, appDataDir);
    ...
    VM_HOOKS.postForkCommon();
    return pid;
}
四. 新进程运行
在前面[流程6]runOnce()过程中调用forkAndSpecialize()创建完新进程后,返回值pid=0(即运行在子进程)继续开始执行handleChildProc()方法。
10. handleChildProc
[-> ZygoteConnection.java]
private void handleChildProc(Arguments parsedArgs, FileDescriptor[] descriptors, FileDescriptor pipeFd, PrintStream newStderr) throws ZygoteInit.MethodAndArgsCaller {

    //关闭Zygote的socket两端的连接
    closeSocket();
    ZygoteInit.closeServerSocket();

    if (descriptors != null) {
        try {
            Os.dup2(descriptors[0], STDIN_FILENO);
            Os.dup2(descriptors[1], STDOUT_FILENO);
            Os.dup2(descriptors[2], STDERR_FILENO);
            for (FileDescriptor fd: descriptors) {
                IoUtils.closeQuietly(fd);
            }
            newStderr = System.err;
        } catch (ErrnoException ex) {
            Log.e(TAG, "Error reopening stdio", ex);
        }
    }

    if (parsedArgs.niceName != null) {
        //设置进程名
        Process.setArgV0(parsedArgs.niceName);
    }

    if (parsedArgs.invokeWith != null) {
        //据说这是用于检测进程内存泄露或溢出时场景而设计,后续还需要进一步分析。
        WrapperInit.execApplication(parsedArgs.invokeWith,
                parsedArgs.niceName, parsedArgs.targetSdkVersion,
                VMRuntime.getCurrentInstructionSet(),
                pipeFd, parsedArgs.remainingArgs);
    } else {
        //执行目标类的main()方法
        RuntimeInit.zygoteInit(parsedArgs.targetSdkVersion,
                parsedArgs.remainingArgs, null);
    }
}
11. zygoteInit
[–>RuntimeInit.java]
public static final void zygoteInit(int targetSdkVersion, String[] argv, ClassLoader classLoader) throws ZygoteInit.MethodAndArgsCaller {

    redirectLogStreams(); //重定向log输出

    commonInit(); // 通用的一些初始化
    nativeZygoteInit(); // zygote初始化
    applicationInit(targetSdkVersion, argv, classLoader); // 应用初始化
}
12.applicationInit
[–>RuntimeInit.java]
private static void applicationInit(int targetSdkVersion, String[] argv, ClassLoader classLoader) throws ZygoteInit.MethodAndArgsCaller {
    //true代表应用程序退出时不调用AppRuntime.onExit(),否则会在退出前调用
    nativeSetExitWithoutCleanup(true);

    //设置虚拟机的内存利用率参数值为0.75
    VMRuntime.getRuntime().setTargetHeapUtilization(0.75f);
    VMRuntime.getRuntime().setTargetSdkVersion(targetSdkVersion);

    final Arguments args;
    try {
        args = new Arguments(argv); //解析参数
    } catch (IllegalArgumentException ex) {
        return;
    }

    Trace.traceEnd(Trace.TRACE_TAG_ACTIVITY_MANAGER);

    //调用startClass的static方法 main()
    invokeStaticMain(args.startClass, args.startArgs, classLoader);
}
此处args.startClass为”android.app.ActivityThread”。
13. invokeStaticMain
[–>RuntimeInit.java]
private static void invokeStaticMain(String className, String[] argv, ClassLoader classLoader) throws ZygoteInit.MethodAndArgsCaller {
    Class<?> cl = Class.forName(className, true, classLoader);

    Method m = cl.getMethod("main", new Class[] { String[].class });

    int modifiers = m.getModifiers();
    ...

    //通过抛出异常,回到ZygoteInit.main()。这样做好处是能清空栈帧,提高栈帧利用率。
    throw new ZygoteInit.MethodAndArgsCaller(m, argv);
}
invokeStaticMain()方法中抛出的异常MethodAndArgsCaller caller,该方法的参数m是指main()方法, argv是指ActivityThread. 根据前面可知,下一步进入caller.run()方法,也就是MethodAndArgsCaller.run()。
14. MethodAndArgsCaller
[–>ZygoteInit.java]
public static class MethodAndArgsCaller extends Exception implements Runnable {

    public void run() {
        try {
            //根据传递过来的参数,此处反射调用ActivityThread.main()方法
            mMethod.invoke(null, new Object[] { mArgs });
        } catch (IllegalAccessException ex) {
            throw new RuntimeException(ex);
        } catch (InvocationTargetException ex) {
            Throwable cause = ex.getCause();
            if (cause instanceof RuntimeException) {
                throw (RuntimeException) cause;
            } else if (cause instanceof Error) {
                throw (Error) cause;
            }
            throw new RuntimeException(ex);
        }
    }
}
进入到了ActivityThread类的main()方法。
15. ActivityThread.main
[–> ActivityThread.java]
public static void main(String[] args) {
    ...
    Environment.initForCurrentUser();
    ...
    Process.setArgV0("<pre-initialized>");
    //创建主线程looper
    Looper.prepareMainLooper();

    ActivityThread thread = new ActivityThread();
    //attach到系统进程
    thread.attach(false);

    if (sMainThreadHandler == null) {
        sMainThreadHandler = thread.getHandler();
    }

    //主线程进入循环状态
    Looper.loop();

    throw new RuntimeException("Main thread loop unexpectedly exited");
}
1.调用Looper的prepareMainLooper方法创建主线程Looper
2.创建ActivityThread对象
3.通过调用ActivityThread对象的getHandler方法获取主线程H类对象,H类继承了Handler类,是ActivityThread的内部类,用于处理线程的消息循环
4.调用Looper的loop方法开启消息循环
五. 总结

 浙公网安备 33010602011771号