
SpringCloud——服务治理中心Eureka
微服务架构经过业务划分后,服务细化,多个服务之间互相调用,链层调用,调用与调用之间的关系越来越困难,需要一个工具来进行统一管理。Eureka是Netflix开源的一款提供服务注册和发现的产品,它提供了完整的Service Registry和Service Discovery实现。也是springcloud体系中最重要最核心的组件之一。
Eureka服务中心又称注册中心,管理着各个服务包括服务注册、服务发现、熔断、负载、降级等。由于各种服务都注册到了服务中心,就有了去做很多高级功能条件。比如几台服务提供相同服务来做均衡负载;监控服务器调用成功率来做熔断,移除服务列表中的故障点;监控服务调用时间来对不同的服务器设置不同的权重等等。
Eureka由两个组件组成:Eureka服务器和Eureka客户端。Eureka服务器用作服务注册服务器。Eureka客户端是一个java客户端,用来简化与服务器的交互、作为轮询负载均衡器,并提供服务的故障切换支持。
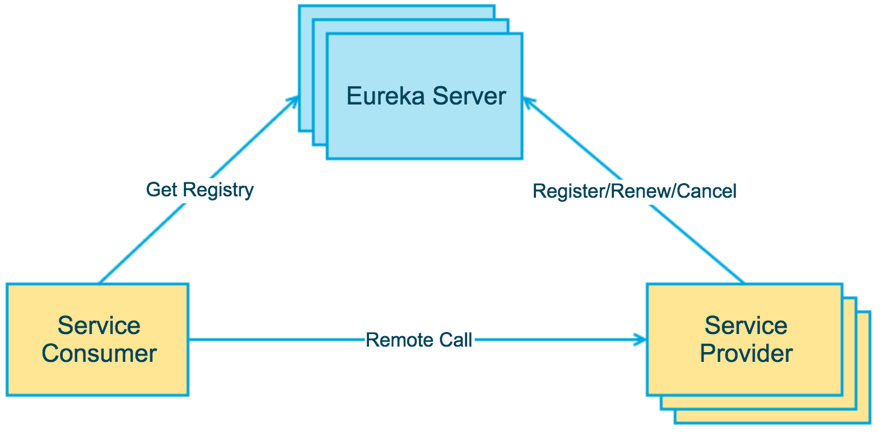
上图简要描述了Eureka的基本架构,由3个角色组成:
- Eureka Server :提供服务注册和发现
- Service Provider : 服务提供方,将自身服务注册到Eureka,从而使服务消费方能够找到
- Service Consumer : 服务消费方,从Eureka获取注册服务列表,从而能够消费服务
现有服务消费方A和服务提供方B,为服务AB提供服务注册中心eureka。

Eureka 单机部署
- pom.xml
       <!--eureka-server-->
        <dependency>
            <groupId>org.springframework.cloud</groupId>
            <artifactId>spring-cloud-starter-netflix-eureka-server</artifactId>
        </dependency>
        <!--boot web actuator-->
        <dependency>
            <groupId>org.springframework.boot</groupId>
            <artifactId>spring-boot-starter-web</artifactId>
        </dependency>
        <dependency>
            <groupId>org.springframework.boot</groupId>
            <artifactId>spring-boot-starter-actuator</artifactId>
        </dependency>
- application.yml
server:
  port: 7001

eureka:
  instance:
    hostname: localhost #eureka服务端的实例名称
  client:
    #在默认设置下,该服务注册中心也会将自己作为客户端来尝试注册它自己,所以我们需要禁用它的客户端注册行为
    register-with-eureka: false     #表示是否将自己注册到Eureka Server,默认为true。
    fetch-registry: false
    #表示是否从Eureka Server获取注册信息,默认为true,false表示自己端就是注册中心,我的职责就是维护服务实例,并不需要去检索服务
    service-url:
      defaultZone: http://localhost:${server.port}/eureka/
    #设置与Eureka Server交互的地址,查询服务和注册服务都需要依赖这个地址。默认是http://localhost:8761/eureka ;多个地址可使用 , 分隔。
3.启动类添加注解
@SpringBootApplication
@EnableEurekaServer
public class EurekaMain7001 {
    public static void main(String[] args) {
        SpringApplication.run(EurekaMain7001.class,args);
    }
}
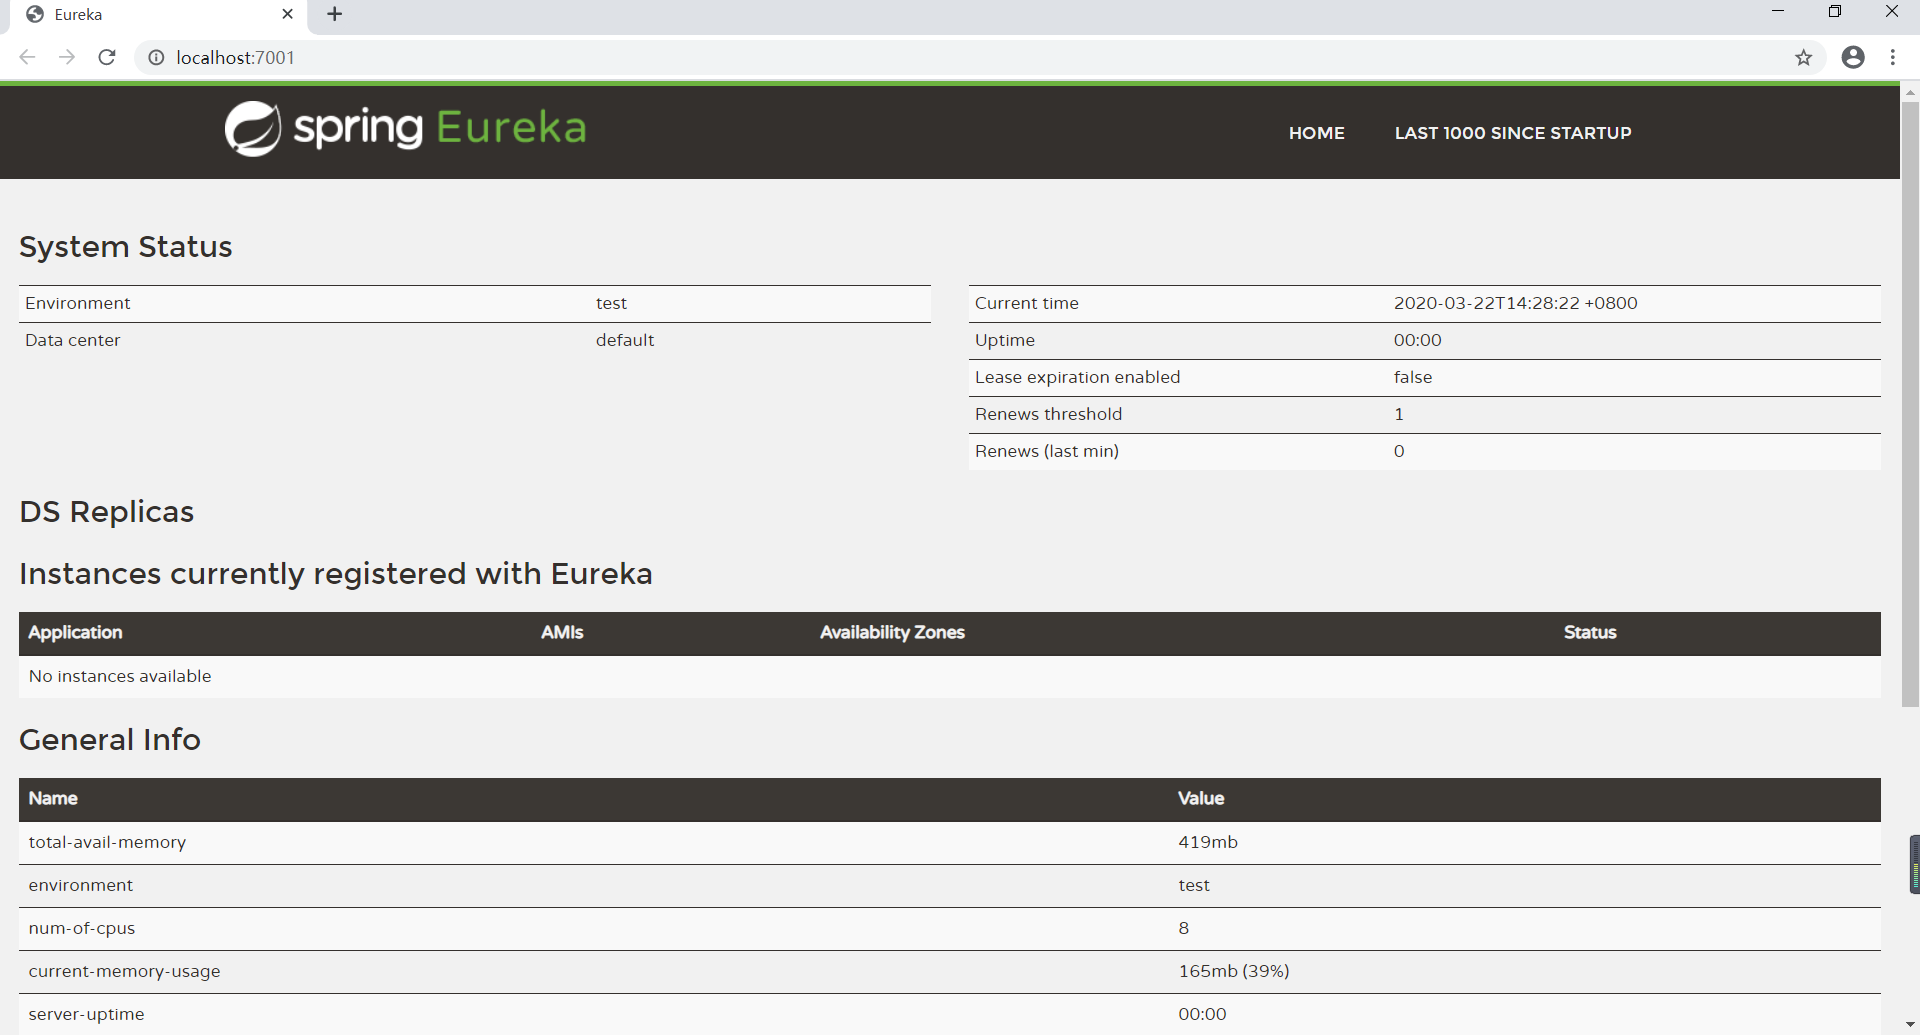
启动工程后,访问:http://localhost:7001/,可以看到下面的页面,其中还没有发现任何服务
集群部署
在一个分布式系统中,服务注册中心是最重要的基础部分,理应随时处于可以提供服务的状态。为了维持其可用性,使用集群是很好的解决方案。Eureka通过互相注册的方式来实现高可用的部署,所以我们只需要将Eureke Server配置其他可用的serviceUrl就能实现高可用部署。
双节点注册中心
此时创建两个eureka模块。

- pom文件上同
- application.yml和单机不同 ,要进行相互注册
server1:
server:
  port: 7001
eureka:
  instance:
    hostname: eureka7001.com
  client:
    register-with-eureka: false
    fetch-registry: false
    service-url:
      defaultZone: http://eureka7002.com:7002/eureka/
server2:
server:
  port: 7002
eureka:
  instance:
    hostname: eureka7002.com
  client:
    register-with-eureka: false
    fetch-registry: false
    service-url:
      defaultZone: http://eureka7001.com:7001/eureka/
- host转换
127.0.0.1 eureka7001.com
127.0.0.1 eureka7002.com
启动两个实例。
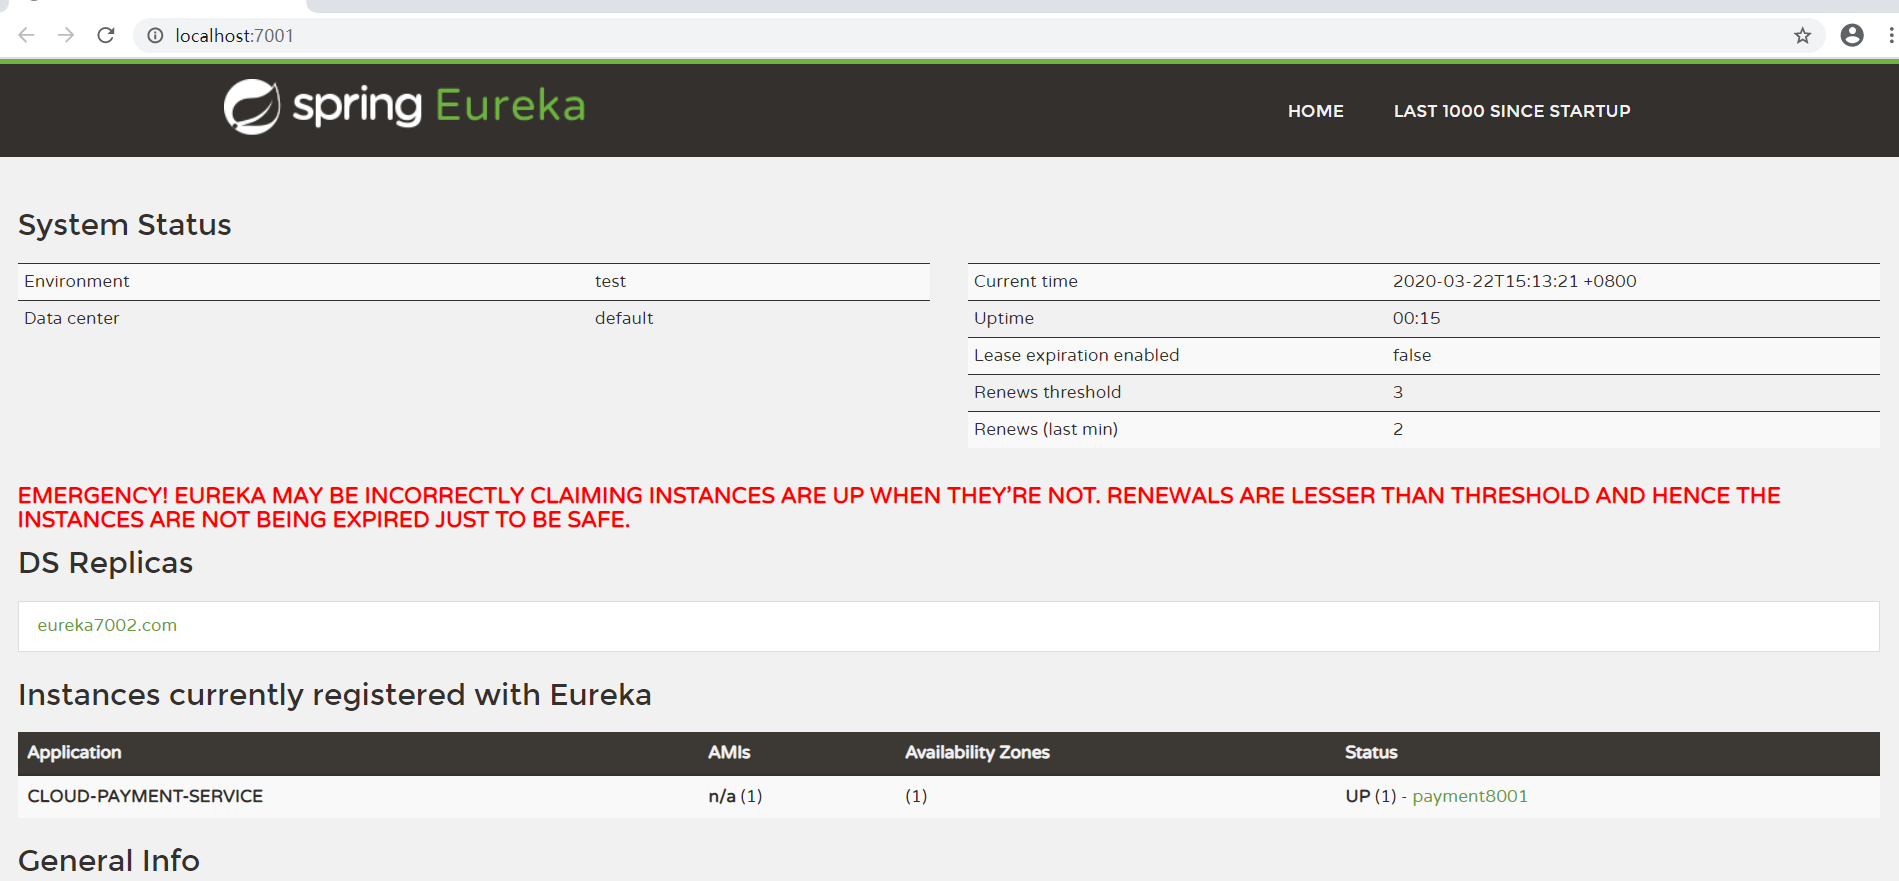
DS Replicas已经有了另一个实例的相关配置信息。当时用多个节点的时候,只需要进行互相注册即可。例如A、B、C三个节点,A要注册到B、C,B要注册到A、C,C要注册到A、B即可。
服务注册
注册中心搭建好了,下面进行服务的注册。
现有服务提供方B,向服务中心进行注册。
- pom
        <!--eureka-client-->
        <dependency>
            <groupId>org.springframework.cloud</groupId>
            <artifactId>spring-cloud-starter-netflix-eureka-client</artifactId>
        </dependency>
- application.yml
server:
  port: 8001
spring:
  application:
    name: cloud-payment-service
eureka:
  client:
    register-with-eureka: true #是否将自己注册进eureka,默认为true
    fetch-registry: true
    service-url:
      defaultZone : http://eureka7001.com:7001/eureka/,http://eureka7002.com:7002/eureka/
  instance:
    prefer-ip-address: true   # 不配置true注册中心显示的是主机名+applicationName+端口号,否则显示  instance-id 值
    instance-id: payment8001
3,启动类添加注解
    @SpringBootApplication
@EnableEurekaClient
public class PayMentMain8001 {
    public static void main(String[] args) {
        SpringApplication.run(PayMentMain8001.class,args);
    }
}
- 服务提供
    @Value("${server.port}")
    private String serverPort;

    @GetMapping("/payment/get/{id}")
    public CommonResult<Payment> getPaymentById (@PathVariable("id") Long id ) {
          return new CommonResult(200,"调用成功 port :" + serverPort,id);
    }
此时服务提供方就被注册到注册中心了。

服务发现
- pom
        <!--eureka-client-->
        <dependency>
            <groupId>org.springframework.cloud</groupId>
            <artifactId>spring-cloud-starter-netflix-eureka-client</artifactId>
        </dependency>
eureka:
  client:
    register-with-eureka: true #是否将自己注册进eureka,默认为true
    fetch-registry: true # 是否从eureka抓取已有的注册信息,默认为true,单节点无所谓,集群下必须设置为true才能配合rubbion使用负载均衡
    service-url:
      defaultZone : http://eureka7001.com:7001/eureka/,http://eureka7002.com:7002/eureka/
  instance:
    prefer-ip-address: true
    instance-id: order80
3,启动类添加注解
@SpringBootApplication
@EnableEurekaClient
public class OrderMain80 {
    public static void main(String[] args) {
        SpringApplication.run(OrderMain80.class,args);
    }
}
- 服务调用
@RestController
@Slf4j
public class OrderController {
    //服务调用方applicationname
    private static final String PAYMENT_URL= "http://cloud-payment-service";

    @Resource
    private RestTemplate restTemplate;

    @GetMapping("/consumer/payment/get/{id}")
    public CommonResult<Payment> getPayment(@PathVariable("id")Long id){
        return restTemplate.getForObject(PAYMENT_URL + "/payment/get/" + id,CommonResult.class);
    }
}
5.Feign调用实现
@FeignClient(name= "cloud-payment-service")
public interface HelloRemote {
    @RequestMapping(value = "/payment/get/{id}")
    public CommonResult<Payment> getPayment(@PathVariable("id")Long id);
}
- name:远程服务名,及spring.application.name配置的名称.
- 此类中的方法和远程服务中contoller中的方法名和参数需保持一致。
将HelloRemote注入到controller层,像普通方法一样去调用即可。
@RestController
public class ConsumerController {

    @Autowired
    HelloRemote HelloRemote;

    @RequestMapping(value = "/consumer/payment/get/{id}")
    public String getPayment(@PathVariable("id")Long id){
        return HelloRemote.getPayment(id);
    }
}
负载均衡
以上面cloud-payment-service为例子修改,将其中的controller改动如下:
    @Value("${server.port}")
    private String serverPort;

    @GetMapping("/payment/get/{id}")
    public CommonResult<Payment> getPaymentById (@PathVariable("id") Long id ) {
          return new CommonResult(200,"调用成功 port :" + serverPort,id);
    }
在配置文件中改动端口:
server.port=8002
启动后,在eureka就会发现两个服务提供者.然后在浏览器再次输入:http://localhost//consumer/payment/get/1 进行测试:
第一次返回结果:调用成功 port : 8001...
第二次返回结果:调用成功 port : 8002...
不断的进行测试下去会发现两种结果交替出现,说明两个服务中心自动提供了服务均衡负载的功能。如果我们将服务提供者的数量在提高为N个,测试结果一样,请求会自动轮询到每个服务端来处理。

 浙公网安备 33010602011771号