
面向对象高级
面向对象高级和应用
1. 继承【补充】
对于Python面向对象中的继承,我们已学过:
-
继承存在意义:将公共的方法提取到父类中,有利于增加代码重用性。
-
继承的编写方式:
# 继承
class Base(object):
    pass

class Foo(Base):
    pass
# 多继承 class Base(object): pass class Bar(object): pass class Foo(Base,Bar): pass -
调用类中的成员时,遵循:
- 优先在自己所在类中找,没有的话则去父类中找。
- 如果类存在多继承(多个父类),则先找左边再找右边。
上述的知识点掌握之后,其实就可以解决继承相关的大部分问题。
但如果遇到一些特殊情况(不常见),你就可能不知道怎么搞了,例如:


1.1 mro和c3算法
如果类中存在继承关系,在可以通过mro()获取当前类的继承关系(找成员的顺序)。
示例1:

mro(A) = [A] + [B,C]
mro(A) = [A,B,C]
mro(A) = [A] + merge( mro(B), mro(C), [B,C] )
mro(A) = [A] + merge( [object], [object], [] )
mro(A) = [A] + [B,C,object]
mro(A) = [A,B,C,object]
mro(A) = [A] + merge( mro(B), mro(C), [B,C] )
mro(A) = [A] + merge( [], [C], [,C]
mro(A) = [A] + [B,C]
class C(object):
    pass

class B(object):
    pass

class A(B, C):
    pass

print( A.mro() )   # [<class '__main__.A'>, <class '__main__.B'>, <class '__main__.C'>, <class 'object'>]
print( A.__mro__ ) # (<class '__main__.A'>, <class '__main__.B'>, <class '__main__.C'>, <class 'object'>)
示例2:

mro(A) = [A] + merge( mro(B), mro(C), [B,C] )
mro(A) = [A] + merge( [], [D], [] )
mro(A) = [A] + [B,C,D]
mro(A) = [A,B,C,D]
class D(object):
    pass


class C(D):
    pass


class B(object):
    pass


class A(B, C):
    pass


print( A.mro() ) # [<class '__main__.A'>, <class '__main__.B'>, <class '__main__.C'>, <class '__main__.D'>, <class 'object'>]
示例3:

mro(A) = [A] + merge( mro(B),mro(C),[B,C])
mro(A) = [A] + merge( [], [C], [C])
mro(A) = [A,B,D,C]
class D(object):
    pass


class C(object):
    pass


class B(D):
    pass


class A(B, C):
    pass


print(A.mro()) # [<class '__main__.A'>, <class '__main__.B'>, <class '__main__.D'>, <class '__main__.C'>, <class 'object'>]
示例4:

mro(A) = [A] + merge( mro(B), mro(C), [B,C])

mro(A) = [A] + merge( [B,D], [C,D], [B,C])

mro(A) = [A] + [B,C,D]
mro(A) = [A,B,C,D]
class D(object):
    pass


class C(D):
    pass


class B(D):
    pass


class A(B, C):
    pass


print(A.mro()) # [<class '__main__.A'>, <class '__main__.B'>, <class '__main__.C'>, <class '__main__.D'>, <class 'object'>]
示例5:
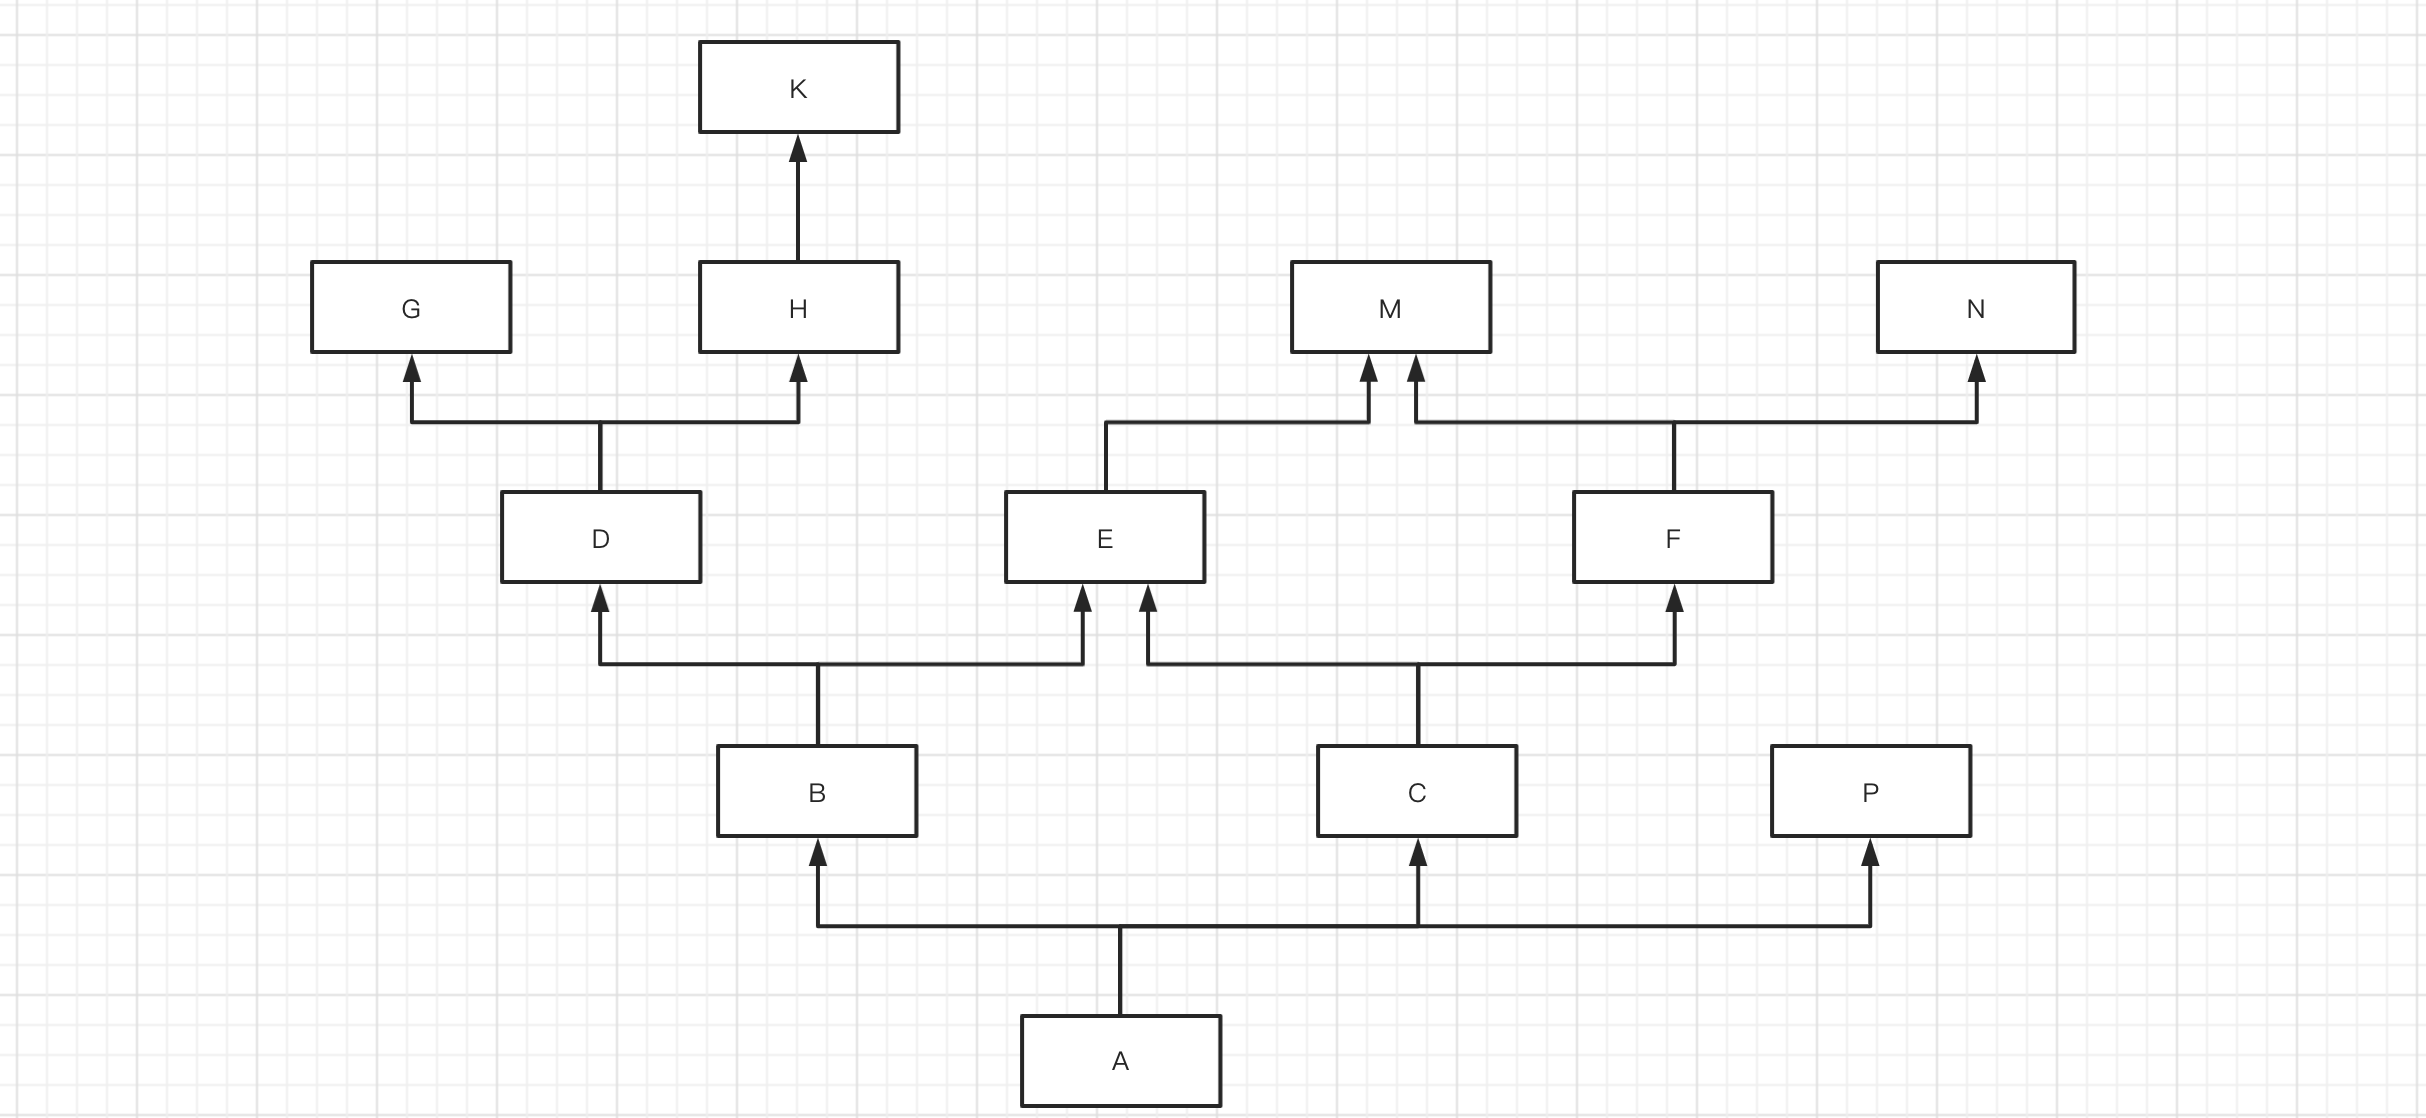
简写为:A -> B -> D -> G -> H -> K -> C -> E -> F -> M -> N -> P -> object
mro(A) = [A] + merge( mro(B),          mro(C),      mro(P),      [B,C,P])
                  []   [N]     [P]          [P]

mro(A) = [A,B,D,G,H,K,C,E,F,M,N,P]

-----------------------------------------------------
mro(B) = [B] + merge( mro(D), mro(E), [D,E])

mro(D) = [D] + merge(mro(G),mro(H), [G,H])

mro(G) = [G]

mro(H) = [H,K]

mro(B) = [B] + merge( [], [E,M], [E])
mro(B) = [B,D,G,H,K,E,M]


-----------------------------------------------------
mro(C) = [C] + merge(mro(E),mro(F),[E,F])

mro(E) = [E,M]

mro(F) = [F,M,N]

mro(C) = [C] + merge([M],[M,N] ,[])
mro(C) = [C,E,F,M,N]
class M:
    pass


class N:
    pass


class E(M):
    pass


class G:
    pass


class K:
    pass


class H(K):
    pass


class D(G, H):
    pass


class F(M, N):
    pass


class P:
    pass


class C(E, F):
    pass


class B(D, E):
    pass


class A(B, C, P):
    pass


print(A.mro()) # 简写为:A -> B -> D -> G -> H -> K -> C -> E -> F -> M -> N -> P -> object
特别补充:一句话搞定继承关系
不知道你是否发现,如果用正经的C3算法规则去分析一个类继承关系有点繁琐,尤其是遇到一个复杂的类也要分析很久。
所以,我自己根据经验总结了一句话赠送给大家:从左到右,深度优先,大小钻石,留住顶端,基于这句话可以更快的找到继承关系。

简写为:A -> B -> D -> G -> H -> K -> C -> E -> F -> M -> N -> P -> object
1.2 py2和py3区别(了解)
概述:
-
在python2.2之前,只支持经典类【从左到右,深度优先,大小钻石,不留顶端】
-
后来,Python想让类默认继承object(其他语言的面向对象基本上也都是默认都继承object),此时发现原来的经典类不能直接集成集成这个功能,有Bug。
-
所以,Python决定不再原来的经典类上进行修改了,而是再创建一个新式类来支持这个功能。【从左到右,深度优先,大小钻石,留住顶端。】
-
经典类,不继承object类型
class Foo: pass -
新式类,直接或间接继承object
class Base(object):
    pass

class Foo(Base):
    pass
-
-
这样,python2.2之后 中就出现了经典类和新式类共存。(正式支持是2.3)
-
最终,python3中丢弃经典类,只保留新式类。
详细文档:
	https://www.python.org/dev/peps/pep-0253/#mro-method-resolution-order-the-lookup-rule
	https://www.python.org/download/releases/2.3/mro/

In classic Python, the rule is given by the following recursive function, also known as the left-to-right depth-first rule.

def classic_lookup(cls, name):
    if cls.__dict__.has_key(name):
        return cls.__dict__[name]
    for base in cls.__bases__:
        try:
            return classic_lookup(base, name)
        except AttributeError:
            pass
    raise AttributeError, name

The problem with this becomes apparent when we consider a "diamond diagram":

      class A:
        ^ ^  def save(self): ...
       /   \
      /     \
     /       \
    /         \
class B     class C:
    ^         ^  def save(self): ...
     \       /
      \     /
       \   /
        \ /
      class D


Arrows point from a subtype to its base type(s). This particular diagram means B and C derive from A, and D derives from B and C (and hence also, indirectly, from A).

Assume that C overrides the method save(), which is defined in the base A. (C.save() probably calls A.save() and then saves some of its own state.) B and D don't override save(). When we invoke save() on a D instance, which method is called? According to the classic lookup rule, A.save() is called, ignoring C.save()!

This is not good. It probably breaks C (its state doesn't get saved), defeating the whole purpose of inheriting from C in the first place.

Why was this not a problem in classic Python? Diamond diagrams are rarely found in classic Python class hierarchies. Most class hierarchies use single inheritance, and multiple inheritance is usually confined to mix-in classes. In fact, the problem shown here is probably the reason why multiple inheritance is unpopular in classic Python.

Why will this be a problem in the new system? The 'object' type at the top of the type hierarchy defines a number of methods that can usefully be extended by subtypes, for example __getattr__().

(Aside: in classic Python, the __getattr__() method is not really the implementation for the get-attribute operation; it is a hook that only gets invoked when an attribute cannot be found by normal means. This has often been cited as a shortcoming -- some class designs have a legitimate need for a __getattr__() method that gets called for all attribute references. But then of course this method has to be able to invoke the default implementation directly. The most natural way is to make the default implementation available as object.__getattr__(self, name).)

Thus, a classic class hierarchy like this:

class B     class C:
    ^         ^  def __getattr__(self, name): ...
     \       /
      \     /
       \   /
        \ /
      class D


will change into a diamond diagram under the new system:

      object:
        ^ ^  __getattr__()
       /   \
      /     \
     /       \
    /         \
class B     class C:
    ^         ^  def __getattr__(self, name): ...
     \       /
      \     /
       \   /
        \ /
      class D


and while in the original diagram C.__getattr__() is invoked, under the new system with the classic lookup rule, object.__getattr__() would be invoked!

Fortunately, there's a lookup rule that's better. It's a bit difficult to explain, but it does the right thing in the diamond diagram, and it is the same as the classic lookup rule when there are no diamonds in the inheritance graph (when it is a tree).
总结:Python2和Python3在关于面向对象的区别。
-
Py2:
-
经典类,未继承object类型。【从左到右,深度优先,大小钻石,不留顶端】
class Foo: pass -
新式类,直接获取间接继承object类型。【从左到右,深度优先,大小钻石,留住顶端 -- C3算法】
class Foo(object):
  pass
或
class Base(object):
  pass

class Foo(Base):
  pass
-
-
Py3
-
新式类,丢弃了经典类只保留了新式类。【从左到右,深度优先,大小钻石,留住顶端 -- C3算法】
class Foo:
    pass

class Bar(object):
    pass
-
2. 内置函数补充
本次要给讲解的内置函数共8个,他们都跟面向对象的知识相关。
-
classmethod、staticmethod、property 。
-
callable,是否可在后面加括号执行。
-
函数
def func(): pass print( callable(func) ) # True -
类
class Foo(object): pass print( callable(Foo) ) # True -
类中具有
__call__方法的对象class Foo(object): pass obj = Foo() print( callable(obj) ) # Falseclass Foo(object): def __call__(self, *args, **kwargs): pass obj = Foo() print( callable(obj) ) # True
所以当你以后在见到下面的情况时,首先就要想到handler可以是:函数、类、具有call方法的对象 这三种,到底具体是什么,需要根据代码的调用关系才能分析出来。
def do_something(handler): handler() -
-
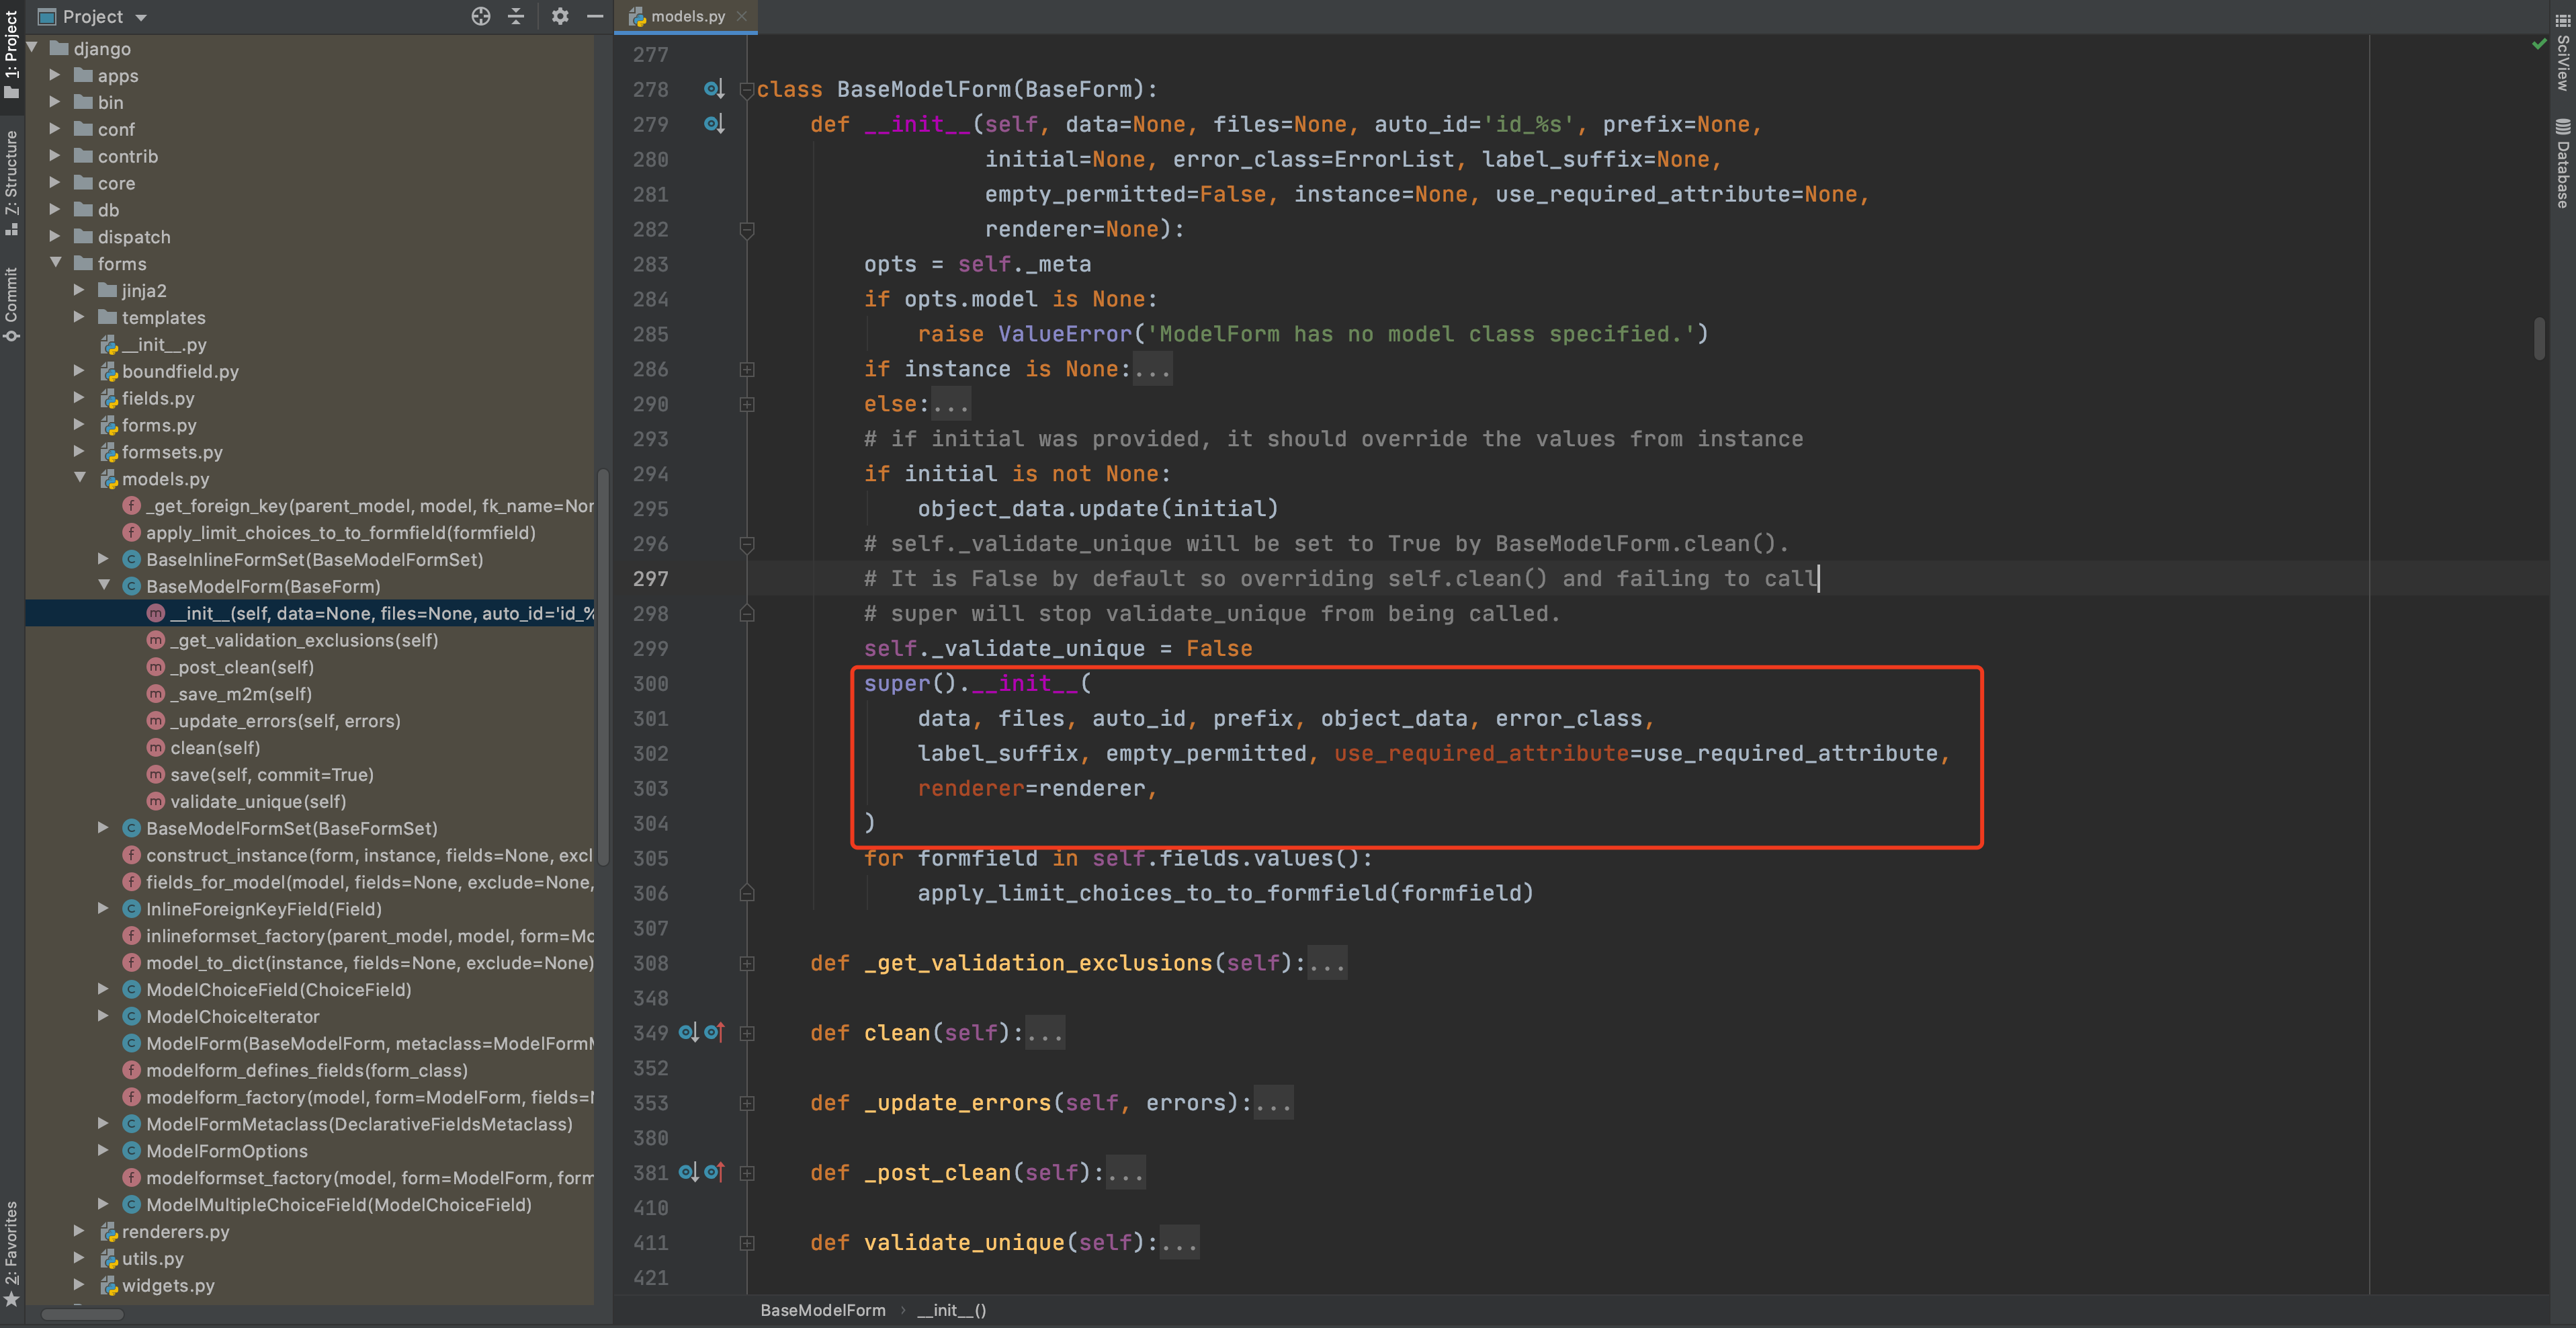
super,按照mro继承关系向上找成员。
class Top(object):
    def message(self, num):
        print("Top.message", num)

class Base(Top):
    pass

class Foo(Base):

    def message(self, num):
        print("Foo.message", num)
        super().message(num + 100)


obj = Foo()
obj.message(1)

>>> Foo.message 1
>>> Top.message 101
class Base(object): def message(self, num): print("Base.message", num) super().message(1000) class Bar(object): def message(self, num): print("Bar.message", num) class Foo(Base, Bar): pass obj = Foo() obj.message(1) >>> Base.message 1 >>> Bar.message 1000应用场景
假设有一个类,他原来已实现了某些功能,但我们想在他的基础上再扩展点功能,重新写一遍?比较麻烦,此时可以用super。
info = dict() # {}
info['name'] = "武沛齐"
info["age"] = 18

value = info.get("age")

print(value)
class MyDict(dict): def get(self, k): print("自定义功能") return super().get(k) info = MyDict() info['name'] = "武沛齐" # __setitem__ info["age"] = 18 # __setitem__ print(info) value = info.get("age") print(value)
-
type,获取一个对象的类型。
v1 = "武沛齐"
result = type(v1)
print(result) # <class 'str'>
v2 = "武沛齐" print( type(v2) == str ) # True v3 = [11, 22, 33] # list(...) print( type(v3) == list ) # Trueclass Foo(object): pass v4 = Foo() print( type(v4) == Foo ) # True -
isinstance,判断对象是否是某个类或其子类的实例。
class Top(object):
    pass


class Base(Top):
    pass


class Foo(Base):
    pass


v1 = Foo()

print( isinstance(v1, Foo) )   # True,对象v1是Foo类的实例
print( isinstance(v1, Base) )  # True,对象v1的Base子类的实例。
print( isinstance(v1, Top) )   # True,对象v1的Top子类的实例。
class Animal(object): def run(self): pass class Dog(Animal): pass class Cat(Animal): pass data_list = [ "alex", Dog(), Cat(), "root" ] for item in data_list: if type(item) == Cat: item.run() elif type(item) == Dog: item.run() else: pass for item in data_list: if isinstance(item, Animal): item.run() else: pass -
issubclass,判断类是否是某个类的子孙类。
class Top(object):
    pass


class Base(Top):
    pass


class Foo(Base):
    pass


print(issubclass(Foo, Base))  # True
print(issubclass(Foo, Top))   # True
3.异常处理
在程序开发中如果遇到一些 不可预知的错误 或 你懒得做一些判断 时,可以选择用异常处理来做。
import requests

while True:
    url = input("请输入要下载网页地址:")
    res = requests.get(url=url)
    with open('content.txt', mode='wb') as f:
        f.write(res.content)
上述下载视频的代码在正常情况下可以运行,但如果遇到网络出问题,那么此时程序就会报错无法正常执行。
try:
    res = requests.get(url=url)
except Exception as e:
    代码块,上述代码出异常待执行。
print("结束")
import requests

while True:
    url = input("请输入要下载网页地址:")

    try:
        res = requests.get(url=url)
    except Exception as e:
        print("请求失败,原因:{}".format(str(e)))
        continue

    with open('content.txt', mode='wb') as f:
        f.write(res.content)
num1 = input("请输入数字:")
num2 = input("请输入数字:")
try:
    num1 = int(num1)
    num2 = int(num2)
    result = num1 + num2
    print(result)
except Exception as e:
    print("输入错误")
以后常见的应用场景:
-
调用微信的API实现微信消息的推送、微信支付等
-
支付宝支付、视频播放等
-
数据库 或 redis连接和操作
-
调用第三方的视频播放发的功能,由第三方的程序出问题导致的错误。
异常处理的基本格式:
try:
    # 逻辑代码
except Exception as e:  # 将Exception实例化后的对象赋值给e
    # try中的代码如果有异常,则此代码块中的代码会执行。
try:
    # 逻辑代码
except Exception as e:
    # try中的代码如果有异常,则此代码块中的代码会执行。
finally:
    # try中的代码无论是否报错,finally中的代码都会执行,一般用于释放资源。

print("end")

"""
try:
    file_object = open("xxx.log")
    # ....
except Exception as e:
    # 异常处理
finally:
    file_object.close()  # try中没异常,最后执行finally关闭文件;try有异常,执行except中的逻辑,最后再执行finally关闭文件。
"""
3.1 异常细分
import requests

while True:
    url = input("请输入要下载网页地址:")

    try:
        res = requests.get(url=url)
    except Exception as e:
        print("请求失败,原因:{}".format(str(e)))
        continue

    with open('content.txt', mode='wb') as f:
        f.write(res.content)
之前只是简单的捕获了异常,出现异常则统一提示信息即可。如果想要对异常进行更加细致的异常处理,则可以这样来做:
import requests
from requests import exceptions

while True:
    url = input("请输入要下载网页地址:")
    try:
        res = requests.get(url=url)
        print(res)
    except exceptions.MissingSchema as e:
        print("URL架构不存在")
    except exceptions.InvalidSchema as e:
        print("URL架构错误")
    except exceptions.InvalidURL as e:
        print("URL地址格式错误")
    except exceptions.ConnectionError as e:
        print("网络连接错误")
    except Exception as e:
        print("代码出现错误", e)

# 提示:如果想要写的简单一点,其实只写一个Exception捕获错误就可以了。
如果想要对错误进行细分的处理,例如:发生Key错误和发生Value错误分开处理。
基本格式:
try:
    # 逻辑代码
    pass

except KeyError as e:
    # 小兵,只捕获try代码中发现了键不存在的异常,例如:去字典 info_dict["n1"] 中获取数据时,键不存在。
    print("KeyError")

except ValueError as e:
    # 小兵,只捕获try代码中发现了值相关错误,例如:把字符串转整型 int("无诶器")
    print("ValueError")

except Exception as e:
    # 王者,处理上面except捕获不了的错误(可以捕获所有的错误)。
    print("Exception")
Python中内置了很多细分的错误,供你选择。
常见异常:
"""
AttributeError 试图访问一个对象没有的树形,比如foo.x,但是foo没有属性x
IOError 输入/输出异常;基本上是无法打开文件
ImportError 无法引入模块或包;基本上是路径问题或名称错误
IndentationError 语法错误(的子类) ;代码没有正确对齐
IndexError 下标索引超出序列边界,比如当x只有三个元素,却试图访问n x[5]
KeyError 试图访问字典里不存在的键 inf['xx']
KeyboardInterrupt Ctrl+C被按下
NameError 使用一个还未被赋予对象的变量
SyntaxError Python代码非法,代码不能编译(个人认为这是语法错误,写错了)
TypeError 传入对象类型与要求的不符合
UnboundLocalError 试图访问一个还未被设置的局部变量,基本上是由于另有一个同名的全局变量,
导致你以为正在访问它
ValueError 传入一个调用者不期望的值,即使值的类型是正确的
"""
更多异常:
"""
ArithmeticError
AssertionError
AttributeError
BaseException
BufferError
BytesWarning
DeprecationWarning
EnvironmentError
EOFError
Exception
FloatingPointError
FutureWarning
GeneratorExit
ImportError
ImportWarning
IndentationError
IndexError
IOError
KeyboardInterrupt
KeyError
LookupError
MemoryError
NameError
NotImplementedError
OSError
OverflowError
PendingDeprecationWarning
ReferenceError
RuntimeError
RuntimeWarning
StandardError
StopIteration
SyntaxError
SyntaxWarning
SystemError
SystemExit
TabError
TypeError
UnboundLocalError
UnicodeDecodeError
UnicodeEncodeError
UnicodeError
UnicodeTranslateError
UnicodeWarning
UserWarning
ValueError
Warning
ZeroDivisionError
"""
3.2 自定义异常&抛出异常
上面都是Python内置的异常,只有遇到特定的错误之后才会抛出相应的异常。
其实,在开发中也可以自定义异常。
class MyException(Exception):
    pass
try:
    pass
except MyException as e:
    print("MyException异常被触发了", e)
except Exception as e:
    print("Exception", e)
上述代码在except中定义了捕获MyException异常,但他永远不会被触发。因为默认的那些异常都有特定的触发条件,例如:索引不存在、键不存在会触发IndexError和KeyError异常。
对于我们自定义的异常,如果想要触发,则需要使用:raise MyException()类实现。
class MyException(Exception):
    pass


try:
    # 。。。
    raise MyException()
    # 。。。
except MyException as e:
    print("MyException异常被触发了", e)
except Exception as e:
    print("Exception", e)
class MyException(Exception):
    def __init__(self, msg, *args, **kwargs):
        super().__init__(*args, **kwargs)
        self.msg = msg


try:
    raise MyException("xxx失败了")
except MyException as e:
    print("MyException异常被触发了", e.msg)
except Exception as e:
    print("Exception", e)
class MyException(Exception):
    title = "请求错误"


try:
    raise MyException()
except MyException as e:
    print("MyException异常被触发了", e.title)
except Exception as e:
    print("Exception", e)
案例一:你我合作协同开发,你调用我写的方法。
-
我定义了一个函数
class EmailValidError(Exception): title = "邮箱格式错误" class ContentRequiredError(Exception): title = "文本不能为空错误" def send_email(email,content): if not re.match("\w+@live.com",email): raise EmailValidError() if len(content) == 0 : raise ContentRequiredError() # 发送邮件代码... # ... -
你调用我写的函数
def execute():
    # 其他代码
    # ...

	try:
        send_email(...)
    except EmailValidError as e:
        pass
    except ContentRequiredError as e:
        pass
    except Exception as e:
        print("发送失败")

execute()

# 提示:如果想要写的简单一点,其实只写一个Exception捕获错误就可以了。
案例二:在框架内部已经定义好,遇到什么样的错误都会触发不同的异常。
import requests
from requests import exceptions

while True:
    url = input("请输入要下载网页地址:")
    try:
        res = requests.get(url=url)
        print(res)
    except exceptions.MissingSchema as e:
        print("URL架构不存在")
    except exceptions.InvalidSchema as e:
        print("URL架构错误")
    except exceptions.InvalidURL as e:
        print("URL地址格式错误")
    except exceptions.ConnectionError as e:
        print("网络连接错误")
    except Exception as e:
        print("代码出现错误", e)

# 提示:如果想要写的简单一点,其实只写一个Exception捕获错误就可以了。
案例三:按照规定去触发指定的异常,每种异常都具备被特殊的含义。
3.4 特殊的finally
try:
    # 逻辑代码
except Exception as e:
    # try中的代码如果有异常,则此代码块中的代码会执行。
finally:
    # try中的代码无论是否报错,finally中的代码都会执行,一般用于释放资源。

print("end")
当在函数或方法中定义异常处理的代码时,要特别注意finally和return。
def func():
    try:
        return 123
    except Exception as e:
        pass
    finally:
        print(666)

func()
在try或except中即使定义了return,也会执行最后的finally块中的代码。
练习题
-
补充代码实现捕获程序中的错误。
# 迭代器 class IterRange(object): def __init__(self, num): self.num = num self.counter = -1 def __iter__(self): return self def __next__(self): self.counter += 1 if self.counter == self.num: raise StopIteration() return self.counter obj = IterRange(20) while True: try: ele = next(obj) except StopIteration as e: print("数据获取完毕") break print(ele) -
补充代码实现捕获程序中的错误。
class IterRange(object): def __init__(self, num): self.num = num self.counter = -1 def __iter__(self): return self def __next__(self): self.counter += 1 if self.counter == self.num: raise StopIteration() return self.counter class Xrange(object): def __init__(self, max_num): self.max_num = max_num def __iter__(self): return IterRange(self.max_num) data_object = Xrange(100) obj_iter = data_object.__iter__() while True: try: ele = next(obj_iter) except StopIteration as e: print("数据获取完毕") break print(ele) -
补充代码实现捕获程序中的错误。
def func(): yield 1 yield 2 yield 3 gen = func() while True: try: ele = next(gen) except StopIteration as e: print("数据获取完毕") break print(ele) -
补充代码实现捕获程序中的错误。(注意:本案例用于练习,在真是开发中对于这种情况建议还是自己做判断处理,不要用异常)
num = int("武沛齐")try: num = int("武沛齐") except ValueError as e: print("转换失败") -
补充代码实现捕获程序中的错误。(注意:本案例用于练习,在真是开发中对于这种情况建议还是自己做判断处理,不要用异常)
data = [11,22,33,44,55]
data[1000]
try: data = [11,22,33,44,55] data[1000] except IndexError as e: print("转换失败") -
补充代码实现捕获程序中的错误。(注意:本案例用于练习,在真是开发中对于这种情况建议还是自己做判断处理,不要用异常)
data = {"k1":123,"k2":456}
data["xxxx"]
try: data = {"k1":123,"k2":456} data["xxxx"] except KyeError as e: print("转换失败") -
分析代码,写结果
class MyDict(dict): def __getitem__(self, item): try: return super().__getitem__(item) # KeyError except KeyError as e: return None info = MyDict() info['name'] = "武沛齐" info['wx'] = "wupeiq666" print(info['wx']) # info['wx'] -> __getitem__ print(info['email']) # info['email'] -> __getitem__ -
看代码写结果
def run(handler):
    try:
        num = handler()
        print(num)
        return "成功"
    except Exception as e:
        return "错误"
    finally:
        print("END")

    print("结束")


res = run(lambda: 123)
print(res)
>>> 123 >>> END >>> 成功def func(): print(666) return "成功" def run(handler): try: num = handler() print(num) return func() except Exception as e: return "错误" finally: print("END") print("结束") res = run(lambda: 123) print(res)>>> 123 >>> 666 >>> END >>> 成功
4.反射
反射,提供了一种更加灵活的方式让你可以实现去 对象 中操作成员(以字符串的形式去 对象 中进行成员的操作)。
反射:通过字符串映射到对象的属性。
class Person(object):

    def __init__(self,name,wx):
        self.name = name
        self.wx = wx

    def show(self):
        message = "姓名{},微信:{}".format(self.name,self.wx)


user_object = Person("武沛齐","wupeiqi666")


# 对象.成员 的格式去获取数据
user_object.name
user_object.wx
user_object.show()

# 对象.成员 的格式无设置数据
user_object.name = "吴培期"
user = Person("武沛齐","wupeiqi666")

# getattr 获取成员
getattr(user,"name") # user.name
getattr(user,"wx")   # user.wx


method = getattr(user,"show") # user.show
method()
# 或
getattr(user,"show")()

# setattr 设置成员
setattr(user, "name", "吴培期") # user.name = "吴培期"
Python中提供了4个内置函数来支持反射:
-
getattr,去对象中获取成员
v1 = getattr(对象,"成员名称") v2 = getattr(对象,"成员名称", 不存在时的默认值) -
setattr,去对象中设置成员
setattr(对象,"成员名称",值) -
hasattr,对象中是否包含成员
v1 = hasattr(对象,"成员名称") # True/False -
delattr,删除对象中的成员
delattr(对象,"成员名称")
以后如果再遇到 对象.成员 这种编写方式时,均可以基于反射来实现。
案例:
class Account(object):

    def login(self):
        pass

    def register(self):
        pass

    def index(self):
        pass


def run(self):
    name = input("请输入要执行的方法名称:") # index register login xx run ..

    account_object = Account()
    method = getattr(account_object, name,None) # index = getattr(account_object,"index")

    if not method:
        print("输入错误")
        return
    method()
4.1 一些皆对象
在Python中有这么句话:一切皆对象。 每个对象的内部都有自己维护的成员。
-
对象是对象
class Person(object): def __init__(self,name,wx): self.name = name self.wx = wx def show(self): message = "姓名{},微信:{}".format(self.name,self.wx) user_object = Person("武沛齐","wupeiqi666") user_object.name -
类是对象
class Person(object): title = "武沛齐" Person.title # Person类也是一个对象(平时不这么称呼) -
模块是对象
import re

re.match
# re模块也是一个对象(平时不这么称呼)。
由于反射支持以字符串的形式去对象中操作成员【等价于 对象.成员 】,所以,基于反射也可以对类、模块中的成员进行操作。
简单粗暴:只要看到 xx.oo 都可以用反射实现。
class Person(object):
    title = "武沛齐"

v1 = Person.title
print(v1)
v2 = getattr(Person,"title")
print(v2)
import re

v1 = re.match("\w+","dfjksdufjksd")
print(v1)

func = getattr(re,"match")
v2 = func("\w+","dfjksdufjksd")
print(v2)
4.2 import_module + 反射
在Python中如果想要导入一个模块,可以通过import语法导入;企业也可以通过字符串的形式导入。
示例一:
# 导入模块
import random

v1 = random.randint(1,100)
# 导入模块
from importlib import import_module

m = import_module("random")

v1 = m.randint(1,100)
示例二:
# 导入模块exceptions
from requests import exceptions as m
# 导入模块exceptions
from importlib import import_module
m = import_module("requests.exceptions")
示例三:
# 导入模块exceptions,获取exceptions中的InvalidURL类。
from requests.exceptions import InvalidURL
# 错误方式
from importlib import import_module
m = import_module("requests.exceptions.InvalidURL") # 报错,import_module只能导入到模块级别。
# 导入模块
from importlib import import_module
m = import_module("requests.exceptions")
# 去模块中获取类
cls = m.InvalidURL
在很多项目的源码中都会有 import_module 和 getattr 配合实现根据字符串的形式导入模块并获取成员,例如:
from importlib import import_module

path = "openpyxl.utils.exceptions.InvalidFileException"

module_path,class_name = path.rsplit(".",maxsplit=1) # "openpyxl.utils.exceptions"   "InvalidFileException"

module_object = import_module(module_path)

cls = getattr(module_object,class_name)

print(cls)
我们在开发中也可以基于这个来进行开发,提高代码的可扩展性,例如:请在项目中实现一个发送 短信、微信 的功能。
参考示例代码中的:auto_message 项目。
5.组合
组合指的是,在一个类中以另外一个类的对象作为数据属性,称为类的组合;
组合可以不通过继承得到类与类之间的相互关系(什么有什么的关系);
将一个对象通过属性的方式赋值给另一个对象,从而达到调用的目的;
当类之间有显著不同,并且较小的类是较大的类所需要的组件时,用组合比较好。
class People:
    school='luffycity'

    def __init__(self,name,age,sex):
        self.name=name
        self.age=age
        self.sex=sex


class Teacher(People):
    def __init__(self,name,age,sex,level,salary,):
        super().__init__(name,age,sex)

        self.level=level
        self.salary=salary


    def teach(self):
        print('%s is teaching' %self.name)


class Student(People):
    def __init__(self, name, age, sex, class_time,):
        super().__init__(name,age,sex)

        self.class_time=class_time

    def learn(self):
        print('%s is learning' % self.name)

class Course:
    def __init__(self,course_name,course_price,course_period):
        self.course_name = course_name
        self.course_price = course_price
        self.course_period = course_period

    def tell_info(self):
        print('课程名<%s> 课程价钱<%s> 课程周期<%s>' %(self.course_name,self.course_price,self.course_period))

class Date:
    def __init__(self,year,mon,day):
        self.year=year
        self.mon=mon
        self.day=day

    def tell_info(self):
        print('%s-%s-%s' %(self.year,self.mon,self.day))

# teacher1=Teacher('alex',18,'male',10,3000,)
# teacher2=Teacher('egon',28,'male',30,3000,)
# python=Course('python',3000,'3mons')
# linux=Course('linux',2000,'4mons')

# print(python.course_name)

# teacher1.course=python
# teacher2.course=python

# print(python)
# print(teacher1.course)
# print(teacher2.course)
# print(teacher1.course.course_name)
# print(teacher2.course.course_name)
# teacher1.course.tell_info()

# student1=Student('张三',28,'female','08:30:00')
# student1.course1=python
# student1.course2=linux

# student1.course1.tell_info()
# student1.course2.tell_info()
# student1.courses=[]
# student1.courses.append(python)
# student1.courses.append(linux)


student1=Student('张三',28,'female','08:30:00')
d=Date(1988,4,20)
python=Course('python',3000,'3mons')


student1.birh=d # 将d对象作为属性赋值给student1对象
student1.birh.tell_info() # 通过属性调用d对象中的方法

student1.course=python

student1.course.tell_info()
6.抽象类
1.什么是接口
hi boy,给我开个查询接口。。。此时的接口指的是:自己提供给使用者来调用自己功能的方式\方法\入口,java中的interface使用如下
=================第一部分:Java 语言中的接口很好的展现了接口的含义: IAnimal.java
/*
* Java的Interface接口的特征:
* 1)是一组功能的集合,而不是一个功能
* 2)接口的功能用于交互,所有的功能都是public,即别的对象可操作
* 3)接口只定义函数,但不涉及函数实现
* 4)这些功能是相关的,都是动物相关的功能,但光合作用就不适宜放到IAnimal里面了 */

package com.oo.demo;
public interface IAnimal {
    public void eat();
    public void run();
    public void sleep();
    public void speak();
}

=================第二部分:Pig.java:猪”的类设计,实现了IAnnimal接口
package com.oo.demo;
public class Pig implements IAnimal{ //如下每个函数都需要详细实现
    public void eat(){
        System.out.println("Pig like to eat grass");
    }

    public void run(){
        System.out.println("Pig run: front legs, back legs");
    }

    public void sleep(){
        System.out.println("Pig sleep 16 hours every day");
    }

    public void speak(){
        System.out.println("Pig can not speak"); }
}

=================第三部分:Person2.java
/*
*实现了IAnimal的“人”,有几点说明一下:
* 1)同样都实现了IAnimal的接口,但“人”和“猪”的实现不一样,为了避免太多代码导致影响阅读,这里的代码简化成一行,但输出的内容不一样,实际项目中同一接口的同一功能点,不同的类实现完全不一样
* 2)这里同样是“人”这个类,但和前面介绍类时给的类“Person”完全不一样,这是因为同样的逻辑概念,在不同的应用场景下,具备的属性和功能是完全不一样的 */

package com.oo.demo;
public class Person2 implements IAnimal {
    public void eat(){
        System.out.println("Person like to eat meat");
    }

    public void run(){
        System.out.println("Person run: left leg, right leg");
    }

    public void sleep(){
        System.out.println("Person sleep 8 hours every dat");
    }

    public void speak(){
        System.out.println("Hellow world, I am a person");
    }
}

=================第四部分:Tester03.java
package com.oo.demo;

public class Tester03 {
    public static void main(String[] args) {
        System.out.println("===This is a person===");
        IAnimal person = new Person2();
        person.eat();
        person.run();
        person.sleep();
        person.speak();

        System.out.println("\n===This is a pig===");
        IAnimal pig = new Pig();
        pig.eat();
        pig.run();
        pig.sleep();
        pig.speak();
    }
}

 java中的interface
2. 为何要用接口
接口提取了一群类共同的函数,可以把接口当做一个函数的集合。
然后让子类去实现接口中的函数。
这么做的意义在于归一化,什么叫归一化,就是只要是基于同一个接口实现的类,那么所有的这些类产生的对象在使用时,从用法上来说都一样。
归一化的好处在于:
- 归一化让使用者无需关心对象的类是什么,只需要的知道这些对象都具备某些功能就可以了,这极大地降低了使用者的使用难度。
- 归一化使得高层的外部使用者可以不加区分的处理所有接口兼容的对象集合
- 就好象linux的泛文件概念一样,所有东西都可以当文件处理,不必关心它是内存、磁盘、网络还是屏幕(当然,对底层设计者,当然也可以区分出“字符设备”和“块设备”,然后做出针对性的设计:细致到什么程度,视需求而定)。
- 再比如:我们有一个汽车接口,里面定义了汽车所有的功能,然后由本田汽车的类,奥迪汽车的类,大众汽车的类,他们都实现了汽车接口,这样就好办了,大家只需要学会了怎么开汽车,那么无论是本田,还是奥迪,还是大众我们都会开了,开的时候根本无需关心我开的是哪一类车,操作手法(函数调用)都一样
3. 模仿interface
在python中根本就没有一个叫做interface的关键字,如果非要去模仿接口的概念
可以借助第三方模块:http://pypi.python.org/pypi/zope.interface
也可以使用继承,其实继承有两种用途
一:继承基类的方法,并且做出自己的改变或者扩展(代码重用):实践中,继承的这种用途意义并不很大,甚至常常是有害的。因为它使得子类与基类出现强耦合。
二:声明某个子类兼容于某基类,定义一个接口类(模仿java的Interface),接口类中定义了一些接口名(就是函数名)且并未实现接口的功能,子类继承接口类,并且实现接口中的功能
class Interface:#定义接口Interface类来模仿接口的概念,python中压根就没有interface关键字来定义一个接口。
    def read(self): #定接口函数read
        pass

    def write(self): #定义接口函数write
        pass


class Txt(Interface): #文本,具体实现read和write
    def read(self):
        print('文本数据的读取方法')

    def write(self):
        print('文本数据的读取方法')

class Sata(Interface): #磁盘,具体实现read和write
    def read(self):
        print('硬盘数据的读取方法')

    def write(self):
        print('硬盘数据的读取方法')

class Process(Interface):
    def read(self):
        print('进程数据的读取方法')

    def write(self):
        print('进程数据的读取方法')
上面的代码只是看起来像接口,其实并没有起到接口的作用,子类完全可以不用去实现接口 ,这就用到了抽象类
抽象类
1 什么是抽象类
与java一样,python也有抽象类的概念但是同样需要借助模块实现,抽象类是一个特殊的类,它的特殊之处在于只能被继承,不能被实例化
2 为什么要有抽象类
如果说类是从一堆对象中抽取相同的内容而来的,那么抽象类就是从一堆类中抽取相同的内容而来的,内容包括数据属性和函数属性。
比如我们有香蕉的类,有苹果的类,有桃子的类,从这些类抽取相同的内容就是水果这个抽象的类,你吃水果时,要么是吃一个具体的香蕉,要么是吃一个具体的桃子。。。。。。你永远无法吃到一个叫做水果的东西。
从设计角度去看,如果类是从现实对象抽象而来的,那么抽象类就是基于类抽象而来的。
从实现角度来看,抽象类与普通类的不同之处在于:抽象类中只能有抽象方法(没有实现功能),该类不能被实例化,只能被继承,且子类必须实现抽象方法。这一点与接口有点类似,但其实是不同的,即将揭晓答案
3. 在python中实现抽象类
#一切皆文件
import abc #利用abc模块实现抽象类

class All_file(metaclass=abc.ABCMeta):
    all_type='file'
    @abc.abstractmethod #定义抽象方法,无需实现功能
    def read(self):
        '子类必须定义读功能'
        pass

    @abc.abstractmethod #定义抽象方法,无需实现功能
    def write(self):
        '子类必须定义写功能'
        pass

# class Txt(All_file):
#     pass
#
# t1=Txt() #报错,子类没有定义抽象方法

class Txt(All_file): #子类继承抽象类,但是必须定义read和write方法
    def read(self):
        print('文本数据的读取方法')

    def write(self):
        print('文本数据的读取方法')

class Sata(All_file): #子类继承抽象类,但是必须定义read和write方法
    def read(self):
        print('硬盘数据的读取方法')

    def write(self):
        print('硬盘数据的读取方法')

class Process(All_file): #子类继承抽象类,但是必须定义read和write方法
    def read(self):
        print('进程数据的读取方法')

    def write(self):
        print('进程数据的读取方法')

wenbenwenjian=Txt()

yingpanwenjian=Sata()

jinchengwenjian=Process()

#这样大家都是被归一化了,也就是一切皆文件的思想
wenbenwenjian.read()
yingpanwenjian.write()
jinchengwenjian.read()

print(wenbenwenjian.all_type)
print(yingpanwenjian.all_type)
print(jinchengwenjian.all_type)
4. 抽象类与接口
抽象类的本质还是类,指的是一组类的相似性,包括数据属性(如all_type)和函数属性(如read、write),而接口只强调函数属性的相似性。
抽象类是一个介于类和接口直接的一个概念,同时具备类和接口的部分特性,可以用来实现归一化设计
7.元类
一 、知识储备
exec:三个参数

参数一:字符串形式的命令

参数二:全局作用域(字典形式),如果不指定,默认为globals()

参数三:局部作用域(字典形式),如果不指定,默认为locals()
exec的使用
g={
'x':1,
'y':2
}
l={}

exec('''
global x,z
x=100
z=200

m=300
''',g,l)

print(g) #{'x': 100, 'y': 2,'z':200,......}
print(l) #{'m': 300}
二 、引子(类也是对象)
class Foo:
      pass

f1=Foo() #f1是通过Foo类实例化的对象
python中一切皆是对象,类本身也是一个对象,当使用关键字class的时候,python解释器在加载class的时候就会创建一个对象(这里的对象指的是类而非类的实例),因而我们可以将类当作一个对象去使用,同样满足第一类对象的概念,可以:
1.把类赋值给一个变量
2.把类作为函数参数进行传递
3.把类作为函数的返回值
4.在运行时动态地创建类
5.当作容器类的元素,L=[func,time,obj,1]
上例可以看出f1是由Foo这个类产生的对象,而Foo本身也是对象,那它又是由哪个类产生的呢?
#type函数可以查看类型,也可以用来查看对象的类,二者是一样的
print(type(f1)) # 输出:<class '__main__.Foo'> 表示,obj 对象由Foo类创建
print(type(Foo)) # 输出:<class 'type'>
三 、什么是元类?
元类是类的类,是类的模板
元类是用来控制如何创建类的,正如类是创建对象的模板一样,而元类的主要目的是为了控制类的创建行为
元类的实例化的结果为我们用class定义的类,正如类的实例为对象(f1对象是Foo类的一个实例,Foo类是 type 类的一个实例)
type是python的一个内建元类,用来直接控制生成类,python中任何class定义的类其实都是type类实例化的对象
四 、创建类的两种方式
方式一:使用class关键字
class Chinese(object):
    country='China'
    def __init__(self,name,age):
        self.name=name
        self.age=age
    def talk(self):
        print('%s is talking' %self.name)
方式二:就是手动模拟class创建类的过程):将创建类的步骤拆分开,手动去创建
#准备工作:

#创建类主要分为三部分

  1 类名

  2 类的父类

  3 类体


#类名
class_name='Chinese'
#类的父类
class_bases=(object,)
#类体
class_body="""
country='China'
def __init__(self,name,age):
    self.name=name
    self.age=age
def talk(self):
    print('%s is talking' %self.name)
"""
步骤一: 先处理类体->名称空间):类体定义的名字都会存放于类的名称空间中(一个局部的名称空间),我们可以事先定义一个空字典,然后用exec去执行类体的代码(exec产生名称空间的过程与真正的class过程类似,只是后者会将__开头的属性变形),生成类的局部名称空间,即填充字典
class_dic={}
exec(class_body,globals(),class_dic)


print(class_dic)
#{'country': 'China', 'talk': <function talk at 0x101a560c8>, '__init__': <function __init__ at 0x101a56668>}
步骤二:调用元类type(也可以自定义)来产生类Foo
Foo=type(class_name,class_bases,class_dic) #实例化type得到对象Foo,即我们用class定义的类Foo

print(Foo)
print(type(Foo))
print(isinstance(Foo,type))
'''
<class '__main__.Chinese'>
<class 'type'>
True
'''
我们看到,type 接收三个参数:
- 第 1 个参数是字符串 ‘Foo’,表示类名
- 第 2 个参数是元组 (object, ),表示所有的父类
- 第 3 个参数是字典,这里是一个空字典,表示没有定义属性和方法
补充:若Foo类有继承,即class Foo(Bar):.... 则等同于type('Foo',(Bar,),{})
五 、自定义元类控制类的行为
一个类没有声明自己的元类,默认他的元类就是type,除了使用元类type,用户也可以通过继承type来自定义元类(顺便我们也可以瞅一瞅元类如何控制类的行为,工作流程是什么)
5步带你学会元类
#知识储备:
#产生的新对象 = object.__new__(继承object类的子类)
#步骤一:如果说People=type(类名,类的父类们,类的名称空间),那么我们定义元类如下,来控制类的创建
class Mymeta(type): # 继承默认元类的一堆属性
def __init__(self, class_name, class_bases, class_dic):
if '__doc__' not in class_dic or not class_dic.get('__doc__').strip():
raise TypeError('必须为类指定文档注释')
if not class_name.istitle():
raise TypeError('类名首字母必须大写')
super(Mymeta, self).__init__(class_name, class_bases, class_dic)
class People(object, metaclass=Mymeta):
country = 'China'
def __init__(self, name, age):
self.name = name
self.age = age
def talk(self):
print('%s is talking' % self.name)
#步骤二:如果我们想控制类实例化的行为,那么需要先储备知识__call__方法的使用
class People(object,metaclass=type):
def __init__(self,name,age):
self.name=name
self.age=age
def __call__(self, *args, **kwargs):
print(self,args,kwargs)
# 调用类People,并不会出发__call__
obj=People('egon',18)
# 调用对象obj(1,2,3,a=1,b=2,c=3),才会出发对象的绑定方法obj.__call__(1,2,3,a=1,b=2,c=3)
obj(1,2,3,a=1,b=2,c=3) #打印:<__main__.People object at 0x10076dd30> (1, 2, 3) {'a': 1, 'b': 2, 'c': 3}
#总结:如果说类People是元类type的实例,那么在元类type内肯定也有一个__call__,会在调用People('egon',18)时触发执行,然后返回一个初始化好了的对象obj
#步骤三:自定义元类,控制类的调用(即实例化)的过程
class Mymeta(type): #继承默认元类的一堆属性
def __init__(self,class_name,class_bases,class_dic):
if not class_name.istitle():
raise TypeError('类名首字母必须大写')
super(Mymeta,self).__init__(class_name,class_bases,class_dic)
def __call__(self, *args, **kwargs):
#self=People
print(self,args,kwargs) #<class '__main__.People'> ('egon', 18) {}
#1、实例化People,产生空对象obj
obj=object.__new__(self)
#2、调用People下的函数__init__,初始化obj
self.__init__(obj,*args,**kwargs)
#3、返回初始化好了的obj
return obj
class People(object,metaclass=Mymeta):
country='China'
def __init__(self,name,age):
self.name=name
self.age=age
def talk(self):
print('%s is talking' %self.name)
obj=People('egon',18)
print(obj.__dict__) #{'name': 'egon', 'age': 18}
#步骤四:
class Mymeta(type): #继承默认元类的一堆属性
def __init__(self,class_name,class_bases,class_dic):
if not class_name.istitle():
raise TypeError('类名首字母必须大写')
super(Mymeta,self).__init__(class_name,class_bases,class_dic)
def __call__(self, *args, **kwargs):
#self=People
print(self,args,kwargs) #<class '__main__.People'> ('egon', 18) {}
#1、调用self,即People下的函数__new__,在该函数内完成:1、产生空对象obj 2、初始化 3、返回obj
obj=self.__new__(self,*args,**kwargs)
#2、一定记得返回obj,因为实例化People(...)取得就是__call__的返回值
return obj
class People(object,metaclass=Mymeta):
country='China'
def __init__(self,name,age):
self.name=name
self.age=age
def talk(self):
print('%s is talking' %self.name)
def __new__(cls, *args, **kwargs):
obj=object.__new__(cls)
cls.__init__(obj,*args,**kwargs)
return obj
obj=People('egon',18)
print(obj.__dict__) #{'name': 'egon', 'age': 18}
#步骤五:基于元类实现单例模式,比如数据库对象,实例化时参数都一样,就没必要重复产生对象,浪费内存
class Mysql:
__instance=None
def __init__(self,host='127.0.0.1',port='3306'):
self.host=host
self.port=port
@classmethod
def singleton(cls,*args,**kwargs):
if not cls.__instance:
cls.__instance=cls(*args,**kwargs)
return cls.__instance
obj1=Mysql()
obj2=Mysql()
print(obj1 is obj2) #False
obj3=Mysql.singleton()
obj4=Mysql.singleton()
print(obj3 is obj4) #True
#应用:定制元类实现单例模式(写法一)
class Mymeta(type):
def __init__(self,name,bases,dic): #定义类Mysql时就触发
self.__instance=None
super().__init__(name,bases,dic)
def __call__(self, *args, **kwargs): #Mysql(...)时触发
if not self.__instance:
self.__instance=object.__new__(self) #产生对象
self.__init__(self.__instance,*args,**kwargs) #初始化对象
#上述两步可以合成下面一步
# self.__instance=super().__call__(*args,**kwargs)
return self.__instance
class Mysql(metaclass=Mymeta):
def __init__(self,host='127.0.0.1',port='3306'):
self.host=host
self.port=port
obj1=Mysql()
obj2=Mysql()
print(obj1 is obj2)
#应用:定制元类实现单例模式(写法二)
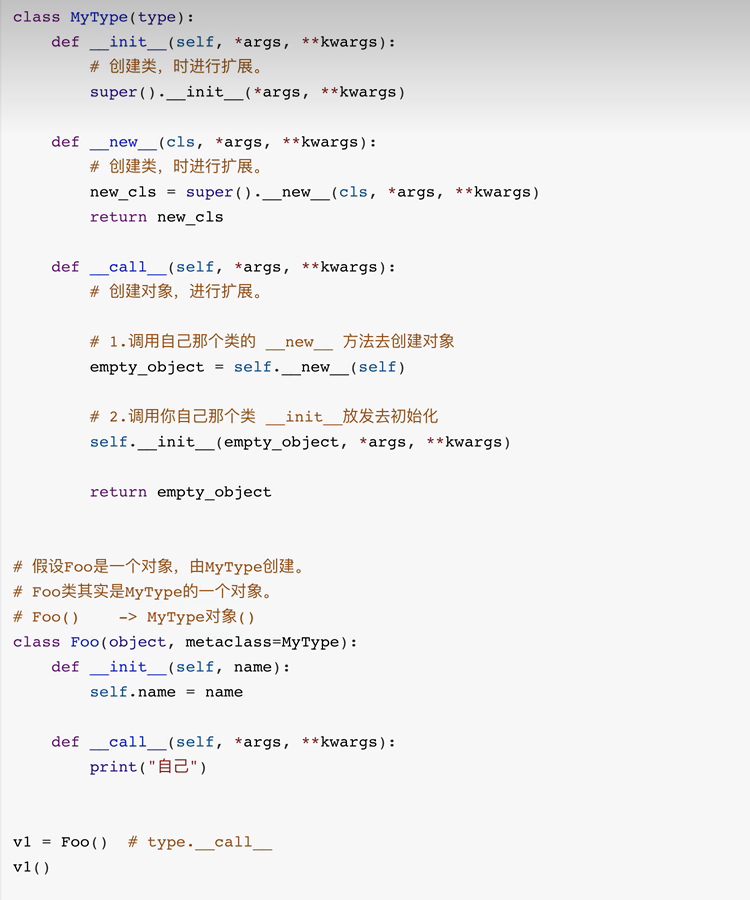
class MyType(type):
def __init__(self, name, base, attrs):
super(MyType, self).__init__(name, base, attrs)
self.instance = None
print(attrs)
def __call__(self, *args, **kwargs):
if not self.instance:
# 1.调用自己那个类的__new__方法去创建对象
self.instance = self.__new__(self)
# 2.调用自己那个类 __init__方法去初始化
self.__init__(self.instance, *args, **kwargs)
return self.instance
class Singleton(object, metaclass=MyType):
pass
class Foo(Singleton):
def __init__(self):
pass
print(Foo.instance)
v1 = Foo()
v2 = Foo()
print(v1)
print(v2)
六、 练习题
练习一:在元类中控制把自定义类的数据属性都变成大写
class Mymetaclass(type):
    def __new__(cls,name,bases,attrs):
        update_attrs={}
        for k,v in attrs.items():
            if not callable(v) and not k.startswith('__'):
                update_attrs[k.upper()]=v
            else:
                update_attrs[k]=v
        return type.__new__(cls,name,bases,update_attrs)

class Chinese(metaclass=Mymetaclass):
    country='China'
    tag='Legend of the Dragon' #龙的传人
    def walk(self):
        print('%s is walking' %self.name)


print(Chinese.__dict__)
'''
{'__module__': '__main__',
 'COUNTRY': 'China',
 'TAG': 'Legend of the Dragon',
 'walk': <function Chinese.walk at 0x0000000001E7B950>,
 '__dict__': <attribute '__dict__' of 'Chinese' objects>,
 '__weakref__': <attribute '__weakref__' of 'Chinese' objects>,
 '__doc__': None}
'''
练习二:在元类中控制自定义的类无需init方法
1.元类帮其完成创建对象,以及初始化操作;
2.要求实例化时传参必须为关键字形式,否则抛出异常TypeError: must use keyword argument
3.key作为用户自定义类产生对象的属性,且所有属性变成大写
class Mymetaclass(type):
    # def __new__(cls,name,bases,attrs):
    #     update_attrs={}
    #     for k,v in attrs.items():
    #         if not callable(v) and not k.startswith('__'):
    #             update_attrs[k.upper()]=v
    #         else:
    #             update_attrs[k]=v
    #     return type.__new__(cls,name,bases,update_attrs)

    def __call__(self, *args, **kwargs):
        if args:
            raise TypeError('must use keyword argument for key function')
        obj = object.__new__(self) #创建对象,self为类Foo

        for k,v in kwargs.items():
            obj.__dict__[k.upper()]=v
        return obj

class Chinese(metaclass=Mymetaclass):
    country='China'
    tag='Legend of the Dragon' #龙的传人
    def walk(self):
        print('%s is walking' %self.name)


p=Chinese(name='egon',age=18,sex='male')
print(p.__dict__)
总结
-
了解 mro和c3算法
-
python2和python3在面向对象中的区别。
-
内置函数
staticmethod,classmethod,property,callable,type,isinstance,issubclass,super getattr,setattr,hasattr,delattr -
异常处理
-
根据字符串的形式导入模块
import_module -
根据字符串的形式操作成员
反射-getattr,setattr,hasattr,delattr

 浙公网安备 33010602011771号