

rsync+sersync
先前测试过rsync+inotify 大量小文件的同步不适用,太慢。
主130备份到131的配置:
两台机器都要安装好rsync,一般系统都自带,没有yum安装或者源码安装均可。
A:131上的操作:
新建/etc/rsyncd.conf配置文件:
strict modes = yes
port = 873
logfile = /var/log/rsyncd.log
pidfile = /var/run/rsyncd.pid
lock file = /var/run/rsyncd.lock
max connections = 200

[test]         #自定义的模块名,130上sersync会用到
uid = root     #设置运行的权限
gid = root     #设置运行的权限
path = /home/hytest/upload/test  #要存放的数据路径
read only = no #设置文件权限为读写权限
hosts allow = 173.160.201.130
auth users = lipeng #执行数据同步的用户名
secrets file = /etc/rsyncd.scrt #用户认证文件,里面包含用户和密码,跟上面auth users对应

[payCard]
uid = root
gid = root
path = /home/hytest/upload/payCard
read only = no
hosts allow = 173.160.201.130
auth users = lipeng
secrets file = /etc/rsyncd.scrt

[authInfo]
uid = root
gid = root
path = /home/hytest/upload/authInfo
read only = no
hosts allow = 173.160.201.130
auth users = lipeng
secrets file = /etc/rsyncd.scrt

[48502000]
uid = root
gid = root
path = /home/hytest/upload/48502000
read only = no
hosts allow = 173.160.201.130
auth users = lipeng
secrets file = /etc/rsyncd.scrt

[authentication]
uid = root
gid = root
path = /home/hytest/upload/authentication
read only = no
hosts allow = 173.160.201.130
auth users = lipeng
secrets file = /etc/rsyncd.scrt

[branch]
uid = root
gid = root
path = /home/hytest/upload/branch
read only = no
hosts allow = 173.160.201.130
auth users = lipeng
secrets file = /etc/rsyncd.scrt

[elecAgreement]
uid = root
gid = root
path = /home/hytest/upload/elecAgreement
read only = no
hosts allow = 173.160.201.130
auth users = lipeng
secrets file = /etc/rsyncd.scrt

[informationUpload]
uid = root
gid = root
path = /home/hytest/upload/informationUpload
read only = no
hosts allow = 173.160.201.130
auth users = lipeng
secrets file = /etc/rsyncd.scrt
创建/etc/rsyncd.scrt文件,写入验证的用户和密码:
lipeng:123456
权限设置为600,chmod 600 /etc/rsyncd.scrt
启动rsync:
rsync --daemon --config=/etc/rsyncd.conf
rsyncd.conf配置文件内容变更了之后,无需重启该进程。
B:130上操作:
echo 50000000 > /proc/sys/fs/inotify/max_user_watches
echo 327679 > /proc/sys/fs/inotify/max_queued_events
创建/etc/rsyncd.scrt文件,写入密码:
123456
权限设置为600,chmod 600 /etc/rsyncd.scrt
安装sersync:
下载sersync并上传到服务器上:
链接:https://pan.baidu.com/s/1tKwmLaH9aruLs9f4RsFhCg
提取码:dqjw
直接解压tar -zxvf sersync2.5.4_64bit_binary_stable_final\ \(1\).tar.gz
直接mv到自定义的目录下,我这边直接放到/home下的自定义的目录了,便于管理。
mv GNU-Linux-x86/ /home/rsyncto131/sersync
cd /home/rsyncto131/sersync

这边演示配置test模块:
修改confxml.xml文件: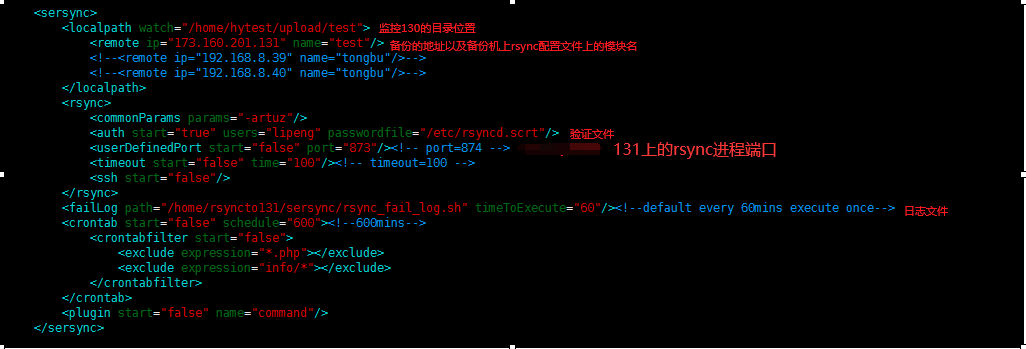
其他的不需要修改。
直接启动sersync:
nohup /rsyncto131/sersync/sersync2 -d -r -o /home/rsyncto131/sersync/confxml.xml >>nohu.out &
传输的日志需要在131上查看:
tail -f /var/log/rsyncd.log
C:多个模块需要相应的多起sersync进程:
131新增的48502000模块,则130上操作:
cp confxml_authInfo.xml confxml_48502000.xml #confxml_48502000.xml记得需要修改相应的文件内容
cp nohup.out nohup_48502000.out
启动:
nohup /home/rsyncto131/sersync/sersync2 -d -r -o /home/rsyncto131/sersync/confxml_48502000.xml >> nohup_48502000.out &


 浙公网安备 33010602011771号