angular学习3-指令
7. angular指令
7.1 内置指令
angular提供两种内置指令:结构指令和属性指令
内置指令仅仅使用了公共 API。也就是说,它们没有用到任何其它指令无权访问的私有 API。
7.1.1内置属性指令
通常应用在元素或者组件上,监听他们的行为、attribute和property,就像元素属性一样。
ngClass: 同时添加或者删除一个或者多个css类
ngStyle:可以通过style属性绑定的方式更改单个样式;也可以通过ngStyle添加对象的方式设置多个样式
ngModel: 双向数据绑定
-
使用 ngModel 指令,必须先导入 FormsModule 并将其添加到 NgModule 的 imports 列表中
-
因此
NgModel指令仅适用于通过 ControlValueAccessor 适配过这种协议的元素。Angular 已经为所有基本的 HTML 表单元素提供了值访问器。
7.1.2 内置结构指令
结构指令通过添加、移除它们的宿主元素来塑造和控制dom结构。
内置结构指令前面要加上*。
当指令没有合适的宿主,可以用<ng-container>对元素进行分类
ngIf:添加或者删除元素。
-
ngIf删除元素会从dom结构中删除该元素以及这个元素的子结构
-
应用:防范空指针错误。
<div *ngIf="currentCustomer">Hello, {{currentCustomer.name}}</div>
ngFor:重复指令。用来显示条目列表的方法。
<div *ngFor="let item of items; let i=index">{{i + 1}} - {{item.name}}</div>
ngSwitch: 官网
7.2自定义指令-属性指令
项目地址. 指令和组件本质上是一样的,都是导出一个类
7.2.1 创建一个简单的自定义属性指令
创建指令类文件
ng generate directive highlight
将highlight.directive.ts的内容更改如下
import { Directive, ElementRef, HostListener } from '@angular/core';
// @HostListener装饰器让你订阅属性指令所在宿主dom元素的事件。
// 你可以在指令的构造函数中使用 ElementRef 来注入宿主 DOM 元素的引用,也就是你放置 appHighlight 的那个元素。
@Directive({
selector: '[appHighlight]'
})
export class HighlightDirective {
@HostListener('mouseenter') onmouseenter() {
console.log('enter')
}
@HostListener('mouseleave') onmouseleave() {
console.log('leave')
}
// 构造函数接收一个参数:el,通过el可以直接访问宿主元素
// 当在宿主元素上面发现appHighlight属性,就会创建一个HighlightDirective实例
constructor(el: ElementRef) {
console.log(el)
el.nativeElement.style.backgroundColor = 'yellow';
}
}
使用:
<p appHighlight>我使用了自定义指令</p>
@Directive中的selector定义指令的名称,即在标签中怎样引用指令
指令不支持命名空间?
7.2.2 处理器委托辅助方法来操作dom元素:
import { Directive, ElementRef, HostListener } from '@angular/core';
@Directive({
selector: '[appHighlight]'
})
export class HighlightDirective {
constructor(private el: ElementRef) { }
@HostListener('mouseenter') onMouseEnter() {
this.highlight('yellow');
}
@HostListener('mouseleave') onMouseLeave() {
this.highlight(null);
}
private highlight(color: string) {
this.el.nativeElement.style.backgroundColor = color;
}
}
7.2.3通过@input向自定义指令传值
-
绑定@input属性
import { Directive, ElementRef, HostListener, Input } from '@angular/core';
@Directive({
selector: '[appHighLightWithInput]'
})
export class HighLightWithInputDirective {
<p appHighLightWithInput="red">通过单独属性的方式传值给自定义指令</p>然后就可以在自定义指令文件中通过
this.highLightColor获取传进去的值了 -
向指令传递第二个参数
import { Directive, ElementRef, HostListener, Input } from '@angular/core';
@Directive({
selector: '[appHighLightWithInput]'
})
export class HighLightWithInputDirective {
<p appHighLightWithInput="red" defaultColor="green">通过属性值的方式传值给自定义指令</p>然后就可以在自定义指令文件中通过
this.defaultColor获取传进去的值了。在constructor构造函数中获取不到传进来的值
7.2.4 ngNonBindable
防止浏览器进行表达式求值、停用模板中的插件、指令和绑定。
这种停用不会影响html原生属性。
-
应用了
ngNonBindable的元素,会停用所有它子元素上的任何插值和绑定。例如:{{1+1}}会被原样在浏览器输出。上面的指令应用在子元素上也不会生效。自定义属性会被渲染到元素属性上,但不会起作用; -
应用了
ngNonBindable的元素本身自定义指令还是有效的,但是会停用它的表达式求值。
7.3 自定义指令-结构指令
7.3.1创建一个简单的结构指令
通过如下命令创建unless指令类 -- 实现与ngIf相反的功能
ng generate directive unless
在创建的指令文件中引入TemplateRef 和 ViewContainerRef
import { Directive, Input, TemplateRef, ViewContainerRef } from '@angular/core';
@Directive({
selector: '[appUnless]'
})
export class UnlessDirective {
constructor(
private tRef: TemplateRef<any>,
private vcf: ViewContainerRef
) {
}
}
UnlessDirective会通过angular生成的ng-template创建一个嵌入的视图(this.tRef)。然后通过this.vcf的方法将视图插入到原始的宿主元素紧后面的视图容器中。
创建一个带setter的@input属性
@Input() set appUnless(condition: boolean) {
    // 1. 当条件为假,且angular尚为创建视图,此时setter会导致视图容器从模板创建出嵌入式视图
    if (!condition && !this.hasView) {
      this.vcf.createEmbeddedView(this.tRef);
      this.hasView = true;
    } else if (condition && this.hasView) {
      // 2. 如果条件为真,并且当时正显示着视图,就会清除容器,销毁视图
      this.vcf.clear();
      this.hasView = false;
    }
  }
  // 判断宿主视图是否被创建,初始化为false
  hasView:any = false
测试指令:当condition=false时,显示组件。当condition=true时销毁组件
<!-- 自定义结构指令 -->
<button (click)="condition = !condition">triggle condition</button>
<p *appUnless="condition" class="unless a">
  (A) This paragraph is displayed because the condition is false.
</p>
上面的
*是把指令标记为结构指令的简写形式。angular会将结构指令前面的*转化为围绕宿主元素及其后代的<ng-template>元素。
7.3.2 <ng-template>创建视图片段
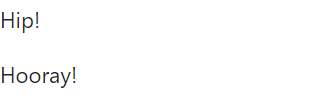
<ng-template>被定义成默认情况下不渲染任何内容的模板。既在没有结构指令的情况下,<ng-template>包裹的内容不会被渲染。
<p>Hip!</p>
<ng-template>
  <p>Hip!</p>
</ng-template>
<p>Hooray!</p>
最终的浏览器效果如下:

 浙公网安备 33010602011771号