

Dubbo 使用rest协议发布http服务
演示用GitHub地址:https://github.com/suyin58/dubbo-rest-example
1 Dubbo_rest介绍
Dubbo自2.6.0版本后,合并了dubbox的restful风格的接口暴露方式,其restful的处理采用的是jboss.resteasy框架。使用该功能可以简便的将dubbo服务直接通过http的方式发布,不需要再使用中转的http应用暴露服务。
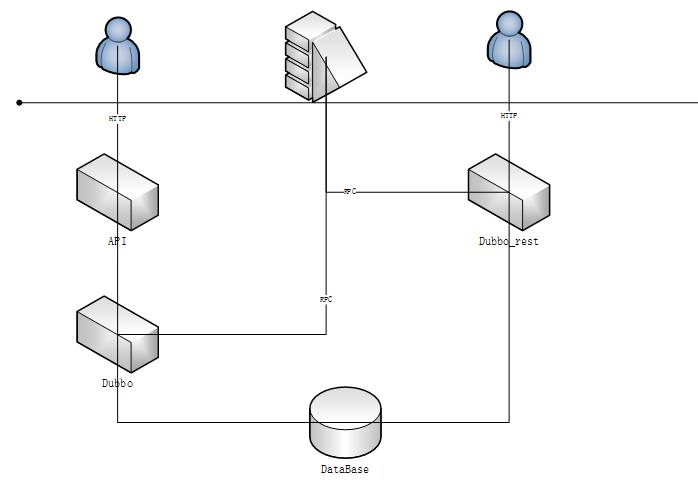
如上图,原有结构中,HTTP访问需要通过API应用中转服务,RPC访问调用dubbo应用,使用dubbo_rest之后,HTTP和RPC访问都直接调用dubbo应用即可。
2 使用方法
参考demo项目 https://github.com/suyin58/dubbo-rest-example,
由于dubbo 2.6依赖jar包javax.json.bind-api是JDK1.8版本,因此建议使用JDK1.8版本,但是使用JDK1.7版本也可以,不影响以下介绍的功能点。
2.1 POM依赖
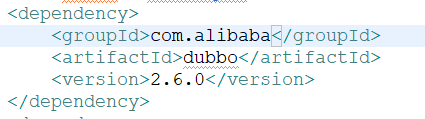
2.1.1 Dubbo依赖
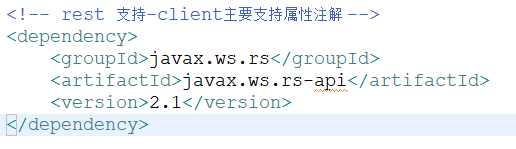
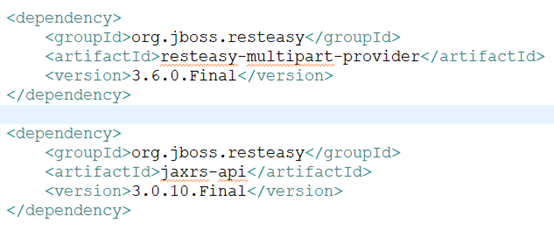
2.1.2 Resteasy依赖

2.2 接口暴露
2.2.1 服务协议配置
在dubbo_service.xml中增加dubbo:protocol name="rest"显式申明提供rest服务。

2.2.2 接口服务配置
同原有Dubbo服务一样,将Dubbo服务发布出来,需要使用<dubbo:service显式申明。

2.3 服务注解
所有在<dubbo:service显式申明提供服务的接口实现类(也可以加载接口中,设计原则建议放在实现类做具体操作)中,需要增加@Path注解。


如果某个dubbo服务显式进行了申明,但是没有增加@Path注解,否则会应用无法启动,并报错【RESTEASY003130: Class is not a root resource. It, or one of its interfaces must be annotated with @Path】
其原因是在于resteasy中定义扫描并加载哪些类,是由dubbo提供的,dubbo将所有显式申明的<dubbo:service都被扫描,如果某个类没有@Path则会报错
参考:https://blog.csdn.net/wtopps/article/details/76919008
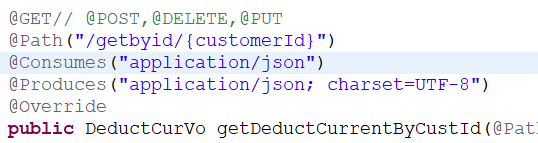
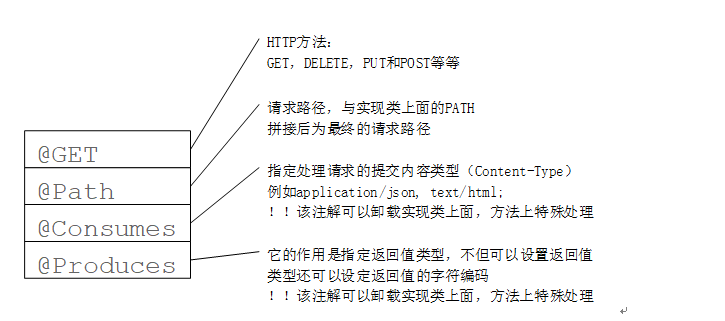
2.4 方法注解
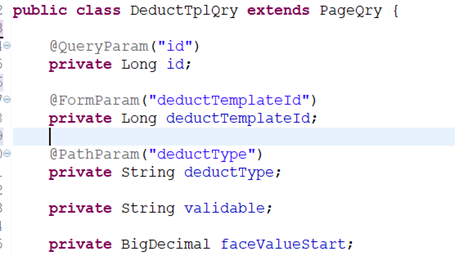
2.5 参数注解

l @PathParam -->url路径问号前的参数
请求路径:http://www.wjs.com/product/111/detail
Path路径:@Path(“product/{productCode}/detail”)
参数注解:detail(@PathParam(“productCode”) code){
l @QueryParam -->url路径问号后中的参数
请求路径:http://www.wjs.com/product/detail?productCode=111
Path路径:@Path(“product/detail”)
参数注解:detail(@QueryParam(“productCode”) code)
l @FormParam -->x-www.form-urlencoded参数
|
值 |
描述 |
|
application/x-www-form-urlencoded |
在发送前编码所有字符(默认) |
|
multipart/form-data |
不对字符编码。 在使用包含文件上传控件的表单时,必须使用该值。 |
通过Form表单提交的请求,需要区分是普通form表单(enctype=application/x-www-form-urlencoded),还是文件上传表单(enctype=multipart/form-data)。
普通表单可以在方法体中使用@FormParam注解,也可以在类的属性中使用@FormParam注解。文件表单,由于服务端获取到的是个文件六,不能在方法体中使用@FormParam注解,但是可以在MultipartForm注解的类中使用@FormParam注解。
l @BeanParam – 对象属性赋值
如果接收参数处理是个对象的话,可以使用@BeanParam注解对象获取参数
参数注解:pageListTemplate(@BeanParam DeductTplQry qry)
对象属性注解:
l @MultipartForm -- multipart/form-data表单参数
如果是文件上传,那么需要通过@MultipartForm注解获取对象参数
参数注解:upload(@MultipartForm DiskFile diskFile,
对象属性注解:

在这里需要注意的是,文件上传由于resteasy框架的缺陷,无法自动获取流中的文件名称,需要通过前端的form表单提供并传给后台。
l @Context
如果需要部分HTTP上下环境参数的话,例如request或者response的话,可以通过@Context注解获取。
参数注解:httparg(@Context HttpServletRequest request, @Context HttpServletResponse){
2.6 文件上传/下载
2.6.1 单个文件上传
单个文件上传,参考@ MultipartForm注解说明
2.6.2 多个文件上传
@MultipartForm不支持,使用MultipartFormDataInput的方式处理。
示例代码:
@POST
@Path("/uploadmulti")
@Consumes(MediaType.MULTIPART_FORM_DATA)
@Override
public Object uploadmulti(MultipartFormDataInput input) {
System.out.println("进入业务逻辑");
// MultipartFormDataReader
Map<String, List<InputPart>> uploadForm = input.getFormDataMap();
InputStream inputStream = null;
OutputStream outStream = null;
final String DIRCTORY = "D:/temp/datainputmulti/";
//取得文件表单名
try {
for (Iterator<Entry<String, List<InputPart>>> it = uploadForm.entrySet().iterator() ; it.hasNext() ;) {
Entry<String, List<InputPart>> entry = it.next();
List<InputPart> inputParts = entry.getValue();
initDirectory(DIRCTORY);
for (InputPart inputPart : inputParts) {
// 文件名称
String fileName = getFileName(inputPart.getHeaders());
inputStream = inputPart.getBody(InputStream.class, null);
//把文件流保存;
File file = new File(DIRCTORY + fileName);
intindex;
byte[] bytes = newbyte[1024];
outStream = new FileOutputStream(file);
while ((index = inputStream.read(bytes)) != -1) {
outStream.write(bytes, 0, index);
outStream.flush();
}
}
}
} catch (Exception e) {
e.printStackTrace();
}finally {
if(null != inputStream){
try {
inputStream.close();
} catch (IOException e) {
}
}
if(null != outStream){
try {
outStream.close();
} catch (IOException e) {
}
}
}
return Response.ok().build();
}
异常处理:文件名称获取乱码问题
MultipartFormDataInput的方式获取文件名称存在字符集乱码的问题,需要通过重新编译代码的方式解决。解决方式参考:https://www.cnblogs.com/loveyou/p/9529856.html
异常处理:
2.6.3 文件下载
文件下载,通过参数的@Context获取http Response,然后直接通过Response.outputstream往外面写流即可。
示例代码:
@GET
@Path("/download")
@Produces("application/json; charset=UTF-8")
@Override
publicvoid download(@QueryParam(value = "fileName") String fileName, @Context HttpServletRequest request, @Context HttpServletResponse response) {
InputStream in = null;
OutputStream out = null;
try {
fileName = "app.log";
String filePath = "D:\\logs\\manageplat\\" + fileName;
response.setHeader("content-disposition", "attachment;filename=" + URLEncoder.encode(fileName, "UTF-8"));
in = new FileInputStream(filePath); //获取文件的流
intlen = 0;
bytebuf[] = newbyte[1024];//缓存作用
out = response.getOutputStream();//输出流
while ((len = in.read(buf)) > 0) //切忌这后面不能加分号 ”;“
{
out.write(buf, 0, len);//向客户端输出,实际是把数据存放在response中,然后web服务器再去response中读取
}
} catch (Exception e) {
e.printStackTrace();
} finally {
if (in != null) {
try {
in.close();
} catch (IOException e) {
e.printStackTrace();
}
}
if (out != null) {
try {
out.close();
} catch (IOException e) {
e.printStackTrace();
}
}
}
3 封装
3.1 权限拦截
拦截器的配置,在Dubbo的protocol协议中的extension显式申明。

3.2 编码拦截
编码拦截在获得请求的时候进行处理,需要继承接口ContainerRequestFilter。
@Override
publicvoid filter(ContainerRequestContext requestContext) throws IOException {
System.err.println("进入请求拦截——filter");
// 编码处理
request.setCharacterEncoding(ENCODING_UTF_8);
response.setCharacterEncoding(ENCODING_UTF_8);
request.setAttribute(InputPart.DEFAULT_CHARSET_PROPERTY, ENCODING_UTF_8);
requestContext.setProperty(InputPart.DEFAULT_CHARSET_PROPERTY, ENCODING_UTF_8);
// 客户端head显示提醒不要对返回值进行封装
requestContext.setProperty("Not-Wrap-Result", requestContext.getHeaderString("Not-Wrap-Result") == null ? "" : requestContext.getHeaderString("Not-Wrap-Result"));
// 请求参数打印
logRequest(request);
}
3.3 异常处理
系统异常情况对异常结果进行封装,需要继承接口ExceptionMapper。
/**
* 异常拦截
*/
@Override
public Response toResponse(Exception e) {
// System.err.println("进入结果处理——toResponse");
String errMsg = e.getMessage();
JsonResult<Object> result = new JsonResult<>(false, StringUtils.isEmpty(errMsg)? "系统异常" : errMsg);
if(javax.ws.rs.ClientErrorException.class.isAssignableFrom(e.getClass())){
ClientErrorException ex = (ClientErrorException) e;
LOGGER.error("请求错误:" + e.getMessage());
returnex.getResponse();
}
if(einstanceof BaseException){
BaseException ex = (BaseException) e;
result.setData(ex.getErrorParams());
}
LOGGER.error(errMsg, e);
return Response.status(200).entity(result).build();
}
3.4 结果封装
对结果封装,需要继承WriterInterceptor, ContainerResponseFilter,对200状态码的结果进行封装处理,以及对异常状态码的结果进行封装处理。
@Override
publicvoid aroundWriteTo(WriterInterceptorContext context) throws IOException, WebApplicationException {
System.err.println("进入结果处理——aroundWriteTo");
// 针对需要封装的请求对结构进行封装处理。这里需要注意的是对返回类型已经是封装类(比如:异常处理器的响应可能已经是封装类型)时要忽略掉。
Object originalObj = context.getEntity();
String wrapTag = context.getProperty("Not-Wrap-Result") == null ? "" : context.getProperty("Not-Wrap-Result").toString(); // 客户端显示提醒不要对返回值进行封装
Boolean wraped = originalObjinstanceof JsonResult; // 已经被封装过了的,不用再次封装
if (StringUtils.isBlank(wrapTag) && !wraped){
JsonResult<Object> result = new JsonResult<>(true, "执行成功");
result.setData(context.getEntity());
context.setEntity(result);
// 以下两处set避免出现Json序列化的时候,对象类型不符的错误
context.setType(result.getClass());
context.setGenericType(result.getClass().getGenericSuperclass());
}
context.proceed();
}
@Override
publicvoid filter(ContainerRequestContext requestContext, ContainerResponseContext responseContext) throws IOException {
System.err.println("进入结果处理——filter");
// 它的目的是专门处理方法返回类型是 void,或者某个资源类型返回是 null 的情况,
// 这种情况下JAX-RS 框架一般会返回状态204,表示请求处理成功但没有响应内容。我们对这种情况也重新处理改为操作成功
String wrapTag = requestContext.getProperty("Not-Wrap-Result") == null ? "" : requestContext.getProperty("Not-Wrap-Result").toString(); // 客户端显示提醒不要对返回值进行封装
if (StringUtils.isBlank(wrapTag) &&responseContext.getStatus() == 204 && !responseContext.hasEntity()){
responseContext.setStatus(200);
responseContext.setEntity(new JsonResult<>(true, "执行成功"));
responseContext.getHeaders().add(HttpHeaders.CONTENT_TYPE, MediaType.APPLICATION_JSON);
}
3.5 客户端申明不对结果做封装
requestContext.getHeaderString("Not-Wrap-Result")
客户端请求的时候,增加header”Not-Wrap-Result”

 浙公网安备 33010602011771号