博客园的美化
博客样式的美化
虽然自己已经工作了两年多,平常的问题总结以及技术积累都统计在语雀文档内。 最近在博客园申请了一个博客地址,觉得博客本身自带的功能太过单一,于是乎,去网上论坛以及自己的一些想法去使自己的博客美化一些。废话不多说,撸起代码就是干,以下为博客增加的功能样式,有不足之处评论指点出来,共同讨论学习进步~~~以下为给博客添加的十几个小功能。
1.给鼠标点击样式添加爱心特效
在管理设置,博客侧边栏公告(支持HTML代码) (支持 JS 代码),添加如下代码
<script type="text/javascript">
    (function (window, document, undefined) {
        var hearts = [];
        window.requestAnimationFrame = (function () {
            return window.requestAnimationFrame ||
                window.webkitRequestAnimationFrame ||
                window.mozRequestAnimationFrame ||
                window.oRequestAnimationFrame ||
                window.msRequestAnimationFrame ||
                function (callback) {
                    setTimeout(callback, 1000 / 60);
                }
        })();
        init();
        function init() {
            css(
            ".heart{width: 10px;height: 10px;position: fixed;background: #f00;transform: rotate(45deg);-webkit-transform: rotate(45deg);-moz-transform: rotate(45deg);}.heart:after,.heart:before{content: '';width: inherit;height: inherit;background: inherit;border-radius: 50%;-webkit-border-radius: 50%;-moz-border-radius: 50%;position: absolute;}.heart:after{top: -5px;}.heart:before{left: -5px;}");
            attachEvent();
            gameloop();
        }

        function gameloop() {
            for (var i = 0; i < hearts.length; i++) {
                if (hearts[i].alpha <= 0) {
                    document.body.removeChild(hearts[i].el);
                    hearts.splice(i, 1);
                    continue;
                }
                hearts[i].y--;
                hearts[i].scale += 0.004;
                hearts[i].alpha -= 0.013;
                hearts[i].el.style.cssText = "left:" + hearts[i].x + "px;top:" + hearts[i].y + "px;opacity:" +
                    hearts[i].alpha + ";transform:scale(" + hearts[i].scale + "," + hearts[i].scale +
                    ") rotate(45deg);background:" + hearts[i].color;
            }
            requestAnimationFrame(gameloop);
        }

        function attachEvent() {
            var old = typeof window.onclick === "function" && window.onclick;
            window.onclick = function (event) {
                old && old();
                createHeart(event);
            }
        }

        function createHeart(event) {
            var d = document.createElement("div");
            d.className = "heart";
            hearts.push({
                el: d,
                x: event.clientX - 5,
                y: event.clientY - 5,
                scale: 1,
                alpha: 1,
                color: randomColor()
            });
            document.body.appendChild(d);
        }

        function css(css) {
            var style = document.createElement("style");
            style.type = "text/css";
            try {
                style.appendChild(document.createTextNode(css));
            } catch (ex) {
                style.styleSheet.cssText = css;
            }
            document.getElementsByTagName('head')[0].appendChild(style);
        }

        function randomColor() {
            return "rgb(" + (~~(Math.random() * 255)) + "," + (~~(Math.random() * 255)) + "," + (~~(Math.random() *
                255)) + ")";
        }
    })(window, document);
</script>
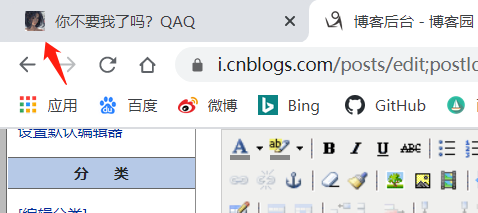
2.浏览器tab切换时标题进行更改
代码放在博客侧边栏公告(支持HTML代码) (支持 JS 代码)
<script>
    // 浏览器标题切换改变标题
    var OriginTitile = document.title;    // 保存之前页面标题
    var titleTime;
    document.addEventListener('visibilitychange', function(){
        if (document.hidden){
            document.title ='你不要我了吗?QAQ';
            clearTimeout(titleTime);
        }else{
            document.title = '~(o°ω°o) ';
            titleTime = setTimeout(function() {
                document.title = OriginTitile;
            }, 1000); // 2秒后恢复原标题
        }
    });
    </script>
3.给博客添加进度条progoss 显示
代码放在 页首 HTML 代码
<!DOCTYPE html>
<style type="text/css">
    * {
        margin: 0;
        padding: 0;
    }
    body {
        padding: 0px;
    }

    .test {
        width: 0px;
        height: 0px;
        background-color: #000;
        margin: 0px 0 0px 0px;
    }
</style>
</head>

<body>
    <div class="test"></div>
    <script>
        ;
        (function (w, d) {
            var domDiv = d.createElement('div');
            //修改domDiv的行内样式
            domDiv.style.cssText = 'position: fixed; top: 0; left: 0; width: 0; height: 7px;' +
                'box-shadow: 0 0 3px #999; background: -webkit-linear-gradient(left, red , blue );; z-index: 999999; -webkit-transition:width .3s linear;'
            //append是jquery的方法,dom对象的是appendchild();
            d.body.appendChild(domDiv);
            //domH:可视区域的高度
            var domH = w.innerHeight || d.documentElement.clientHeight || d.body.clientHeight;
            /**
             * [通过给window添加scroll事件实现了监控的作用。]
             * @param  {[type]} ){                var divsw         [description]
             * @param  {[type]} false      [冒泡阶段]
             * @return {[type]}            [description]
             * pageYOffset:滚到了视口顶部的高度。
             * document.body.offsetHeight:body的高度
             */
            w.addEventListener('scroll', function () {
                var divsw = domDiv.style.width = Math.round(pageYOffset / (d.body.offsetHeight - domH) *
                    100) + '%';
            }, false);
        })(window, document);
    </script>
</body>
</html>
<script type="text/javascript">
    var canShowAdsense = function () {
        return !!0
    };
</script>
<link href="https://cdn.bootcss.com/font-awesome/4.7.0/css/font-awesome.min.css" rel="stylesheet">
</link>
<script src="https://cdn.bootcss.com/animejs/2.0.2/anime.min.js"></script>
<script src="https://cdn.bootcss.com/emojify.js/1.1.0/js/emojify.min.js"></script>
<script>
    var _hmt = _hmt || [];
    (function () {
        var hm = document.createElement("script");
        hm.src = "https://hm.baidu.com/hm.js?74ea64bad6ab0292a2fd9a69fac161cc";
        var s = document.getElementsByTagName("script")[0];
        s.parentNode.insertBefore(hm, s);
    })();
</script>
4.在右上角添加github图标
代码放在 页首 HTML 代码
<!-- 添加github -->
<a href="https://github.com/FreedomOn/" title="我的github地址" target="_Blank" class="github-corner" aria-label="View source on Github"><svg width="80" height="80" viewBox="0 0 250 250" style="fill:#64CEAA; color:#fff; position: absolute; top: 0; border: 0; right: 0;" aria-hidden="true"><path d="M0,0 L115,115 L130,115 L142,142 L250,250 L250,0 Z"></path><path d="M128.3,109.0 C113.8,99.7 119.0,89.6 119.0,89.6 C122.0,82.7 120.5,78.6 120.5,78.6 C119.2,72.0 123.4,76.3 123.4,76.3 C127.3,80.9 125.5,87.3 125.5,87.3 C122.9,97.6 130.6,101.9 134.4,103.2" fill="currentColor" style="transform-origin: 130px 106px;" class="octo-arm"></path><path d="M115.0,115.0 C114.9,115.1 118.7,116.5 119.8,115.4 L133.7,101.6 C136.9,99.2 139.9,98.4 142.2,98.6 C133.8,88.0 127.5,74.4 143.8,58.0 C148.5,53.4 154.0,51.2 159.7,51.0 C160.3,49.4 163.2,43.6 171.4,40.1 C171.4,40.1 176.1,42.5 178.8,56.2 C183.1,58.6 187.2,61.8 190.9,65.4 C194.5,69.0 197.7,73.2 200.1,77.6 C213.8,80.2 216.3,84.9 216.3,84.9 C212.7,93.1 206.9,96.0 205.4,96.6 C205.1,102.4 203.0,107.8 198.3,112.5 C181.9,128.9 168.3,122.5 157.7,114.1 C157.9,116.9 156.7,120.9 152.7,124.9 L141.0,136.5 C139.8,137.7 141.6,141.9 141.8,141.8 Z" fill="currentColor" class="octo-body"></path></svg></a><style>.github-corner:hover .octo-arm{animation:octocat-wave 560ms ease-in-out}@keyframes octocat-wave{0%,100%{transform:rotate(0)}20%,60%{transform:rotate(-25deg)}40%,80%{transform:rotate(10deg)}}@media (max-width:500px){.github-corner:hover .octo-arm{animation:none}.github-corner .octo-arm{animation:octocat-wave 560ms ease-in-out}}</style>
<!-- 添加github   end -->
5.添加卡通人物
方法一::代码放在 页脚 HTML 代码
<script src="https://eqcn.ajz.miesnfu.com/wp-content/plugins/wp-3d-pony/live2dw/lib/L2Dwidget.min.js"></script>
<script>
  L2Dwidget.init({ "model": { jsonPath:
  "https://unpkg.com/live2d-widget-model-koharu@1.0.5/assets/koharu.model.json",
  "scale": 1 }, "display": { "position": "left", "width": 150, "height": 300,
  "hOffset": 0, "vOffset": -20 }, "mobile": { "show": true, "scale": 0.5 },
  "react": { "opacityDefault": 0.7, "opacityOnHover": 0.2 } });
</script>
方法二:代码放在侧边栏
<script src="https://cdn.jsdelivr.net/npm/jquery/dist/jquery.min.js"></script>
<link rel="stylesheet" href="https://cdn.jsdelivr.net/npm/font-awesome/css/font-awesome.min.css"/>
<script src="https://cdn.jsdelivr.net/gh/stevenjoezhang/live2d-widget/autoload.js"></script>
6.鼠标点击添加烟花效果
在页首html代码中添加下面一行代码就OK了
<!-- 添加烟花效果   start -->
<script src="https://blog-static.cnblogs.com/files/e-cat/cursor-effects.js"></script>
<!-- 添加烟花效果   end -->
7.图片放大效果
很多时候图片比较小,图片文字在博文中不是很清楚,这时候如果可以点击放大就很好了,推荐一个实现该功能的代码,放在【页脚Html代码】中,具体的代码如下
<!-- 图片放大效果 -->
<script type="text/javascript" src="https://blog-static.cnblogs.com/files/jajian/img.enlarge.js"></script>
<div id="outerdiv" style="text-align: center;position: fixed;z-index: 1000;top: 0;left: 0;
    width: 100%;height: 100%;background-color: rgba(255,255,255,.9);">
    <img id="bigimg" style="height: auto;width: 65%;border: 5px solid #7e8c8d;
        margin: auto;position: absolute;top: 0;bottom: 0;left: 0;right: 0;" src="" />
</div>
测试:
8.自动生成章节目录索引
一个好的博文除了博文的质量要好以外,好的组织结构也能让读者阅读的更加舒服与方便,我看园子里面有一些园友的博文都是分章节的,并且在博文的前面都带有章节的目录索引,点击索引之后会跳转到相应的章节阅读,并且还可以回到目录顶端。
使用方法:
登录到博客园之后,打开博客园的后台管理,切换到“设置”选项卡,将上面的代码,粘贴到 “页脚HTML代码” 区保存即可。
注意:上述js代码中提取的h2作为章节的标题,如果你的标题不是h2请在代码注释的地方自行修改。h3作为下一级的标题,该代码除了在文章的最开始生成目录索引之外,还会在每一个章节最后右下角(也就是下一个章节标题的右上角)会生成一个“回到顶部”的链接,以方便读者回到目录。
<script language="javascript" type="text/javascript">
// 生成目录索引列表
// ref: http://www.cnblogs.com/wangqiguo/p/4355032.html
// modified by: zzq
function GenerateContentList()
{
    var mainContent = $('#cnblogs_post_body');
    var h2_list = $('#cnblogs_post_body h2');//如果你的章节标题不是h2,只需要将这里的h2换掉即可

    if(mainContent.length < 1)
        return;

    if(h2_list.length>0)
    {
        var content = '<a name="_labelTop"></a>';
        content += '<div id="navCategory" style="color:#152e97;">';
        content += '<p style="font-size:18px;"><b>目录</b></p>';
        content += '<ul>';
        for(var i=0; i<h2_list.length; i++)
        {
            var go_to_top = '<div style="text-align: right;"><a href="#_labelTop" style="color:#f68a33">回到顶部</a><a name="_label' + i + '"></a></div>';
            $(h2_list[i]).before(go_to_top);

            var h3_list = $(h2_list[i]).nextAll("h3");
            var li3_content = '';
            for(var j=0; j<h3_list.length; j++)
            {
                var tmp = $(h3_list[j]).prevAll('h2').first();
                if(!tmp.is(h2_list[i]))
                    break;
                var li3_anchor = '<a name="_label' + i + '_' + j + '"></a>';
                $(h3_list[j]).before(li3_anchor);
                li3_content += '<li><a href="#_label' + i + '_' + j + '">' + $(h3_list[j]).text() + '</a></li>';
            }

            var li2_content = '';
            if(li3_content.length > 0)
                li2_content = '<li><a href="#_label' + i + '">' + $(h2_list[i]).text() + '</a><ul>' + li3_content + '</ul></li>';
            else
                li2_content = '<li><a href="#_label' + i + '">' + $(h2_list[i]).text() + '</a></li>';
            content += li2_content;
        }
        content += '</ul>';
        content += '</div><p> </p>';
        content += '<hr style="height:1px;border:none;border-top:1px dashed #0066CC;"/>';
        if($('#cnblogs_post_body').length != 0 )
        {
            $($('#cnblogs_post_body')[0]).prepend(content);
        }
    }
}

GenerateContentList();
</script>
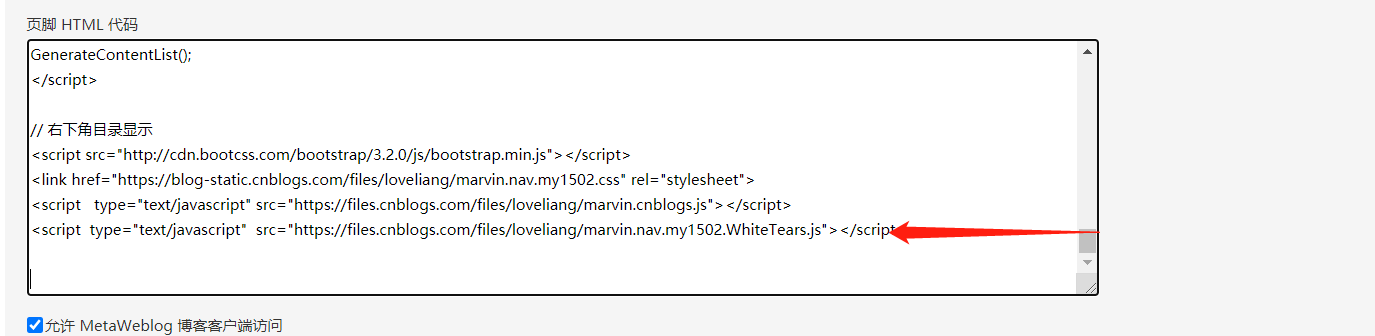
9.自动添加底部侧边栏博文目录
代码文件 https://blog-static.cnblogs.com/files/WhiteTears/marvin.nav.my1502.css https://blog-static.cnblogs.com/files/WhiteTears/marvin.cnblogs.js https://blog-static.cnblogs.com/files/WhiteTears/marvin.nav.my1502.WhiteTears.js
操作说明:第一个文件为样式、第二个文件事实上不是博文目录代码文件,而是后面的版权声明(可不要),第三个文件为生成目录的函数实现。使用的时候将这三个文件下载下来,下载方法为【右键】-【另存为】-【保存】,文件名默认即可。然后进入博客,选择【管理】-【文件】-【上传文件】,将三个文件上传自自己的博客,记录文件地址。然后将以下代码复制到“页脚HTML代码”栏:
10 自定义地址栏logo
准备一个icon类型的文件
打开这个网站:在线ico图标制作,然后上传自己的图片(jpg,png),就可以download一个icon图标了。
上传准备好的icon文件
进入自己的博客后台管理->文件->选择文件->上传,然后点击已上传的文件,copy这个文件的网络地址
添加脚本
进入自己的博客园->设置,将以下JavaScript代码添加到“页脚Html代码”
将下面icon的网络路径替换为自己的上传的icon的网络地址
<script type="text/javascript" language="javascript">
  //Setting ico for cnblogs
  var linkObject = document.createElement('link');
  linkObject.rel = "shortcut icon";
  linkObject.href = "icon的网络路径";
  document.getElementsByTagName("head")[0].appendChild(linkObject);
</script>
11 跟随鼠标移动线条
设置方式是在博客的“管理-->设置”,然后在设置中的页脚HTML代码中添加如下代码
<script>
    ! function () {
        function n(n, e, t) {
            return n.getAttribute(e) || t
        }
        function e(n) {
            return document.getElementsByTagName(n)
        }
        function t() {
            var t = e("script"),
                o = t.length,
                i = t[o - 1];
            return {
                l: o,
                z: n(i, "zIndex", -1),
                o: n(i, "opacity", .5),
                c: n(i, "color", "0,0,0"),
                n: n(i, "count", 99)
            }
        }
        function o() {
            a = m.width = window.innerWidth || document.documentElement.clientWidth || document.body.clientWidth,
            c = m.height = window.innerHeight || document.documentElement.clientHeight || document.body.clientHeight
        }
        function i() {
            r.clearRect(0, 0, a, c);
            var n, e, t, o, m, l;
            s.forEach(function (i, x) {
                    for (i.x += i.xa, i.y += i.ya, i.xa *= i.x > a || i.x < 0 ? -1 : 1, i.ya *= i.y > c || i.y < 0 ?
                        -1 : 1, r.fillRect(i.x - .5, i.y - .5, 1, 1), e = x + 1; e < u.length; e++) n = u[e],
                        null !== n.x && null !== n.y && (o = i.x - n.x, m = i.y - n.y,
                        l = o * o + m * m, l < n.max && (n === y && l >= n.max / 2 && (i.x -= .03 * o, i.y -=
                                    .03 * m),
                                t = (n.max - l) / n.max, r.beginPath(), r.lineWidth = t / 2, r.strokeStyle =
                                "rgba(" + d.c + "," + (t + .2) + ")", r.moveTo(i.x, i.y), r.lineTo(n.x, n.y), r
                                .stroke()))

                }),
                x(i)
        }
        var a, c, u, m = document.createElement("canvas"),
            d = t(),
            l = "c_n" + d.l,
            r = m.getContext("2d"),
            x = window.requestAnimationFrame || window.webkitRequestAnimationFrame || window.mozRequestAnimationFrame ||
            window.oRequestAnimationFrame || window.msRequestAnimationFrame ||
            function (n) {
                window.setTimeout(n, 1e3 / 45)

            },
            w = Math.random,
            y = {
                x: null,
                y: null,
                max: 2e4
            };
        m.id = l, m.style.cssText = "position:fixed;top:0;left:0;z-index:" + d.z + ";opacity:" + d.o, e("body")[0]
            .appendChild(m), o(), window.onresize = o,
            window.onmousemove = function (n) {
                n = n || window.event, y.x = n.clientX, y.y = n.clientY
            },
            window.onmouseout = function () {
                y.x = null, y.y = null
            };
        for (var s = [], f = 0; d.n > f; f++) {
            var h = w() * a,
                g = w() * c,
                v = 2 * w() - 1,
                p = 2 * w() - 1;
            s.push({
                x: h,
                y: g,
                xa: v,
                ya: p,
                max: 6e3
           })
        }
        u = s.concat([y]),
            setTimeout(function () {
                i()
            }, 100)
    }();
</script>
12 自定义鼠标样式
第一步 选择自己喜爱的鼠标样式 进行下载下来
第二步 鼠标图标大小设置 推荐32x32(推荐网址) http://www.bitbug.net/
第三步 将准备好的图标文件上传到博客园后台文件当中,点击文件,可获取图片的网络地址
第四步 在css样式中设置代码
/*鼠标样式*/
body {
cursor: url("你的地址"), auto;
}
a:hover { cursor:url("你的地址"),auto;}#header:before
参考
本文是参考各位博客园前辈的文章来进行改善的,各位博格园地址为:
https://www.cnblogs.com/jajian/p/9763946.html
https://www.jianshu.com/p/eb66825d6808#--
https://www.cnblogs.com/enjoy233/default.html?page=2
https://www.cnblogs.com/asxinyu/p/4344153.html
https://www.cnblogs.com/WhiteTears/p/8824544.html
https://www.cnblogs.com/jackson0714/p/BeautifyBlog_04.html
https://www.cnblogs.com/Sharley/p/9603129.html
https://www.cnblogs.com/zwfymqz/p/9670607.html#_label2

 浙公网安备 33010602011771号