postman具体讲解
postman 简单教程-实现简单的接口测试
最近开始做接口测试了,因为公司电脑刚好有postman,于是就用postman来做接口测试,哈哈哈哈,。。。postman 功能蛮强大的,还比较好用,下面说下postman如何来测试接口
1.下载postman插件,网址http://chromecj.com/web-development/2014-09/60/download.html
2.chrom 浏览器设置中-更多工具-扩展程序中找到postman插件,找到postman,点击启动按钮,打开postman

3.postman页面详细介绍
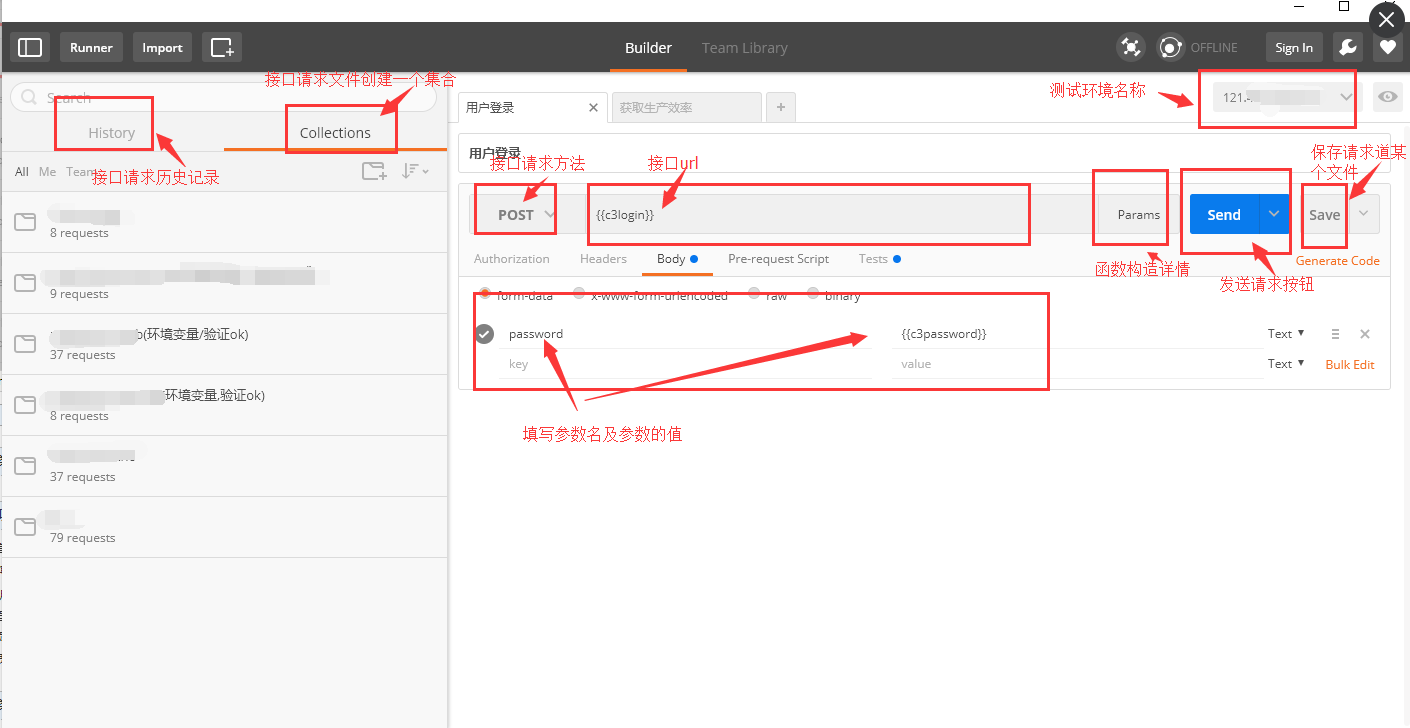
4.postman 实现简单的post请求
a.填写url
b.body中天下参数名及参数值
c.点击send按钮
d.查看返回的结果数据与预期是否一致

嗯,接口测试就是这么简单,下一篇,我们开始讲postman的环境变量和如何引用postman中上一次请求返回的值
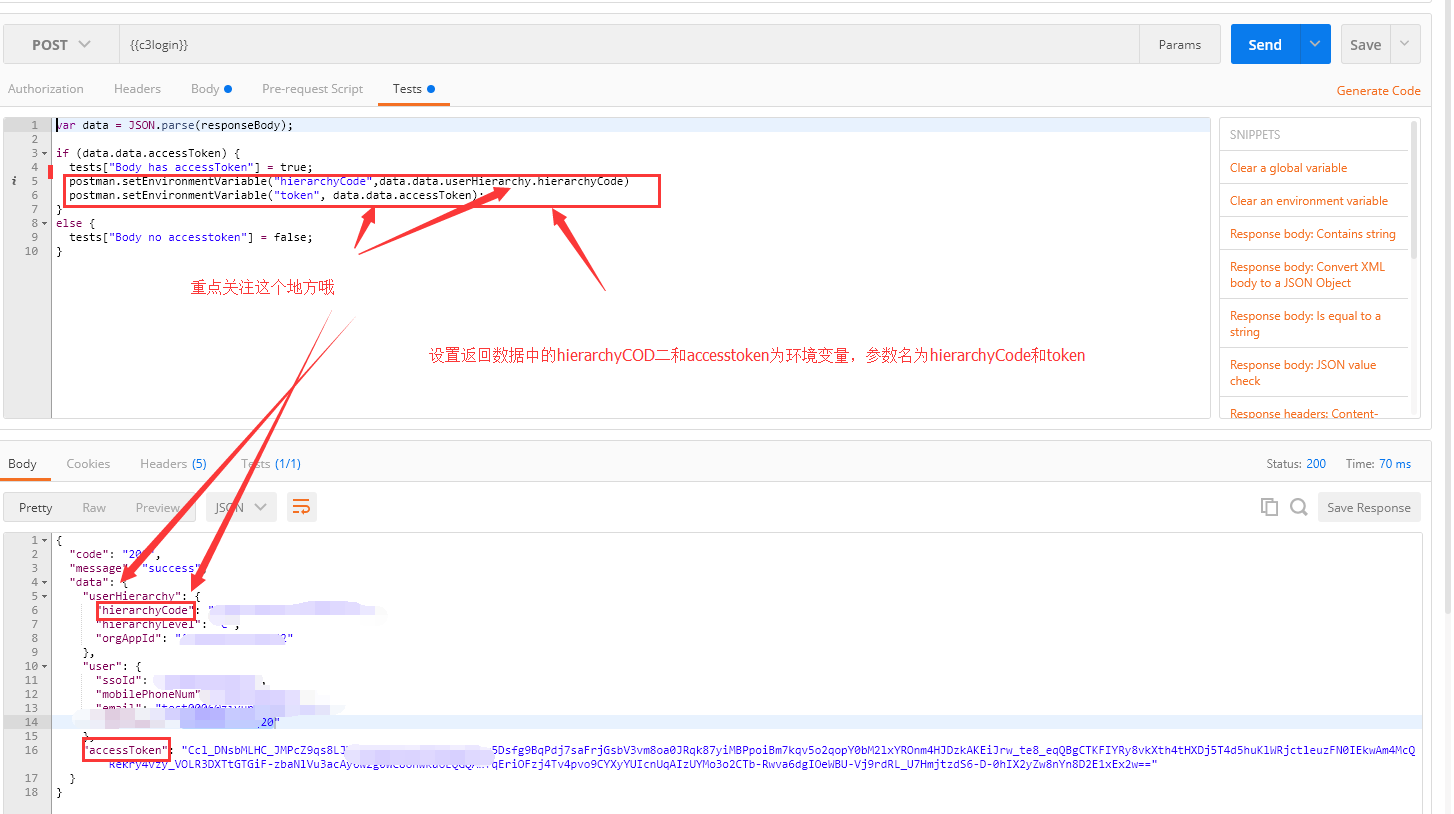
postman简单教程,如何在请求中引用上次请求返回的值
做接口测试,一定会遇到这种情况,需要拿上次请求的值在本次请求中使用,比如,我们去测试一个东西,要去登录才能做其他的操作,需要拿到登录返回数据中的某些字段,比如,token啊等。。。
如果发一次请求,就去粘贴复制一次,,会很伐木累。。。,而且token 有时候还会过期,每次都要再操作一次,再粘贴复制,真的真的好伐木累,。。。本君不会说,70多个接口,我真的是每次都手动粘贴复制,真的很伐木累啊;所以在请求中引用上次请求返回的值真的很必要!!!!下面开始讲如何引用上次请求的值,需要结合上篇文章我们讲的环境变量来实现,直接上栗子讲吧,,
1,先发送登录,查看需要引用的返回值
2、postman -tests模块中设置需要引用的值为环境变量
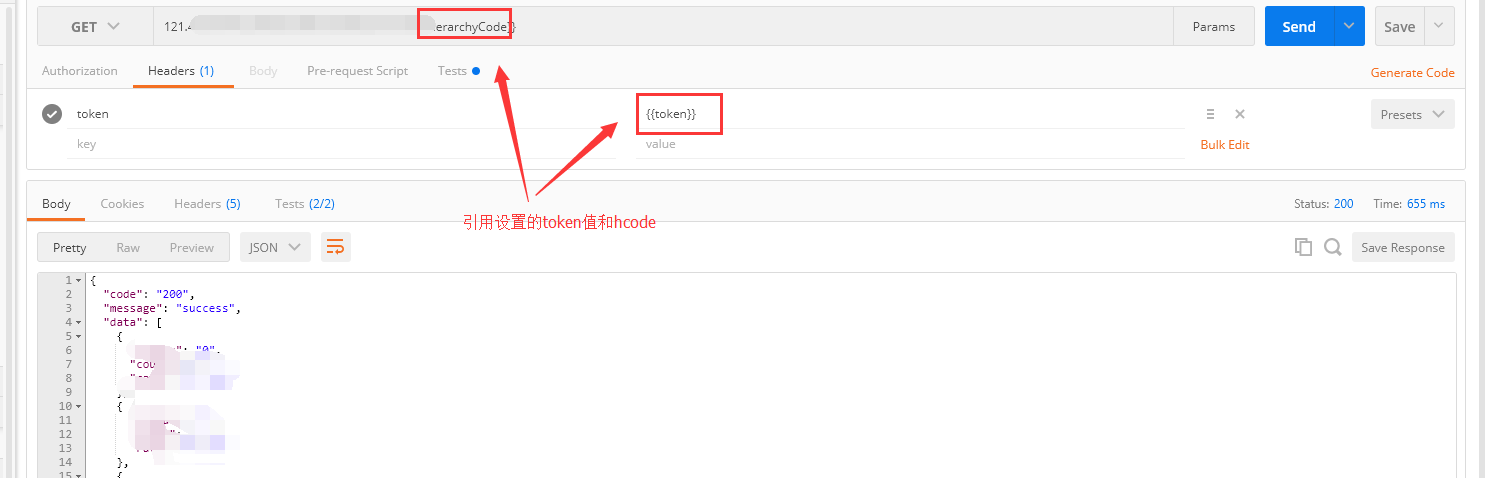
3.下一个请求中引用我们设置的环境变量
大概就是这样,蛮简单 的,大家学起来,学起来,下一章开始写如何判断接口是pass还是failed,postman的tests模块
postman简单教程,使用tests模块来验证接口时是否通过
接口测试醉重要的就是返回数据的检查,一个简单的接口,我们可以肉眼检查返回数据,但接口一旦多起来且复杂,每次的检查都会很费劲,此时我们就需要postman 的tests模块来代替
概念:
test验证方式:
内置脚本说明:
1. 清除一个全局变量
     Clear a global variable
    对应脚本:
    postman.clearGlobalVariable("variable_key");
    参数:需要清除的变量的key

2.清除一个环境变量
    Clear an environment variable
    对应脚本:
    postman.clearEnvironmentVariable("variable_key");
    参数:需要清除的环境变量的key

3.response包含内容
    Response body:Contains string
    对应脚本:
    tests["Body matches string"] =responseBody.has("string_you_want_to_search");
    参数:预期内容

4.将xml格式的response转换成son格式
    Response body:Convert XML body to a JSON Object
    对应脚本:
    var jsonObject = xml2Json(responseBody);
    参数:(默认不需要设置参数,为接口的response)需要转换的xml

5.response等于预期内容
    Response body:Is equal to a string
    对应脚本:
    tests["Body is correct"] = responseBody === "response_body_string";
    参数:预期response

6.json解析key的值进行校验
    Response body:JSON value check
    对应脚本:
    tests["Args key contains argument passed as url parameter"] = 'test' in responseJSON.args
    参数:test替换被测的值,args替换被测的key

7.检查response的header信息是否有被测字段
    Response headers:Content-Type header check
    对应脚本:
    tests["Content-Type is present"] = postman.getResponseHeader("Content-Type");
    参数:预期header

8.响应时间判断
    Response time is less than 200ms
    对应脚本:
    tests["Response time is less than 200ms"] = responseTime < 200;
    参数:响应时间

9.设置全局变量
      Set an global variable
      对应脚本:
      postman.setGlobalVariable("variable_key", "variable_value");
      参数:全局变量的键值

10.设置环境变量
      Set an environment variable
      对应脚本:
      postman.setEnvironmentVariable("variable_key", "variable_value");
      参数:环境变量的键值

11.判断状态码
      Status code:Code is 200
      对应脚本:
      tests["Status code is 200"] = responseCode.code != 400;
      参数:状态码

12.检查code name 是否包含内容
      Status code:Code name has string
      对应脚本:
      tests["Status code name has string"] = responseCode.name.has("Created");
      参数:预期code name包含字符串

13.成功的post请求
      Status code:Successful POST request
      对应脚本:
      tests["Successful POST request"] = responseCode.code === 201 || responseCode.code === 202;

14.微小验证器
       Use Tiny Validator for JSON data
       对应脚本:
        var schema = {
         "items": {
         "type": "boolean"
             }
         };
        var data1 = [true, false];
        var data2 = [true, 123];
        console.log(tv4.error);
        tests["Valid Data1"] = tv4.validate(data1, schema);
        tests["Valid Data2"] = tv4.validate(data2, schema);
        参数:可以修改items里面的键值对来对应验证json的参数

 浙公网安备 33010602011771号