


安装与环境
【golang】下载:https://studygolang.com/dl
下载安装完成后打开cmd,输入go version显示当前版本即安装完成
[GOROOT和GOPATH]
其中GOPATH已经设置好了默认为C:\Users\Administrator\go,环境变量已自动配置E:\go\bin,需要设置GOROOT(就是GO的安装路径,我是E:\go),在cmd中输入set GOROOT=E:\go即可
[gomod] cmd命令行输入
go env -w GO111MODULE=on
go env -w GOPROXY=https://goproxy.cn,direct
可用 go env 命令查看已设置的环境变量,Goproxy用的Goproxy中国的镜像,这样下载第三方库就不会被墙了。启用了 go module需要在cmd进入项目目录下输入go mod init 项目名,会生成一个go.mod文件
【git】下载第三方库需要用到git,下载地址 https://git-scm.com/
安装选择路径之后一路Next,完毕后打开cmd输入git version出现版本号即可
【IDE】选择Vscode
上官网下载最新版的vscode:https://code.visualstudio.com/
vscode设置中文:按ctrl+shift+p,输入Configure Display Language,选择Zh-cn
vscode设置颜色主题:文件 -> 首选项 -> 颜色主题 -> Dark+(default dark)
vscode设置字体配置:文件 -> 首选项 -> 设置 -> 文本编辑器 -> 字体 (Font Family:Consolas, '微软雅黑', monospace)(Font Size:18)(Font Weight:1000)
vscode安装Go语言扩展:左侧菜单栏中选择扩展,输入go,安装(如已设置GOPATH和GOROOT情况下仍报错则重启电脑),编辑一个GO文件,右键出现格式化文档即可。格式化文档会弹出扩展安装询问,直接Install All。或ctrl+shift+p,输入go install/update tools,17个全部勾上一起下载
【第三方库】假设下载iris框架,在cmd输入go get -u github.com/kataras/iris,然后在go文件中import
IDE骚操作
【生成函数单元测试】main.go选中函数,按下Ctrl+Shift+P 输入Generate Unit Tests For Function

生成的main_test.go
package main

import "testing"

func Test_jian(t *testing.T) {
	type args struct {
		a int
		b int
	}
	tests := []struct {
		name string
		args args
		want int
	}{
		// TODO: Add test cases.

	}
	for _, tt := range tests {
		t.Run(tt.name, func(t *testing.T) {
			if got := jian(tt.args.a, tt.args.b); got != tt.want {
				t.Errorf("jian() = %v, want %v", got, tt.want)
			}
		})
	}
}
【自动填充struct项】这里 // TODO: 可以手动填充该struct,像这样
// TODO: Add test cases.
{
	name: "",
	args: args{
		a: 100,
		b: 40,
	},
	want: 60,
},
也可以用命令自动填充,各项值为各类型默认初始值,需手动修改
{
        // TODO: Add test cases.
        {
                //此处按Ctrl + Shift + P 用 Fill Struct命令填充,需要先写好两侧{}
        }
}
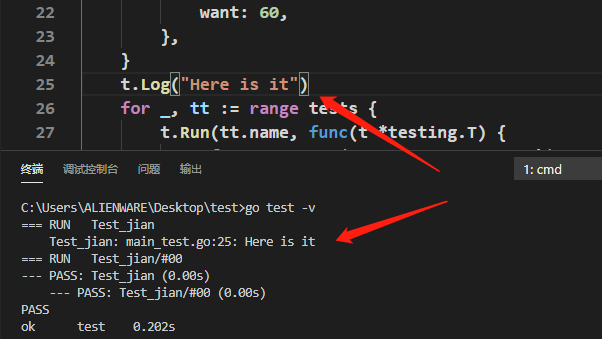
其中若要加上t.log("此处打印"),但go test命令打印不了,需要go test -v才能打印
【自动实现接口】go文件里先写interface和struct
package vscodeshow

// User 用户信息
type User interface {
	// GetName 获取用户姓名
	GetName() string
	// GetAge 获取用户年龄
	GetAge() int
}

// Student 学生
type Student struct {
	Name string
	Age int
}
然后光标移动到下面空行,按 Ctrl + Shift + P,用 Generate Interface Stubs 命令,需要写两个参数:第一个是 s *Student 第二个是你要实现的接口 vscodeshow.User,中间用空格隔开

IDE会自动生成 func 代码,连带注释一起。再单独写各 func 内业务逻辑就好,很方便
package vscodeshow

// User 用户信息
type User interface {
	// GetName 获取用户姓名
	GetName() string
	// GetAge 获取用户年龄
	GetAge() int
}

// Student 学生信息
type Student struct {
	Name string
	Age int
}

// GetName 获取用户姓名
func (s *Student) GetName() string {
	panic("not implemented") // TODO: Implement
}

// GetAge 获取用户年龄
func (s *Student) GetAge() int {
	panic("not implemented") // TODO: Implement
}
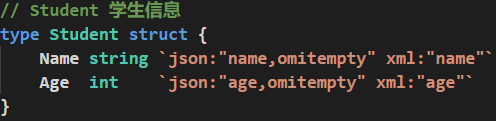
【为struct添加/删除tag】选中struct,按 Ctrl + Shift + P,用 Add Tags To Struct Fields 命令添加tag,用 Remove Tags From Struct Fields 删除tag
添加tag
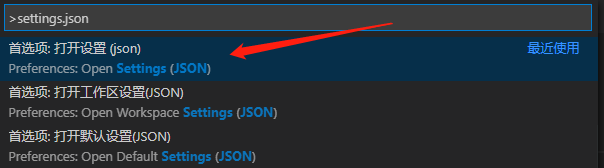
若要添加自定义tag,在commands中输入settings.json,选择打开设置
添加代码
"go.addTags": {
     // 添加tag时同时添加多个tag
        "tags": "json,xml",

     // 不要omitempty可以写作"options": "json=",
        "options": "json=omitempty",

        "promptForTags": false,

     // snakecase驼峰命名时中间用下划线隔开,如 MyName string `json:"my_name,omitempty" xml:"name"`
     // camelcase驼峰命名时首字母小写,如 MyName string `json:"myName,omitempty" xml:"name"
     "transform": "snakecase"
}
【右键常用命令】按 Ctrl + Shift + P,输入settings.json,选择打开设置
添加代码,根据自己的需要添加命令和命令的开启关闭,保存之后重启vscode就生效了
"go.editorContextMenuCommands": {
        "toggleTestFile": true,
        "fillStruct": true,
        "addTags": true,
        "removeTags": true,
        "testAtCursor": false,
        "testFile": false,
        "testPackage": false,
        "generateTestForFunction": false,
        "generateTestForFile": false,
        "generateTestForPackage": false,
        "addImport": true,
        "testCoverage": false,
        "playground": false,
        "debugTestAtCursor": false
}
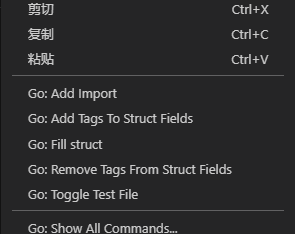
效果
【自定义快捷键】按 Ctrl + Shift + P,输入snippets 配置用户代码片段,选Go


{
	// Place your snippets for go here. Each snippet is defined under a snippet name and has a prefix, body and
	// description. The prefix is what is used to trigger the snippet and the body will be expanded and inserted. Possible variables are:
	// $1, $2 for tab stops, $0 for the final cursor position, and ${1:label}, ${2:another} for placeholders. Placeholders with the
	// same ids are connected.
	// Example:
	// "Print to console": {
	// 	"prefix": "log",
	// 	"body": [
	// 		"console.log('$1');",
	// 		"$2"
	// 	],
	// 	"description": "Log output to console"
	// }

     // 敲下pln选定Enter会直接出现fmt.Println(),光标落在括号里
	"println":{
		"prefix": "pln",
		"body":"fmt.Println($0)",
		"description": "println"
	},
	"printf":{
		"prefix": "plf",
		"body": "fmt.Printf(\"$0\")",
		"description": "printf"
	}
}

基本语法 - 变量与常量
【变量的来历】程序运行时的数据都储存在内存中,直接写内存地址来操作数据可读性很差(比如代码通篇都是0x0700609c这样的写法,还能很快分清谁是谁吗),现在有个东西也可以借助内存地址操作这些数据,这个东西就是变量,我们只用为变量取个方便记的名字就好了。但是有些名字不能取,包括25个关键字和37个保留字
【变量的声明】
单个变量声明
var s int = 42    // 可读性最强,用于重要变量
var s = 42         // 介于两者之间
s := 42             // 最方便,用于很随意的变量
多个变量一起声明
var (
	a int
	b string
	c = "xixi"
	d = 123
)
注:其中for语句里面不能用var声明,直接用 := 就好
for i := 0; i < 10; i++ {

}
如果定义了变量不赋值,那么变量会被赋予一个默认值
string    类型的[零值]是  一个空字符串,长度为0
int       类型的[零值]是  0
bool      类型的零值]是   false
指针       类型的[零值]是  nil
匿名变量
_ = append(s1, 6) // 如果有声明了不想用又不得不用的变量可以赋值给它,这个特殊变量不可读取,不占用命名空间,不会分配内存。
【常量及声明】常量是恒定不变的值,多用于定义程序运行期间不会改变的那些值。
单个常量声明
const pi = 3.1415
const e = 2.7182
多个常量同时声明
const (
    pi = 3.1415
    e = 2.7182
)
const同时声明多个常量时,如果省略了值则表示和上面一行的值相同。 例如:
const (
    n1 = 100   // n1值为100
    n2      // n2值为100
    n3      // n3值为100
)
【特殊常量iota】只能在常量的表达式中使用。
常规用法
const (
    n1 = iota       //0
    n2              //1
    n3              //2
    n4              //3
)
特殊用法
// ====== 使用 _ 跳过某些值 ======
const (
	n1 = iota      //0
	n2              //1
	_               //
	n4              //3
)

// ====== iota声明中间插队 ======
const (
        n1 = iota    //0
        n2 = 100     //100
        n3 = iota    //2
        n4           //3
)
const n5 = iota      //0

// ====== 多个iota定义在一行 ======
const (
	a, b = iota + 1, iota + 2    //1,2
	c, d                         //2,3
	e, f                         //3,4
)
基本语法 - 变量类型
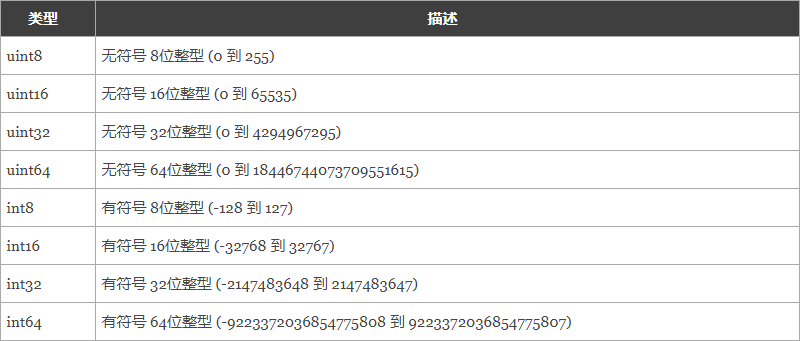
【整型】

【浮点型】float32和float64
【byte和rune类型】byte是uint8类型,代表了ASCII码的一个字符;rune是int32类型,代表一个 UTF-8字符。
// 遍历字符串
func traversalString() {
	s := "hello沙河"

     // byte遍历
	for i := 0; i < len(s); i++ {
		fmt.Printf("%v(%c) ", s[i], s[i])  // %v输出ascii码,%c输出对应字符
	}
	fmt.Println()

     // rune遍历
	for _, r := range s {
		fmt.Printf("%v(%c) ", r, r)
	}
	fmt.Println()
}
结果
104(h) 101(e) 108(l) 108(l) 111(o) 230(æ) 178(²) 153() 230(æ) 178(²) 179(³)
104(h) 101(e) 108(l) 108(l) 111(o) 27801(沙) 27827(河)
UTF8编码下一个中文汉字由3~4个字节组成,所以我们不能简单的按照字节去遍历一个包含中文的字符串
【uintptr】
【字符串型】Go 语言里的字符串的内部实现使用UTF-8编码。字符串不可直接修改
多行字符串
s1 := `第一行
第二行
第三行
`
fmt.Println(s1)
Go语言中要定义一个多行字符串时,就必须使用反引号字符。所有的转义字符均无效,文本将会原样输出。
字符串的修改,需根据情况将 string 转换为 []byte 或 []rune,然后再转换为 string
func changeString() {
	s1 := "big"     // 英文字符串
	// 强制类型转换
	byteS1 := []byte(s1)
	byteS1[0] = 'p'
	fmt.Println(string(byteS1))

	s2 := "白萝卜"    // 中文字符串用rune[]
	runeS2 := []rune(s2)
	runeS2[0] = '红'
	fmt.Println(string(runeS2))
}
【Bool值】只有 true 和 false 两个值
【复数】complex64和complex128
【复合类型】指针类型、数组类型、结构体类型、Channel类型、函数类型、切片类型、接口类型(interface)、Map类型
基本语法 - 运算符
【算术运算符】
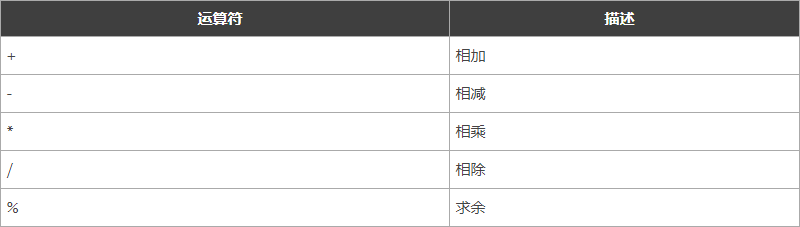
注意: ++(自增)和 --(自减)在Go语言中是单独的语句,并不是运算符。
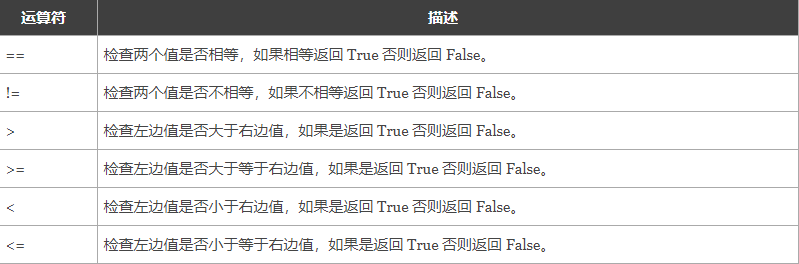
【关系运算符】
【逻辑运算符】

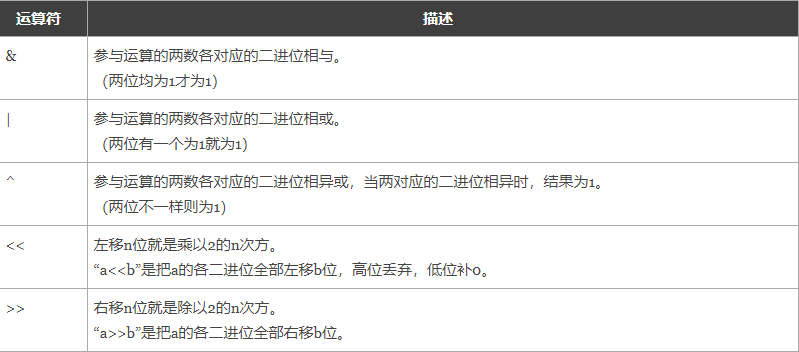
【位运算符】
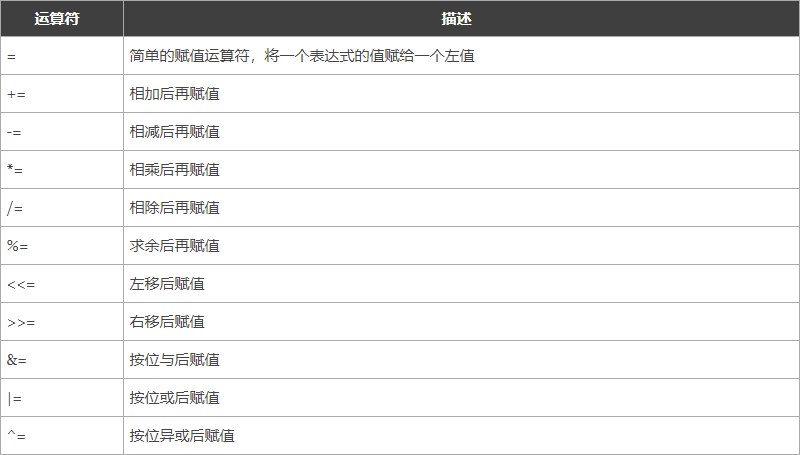
【赋值运算符】
基本语法 - 分支循环
【条件语句:if语句】
// if 语句
var a = 19
if a < 10 {
	fmt.Println("small")
}
结果:

// if else语句
if a < 10 {
	fmt.Println("small")
} else {
	fmt.Println("big")
}
结果:big

// if else if 语句
if a < 10 {
	fmt.Println("small")
} else if a < 20{
	fmt.Println("big")
}
结果:big
if 的特殊用法
if res, err := test(); err != nil {
    // TODO:
}
可以先执行一个语句,再跟一个if条件判断句
【条件语句:switch语句】
// 一般用途
switch {
	case a < 10:
		fmt.Println("小于10")
	case a < 20:
		fmt.Println("小于20")
	default:
		fmt.Println("大于20")
}
结果:小于20

// 用来判断 interface 类型
var x interface{}

switch i := x.(type) {
	case nil:
		fmt.Println(i)
	case int:
		fmt.Println("int")
	default:
		fmt.Println("未知")
}
结果:<nil>
fallthrough语法可以执行满足条件的case的下一个case,是为了兼容C语言中的case设计的。
func switchDemo5() {
	s := "a"
	switch {
	case s == "a":
		fmt.Println("a")
		fallthrough
	case s == "b":
		fmt.Println("b")
	case s == "c":
		fmt.Println("c")
	default:
		fmt.Println("...")
	}
}
结果:
a
b
【条件语句:select语句】
package main

import "fmt"

var ch1 = make(chan int)
var ch2 = make(chan int)

func c2() {
	i :=<- ch2
	fmt.Println(i)
}

func main() {

	go c2()

	select {
	case num :=<- ch1:  // 由于没有往ch1中写入任何数据,该条不会执行
		fmt.Println(num)
	case ch2 <- 1:    // 在 c2() 被拉起来之前,该条也不会执行,因为是无缓冲channel
		fmt.Println("已将1发送到ch2")
	// default:
	// 	fmt.Println("没有case执行")
	}
	fmt.Println("check select")
}
结果:
每个 case 都必须是一个通信,如果任意某个通信可以进行,它就执行,其他被忽略。
如果有多个 case 都可以运行,Select 会随机公平地选出一个执行。其他不会执行。
如果没有case语句能执行,则执行 default 语句。如果没有 default 子句,select 将阻塞,直到某个通信可以运行
【循环语句:for语句】
// 一般写法
for i := 0; i < 10; i++ {
	fmt.Println(i)
}

// 省略初始语句,但要再之前声明并赋值
i := 0
for ; i < 10; i++ {
	fmt.Println(i)
}

// 只留条件判断句
i := 0
for i < 10 {
	fmt.Println(i)
	i++
}
无限循环
for {
    // TODO:
}
for range
// 遍历数组
var a = [9]int{1, 2, 3, 4, 5, 6, 7, 8, 9}
for k, v := range a {
	fmt.Println(k, v)
}

// 遍历切片
var s = []int{1,2,3,4,5}
for k, v := range s {
	fmt.Println(k, v)
}

// 遍历map
var m = map[int]string{
	90: "优秀",
	80: "良好",
	60: "及格",
}
for k, v := range m {
	fmt.Println(k, v)
}

// 遍历channel
ch := make(chan int, 5)
for i := 0; i < 5; i++ {
	ch <- i
}
for v := range ch {
	fmt.Println(v)
}

// 遍历字符串
str := "caonima"
for k, v := range str {
	fmt.Println(k, v)
}
【终止循环语句:break语句】
break语句可以结束for、switch和select的代码块。
break语句还可以在语句后面添加标签,表示退出某个标签对应的代码块,标签要求必须定义在对应的for、switch和 select的代码块上。 举个例子:
func breakDemo1() {
BREAKDEMO1:
	for i := 0; i < 10; i++ {
		for j := 0; j < 10; j++ {
			if j == 2 {
				break BREAKDEMO1
			}
			fmt.Printf("%v-%v\n", i, j)
		}
	}
	fmt.Println("...")
}
【终止循环语句:continue语句】
continue语句可以结束当前循环,开始下一次的循环迭代过程,仅限在for循环内使用。
在 continue语句后添加标签时,表示开始标签对应的循环。例如:
func continueDemo() {
forloop1:
	for i := 0; i < 5; i++ {
		// forloop2:
		for j := 0; j < 5; j++ {
			if i == 2 && j == 2 {
				continue forloop1
			}
			fmt.Printf("%v-%v\n", i, j)
		}
	}
}
【终止循环语句:goto语句】
goto语句通过标签进行代码间的无条件跳转。
func gotoDemo2() {
	for i := 0; i < 10; i++ {
		for j := 0; j < 10; j++ {
			if j == 2 {
				// 设置退出标签
				goto breakTag
			}
			fmt.Printf("%v-%v\n", i, j)
		}
	}
	return
	// 标签
breakTag:
	fmt.Println("结束for循环")
}

 浙公网安备 33010602011771号