Nacos深入浅出(二)
如果你的服务已经能正常跑起来,个人建议可以先感受下nacos的魅力,也就是怎么使用吧
直接上代码
@Controller
@NacosPropertySource(dataId = "springboot2-nacos-config", autoRefreshed = true)
public class HealthController {


    @NacosValue(value = "${nacos.test.propertie:123}", autoRefreshed = true)
    private String testProperties;

    @ResponseBody
    @GetMapping("/nacos/test")
    public String test(){
        return testProperties;
    }

    @ResponseBody
    @RequestMapping(value = "/readiness", method = RequestMethod.GET)
    public Object readiness(HttpServletRequest request) {
        boolean isConfigReadiness = true;
        boolean isNamingReadiness = false;

        if (isConfigReadiness && isNamingReadiness) {
            return ResponseEntity.ok().body("OK");
        }

        if (!isConfigReadiness && !isNamingReadiness) {
            return ResponseEntity.status(500).body("Config and Naming are not in readiness");
        }

        if (!isConfigReadiness) {
            return ResponseEntity.status(500).body("Config is not in readiness");
        }

        return ResponseEntity.status(500).body("Naming is not in readiness");
    }
}
我们直接用postman请求下,直接返回结果了,

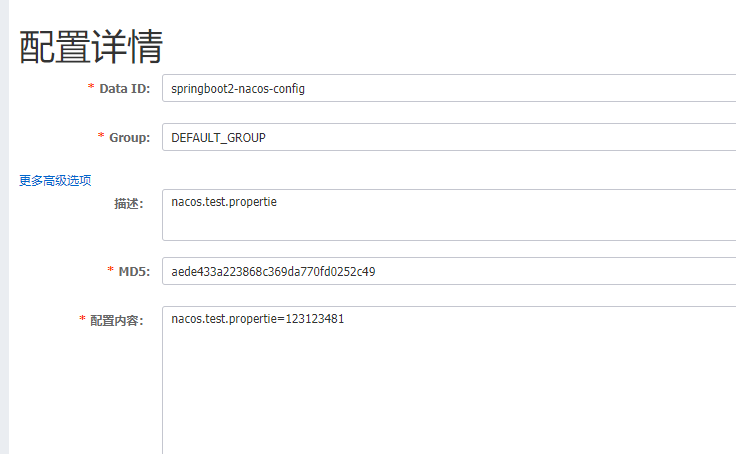
我们在nacos中的相关配置如下:
这样我就很方便的把我们需要的值取过来了,而且不是通过DB,cache方式获取,而是在远程nacos中配置,我们能够实时获取的到;
那么问题就来了,nacos是怎么做到的呢,当然nacos的功能远不止于此;
我们就根据这个作为一个最直观的入口,跟下代码:
在nacos中发布的操作
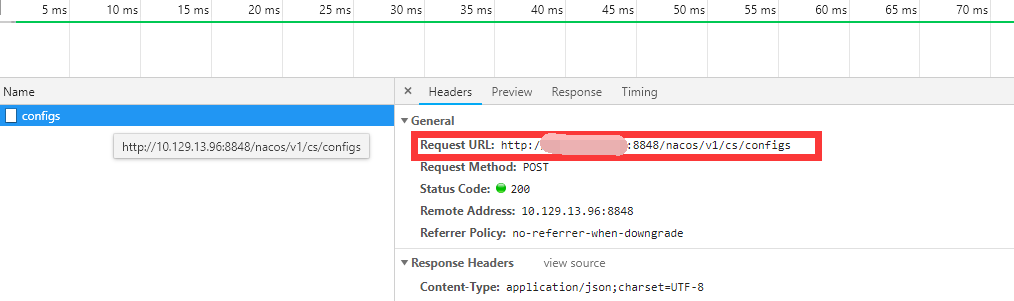
找代码v1/cs/configs,当然再试的时候可以找V1/CS
Constants.java
public static final String BASE_PATH = "/v1/cs";
public static final String CONFIG_CONTROLLER_PATH = BASE_PATH + "/configs";
/**
     * 增加或更新非聚合数据。
     *
     * @throws NacosException
     */
    @RequestMapping(method = RequestMethod.POST)
    @ResponseBody
    public Boolean publishConfig(HttpServletRequest request, HttpServletResponse response,
                                 @RequestParam("dataId") String dataId, @RequestParam("group") String group,
                                 @RequestParam(value = "tenant", required = false, defaultValue = StringUtils.EMPTY)
                                     String tenant,
                                 @RequestParam("content") String content,
                                 @RequestParam(value = "tag", required = false) String tag,
                                 @RequestParam(value = "appName", required = false) String appName,
                                 @RequestParam(value = "src_user", required = false) String srcUser,
                                 @RequestParam(value = "config_tags", required = false) String configTags,
                                 @RequestParam(value = "desc", required = false) String desc,
                                 @RequestParam(value = "use", required = false) String use,
                                 @RequestParam(value = "effect", required = false) String effect,
                                 @RequestParam(value = "type", required = false) String type,
                                 @RequestParam(value = "schema", required = false) String schema)
        throws NacosException {
        final String srcIp = RequestUtil.getRemoteIp(request);
        String requestIpApp = RequestUtil.getAppName(request);
        // 参数校验
        ParamUtils.checkParam(dataId, group, "datumId", content);
        ParamUtils.checkParam(tag);

        Map<String, Object> configAdvanceInfo = new HashMap<String, Object>(10);
        if (configTags != null) {
            configAdvanceInfo.put("config_tags", configTags);
        }
        if (desc != null) {
            configAdvanceInfo.put("desc", desc);
        }
        if (use != null) {
            configAdvanceInfo.put("use", use);
        }
        if (effect != null) {
            configAdvanceInfo.put("effect", effect);
        }
        if (type != null) {
            configAdvanceInfo.put("type", type);
        }
        if (schema != null) {
            configAdvanceInfo.put("schema", schema);
        }
        ParamUtils.checkParam(configAdvanceInfo);
         // 白名单
        if (AggrWhitelist.isAggrDataId(dataId)) {
            log.warn("[aggr-conflict] {} attemp to publish single data, {}, {}",
                RequestUtil.getRemoteIp(request), dataId, group);
            throw new NacosException(NacosException.NO_RIGHT, "dataId:" + dataId + " is aggr");
        }

        final Timestamp time = TimeUtils.getCurrentTime();
        String betaIps = request.getHeader("betaIps");
        ConfigInfo configInfo = new ConfigInfo(dataId, group, tenant, appName, content);

        if (StringUtils.isBlank(betaIps)) {
            if (StringUtils.isBlank(tag)) {
                // 插入或者更新
                persistService.insertOrUpdate(srcIp, srcUser, configInfo, time, configAdvanceInfo, false);
                // 发布事件
                EventDispatcher.fireEvent(new ConfigDataChangeEvent(false, dataId, group, tenant, time.getTime()));
            } else {
                persistService.insertOrUpdateTag(configInfo, tag, srcIp, srcUser, time, false);
                EventDispatcher.fireEvent(new ConfigDataChangeEvent(false, dataId, group, tenant, tag, time.getTime()));
            }
        } else { // beta publish
            persistService.insertOrUpdateBeta(configInfo, betaIps, srcIp, srcUser, time, false);
            EventDispatcher.fireEvent(new ConfigDataChangeEvent(true, dataId, group, tenant, time.getTime()));
        }
        ConfigTraceService.logPersistenceEvent(dataId, group, tenant, requestIpApp, time.getTime(),
            LOCAL_IP, ConfigTraceService.PERSISTENCE_EVENT_PUB, content);

        return true;
    }
就从这个controller去做分析,其实核心一下就能看出来就是一个insertOrUpdate,一个fireEvent;
insertorUpdate这个nacos没有用mybatis、hibernate这些ORM框架(减少依赖耦合吧);
下方高能!!!!!!!!!!!!!!!!!!!!!!!!!!
直接用jdbcTemblate就行数据插入,大家在进行debug的时候注意下,jdbcTemplate中有个事务超时时间,
nacos中有两种模板,
 private JdbcTemplate jt;
 private TransactionTemplate tjt;
这个他都设置了默认超时时间(还有另外一个地方一个3秒一个5秒,建议大家在DEBUG的时候把这个时间调大一点,300,,500^_^)
BasicDataSourceServiceImpl.java
 @PostConstruct
    public void init() {
        queryTimeout = NumberUtils.toInt(System.getProperty("QUERYTIMEOUT"), 300);
        jt = new JdbcTemplate();
        /**
         *  设置最大记录数,防止内存膨胀
         */
        jt.setMaxRows(50000);
        jt.setQueryTimeout(queryTimeout);

        testMasterJT = new JdbcTemplate();
        testMasterJT.setQueryTimeout(queryTimeout);

        testMasterWritableJT = new JdbcTemplate();
        /**
         * 防止login接口因为主库不可用而rt太长
         */
        testMasterWritableJT.setQueryTimeout(1);
        /**
         * 数据库健康检测
         */
        testJTList = new ArrayList<JdbcTemplate>();
        isHealthList = new ArrayList<Boolean>();

        tm = new DataSourceTransactionManager();
        tjt = new TransactionTemplate(tm);
        /**
         *  事务的超时时间需要与普通操作区分开
         */
        tjt.setTimeout(TRANSACTION_QUERY_TIMEOUT);
        if (!STANDALONE_MODE || PropertyUtil.isStandaloneUseMysql()) {
            try {
                reload();
            } catch (IOException e) {
                e.printStackTrace();
                throw new RuntimeException(DB_LOAD_ERROR_MSG);
            }

            TimerTaskService.scheduleWithFixedDelay(new SelectMasterTask(), 10, 10,
                TimeUnit.SECONDS);
            TimerTaskService.scheduleWithFixedDelay(new CheckDBHealthTask(), 10, 10,
                TimeUnit.SECONDS);
        }
    }
看下config_info的表结构,他这边判断更新的依据就是直接插入,
捕获唯一索引的异常,data_id+group+tenant重复的话就会抛出异常,捕获这个异常进行更新操作!
表结构

persistService.insertOrUpdate
 /**
     * 写入主表,插入或更新
     */
    public void insertOrUpdate(String srcIp, String srcUser, ConfigInfo configInfo, Timestamp time,
                               Map<String, Object> configAdvanceInfo, boolean notify) {
        try {
            addConfigInfo(srcIp, srcUser, configInfo, time, configAdvanceInfo, notify);
        } catch (DataIntegrityViolationException ive) { // 唯一性约束冲突
            updateConfigInfo(configInfo, srcIp, srcUser, time, configAdvanceInfo, notify);
        }
    }
后面就是最核心的地方了
EventDispatcher.fireEvent(new ConfigDataChangeEvent(false, dataId, group, tenant, time.getTime()));
通过event的dispatcher,进行相应的操作,这个就是观察者模式的体现,Apollo中也有类似的操作;
篇幅过长,这里就不再追加了,看下一篇吧^_^
没有什么比每天有成长进步更高兴的事情

 浙公网安备 33010602011771号