通知栏的使用
创建自定义的通知栏
package com.loaderman.notificationdemo;
import android.app.Notification;
import android.app.NotificationManager;
import android.app.PendingIntent;
import android.content.Context;
import android.content.Intent;
import android.graphics.Color;
import android.os.Bundle;
import android.support.v4.app.NotificationCompat;
import android.support.v7.app.AppCompatActivity;
import android.widget.RemoteViews;
public class MainActivity extends AppCompatActivity {
@Override
protected void onCreate(Bundle savedInstanceState) {
super.onCreate(savedInstanceState);
setContentView(R.layout.activity_main);
//自定义布局
showCustomizeNotification();
showDefaultNotification();
}
//自定义显示的通知 ,创建RemoteView对象
private void showCustomizeNotification() {
int icon = R.drawable.logo;
NotificationCompat.Builder builder = new NotificationCompat.Builder(this);
PendingIntent contentIntent = PendingIntent.getActivity
(MainActivity.this, 0, new Intent("android.settings.SETTINGS"), 0);
builder.setAutoCancel(true)
.setDefaults(Notification.DEFAULT_ALL)
.setWhen(System.currentTimeMillis())
.setSmallIcon(icon) //不设置出不来效果
.setDefaults(Notification.DEFAULT_LIGHTS | Notification.DEFAULT_SOUND)
.setContentIntent(contentIntent)
.setContentInfo("Info");
// 1、创建一个自定义的消息布局 view.xml
// 2、在程序代码中使用RemoteViews的方法来定义image和text。然后把RemoteViews对象传到contentView字段
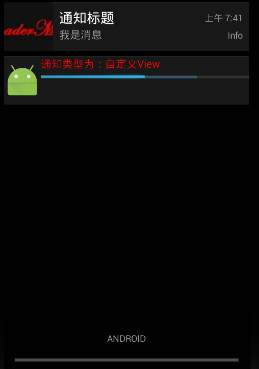
RemoteViews remoteView = new RemoteViews(this.getPackageName(), R.layout.notification);
remoteView.setImageViewResource(R.id.image, R.mipmap.ic_launcher);
remoteView.setTextViewText(R.id.text, "通知类型为:自定义View");
remoteView.setTextColor(R.id.text, Color.RED);
builder.setContent(remoteView);
// 3、为Notification的contentIntent字段定义一个Intent(注意,使用自定义View不需要setLatestEventInfo()方法)
//点击后启动Settings模块
NotificationManager mnotiManager = (NotificationManager) getSystemService(Context.NOTIFICATION_SERVICE);
mnotiManager.notify(0, builder.build());
}
// 默认显示的的Notification
private void showDefaultNotification() {
// 定义Notication的各种属性
int icon = R.drawable.logo;
Intent intent = new Intent(this, MainActivity.class);
PendingIntent contentIntent = PendingIntent.getActivity(this, 0, intent, PendingIntent.FLAG_UPDATE_CURRENT);
NotificationCompat.Builder builder = new NotificationCompat.Builder(this);
builder.setAutoCancel(true)
.setDefaults(Notification.DEFAULT_ALL)
.setWhen(System.currentTimeMillis())
.setSmallIcon(icon)
.setTicker("Hearty365")
.setContentTitle("通知标题")
.setContentText("我是消息")
.setDefaults(Notification.DEFAULT_LIGHTS | Notification.DEFAULT_SOUND)
.setContentIntent(contentIntent)
.setContentInfo("Info");
NotificationManager notificationManager = (NotificationManager) this.getSystemService(Context.NOTIFICATION_SERVICE);
notificationManager.notify(1, builder.build());
}
private void removeNotification() {
NotificationManager mNotificationManager = (NotificationManager) getSystemService(Context.NOTIFICATION_SERVICE);
// 取消的只是当前Context的Notification
mNotificationManager.cancel(2);
}
}
notification.xml
<?xml version="1.0" encoding="utf-8"?>

<RelativeLayout xmlns:android="http://schemas.android.com/apk/res/android"
                android:layout_width="fill_parent"
                android:layout_height="fill_parent"
                android:orientation="horizontal">

    <ImageView
        android:id="@+id/image"
        android:src="@mipmap/ic_launcher"
        android:layout_width="wrap_content"
        android:layout_height="fill_parent"/>

    <TextView
        android:id="@+id/text"
        android:text="dasdsadsad"
        android:layout_width="match_parent"
        android:layout_height="wrap_content"
        android:layout_toRightOf="@+id/image"
      />

    <ProgressBar
        android:id="@+id/progress_horizontal"
        style="?android:attr/progressBarStyleHorizontal"
        android:layout_width="fill_parent"
        android:layout_height="wrap_content"
        android:layout_below="@+id/text"
        android:layout_toRightOf="@+id/image"
        android:max="100"
        android:progress="50"
        android:secondaryProgress="75"/>


</RelativeLayout>
效果图:
最后,关注【码上加油站】微信公众号后,有疑惑有问题想加油的小伙伴可以码上加入社群,让我们一起码上加油吧!!!

 浙公网安备 33010602011771号