Apache安装配置详解(Win平台下)

@

1.官方下载

http://httpd.apache.org/
官网不提供经过编译的软件,只提供源码
http://www.apachehaus.com/cgi-bin/download.plx 官方推荐的编译版本

2.安装过程

http://blog.sina.com.cn/s/blog_439248a10101c13s.html
套件 appserv和wamp和phpStudy 和XAMPP

2.2.22安装过程

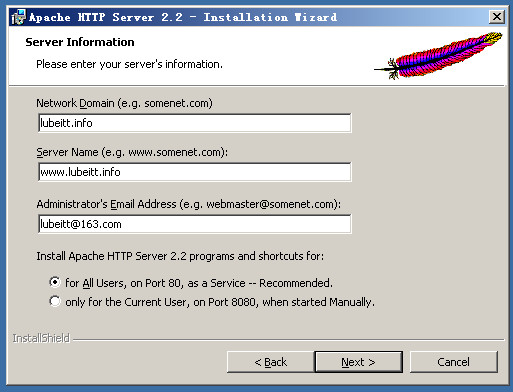
以下三项应该是可以随便填写。会出现在httpd.conf中

在这里插入图片描述
![在这里插入图片描述]( https://img-blog.csdnimg.cn/20190221162748385.png?x-oss-process=image/watermark ,type_ZmFuZ3poZW5naGVpdGk,shadow_10,text_aHR0cHM6Ly9ibG9nLmNzZG4ubmV0L251eHNlYw==,size_16,color_FFFFFF,t_70)
http://localhost/
http://127.0.0.1/
http://192.168.1.102/ 由于是桥接,IP会变
3种都可以访问,安装成功。所以第一个图片中并没有什么用

2.2.31安装过程

已经发生变化
http://blog.csdn.net/wetoto/article/details/49839429
http://jingyan.baidu.com/article/29697b912f6539ab20de3cf8.html

3. 配置过程

1.启动和关闭

进程名字httpd.exe
3种方式关闭和启动Apche http server
①服务中
②apache moniter中
③命令行下(切换到apache的bin目录下或者添加环境变量)
httpd -k shutdown
httpd -k restart
httpd -k start
httpd -k stop

2.端口配置

netstat -an 查看端口
netstat -anb

更改端口httpd.conf中46行。可以同时监听多个端口。

3.目录结构

![在这里插入图片描述]( https://img-blog.csdnimg.cn/20190221162924197.png?x-oss-process=image/watermark ,type_ZmFuZ3poZW5naGVpdGk,shadow_10,text_aHR0cHM6Ly9ibG9nLmNzZG4ubmV0L251eHNlYw==,size_16,color_FFFFFF,t_70)

4.虚拟目录

在这里插入图片描述
![在这里插入图片描述]( https://img-blog.csdnimg.cn/20190221162955914.png?x-oss-process=image/watermark ,type_ZmFuZ3poZW5naGVpdGk,shadow_10,text_aHR0cHM6Ly9ibG9nLmNzZG4ubmV0L251eHNlYw,size_16,color_FFFFFF,t_70)
1.添加代码
![在这里插入图片描述]( https://img-blog.csdnimg.cn/20190221163014114.png?x-oss-process=image/watermark ,type_ZmFuZ3poZW5naGVpdGk,shadow_10,text_aHR0cHM6Ly9ibG9nLmNzZG4ubmV0L251eHNlYw
,size_16,color_FFFFFF,t_70)
2.注释179行的DocumentRoot 默认路径

3.设置欢迎页面

到底用不用注释documentroot 不注释也没有关系

5.权限设置

比较绕

6.虚拟主机

![在这里插入图片描述]( https://img-blog.csdnimg.cn/20190221163114345.png?x-oss-process=image/watermark ,type_ZmFuZ3poZW5naGVpdGk,shadow_10,text_aHR0cHM6Ly9ibG9nLmNzZG4ubmV0L251eHNlYw==,size_16,color_FFFFFF,t_70)

7.整合php

![在这里插入图片描述]( https://img-blog.csdnimg.cn/20190221163133688.png?x-oss-process=image/watermark ,type_ZmFuZ3poZW5naGVpdGk,shadow_10,text_aHR0cHM6Ly9ibG9nLmNzZG4ubmV0L251eHNlYw,size_16,color_FFFFFF,t_70)
![在这里插入图片描述]( https://img-blog.csdnimg.cn/20190221163142156.png?x-oss-process=image/watermark ,type_ZmFuZ3poZW5naGVpdGk,shadow_10,text_aHR0cHM6Ly9ibG9nLmNzZG4ubmV0L251eHNlYw
,size_16,color_FFFFFF,t_70)
![在这里插入图片描述]( https://img-blog.csdnimg.cn/20190221163152429.png?x-oss-process=image/watermark ,type_ZmFuZ3poZW5naGVpdGk,shadow_10,text_aHR0cHM6Ly9ibG9nLmNzZG4ubmV0L251eHNlYw==,size_16,color_FFFFFF,t_70)

在这里插入图片描述
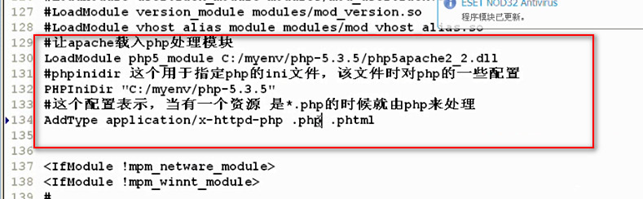
LoadModule php5_module C:/myenv/php5.4.8/php5apache2_2.dll
PHPIniDir "C:/myenv/php5.4.8"

AddType application/x-httpd-php .htm .php .phtml

在这里插入图片描述
extension_dir = "C:/myenv/php5.4.8/ext"

测试

成功

8.安装mysql

![在这里插入图片描述]( https://img-blog.csdnimg.cn/2019022116331450.png?x-oss-process=image/watermark ,type_ZmFuZ3poZW5naGVpdGk,shadow_10,text_aHR0cHM6Ly9ibG9nLmNzZG4ubmV0L251eHNlYw==,size_16,color_FFFFFF,t_70)
密码
root
toor
允许远程连接
测试代码

9.安装phpmyadmin

在这里插入图片描述
在这里插入图片描述

10.绑定多个域名

第一种:虚拟主机中配置不同的端口监听
![在这里插入图片描述]( https://img-blog.csdnimg.cn/20190221163416605.png?x-oss-process=image/watermark ,type_ZmFuZ3poZW5naGVpdGk,shadow_10,text_aHR0cHM6Ly9ibG9nLmNzZG4ubmV0L251eHNlYw,size_16,color_FFFFFF,t_70)
第二种
![在这里插入图片描述]( https://img-blog.csdnimg.cn/20190221163431420.png?x-oss-process=image/watermark ,type_ZmFuZ3poZW5naGVpdGk,shadow_10,text_aHR0cHM6Ly9ibG9nLmNzZG4ubmV0L251eHNlYw
,size_16,color_FFFFFF,t_70)
DirectoryIndex index.html index.htm index.php
http://www.cnblogs.com/zxjyuan/p/3581480.html 一个主机配多个域名

ServerName kuigg.com
ServerAlias  www.kuigg.com  abc.kuigg.com

http://www.cnblogs.com/hi-bazinga/archive/2012/04/23/2466605.html 此文中的基于域名的必须去掉空行,否则报错

<VirtualHost *:80>
    ServerAdmin lubeitt@163.com
    DocumentRoot "D:/www/wordpress"
    ServerName www.lubeitt.info
    ErrorLog "logs/dummy-host.lubeitt.info-error.log"
    CustomLog "logs/dummy-host.lubeitt.info-access.log" common
	<Directory "D:/www/wordpress">
		Options Indexes FollowSymLinks
		AllowOverride None
		Order allow,deny
		Allow from all
	</Directory>
</VirtualHost>
posted @ 2019-07-05 16:36  lnxcode  阅读(340)  评论(0)    收藏  举报