
spark实验六SparkStreaming
1.安装 Flume
Flume 是 Cloudera 提供的一个分布式、可靠、可用的系统,它能够将不同数据源的海量
日志数据进行高效收集、聚合、移动,最后存储到一个中心化数据存储系统中。Flume 的
核心是把数据从数据源收集过来,再送到目的地。请到 Flume 官网下载 Flume1.7.0 安装文
件,下载地址如下:
下载后,把 Flume1.7.0 安装到 Linux 系统的“/usr/local/flume”目录下,具体安装和使
用方法可以参考教程官网的“实验指南”栏目中的“日志采集工具 Flume 的安装与使用方
法”。
- 使用 Avro 数据源测试 Flume
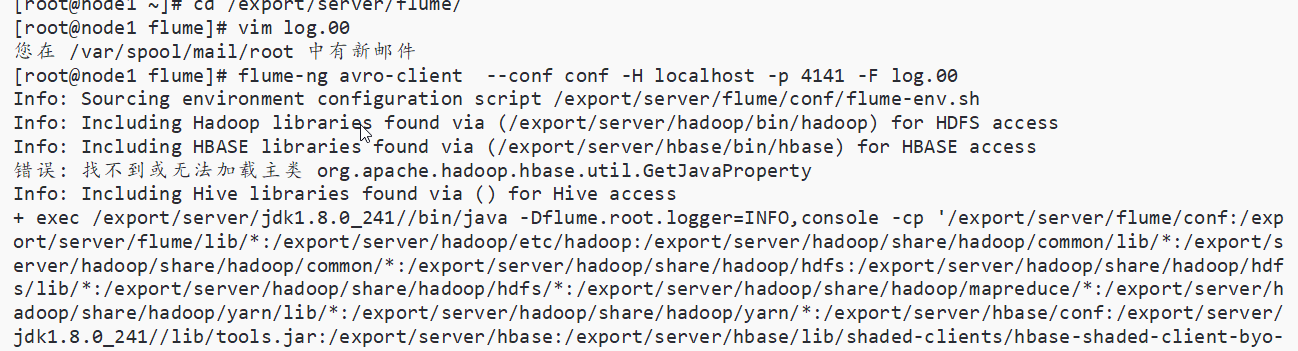
Avro 可以发送一个给定的文件给 Flume,Avro 源使用 AVRO RPC 机制。请对 Flume
的相关配置文件进行设置,从而可以实现如下功能:在一个终端中新建一个文件
helloworld.txt(里面包含一行文本“Hello World”),在另外一个终端中启动 Flume 以后,
可以把 helloworld.txt 中的文本内容显示出来。
(1)创建agent配置文件

a1.sources = r1
a1.sinks = k1
a1.channels = c1
# Describe/configure the source
a1.sources.r1.type = avro
a1.sources.r1.channels = c1
a1.sources.r1.bind = 0.0.0.0
a1.sources.r1.port = 4141
#注意这个端口名,在后面的教程中会用得到
# Describe the sink
a1.sinks.k1.type = logger
# Use a channel which buffers events in memory
a1.channels.c1.type = memory
a1.channels.c1.capacity = 1000
a1.channels.c1.transactionCapacity = 100
# Bind the source and sink to the channel
a1.sources.r1.channels = c1
a1.sinks.k1.channel = c1
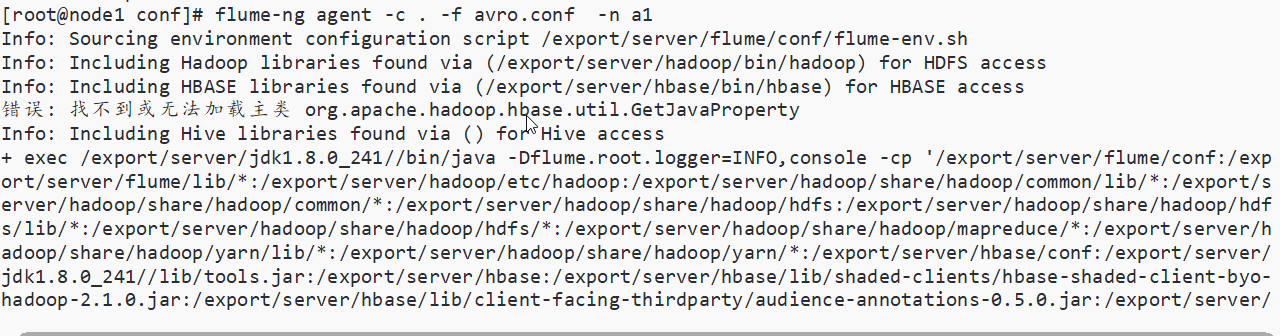
(2)启动 flume agent a1
(3)创建指定文件输出到agent

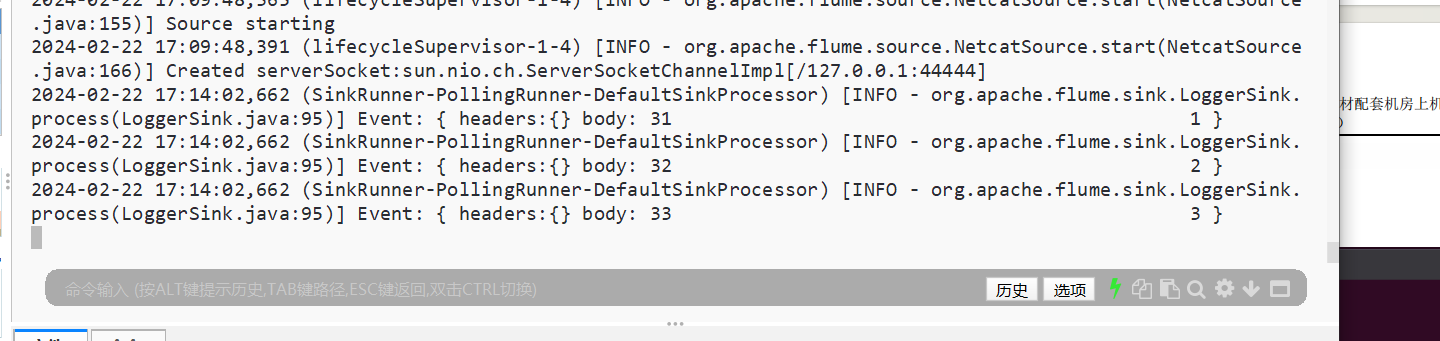
- 使用 netcat 数据源测试 Flume
请对 Flume 的相关配置文件进行设置,从而可以实现如下功能:在一个 Linux 终端(这
里称为“Flume 终端”)中,启动 Flume,在另一个终端(这里称为“Telnet 终端”)中,
输入命令“telnet localhost 44444”,然后,在 Telnet 终端中输入任何字符,让这些字符可以
顺利地在 Flume 终端中显示出来。
(1)编写conf配置文件
#example.conf: A single-node Flume configuration
# Name the components on this agent
a1.sources = r1
a1.sinks = k1
a1.channels = c1
# Describe/configure the source
a1.sources.r1.type = netcat
a1.sources.r1.bind = localhost
a1.sources.r1.port = 44444
#同上,记住该端口名
# Describe the sink
a1.sinks.k1.type = logger
# Use a channel which buffers events in memory
a1.channels.c1.type = memory
a1.channels.c1.capacity = 1000
a1.channels.c1.transactionCapacity = 100
# Bind the source and sink to the channel
a1.sources.r1.channels = c1
a1.sinks.k1.channel = c1
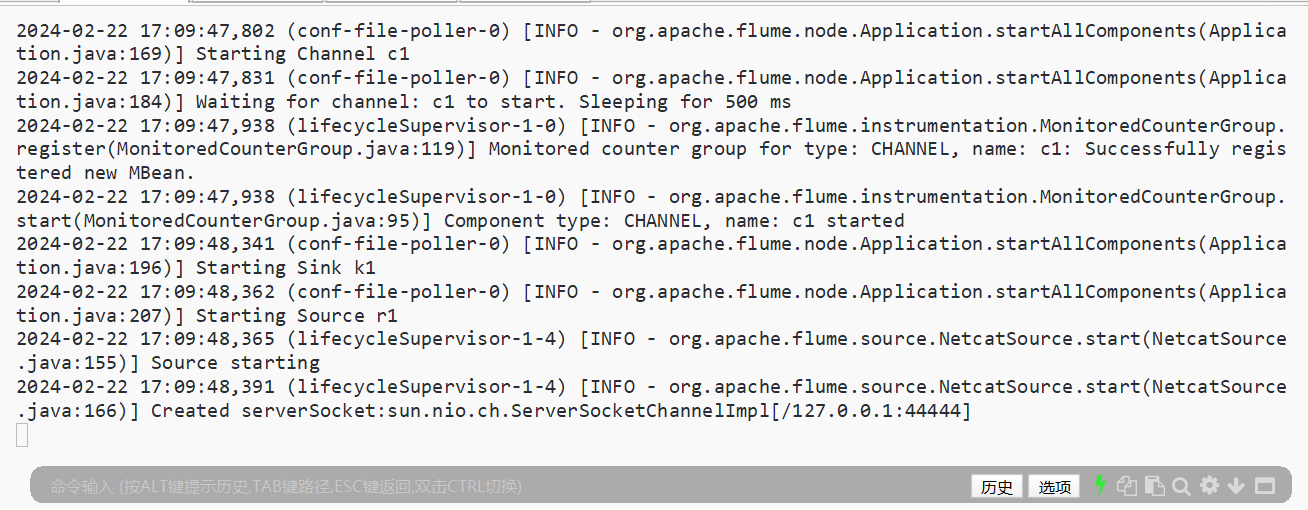
⑵启动 flume agent (即打开日志控制台):
/usr/local/flume/bin/flume-ng agent --conf ./conf
--conf-file ./conf/example.conf --name a1
-Dflume.root.logger=INFO,console
(3)使用netcat向flume agent发送数据

4.使用 Flume 作为 Spark Streaming 数据源
Flume 是非常流行的日志采集系统,可以作为 Spark Streaming 的高级数据源。请把 Flume
Source 设置为 netcat 类型,从终端上不断给 Flume Source 发送各种消息,Flume 把消息汇集
到 Sink,这里把 Sink 类型设置为 avro,由 Sink 把消息推送给 Spark Streaming,由自己编写
的 Spark Streaming 应用程序对消息进行处理。
(1)编写flume配置文件

#flume-to-spark.conf: A single-node Flume configuration
 # Name the components on this agent
 a1.sources = r1
 a1.sinks = k1
 a1.channels = c1
 # Describe/configure the source
 a1.sources.r1.type = netcat
 a1.sources.r1.bind = localhost
 a1.sources.r1.port = 33333
# Describe the sink
 a1.sinks.k1.type = avro
 a1.sinks.k1.hostname = localhost
 a1.sinks.k1.port =44444
 # Use a channel which buffers events in memory
 a1.channels.c1.type = memory
a1.channels.c1.capacity = 1000000
 a1.channels.c1.transactionCapacity = 1000000
 # Bind the source and sink to the channel
 a1.sources.r1.channels = c1
 a1.sinks.k1.channel = c1
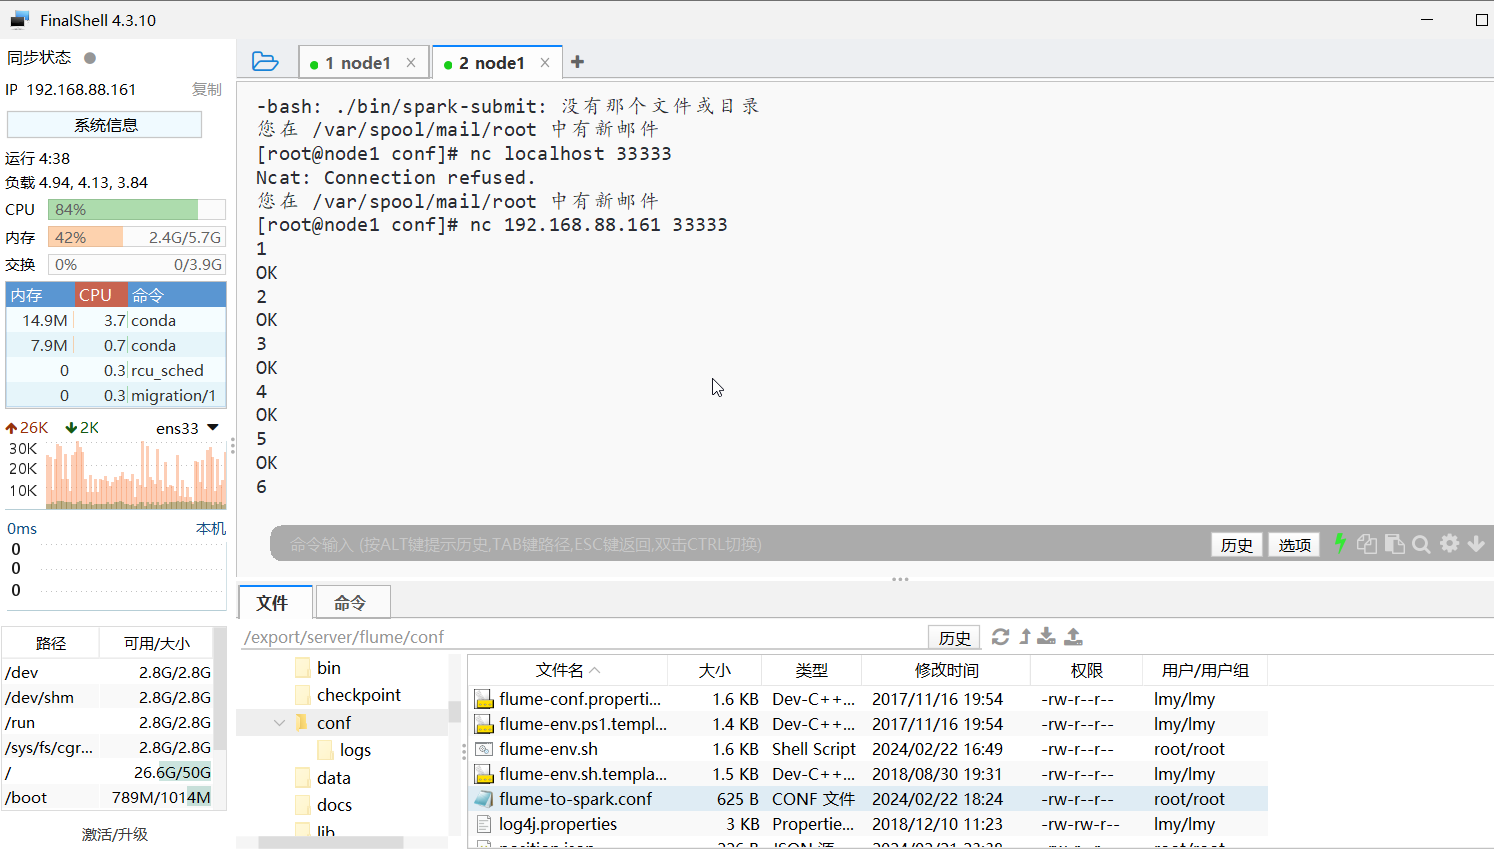
在上面的配置文件中,我们把 Flume Source 类别设置为 netcat,绑定到 localhost 的
33333 端口,这样,我们后面就可以通过“telnet localhost 33333”命令向 Flume Source 发
送消息。
同时,我们把 Flume Sink 类别设置为 avro,绑定到 localhost 的 44444 端口,这样,
Flume Source 把采集到的消息汇集到 Flume Sink 以后,Sink 会把消息推送给 localhost 的
44444 端口,而我们编写的 Spark Streaming 程序一直在监听 localhost 的 44444 端口,一
旦有消息到达,就会被 Spark Streaming 应用程序取走进行处理。
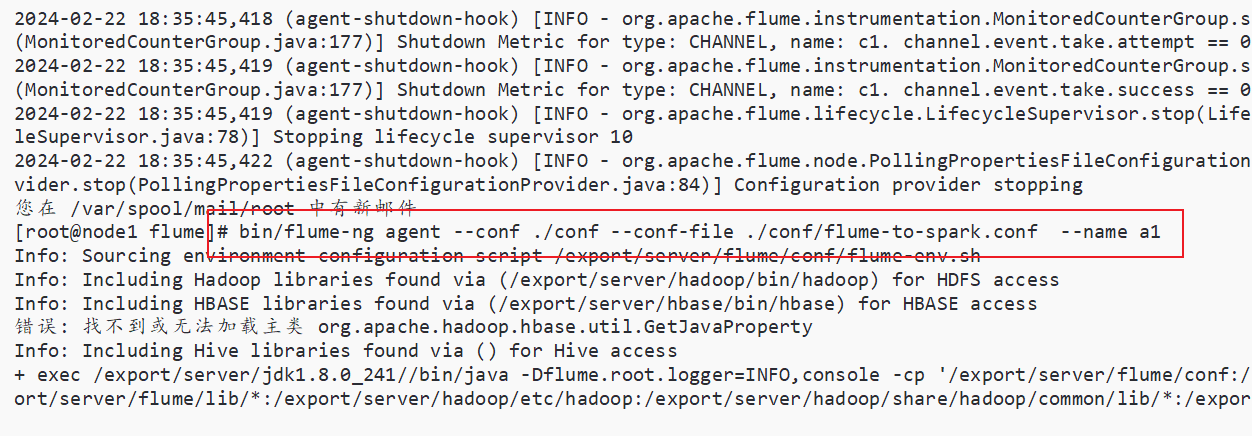
特别要强调的是,上述配置文件完成以后,暂时“不要”启动 Flume Agent,如果这个时
候使用“flume-ng agent”命令启动 agent,就会出现错误提示“localhost:44444 拒绝连接”,也就是 Flume Sink 要发送消息给 localhost 的 44444 端口,但是,无法连接上 localhost 的44444 端口。为什么会出现这个错误呢?因为,这个时候我们还没有启动 Spark Streaming应用程序,也就没有启动 localhost 的 44444 端口,所以,Sink 是无法向这个端口发送消息的。
(1)编写flume配置文件
#flume-to-spark.conf: A single-node Flume configuration
 # Name the components on this agent
 a1.sources = r1
 a1.sinks = k1
 a1.channels = c1
 # Describe/configure the source
 a1.sources.r1.type = netcat
 a1.sources.r1.bind = 192.168.88.161
 a1.sources.r1.port = 33333
# Describe the sink
 a1.sinks.k1.type = avro
 a1.sinks.k1.hostname = 192.168.1.4
 a1.sinks.k1.port =44444
 # Use a channel which buffers events in memory
 a1.channels.c1.type = memory
a1.channels.c1.capacity = 1000000
 a1.channels.c1.transactionCapacity = 1000000
 # Bind the source and sink to the channel
 a1.sources.r1.channels = c1
 a1.sinks.k1.channel = c1
(2)编写sparkStream代码
<project xmlns="http://maven.apache.org/POM/4.0.0" xmlns:xsi="http://www.w3.org/2001/XMLSchema-instance"
  xsi:schemaLocation="http://maven.apache.org/POM/4.0.0 http://maven.apache.org/xsd/maven-4.0.0.xsd">
  <modelVersion>4.0.0</modelVersion>

  <groupId>org.example</groupId>
  <artifactId>sparkStreaming</artifactId>
  <version>1.0-SNAPSHOT</version>
  <packaging>jar</packaging>

  <name>sparkStreaming</name>
  <url>http://maven.apache.org</url>

  <properties>
    <project.build.sourceEncoding>UTF-8</project.build.sourceEncoding>
  </properties>

  <dependencies>
    <dependency>
      <groupId>junit</groupId>
      <artifactId>junit</artifactId>
      <version>4.12</version>
      <scope>provided</scope>
    </dependency>
    <dependency>
      <groupId>org.scala-lang</groupId>
      <artifactId>scala-library</artifactId>
      <version>2.11.8</version>
    </dependency>
    <dependency>
      <groupId>org.apache.spark</groupId>
      <artifactId>spark-core_2.11</artifactId>
      <version>2.1.1</version>
    </dependency>
    <dependency>
      <groupId>org.apache.spark</groupId>
      <artifactId>spark-sql_2.11</artifactId>
      <version>2.1.1</version>
    </dependency>
    <dependency>
      <groupId>org.apache.spark</groupId>
      <artifactId>spark-streaming_2.11</artifactId>
      <version>2.1.1</version>
    </dependency>
    <dependency>
      <groupId>org.slf4j</groupId>
      <artifactId>slf4j-simple</artifactId>
      <version>1.7.12</version>
    </dependency>

    <!-- https://mvnrepository.com/artifact/org.apache.spark/spark-streaming-flume -->
    <dependency>
      <groupId>org.apache.spark</groupId>
      <artifactId>spark-streaming-flume_2.11</artifactId>
      <version>2.1.0</version>
    </dependency>
  </dependencies>

  <build>
    <sourceDirectory>src/main/scala</sourceDirectory>
    <testSourceDirectory>src/test/scala</testSourceDirectory>
    <plugins>
      <plugin>
        <groupId>org.apache.maven.plugins</groupId>
        <artifactId>maven-compiler-plugin</artifactId>
        <version>3.5.1</version>
        <configuration>
          <source>1.8</source>
          <target>1.8</target>
        </configuration>
      </plugin>

      <plugin>
        <groupId>net.alchim31.maven</groupId>
        <artifactId>scala-maven-plugin</artifactId>
        <version>3.2.0</version>
        <executions>
          <execution>
            <goals>
              <goal>compile</goal>
              <goal>testCompile</goal>
            </goals>
            <configuration>
              <args>
                <arg>-dependencyfile</arg>
                <arg>${project.build.directory}/.scala_dependencies</arg>
              </args>
            </configuration>
          </execution>
        </executions>
      </plugin>
    </plugins>
  </build>
</project>
package cn.itcast.shiyan6
import org.apache.spark.SparkConf
import org.apache.spark.storage.StorageLevel
import org.apache.spark.streaming._
import org.apache.spark.streaming.flume._
import org.apache.spark.util.IntParam
object FlumeEventCount {
def main(args: Array[String]) {
// if (args.length < 2) {
// System.err.println(
// "Usage: FlumeEventCount <host> <port>")
// System.exit(1)
// }
// StreamingExamples.setStreamingLogLevels()
// val Array(host, IntParam(port)) = args
val batchInterval = Milliseconds(2000)
// Create the context and set the batch size
val sparkConf = new SparkConf().setAppName("FlumeEventCount").setMaster("local[2]")
val ssc = new StreamingContext(sparkConf, batchInterval)
// Create a flume stream
var host = "0.0.0.0"
var port = 44444
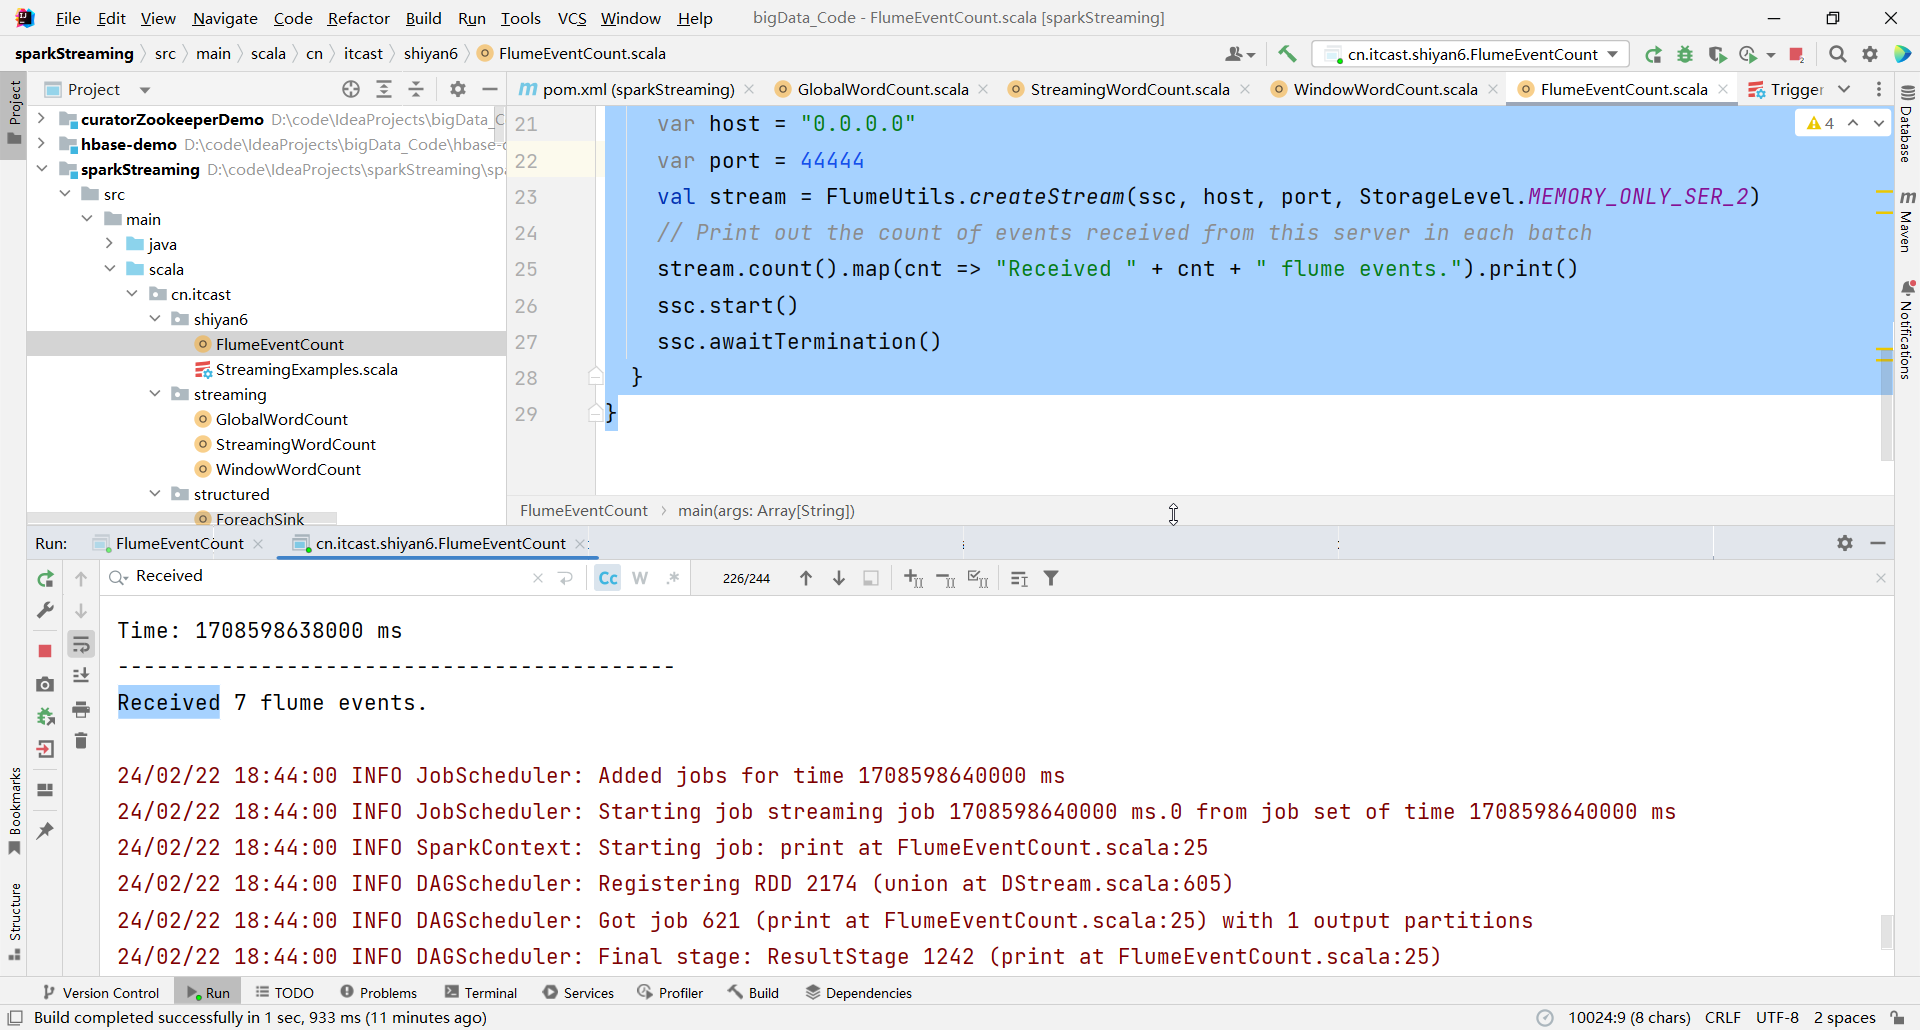
val stream = FlumeUtils.createStream(ssc, host, port, StorageLevel.MEMORY_ONLY_SER_2)
// Print out the count of events received from this server in each batch
stream.count().map(cnt => "Received " + cnt + " flume events.").print()
ssc.start()
ssc.awaitTermination()
}
}
(3)打开flume程序
(4)启动netcat

 浙公网安备 33010602011771号