

Spring-Cloud之Feign声明式调用-4
一、Feign受Retrofit、JAXRS-2.0和WebSocket影响,采用了声明式API 接口的风格,将Java Http 客户端绑定到它的内部。 Feign 首要目的是将 Java Http 客户端调用过程变得简单。
理解的简单一点就是Feign的原理就是通过Java Http的方式访问,已经编写好的接口,实现调用的简单化、解耦化。
二、我们先写一个Feign例子看看(端口8676):
1)加入依赖:
       <dependency>
            <groupId>org.springframework.cloud</groupId>
            <artifactId>spring-cloud-starter-openfeign</artifactId>
        </dependency>
        <dependency>
            <groupId>org.springframework.cloud</groupId>
            <artifactId>spring-cloud-starter-netflix-eureka-client</artifactId>
        </dependency>
        <dependency>
            <groupId>org.springframework.boot</groupId>
            <artifactId>spring-boot-starter-web</artifactId>
        </dependency>
2)编写配置文件application.yaml
server:
  port: 8676
spring:
  application:
    name: feign
eureka:
  client:
    service-url:
      defaultZone: http://127.0.0.1:8670/eureka/ # 实际开发中建议使用域名的方式
3)编写启动项:
package com.cetc;

import org.springframework.boot.SpringApplication;
import org.springframework.boot.autoconfigure.SpringBootApplication;
import org.springframework.cloud.netflix.eureka.EnableEurekaClient;
import org.springframework.cloud.openfeign.EnableFeignClients;

@SpringBootApplication
@EnableEurekaClient
@EnableFeignClients
public class FeignApplication {

    public static void main(String[] args) {
        SpringApplication.run(FeignApplication.class, args);
    }
}
说明:@EnableEurekaClient:开启Eureka-Client功能。@EnableFeignClients:开启Feign-Client功能。
4)编写配置
package com.cetc.config;

import feign.Retryer;
import org.springframework.context.annotation.Bean;
import org.springframework.context.annotation.Configuration;

@Configuration
public class FeignConfiguration {

    @Bean
    public Retryer retryer() {
        return new Retryer.Default();
    }
}
说明:这里的配置主要目的就是远程调用失败后,进行重试。
5)编写Feign接口
package com.cetc.feign.client;

import com.cetc.config.FeignConfiguration;
import org.springframework.cloud.openfeign.FeignClient;
import org.springframework.stereotype.Component;
import org.springframework.web.bind.annotation.GetMapping;

@Component
@FeignClient(value = "client", configuration = {FeignConfiguration.class})
public interface TestFeign {

    @GetMapping("/api/test/getPort")
    Integer getPort();
}
说明:@FeignClient注解会在开启@EnableFeignClients后生效。远程接口调用方式和具体的编写方式一样,只是需要复制而已。@Component:这里可以不加,运行也不会报错,但是idea会报错,所以一般我都加上。
6)编写rest接口和service
package com.cetc.service;

public interface IFeignService {

    Integer getPort();
}
package com.cetc.service.impl;

import com.cetc.feign.client.TestFeign;
import com.cetc.service.IFeignService;
import org.springframework.beans.factory.annotation.Autowired;
import org.springframework.stereotype.Service;

@Service
public class FeignServiceImpl implements IFeignService {

    @Autowired
    private TestFeign testFeign;

    @Override
    public Integer getPort() {
        return testFeign.getPort();
    }
}
package com.cetc.web.rest;

import com.cetc.service.IFeignService;
import org.springframework.beans.factory.annotation.Autowired;
import org.springframework.web.bind.annotation.GetMapping;
import org.springframework.web.bind.annotation.RequestMapping;
import org.springframework.web.bind.annotation.RestController;

@RestController
@RequestMapping("/api/feign")
public class FeignResource {

    @Autowired
    private IFeignService feignService;

    @GetMapping("/getPort")
    public Integer getPort() {
        return feignService.getPort();
    }
}
三、feign的基本编写就基本完成了,现在我们进行测试。
1)先启动Eureka-Server端口8670
2)启动2个Eureka-Client端口8673和8674
3)启动Feign-Client端口8676
4)效果如下:

5)访问端口8676,接口/api/feign/getPort测试

四、具体的调用过程:
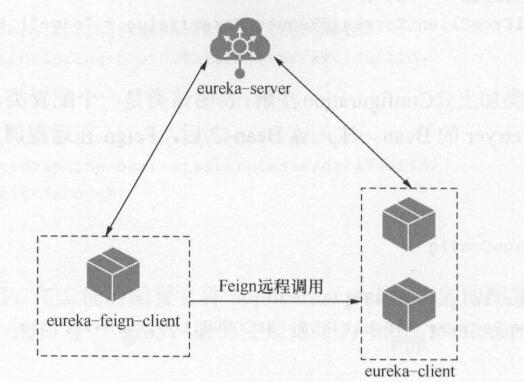
由上面的测试可以看见,Feign-Client是具有负载均衡功能的,那说明Feign中是存在Ribbon的调用的,通过查看依赖我们可以得知
<project xmlns="http://maven.apache.org/POM/4.0.0" xmlns:xsi="http://www.w3.org/2001/XMLSchema-instance"
    xsi:schemaLocation="http://maven.apache.org/POM/4.0.0 https://maven.apache.org/xsd/maven-4.0.0.xsd">
    <modelVersion>4.0.0</modelVersion>
    <parent>
        <groupId>org.springframework.cloud</groupId>
        <artifactId>spring-cloud-openfeign</artifactId>
        <version>2.0.4.RELEASE</version>
        <relativePath>..</relativePath>
    </parent>
    <artifactId>spring-cloud-starter-openfeign</artifactId>
    <name>Spring Cloud Starter OpenFeign</name>
    <description>Spring Cloud Starter OpenFeign</description>
    <url>https://projects.spring.io/spring-cloud</url>
    <organization>
        <name>Pivotal Software, Inc.</name>
        <url>https://www.spring.io</url>
    </organization>
    <properties>
        <main.basedir>${basedir}/../..</main.basedir>
    </properties>
    <dependencies>
        <dependency>
            <groupId>org.springframework.cloud</groupId>
            <artifactId>spring-cloud-starter</artifactId>
        </dependency>
        <dependency>
            <groupId>org.springframework.cloud</groupId>
            <artifactId>spring-cloud-openfeign-core</artifactId>
        </dependency>
        <dependency>
            <groupId>org.springframework</groupId>
            <artifactId>spring-web</artifactId>
        </dependency>
        <dependency>
            <groupId>org.springframework.cloud</groupId>
            <artifactId>spring-cloud-commons</artifactId>
        </dependency>
        <dependency>
            <groupId>io.github.openfeign</groupId>
            <artifactId>feign-core</artifactId>
        </dependency>
        <dependency>
            <groupId>io.github.openfeign</groupId>
            <artifactId>feign-slf4j</artifactId>
        </dependency>
        <dependency>
            <groupId>io.github.openfeign</groupId>
            <artifactId>feign-hystrix</artifactId>
        </dependency>
        <dependency>
            <groupId>io.github.openfeign</groupId>
            <artifactId>feign-java8</artifactId>
        </dependency>
        <dependency>
            <groupId>org.springframework.cloud</groupId>
            <artifactId>spring-cloud-starter-netflix-ribbon</artifactId>
            <optional>true</optional>
        </dependency>
        <dependency>
            <groupId>org.springframework.cloud</groupId>
            <artifactId>spring-cloud-starter-netflix-archaius</artifactId>
            <optional>true</optional>
        </dependency>
    </dependencies>
</project>
这里确实是使用了Ribbon来做负载的。
五、关于@FeignClient。
package org.springframework.cloud.openfeign;

import java.lang.annotation.Documented;
import java.lang.annotation.ElementType;
import java.lang.annotation.Retention;
import java.lang.annotation.RetentionPolicy;
import java.lang.annotation.Target;
import org.springframework.core.annotation.AliasFor;

@Target({ElementType.TYPE})
@Retention(RetentionPolicy.RUNTIME)
@Documented
public @interface FeignClient {
    @AliasFor("name")
    String value() default "";

    /** @deprecated */
    @Deprecated
    String serviceId() default "";

    @AliasFor("value")
    String name() default "";

    String qualifier() default "";

    String url() default "";

    boolean decode404() default false;

    Class<?>[] configuration() default {};

    Class<?> fallback() default void.class;

    Class<?> fallbackFactory() default void.class;

    String path() default "";

    boolean primary() default true;
}
@FeignClient 注解用于创建声明式 API 接口,该接口是RESTful 风格的。Feign 被设计成插拔式的,可以注入其他组件和 Feign一起使用。最典型的是如果 Ribbon 可用, Feign 会和Ribbon 结合进行负载均衡。
六、关于FeignClient的配置
1)默认配置为:FeignClientsConfiguration


package org.springframework.cloud.openfeign;

import com.netflix.hystrix.HystrixCommand;
import feign.Contract;
import feign.Feign;
import feign.Logger;
import feign.Retryer;
import feign.Feign.Builder;
import feign.codec.Decoder;
import feign.codec.Encoder;
import feign.hystrix.HystrixFeign;
import feign.optionals.OptionalDecoder;
import java.util.ArrayList;
import java.util.Iterator;
import java.util.List;
import org.springframework.beans.factory.ObjectFactory;
import org.springframework.beans.factory.annotation.Autowired;
import org.springframework.boot.autoconfigure.condition.ConditionalOnClass;
import org.springframework.boot.autoconfigure.condition.ConditionalOnMissingBean;
import org.springframework.boot.autoconfigure.condition.ConditionalOnProperty;
import org.springframework.boot.autoconfigure.http.HttpMessageConverters;
import org.springframework.cloud.openfeign.support.ResponseEntityDecoder;
import org.springframework.cloud.openfeign.support.SpringDecoder;
import org.springframework.cloud.openfeign.support.SpringEncoder;
import org.springframework.cloud.openfeign.support.SpringMvcContract;
import org.springframework.context.annotation.Bean;
import org.springframework.context.annotation.Configuration;
import org.springframework.context.annotation.Scope;
import org.springframework.core.convert.ConversionService;
import org.springframework.format.support.DefaultFormattingConversionService;
import org.springframework.format.support.FormattingConversionService;

@Configuration
public class FeignClientsConfiguration {
    @Autowired
    private ObjectFactory<HttpMessageConverters> messageConverters;
    @Autowired(
        required = false
    )
    private List<AnnotatedParameterProcessor> parameterProcessors = new ArrayList();
    @Autowired(
        required = false
    )
    private List<FeignFormatterRegistrar> feignFormatterRegistrars = new ArrayList();
    @Autowired(
        required = false
    )
    private Logger logger;

    public FeignClientsConfiguration() {
    }

    @Bean
    @ConditionalOnMissingBean
    public Decoder feignDecoder() {
        return new OptionalDecoder(new ResponseEntityDecoder(new SpringDecoder(this.messageConverters)));
    }

    @Bean
    @ConditionalOnMissingBean
    public Encoder feignEncoder() {
        return new SpringEncoder(this.messageConverters);
    }

    @Bean
    @ConditionalOnMissingBean
    public Contract feignContract(ConversionService feignConversionService) {
        return new SpringMvcContract(this.parameterProcessors, feignConversionService);
    }

    @Bean
    public FormattingConversionService feignConversionService() {
        FormattingConversionService conversionService = new DefaultFormattingConversionService();
        Iterator var2 = this.feignFormatterRegistrars.iterator();

        while(var2.hasNext()) {
            FeignFormatterRegistrar feignFormatterRegistrar = (FeignFormatterRegistrar)var2.next();
            feignFormatterRegistrar.registerFormatters(conversionService);
        }

        return conversionService;
    }

    @Bean
    @ConditionalOnMissingBean
    public Retryer feignRetryer() {
        return Retryer.NEVER_RETRY;
    }

    @Bean
    @Scope("prototype")
    @ConditionalOnMissingBean
    public Builder feignBuilder(Retryer retryer) {
        return Feign.builder().retryer(retryer);
    }

    @Bean
    @ConditionalOnMissingBean({FeignLoggerFactory.class})
    public FeignLoggerFactory feignLoggerFactory() {
        return new DefaultFeignLoggerFactory(this.logger);
    }

    @Configuration
    @ConditionalOnClass({HystrixCommand.class, HystrixFeign.class})
    protected static class HystrixFeignConfiguration {
        protected HystrixFeignConfiguration() {
        }

        @Bean
        @Scope("prototype")
        @ConditionalOnMissingBean
        @ConditionalOnProperty(
            name = {"feign.hystrix.enabled"}
        )
        public Builder feignHystrixBuilder() {
            return HystrixFeign.builder();
        }
    }
}
可以发现这个里面存在很多配置常见的几个:Decoder、Encoder、Contract。这3个个类在没有Bean 被注入的情况下,会自动注入默认配置的 Bean ,即 ResponseEntity、DecoderSpringEncoder、SpringMvcContract。
2)默认注入:
Decoder feignDecoder: ResponseEntityDecoder
Encoder feignEncoder: SpringEncoder
Logger feignLogger: Slf4jLogger
Contract feignContract: SpringMvcContract
Feign.Builder feignBuilder: HystrixFeign.Builder
FeignClientsConfiguration 的配置类部分代码如下,@ConditionalOnMissingBean 注解表示如果没有注入该类的 Bean 会默认注入一个 Bean。
3)重写配置:
重写 FeignClientsConfiguration 类中的 Bean 覆盖掉默认的配置 Bean ,从而达到 自定义配置的目的。
例如:Feign 默认的配置在请求失败后,重试次数为 0,即不重试( Retryer.NEVER_RETRY )。现在希望在请求失败后能够重试,这时需要写一个配置 FeignConfiguration 类,在该类中注入 Retryer Bean 覆盖掉默认的 Retryer Bean 并将 FeignConfig 定为 FeignClient配置类。
package com.cetc.config;

import feign.Retryer;
import org.springframework.context.annotation.Bean;
import org.springframework.context.annotation.Configuration;

@Configuration
public class FeignConfiguration {

    @Bean
    public Retryer retryer() {
        return new Retryer.Default();
    }
}
默认为:
     public Default() {
            this(100L, TimeUnit.SECONDS.toMillis(1L), 5);
        }

        public Default(long period, long maxPeriod, int maxAttempts) {
            this.period = period;
            this.maxPeriod = maxPeriod;
            this.maxAttempts = maxAttempts;
            this.attempt = 1;
        }
说明:间隔时间为100ms,最大重试时间为1s,重试次数5。
七、Feign的工作原理:
Feign是一个伪 Java Http 客户端 Feign 不做任何的请求处理。Feign 通过处理注解生成Request 模板,从而简化了 Http API 开发。开发人员可以使用注解的方式定制 Request API模板。在发送 HttpRequest 请求之前 Feign 通过处理注解的方式替换掉 Request 模板中的参数,生成真正的 Request ,并交给 Java Http 客户端去处理 利用这种方式,开发者只需要关注 Feign注解模板的开发,而不用关注 Http 请求本身,简化了 Http 请求的过程,使得 Http请求变得简单和容易理解。
Feign 通过包扫描注入 FeignClient的Bean ,该源码在 FeignClientsRegistrar 类中 。首先在程序启动时,会检查是否有@EnableFeignClients 注解,如果有该注解,则开启包扫描,扫描被@FeignClient 注解的接口。
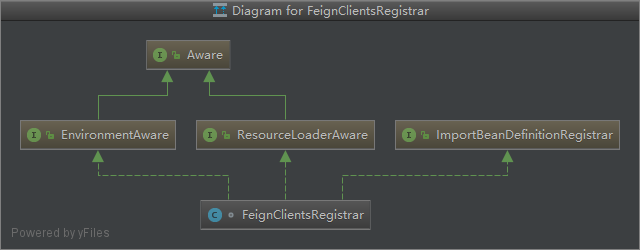
   public void registerFeignClients(AnnotationMetadata metadata, BeanDefinitionRegistry registry) {
        ClassPathScanningCandidateComponentProvider scanner = this.getScanner();
        scanner.setResourceLoader(this.resourceLoader);
        Map<String, Object> attrs = metadata.getAnnotationAttributes(EnableFeignClients.class.getName());
        AnnotationTypeFilter annotationTypeFilter = new AnnotationTypeFilter(FeignClient.class);
        Class<?>[] clients = attrs == null ? null : (Class[])((Class[])attrs.get("clients"));
        Object basePackages;
        if (clients != null && clients.length != 0) {
            final Set<String> clientClasses = new HashSet();
            basePackages = new HashSet();
            Class[] var9 = clients;
            int var10 = clients.length;

            for(int var11 = 0; var11 < var10; ++var11) {
                Class<?> clazz = var9[var11];
                ((Set)basePackages).add(ClassUtils.getPackageName(clazz));
                clientClasses.add(clazz.getCanonicalName());
            }

            AbstractClassTestingTypeFilter filter = new AbstractClassTestingTypeFilter() {
                protected boolean match(ClassMetadata metadata) {
                    String cleaned = metadata.getClassName().replaceAll("\\$", ".");
                    return clientClasses.contains(cleaned);
                }
            };
            scanner.addIncludeFilter(new FeignClientsRegistrar.AllTypeFilter(Arrays.asList(filter, annotationTypeFilter)));
        } else {
            scanner.addIncludeFilter(annotationTypeFilter);
            basePackages = this.getBasePackages(metadata);
        }

        Iterator var17 = ((Set)basePackages).iterator();

        while(var17.hasNext()) {
            String basePackage = (String)var17.next();
            Set<BeanDefinition> candidateComponents = scanner.findCandidateComponents(basePackage);
            Iterator var21 = candidateComponents.iterator();

            while(var21.hasNext()) {
                BeanDefinition candidateComponent = (BeanDefinition)var21.next();
                if (candidateComponent instanceof AnnotatedBeanDefinition) {
                    AnnotatedBeanDefinition beanDefinition = (AnnotatedBeanDefinition)candidateComponent;
                    AnnotationMetadata annotationMetadata = beanDefinition.getMetadata();
                    Assert.isTrue(annotationMetadata.isInterface(), "@FeignClient can only be specified on an interface");
                    Map<String, Object> attributes = annotationMetadata.getAnnotationAttributes(FeignClient.class.getCanonicalName());
                    String name = this.getClientName(attributes);
                    this.registerClientConfiguration(registry, name, attributes.get("configuration"));
                    this.registerFeignClient(registry, annotationMetadata, attributes);
                }
            }
        }

    }
这里涉及Aware和Spring源码的使用过程了,可以参考spring源码-增强容器xml解析-3.1和spring源码-Aware-3.4的具体说明,来实现@FeignClient加入Spring的IOC。
SynchronousMethodHandler拦截:
在IOC容器中我们使用代理方式执行,这个过程中会存在拦截过程,拦截源码在ReflectiveFeign中。
  public <T> T newInstance(Target<T> target) {
        Map<String, MethodHandler> nameToHandler = this.targetToHandlersByName.apply(target);
        Map<Method, MethodHandler> methodToHandler = new LinkedHashMap();
        List<DefaultMethodHandler> defaultMethodHandlers = new LinkedList();
        Method[] var5 = target.type().getMethods();
        int var6 = var5.length;

        for(int var7 = 0; var7 < var6; ++var7) {
            Method method = var5[var7];
            if (method.getDeclaringClass() != Object.class) {
                if (Util.isDefault(method)) {
                    DefaultMethodHandler handler = new DefaultMethodHandler(method);
                    defaultMethodHandlers.add(handler);
                    methodToHandler.put(method, handler);
                } else {
                    methodToHandler.put(method, nameToHandler.get(Feign.configKey(target.type(), method)));
                }
            }
        }

        InvocationHandler handler = this.factory.create(target, methodToHandler);
        T proxy = Proxy.newProxyInstance(target.type().getClassLoader(), new Class[]{target.type()}, handler);
        Iterator var12 = defaultMethodHandlers.iterator();

        while(var12.hasNext()) {
            DefaultMethodHandler defaultMethodHandler = (DefaultMethodHandler)var12.next();
            defaultMethodHandler.bindTo(proxy);
        }

        return proxy;
    }
具体拦截实现就是在SynchronousMethodHandler中
public Object invoke(Object[] argv) throws Throwable {
     //获取RequestTemplate
        RequestTemplate template = this.buildTemplateFromArgs.create(argv);
        Retryer retryer = this.retryer.clone();

        while(true) {
            try {
          //执行访问
                return this.executeAndDecode(template);
            } catch (RetryableException var5) {
                retryer.continueOrPropagate(var5);
                if (this.logLevel != Level.NONE) {
                    this.logger.logRetry(this.metadata.configKey(), this.logLevel);
                }
            }
        }
    }
好了我们这里不深究了,这里只需要关注RequestTemplate。通过RequestTemplate生成访问方式,来形成通过http的方式获取响应。
  Object executeAndDecode(RequestTemplate template) throws Throwable {
        ...try {
            response = this.client.execute(request, this.options);
            response.toBuilder().request(request).build();
        } catch (IOException var15) {
            if (this.logLevel != Level.NONE) {
                this.logger.logIOException(this.metadata.configKey(), this.logLevel, var15, this.elapsedTime(start));
            }

            throw FeignException.errorExecuting(request, var15);
        }

        ...
    }
八、上面我们分析了Feign的调用过程,这里来分析具体的client执行过程。
上面代码中的client是一个接口类型,那么这个client是什么呢?
在Feign 中, Client是一个非常重要的组件, Feign 最终发送 Request 请求以及接收 Response响应都是由 Client 组件完成的。 Client Feign 源码中是 个接口,在默认的情况下, Client的实现类是 Client.Default, Client.Default 是由 HttpURLConnnection 来实现网络请求的。另外,Client 支持 HttpClient、OkHttp 来进行网络请求。
在查看FeignRibbonClient的配置类FeignRibbonClientAutoConfiguration中我们可以看到feignClient注入的Bean。
package org.springframework.cloud.openfeign.ribbon;

import com.netflix.loadbalancer.ILoadBalancer;
import feign.Feign;
import feign.Request.Options;
import org.springframework.boot.autoconfigure.AutoConfigureBefore;
import org.springframework.boot.autoconfigure.condition.ConditionalOnClass;
import org.springframework.boot.autoconfigure.condition.ConditionalOnMissingBean;
import org.springframework.boot.autoconfigure.condition.ConditionalOnMissingClass;
import org.springframework.boot.context.properties.EnableConfigurationProperties;
import org.springframework.cloud.client.loadbalancer.LoadBalancedRetryFactory;
import org.springframework.cloud.netflix.ribbon.SpringClientFactory;
import org.springframework.cloud.openfeign.FeignAutoConfiguration;
import org.springframework.cloud.openfeign.support.FeignHttpClientProperties;
import org.springframework.context.annotation.Bean;
import org.springframework.context.annotation.Configuration;
import org.springframework.context.annotation.Import;
import org.springframework.context.annotation.Primary;

@ConditionalOnClass({ILoadBalancer.class, Feign.class})
@Configuration
@AutoConfigureBefore({FeignAutoConfiguration.class})
@EnableConfigurationProperties({FeignHttpClientProperties.class})
@Import({HttpClientFeignLoadBalancedConfiguration.class, OkHttpFeignLoadBalancedConfiguration.class, DefaultFeignLoadBalancedConfiguration.class})
public class FeignRibbonClientAutoConfiguration {
    public FeignRibbonClientAutoConfiguration() {
    }

    @Bean
    @Primary
    @ConditionalOnMissingBean
    @ConditionalOnMissingClass({"org.springframework.retry.support.RetryTemplate"})
    public CachingSpringLoadBalancerFactory cachingLBClientFactory(SpringClientFactory factory) {
        return new CachingSpringLoadBalancerFactory(factory);
    }

    @Bean
    @Primary
    @ConditionalOnMissingBean
    @ConditionalOnClass(
        name = {"org.springframework.retry.support.RetryTemplate"}
    )
    public CachingSpringLoadBalancerFactory retryabeCachingLBClientFactory(SpringClientFactory factory, LoadBalancedRetryFactory retryFactory) {
        return new CachingSpringLoadBalancerFactory(factory, retryFactory);
    }

    @Bean
    @ConditionalOnMissingBean
    public Options feignRequestOptions() {
        return LoadBalancerFeignClient.DEFAULT_OPTIONS;
    }
}
在配置中加入了FeignAutoConfiguration配置,其中就存在Client的配置
package org.springframework.cloud.openfeign;

...

@Configuration
@ConditionalOnClass({Feign.class})
@EnableConfigurationProperties({FeignClientProperties.class, FeignHttpClientProperties.class})
public class FeignAutoConfiguration {
    ...

    @Configuration
    @ConditionalOnClass({OkHttpClient.class})
    @ConditionalOnMissingClass({"com.netflix.loadbalancer.ILoadBalancer"})
    @ConditionalOnMissingBean({okhttp3.OkHttpClient.class})
    @ConditionalOnProperty({"feign.okhttp.enabled"})
    protected static class OkHttpFeignConfiguration {
     ...

        @Bean
        public okhttp3.OkHttpClient client(OkHttpClientFactory httpClientFactory, ConnectionPool connectionPool, FeignHttpClientProperties httpClientProperties) {
            Boolean followRedirects = httpClientProperties.isFollowRedirects();
            Integer connectTimeout = httpClientProperties.getConnectionTimeout();
            Boolean disableSslValidation = httpClientProperties.isDisableSslValidation();
            this.okHttpClient = httpClientFactory.createBuilder(disableSslValidation.booleanValue()).connectTimeout((long)connectTimeout.intValue(), TimeUnit.MILLISECONDS).followRedirects(followRedirects.booleanValue()).connectionPool(connectionPool).build();
            return this.okHttpClient;
        }
        ...
    }

    @Configuration
    @ConditionalOnClass({ApacheHttpClient.class})
    @ConditionalOnMissingClass({"com.netflix.loadbalancer.ILoadBalancer"})
    @ConditionalOnMissingBean({CloseableHttpClient.class})
    @ConditionalOnProperty(
        value = {"feign.httpclient.enabled"},
        matchIfMissing = true
    )
    protected static class HttpClientFeignConfiguration {
        ...

        @Bean
        @ConditionalOnMissingBean({Client.class})
        public Client feignClient(HttpClient httpClient) {
            return new ApacheHttpClient(httpClient);
        }

        ...
    }

    ...
}
可以看出两种配置都分别加入了@ConditionalOnClass({OkHttpClient.class})和@ConditionalOnClass({ApacheHttpClient.class})
而我们在Client接口中可以发现默认使用的是HttpURLConnection的方式。
     public Response execute(Request request, Options options) throws IOException {
            HttpURLConnection connection = this.convertAndSend(request, options);
            return this.convertResponse(connection).toBuilder().request(request).build();
        }
我们这里如果要使用 HttpClient、OkHttp 这两总方式,就只需要加入对应的依赖和配置
a、HttpClient
     <dependency>
            <groupId>com.netflix.feign</groupId>
            <artifactId>feign-httpclient</artifactId>
            <version>RELEASE</version>
        </dependency>
feign:
  httpclient:
    enabled: true
默认配置也是true,在
@ConditionalOnProperty(
        value = {"feign.httpclient.enabled"},
        matchIfMissing = true
    )
也可以看出这里默认配置为true
{
      "defaultValue": "true",
      "name": "feign.httpclient.enabled",
      "description": "Enables the use of the Apache HTTP Client by Feign.",
      "type": "java.lang.Boolean"
    }
b、OkHttp
     <dependency>
            <groupId>com.netflix.feign</groupId>
            <artifactId>feign-okhttp</artifactId>
            <version>RELEASE</version>
        </dependency>
feign:
  okhttp:
    enabled: true
这里配置是默认关闭的
{
      "defaultValue": "false",
      "name": "feign.okhttp.enabled",
      "description": "Enables the use of the OK HTTP Client by Feign.",
      "type": "java.lang.Boolean"
    }
九、Feign是如何结合Ribbon作为负载均衡的。
回到第七步末尾,我们可以查看execute的执行过程在LoadBalancerFeignClient中。
  public Response execute(Request request, Options options) throws IOException {
        try {
            URI asUri = URI.create(request.url());
            String clientName = asUri.getHost();
            URI uriWithoutHost = cleanUrl(request.url(), clientName);
            RibbonRequest ribbonRequest = new RibbonRequest(this.delegate, request, uriWithoutHost);
            IClientConfig requestConfig = this.getClientConfig(options, clientName);
            return ((RibbonResponse)this.lbClient(clientName).executeWithLoadBalancer(ribbonRequest, requestConfig)).toResponse();
        } catch (ClientException var8) {
            IOException io = this.findIOException(var8);
            if (io != null) {
                throw io;
            } else {
                throw new RuntimeException(var8);
            }
        }
    }
在executeWithLoadBalancer中我们可以找到一个submit的方法,而这个方式是LoadBalancerCommand类的submmit
public Observable<T> submit(final ServerOperation<T> operation) {
        ...
        Observable<T> o = (this.server == null ? this.selectServer() : Observable.just(this.server)).concatMap(new Func1<Server, Observable<T>>() {
            public Observable<T> call(Server server) {
                context.setServer(server);
                final ServerStats stats = LoadBalancerCommand.this.loadBalancerContext.getServerStats(server);
                Observable<T> o = Observable.just(server).concatMap(new Func1<Server, Observable<T>>() {
                    public Observable<T> call(final Server server) {
                        context.incAttemptCount();
                        LoadBalancerCommand.this.loadBalancerContext.noteOpenConnection(stats);
                        ...final Stopwatch tracer = LoadBalancerCommand.this.loadBalancerContext.getExecuteTracer().start();
                        return operation.call(server).doOnEach(new Observer<T>() {
                            ...private void recordStats(Stopwatch tracerx, ServerStats statsx, Object entity, Throwable exception) {
                                tracerx.stop();
                                LoadBalancerCommand.this.loadBalancerContext.noteRequestCompletion(statsx, entity, exception, tracerx.getDuration(TimeUnit.MILLISECONDS), LoadBalancerCommand.this.retryHandler);
                            }
                        });
                    }
                });
                ...
            }
        });
        ...
    }
可以看出最终还是LoadBalancerContext进行执行的。即在Ribbon中讲的LoadBalancerContext执行过程。

十、总结:
1)首先通过@EnableFeignClients 注解开启FeignClient的功能。只有这个注解存在,才会在程序启动时开启对@FeignClient 注解的包扫描。
2)根据 Feign的规则实现接口,并在接口上面加上@FeignClient注解。
3)程序启动后,会进行包扫描,扫描所有的@ FeignClient 注解 ,并将这些信息注入 IOC容器中。
4)当接口的方法被调用时 通过 JDK 的代理来生成具体的RequestTemplate模板对象
5)根据 RequestTemplate 再生成 Http 请求的Request对象.
6)Request 对象交给 Client 去处理 其中 Client 的网络请求框架可以是 HttpURLConnect、HttpClient和OkHttp。
7)最后 Client 被封装到 LoadBalanceClient 类,这个类结合类 Ribbon 做到了负载均衡。
十一、源码地址:https://github.com/lilin409546297/spring-cloud/tree/master/feign

 浙公网安备 33010602011771号