


Redis三:主从、哨兵和集群的搭建
1 主从搭建
- 注:Redis 安装和目录结构参考以前博客 Linux三:软件部署
需求
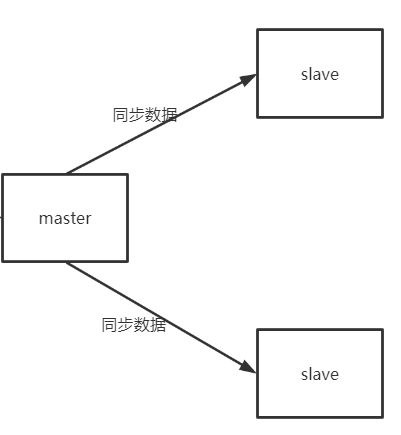
- 在三台虚拟机上,完成搭建一主两从的主从复制架构(如下图)。要求如下
-
从机只能读不能写;
-
三台 Redis 的密码均为 123456;
-
配置文件、数据文件、日志文件分别存放在 /usr/local/redis-5 目录下的 conf、data、log 文 件夹中(下面哨兵、集群搭建时同理)。
![]()
搭建
-
节点说明
IP Redis节点 192.168.192.130:6379 master 节点 192.168.192.131:6379 slave 节点 192.168.192.132:6379 slave 节点
-
主节点配置文件
cd /usr/local/redis-5/conf/ # 内容如下 port 6379 daemonize yes # 日志文件位置 logfile "/usr/local/redis-5/log/redis-6379.log" # rdb和aof的存放目录 dir "/usr/local/redis-5/data" dbfilename "dump-6379.rdb" appendonly yes appendfilename "appendonly-6379.aof" # 密码 requirepass 123456 # 放行访问IP限制 bind 0.0.0.0 -
从节点配置
- 各节点需要关闭防火墙(或开放对应端口),本次使用
systemctl stop firewalld关闭 防火墙,否则从节点连不上主节点。
# 将主节点的配置文件 redis-6379.conf 复制到从节点上 scp redis-6379.conf root@192.168.192.131:/usr/local/redis-5/conf/ cd /usr/local/redis-5/conf/ vi redis-6379.conf # 内容如下(另一个从节点配置文件与该文件一样,略) port 6379 daemonize yes # 日志文件位置 logfile "/usr/local/redis-5/log/redis-6379.log" # rdb和aof的存放目录 dir "/usr/local/redis-5/data" dbfilename "dump-6379.rdb" appendonly yes appendfilename "appendonly-6379.aof" # 密码 requirepass 123456 # 放行访问IP限制 bind 0.0.0.0 ################### 从节点特有配置 ############### # 从节点访问主节点密码(必需与主节点 requirepass 一致) masterauth 123456 # 从节点只读模式 replica-read-only yes # 从节点IP(新版使用replicaof,老版使用slaveof,两者都行) slaveof 192.168.192.130 6379 - 各节点需要关闭防火墙(或开放对应端口),本次使用
-
启动各节点
# 因为三个节点目录结构一样,故启动命令均一样(记得要先关闭防火墙) cd /usr/local/redis-5/ bin/redis-server conf/redis-6379.conf -
查看信息
-
主节点
# 连接主节点,执行info replication命令 [root@localhost redis-5]# bin/redis-cli -a 123456 info replication role:master # 表示当前节点是主节点 connected_slaves:2 # 连接2个从节点,ip、port、state等信息如下 slave0:ip=192.168.192.131,port=6379,state=online,offset=252,lag=0 slave1:ip=192.168.192.132,port=6379,state=online,offset=252,lag=1 master_replid:f06b2e1dcfb28e6648fc8d601413b61be295eca1 master_replid2:0000000000000000000000000000000000000000 master_repl_offset:252 second_repl_offset:-1 repl_backlog_active:1 repl_backlog_size:1048576 repl_backlog_first_byte_offset:1 repl_backlog_histlen:252 -
从节点
# 连接任意一个从节点,执行 info replication 命令
bin/redis-cli -a 123456 info replication

role:slave				# 从节点
master_host:192.168.192.130		# 主节点ip
master_port:6379			# 主节点port
master_link_status:up			# 连接状态
master_last_io_seconds_ago:2
master_sync_in_progress:0
slave_repl_offset:602
slave_priority:100
slave_read_only:1
connected_slaves:0
master_replid:f06b2e1dcfb28e6648fc8d601413b61be295eca1
master_replid2:0000000000000000000000000000000000000000
master_repl_offset:602
second_repl_offset:-1
repl_backlog_active:1
repl_backlog_size:1048576
repl_backlog_first_byte_offset:1
repl_backlog_histlen:602
-
-
查看日志
-
主节点
cd /usr/local/redis-5/log/ tail -f -n 100 redis-6379.log # 开始接受从节点的连接 20090:M 28 Nov 2021 15:48:32.446 * Ready to accept connections # 接受从节点192.168.192.131:6379的同步 20090:M 28 Nov 2021 15:51:14.998 * Replica 192.168.192.131:6379 asks for synchronization 20090:M 28 Nov 2021 15:51:14.998 * Full resync requested by replica 192.168.192.131:6379 20090:M 28 Nov 2021 15:51:14.998 * Starting BGSAVE for SYNC with target: disk 20090:M 28 Nov 2021 15:51:14.999 * Background saving started by pid 20095 20095:C 28 Nov 2021 15:51:15.008 * DB saved on disk 20095:C 28 Nov 2021 15:51:15.008 * RDB: 4 MB of memory used by copy-on-write 20090:M 28 Nov 2021 15:51:15.020 * Background saving terminated with success # 192.168.192.131:6379同步成功 20090:M 28 Nov 2021 15:51:15.021 * Synchronization with replica 192.168.192.131:6379 succeeded # 下面为从节点192.168.192.132:6379的同步信息,与上面相同 20090:M 28 Nov 2021 15:52:32.731 * Replica 192.168.192.132:6379 asks for synchronization 20090:M 28 Nov 2021 15:52:32.731 * Full resync requested by replica 192.168.192.132:6379 20090:M 28 Nov 2021 15:52:32.731 * Starting BGSAVE for SYNC with target: disk 20090:M 28 Nov 2021 15:52:32.732 * Background saving started by pid 20096 20096:C 28 Nov 2021 15:52:32.734 * DB saved on disk 20096:C 28 Nov 2021 15:52:32.734 * RDB: 0 MB of memory used by copy-on-write 20090:M 28 Nov 2021 15:52:32.781 * Background saving terminated with success 20090:M 28 Nov 2021 15:52:32.782 * Synchronization with replica 192.168.192.132:6379 succeeded -
从节点
# 连接任意一个从节点,查看其日志即可
tail -f -n 100 redis-6379.log

# 准备接受连接
11648:S 28 Nov 2021 15:51:14.985 * Ready to accept connections
# 连接到主节点192.168.192.130:6379
11648:S 28 Nov 2021 15:51:14.985 * Connecting to MASTER 192.168.192.130:6379
# 主从复制开始
11648:S 28 Nov 2021 15:51:14.985 * MASTER <-> REPLICA sync started
11648:S 28 Nov 2021 15:51:14.986 * Non blocking connect for SYNC fired the event.
11648:S 28 Nov 2021 15:51:14.987 * Master replied to PING, replication can continue...
11648:S 28 Nov 2021 15:51:14.989 * Partial resynchronization not possible (no cached master)
11648:S 28 Nov 2021 15:51:14.999 * Full resync from master: f06b2e1dcfb28e6648fc8d601413b61be295eca1:0
11648:S 28 Nov 2021 15:51:15.013 * MASTER <-> REPLICA sync: receiving 176 bytes from master
11648:S 28 Nov 2021 15:51:15.015 * MASTER <-> REPLICA sync: Flushing old data
11648:S 28 Nov 2021 15:51:15.015 * MASTER <-> REPLICA sync: Loading DB in memory
# 主从复制同步成功
11648:S 28 Nov 2021 15:51:15.015 * MASTER <-> REPLICA sync: Finished with success
11648:S 28 Nov 2021 15:51:15.016 * Background append only file rewriting started by pid 11652
11648:S 28 Nov 2021 15:51:15.056 * AOF rewrite child asks to stop sending diffs.
11652:C 28 Nov 2021 15:51:15.056 * Parent agreed to stop sending diffs. Finalizing AOF...
11652:C 28 Nov 2021 15:51:15.056 * Concatenating 0.00 MB of AOF diff received from parent.
11652:C 28 Nov 2021 15:51:15.057 * SYNC append only file rewrite performed
11652:C 28 Nov 2021 15:51:15.057 * AOF rewrite: 2 MB of memory used by copy-on-write
11648:S 28 Nov 2021 15:51:15.087 * Background AOF rewrite terminated with success
11648:S 28 Nov 2021 15:51:15.087 * Residual parent diff successfully flushed to the rewritten AOF (0.00 MB)
11648:S 28 Nov 2021 15:51:15.087 * Background AOF rewrite finished successfully
-
-
命令测试
-
测试一:主节点写入数据,测试从节点是否可以获取(即主从复制)
-
测试二:从节点是否可以写入数据(即读写分离)
![]()
-

2 哨兵搭建
需求
-
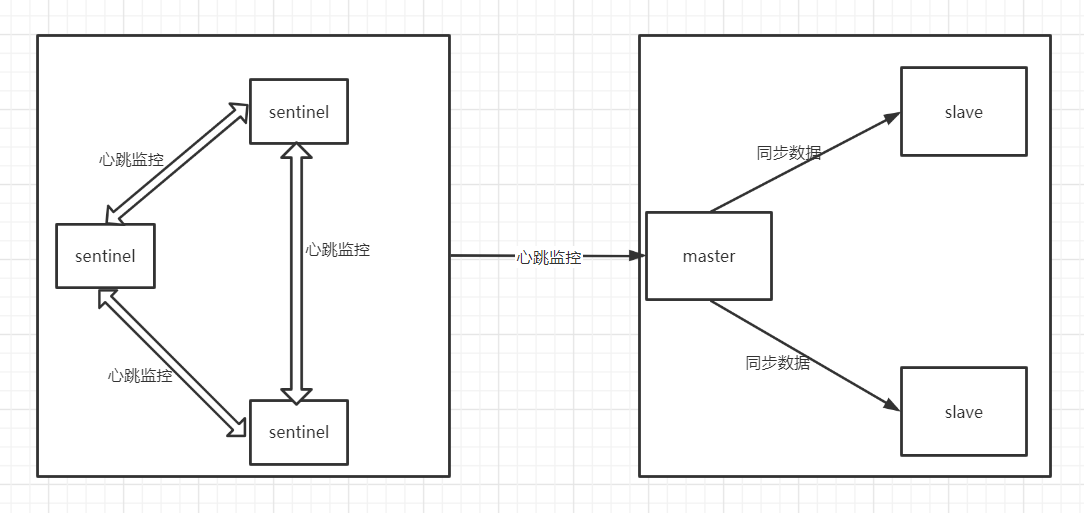
在上面主从复制架构的基础上,再在每台虚拟机上分别搭建一个哨兵,组成哨兵监控架构(如下图)。要求如下
- 模拟主节点宕机时的故障转移(使用
kill -9 pid命令杀死主节点进行模拟)
![]()
- 模拟主节点宕机时的故障转移(使用
搭建
-
节点说明
IP Redis节点 192.168.192.130 6379 为当前 redis master 节点,26379 为 sentinel 节点 192.168.192.131 6379 为当前 redis slave 节点,26379 为 sentinel 节点 192.168.192.132 6379 为当前 redis slave 节点,26379 为 sentinel 节点
-
编写 sentinel.conf
[root@localhost redis-5]# cd /usr/local/redis-5/conf/ [root@localhost conf]# vi sentinel-26379.conf # 放行所有 IP 限制 bind 0.0.0.0 # 进程端口号 port 26379 # 后台启动 daemonize yes # 日志记录文件 logfile "/usr/local/redis-5/log/sentinel-26379.log" # 进程编号记录文件 pidfile /var/run/sentinel-26379.pid # 指示 Sentinel 去监视一个名为 mymaster 的主服务器 sentinel monitor mymaster 192.168.192.130 6379 2 # 访问主节点的密码 sentinel auth-pass mymaster 123456 # Sentinel 认为服务器已经断线所需的毫秒数 sentinel down-after-milliseconds mymaster 10000 # 若 Sentinel 在该配置值内未能完成 failover 操作,则认为本次 failover 失败 sentinel failover-timeout mymaster 180000 # 哨兵sentinel的配置均一样,因此复制到另外两台机器即可 scp sentinel-26379.conf root@192.168.192.131:/usr/local/redis-5/conf/ scp sentinel-26379.conf root@192.168.192.132:/usr/local/redis-5/conf/ -
启动三个 Redis,若是已启动该步骤跳过
-
启动三个 Sentinel
# 三台机器上分别执行如下命令 cd /usr/local/redis-5/ bin/redis-sentinel conf/sentinel-26379.conf -
查看 Sentinel 是否启动成功
# 使用 ps -ef |grep sentinel 命令是最简单的查看,仅能看是否启动成功,不能看sentinel各种信息 # 连接任意sentinel执行info sentinel 命令 [root@localhost redis-5]# bin/redis-cli -p 26379 info sentinel sentinel_masters:1 # master节点个数 sentinel_tilt:0 # 是否进入TILT模式 sentinel_running_scripts:0 # 正在运行脚本个数 sentinel_scripts_queue_length:0 # 队列中正在排队的脚本个数 sentinel_simulate_failure_flags:0 # master节点name、state、address、slaves(从节点个数),以及sentinels(哨兵个数) master0:name=mymaster,status=ok,address=192.168.192.130:6379,slaves=2,sentinels=3 -
查看日志
# 查看任意一台sentinel的日志即可,三者都差不多 [root@localhost log]# cd /usr/local/redis-5/log/ [root@localhost log]# tail -f -n 100 sentinel-26379.log 11811:X 28 Nov 2021 16:28:19.463 # oO0OoO0OoO0Oo Redis is starting oO0OoO0OoO0Oo 11811:X 28 Nov 2021 16:28:19.463 # Redis version=5.0.12, bits=64, commit=00000000, modified=0, pid=11811, just started 11811:X 28 Nov 2021 16:28:19.463 # Configuration loaded 11812:X 28 Nov 2021 16:28:19.466 * Increased maximum number of open files to 10032 (it was originally set to 1024). 11812:X 28 Nov 2021 16:28:19.466 * Running mode=sentinel, port=26379. 11812:X 28 Nov 2021 16:28:19.468 # Sentinel ID is afeb5e698bdf5c0c2bc7b1a6af5f1f7034a9e8a3 11812:X 28 Nov 2021 16:28:19.468 # +monitor master mymaster 192.168.192.130 6379 quorum 2 11812:X 28 Nov 2021 16:28:19.470 * +slave slave 192.168.192.131:6379 192.168.192.131 6379 @ mymaster 192.168.192.130 6379 11812:X 28 Nov 2021 16:28:19.471 * +slave slave 192.168.192.132:6379 192.168.192.132 6379 @ mymaster 192.168.192.130 6379 11812:X 28 Nov 2021 16:28:20.720 * +sentinel sentinel c4b37589df7a468b9d2b57584b7a0cf1f7b9ecfc 192.168.192.132 26379 @ mymaster 192.168.192.130 6379 11812:X 28 Nov 2021 16:28:21.094 * +sentinel sentinel 045878fd09c565628623d1f729236ca238de10fc 192.168.192.130 26379 @ mymaster 192.168.192.130 6379 -
模拟故障转移
-
故障转移前集群状态
# 在主节点192.168.192.130上执行info replication命令 [root@localhost redis-5]# bin/redis-cli -a 123456 info replication role:master # 当前节点为主节点 connected_slaves:2 # 两个从节点信息如下 slave0:ip=192.168.192.131,port=6379,state=online,offset=146720,lag=0 slave1:ip=192.168.192.132,port=6379,state=online,offset=146575,lag=1 master_replid:f06b2e1dcfb28e6648fc8d601413b61be295eca1 master_replid2:0000000000000000000000000000000000000000 master_repl_offset:146720 second_repl_offset:-1 repl_backlog_active:1 repl_backlog_size:1048576 repl_backlog_first_byte_offset:1 repl_backlog_histlen:146720 -
干掉主节点模拟故障转移
[root@localhost redis-5]# ps -ef | grep redis root 20090 1 0 15:48 ? 00:00:12 bin/redis-server 0.0.0.0:6379 root 20255 1 0 16:27 ? 00:00:08 bin/redis-sentinel 0.0.0.0:26379 [sentinel] root 20290 19952 0 16:40 pts/0 00:00:00 grep redis [root@localhost redis-5]# kill -9 20090 -
查看 sentinel 日志
# 部分内容如下 # 1. 原主节点192.168.192.130 6379主观下线(sdown) 11812:X 28 Nov 2021 16:41:24.335 # +sdown master mymaster 192.168.192.130 6379 # 2. 选举新纪元开始,标号为1 11812:X 28 Nov 2021 16:41:24.407 # +new-epoch 1 # 3. 投票哪个sentinel执行故障转移 # 补充:当sentinel运行后,会自动生成一些内容(可使用命令 cat sentinel-26379.conf 查看),"045878fd09c565628623d1f729236ca238de10fc" 是"192.168.192.130 26379"机器上的sentinel # 因此会由130机器上的sentinel进行故障转移,将转移后的结果(即现任主节点)通知给其他sentinel 11812:X 28 Nov 2021 16:41:24.408 # +vote-for-leader 045878fd09c565628623d1f729236ca238de10fc 1 # 4. 原主节点"192.168.192.130 6379"客观下线(quorum 2/2,即有一般以上的sentinel认为原主节点sdown了) 11812:X 28 Nov 2021 16:41:24.420 # +odown master mymaster 192.168.192.130 6379 #quorum 2/2 11812:X 28 Nov 2021 16:41:24.421 # Next failover delay: I will not start a failover before Sun Nov 28 16:47:25 2021 11812:X 28 Nov 2021 16:41:25.642 # +config-update-from sentinel 045878fd09c565628623d1f729236ca238de10fc 192.168.192.130 26379 @ mymaster 192.168.192.130 6379 # 5. 主节点由"192.168.192.130 6379"变为"192.168.192.131 6379" 11812:X 28 Nov 2021 16:41:25.643 # +switch-master mymaster 192.168.192.130 6379 192.168.192.131 6379 # 6. 通知 132 变为 131 的从节点(即告诉132,主节点现在变成131了) 11812:X 28 Nov 2021 16:41:25.644 * +slave slave 192.168.192.132:6379 192.168.192.132 6379 @ mymaster 192.168.192.131 6379 # 7. 通知 130 变成 131 的从节点(当130再次启动时,由原来的主节点现在变成131的从节点) 11812:X 28 Nov 2021 16:41:25.644 * +slave slave 192.168.192.130:6379 192.168.192.130 6379 @ mymaster 192.168.192.131 6379 # 8. 原主节点130下线,现在主节点变成131 11812:X 28 Nov 2021 16:41:35.677 # +sdown slave 192.168.192.130:6379 192.168.192.130 6379 @ mymaster 192.168.192.131 6379 -
原主节点130下线后再次查看集群状态
# 在现主节点131上执行info replication命令 [root@localhost redis-5]# bin/redis-cli -a 123456 info replication role:master # 主节点 connected_slaves:1 # 一个从节点,信息如下 slave0:ip=192.168.192.132,port=6379,state=online,offset=421107,lag=1 master_replid:3a91a51191c0b94258caff79b04510318e6430db master_replid2:f06b2e1dcfb28e6648fc8d601413b61be295eca1 master_repl_offset:421252 second_repl_offset:175178 repl_backlog_active:1 repl_backlog_size:1048576 repl_backlog_first_byte_offset:1 repl_backlog_histlen:421252 -
启动原主节点130,证明原主节点宕机后,再次启动会变成从节点
# 0. 修改原主节点配置文件
# 从节点访问主节点密码(必须与 requirepass 一致)
masterauth 123456
# 从节点只读模式
replica-read-only yes

# 1. 启动
bin/redis-server conf/redis-6379.conf

# 2. sentinel日志
# 重启从节点130,它现在的主节点时131
11812:X 28 Nov 2021 17:19:18.945 * +reboot slave 192.168.192.130:6379 192.168.192.130 6379 @ mymaster 192.168.192.131 6379
11812:X 28 Nov 2021 17:19:19.003 # -sdown slave 192.168.192.130:6379 192.168.192.130 6379 @ mymaster 192.168.192.131 6379

# 3. 查看集群状态
[root@localhost redis-5]# bin/redis-cli -a 123456 info replication

role:master
connected_slaves:2		# 从节点信息如下(原主节点130变为从节点)
slave0:ip=192.168.192.132,port=6379,state=online,offset=665891,lag=1
slave1:ip=192.168.192.130,port=6379,state=online,offset=665891,lag=1
master_replid:3a91a51191c0b94258caff79b04510318e6430db
master_replid2:f06b2e1dcfb28e6648fc8d601413b61be295eca1
master_repl_offset:666181
second_repl_offset:175178
repl_backlog_active:1
repl_backlog_size:1048576
repl_backlog_first_byte_offset:1
repl_backlog_histlen:666181
-
3 集群搭建
需求
-
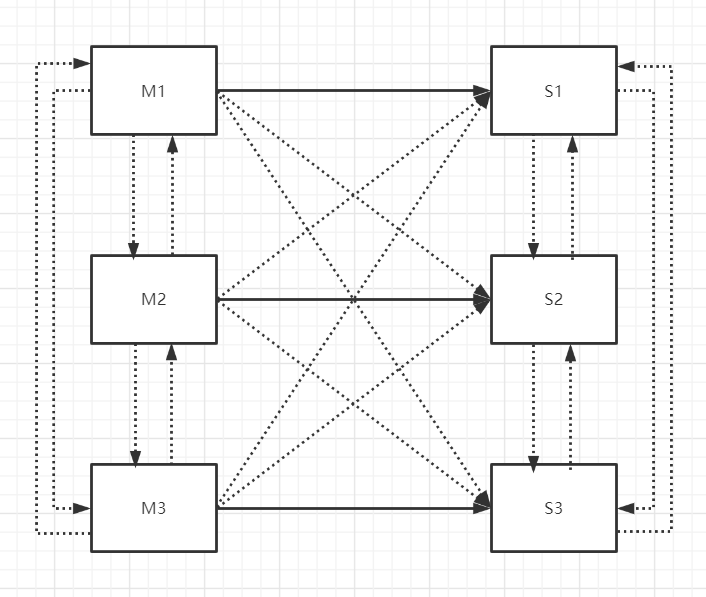
完成搭建三主三从的集群架构(如下图)。要求如下
- 六个 Redis 密码均为123456
![]()
搭建
-
节点说明(下面只是搭建了6个Redis节点,主从待分配)
IP Redis节点 192.168.192.130 6371 端口,6372 端口 192.168.192.131 6373 端口,6374 端口 192.168.192.132 6375 端口,6376 端口
-
编写配置文件
# (1) 6371 端口配置文件 [root@localhost conf]# cd /usr/local/redis-5/conf [root@localhost conf]# vi redis-6371.conf bind 0.0.0.0 port 6371 daemonize yes logfile "/usr/local/redis-5/log/redis-6371.log" dir /usr/local/redis-5/data dbfilename dump-6371.rdb appendonly yes appendfilename "appendonly-6371.aof" requirepass 123456 # 从节点访问主节点密码(必须与 requirepass 一致) masterauth 123456 # 是否开启集群模式,默认 no cluster-enabled yes # 集群节点信息文件,会保存在 dir 配置对应目录下 cluster-config-file nodes-6371.conf # 集群节点连接超时时间 cluster-node-timeout 15000 # 集群节点 IP (可理解为当前机器的IP) cluster-announce-ip 192.168.192.130 # 集群节点映射端口 cluster-announce-port 6371 # 集群节点总线端口 (基于当前端口 + 一万) cluster-announce-bus-port 16371 # (2) 6372 端口配置文件 [root@localhost conf]# sed "s/6371/6372/g" redis-6371.conf > redis-6372.conf # (3) 6373 端口配置文件(先把 6371.conf 配置文件传到 131 机器上,然后基于 6371.conf 进行修改) [root@localhost conf]# scp redis-6371.conf root@192.168.192.131:/usr/local/redis-5/conf/ # 切换到131机器上进行如下操作 [root@localhost conf]# mv redis-6371.conf redis-6373.conf [root@localhost conf]# vi redis-6373.conf # 缩进部分为待修改内容 # 集群节点 IP (可理解为当前机器的IP) cluster-announce-ip 192.168.192.131 # 修改为当期机器IP :%s/6371/6373/g # 该命令在 vi 模式下进行全局替换 # (4) 6374 端口配置文件 [root@localhost conf]# sed "s/6373/6374/g" redis-6373.conf > redis-6374.conf # (5) 6375 端口配置文件 [root@localhost conf]# scp redis-6373.conf root@192.168.192.132:/usr/local/redis-5/conf [root@localhost conf]# mv redis-6373.conf redis-6375.conf [root@localhost conf]# vi redis-6375.conf cluster-announce-ip 192.168.192.132 :%s/6373/6375/g # (6) 6376 端口配置文件 [root@localhost conf]# sed "s/6375/6376/g" redis-6375.conf > redis-6376.conf -
启动六个redis节点
[root@localhost redis-5]# cd /usr/local/redis-5/ # 当前为130机器 [root@localhost redis-5]# bin/redis-server conf/redis-6371.conf [root@localhost redis-5]# bin/redis-server conf/redis-6372.conf [root@localhost redis-5]# bin/redis-server conf/redis-6373.conf # 切换到131机器 [root@localhost redis-5]# bin/redis-server conf/redis-6374.conf [root@localhost redis-5]# bin/redis-server conf/redis-6375.conf # 切换到132机器 [root@localhost redis-5]# bin/redis-server conf/redis-6376.conf # 查看是否启动成功 [root@localhost redis-5]# ps -ef | grep redis # cluster 表示集群模式,且启动成功 root 1766 1 0 17:55 ? 00:00:00 bin/redis-server 0.0.0.0:6375 [cluster] root 1771 1 0 17:55 ? 00:00:00 bin/redis-server 0.0.0.0:6376 [cluster] root 1779 1284 0 17:55 pts/0 00:00:00 grep redis -
搭建集群
- 记得关闭防火墙,若是基于上文的操作,到达此步骤时防火墙一般处于关闭状态,否则上面的主从、哨兵都过不了~
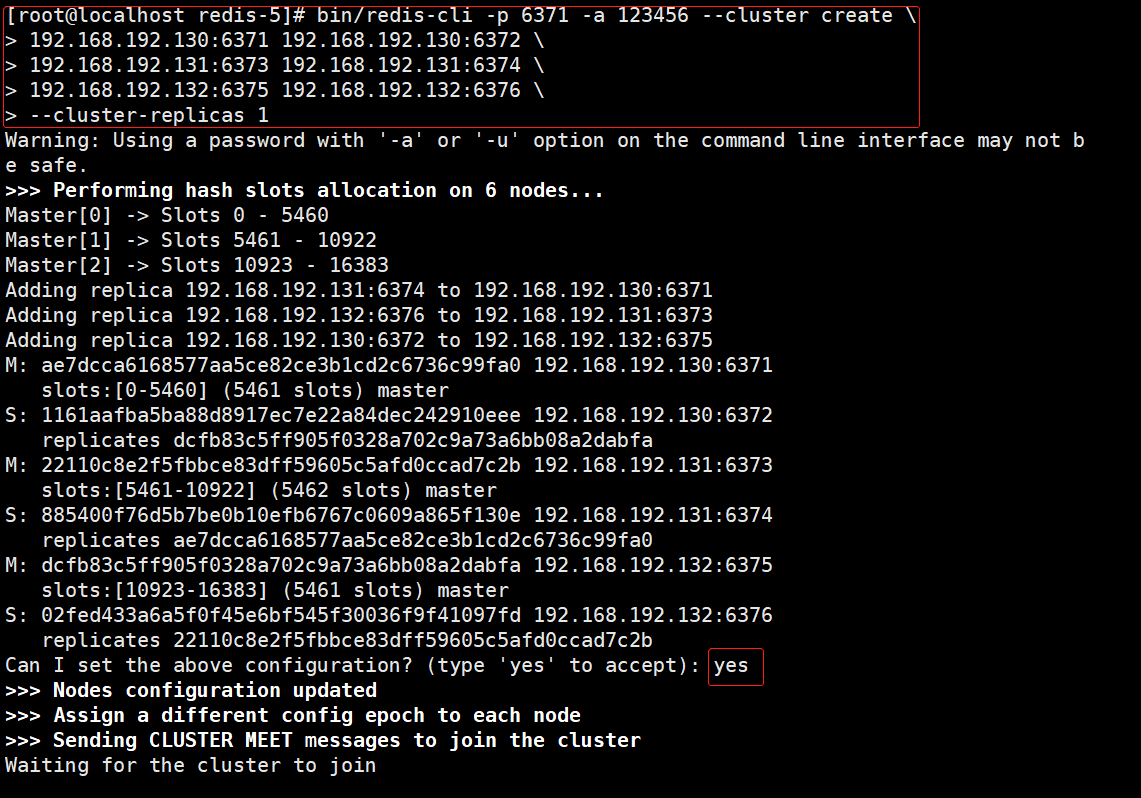
[root@localhost redis-5]# bin/redis-cli -p 6371 -a 123456 --cluster create \ > 192.168.192.130:6371 192.168.192.130:6372 \ > 192.168.192.131:6373 192.168.192.131:6374 \ > 192.168.192.132:6375 192.168.192.132:6376 \ > --cluster-replicas 1 # 参数说明 # bin/redis-cli -p 6371 -a 123456 --cluster create :连接任意一个客户端即可, --cluster create 表示创建集群 # "\" 感觉像连接符号,命令太长时使用。即 "--cluster create" 后面跟 6 个 redis 节点的ip 和 port # --cluster-replicas 1 ,主节点数/从节点数的比例,使用1:1的比例,6 个节点最终会产生3主3从的集群环境![]()
![]()
-
集群检查
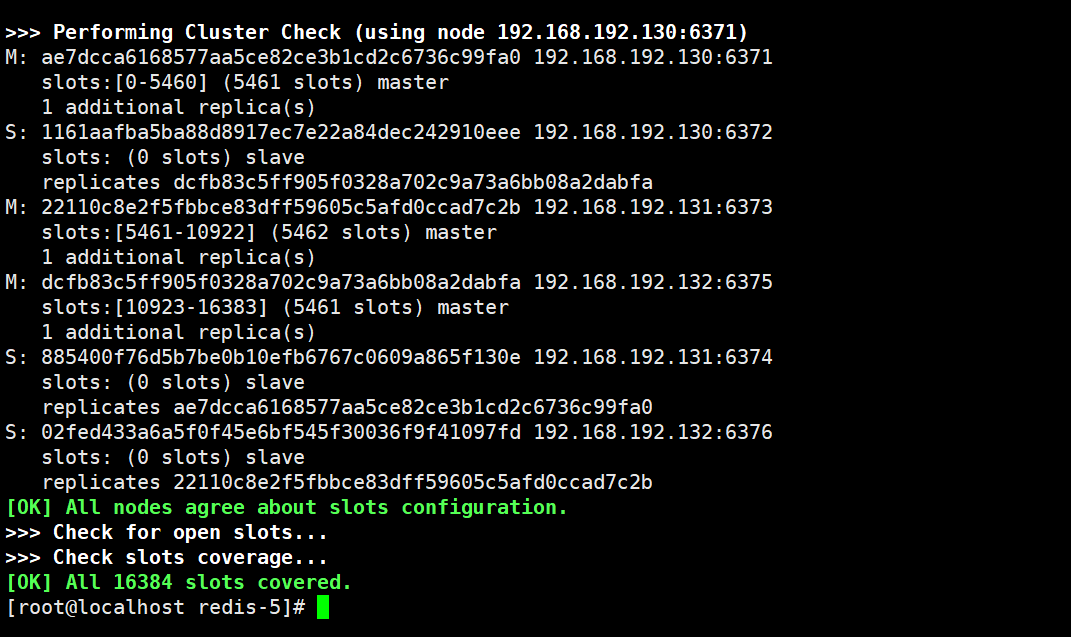
# (1) 检查集群状态(--cluster check命令),连接任意一个节点执行命令即可 [root@localhost redis-5]# bin/redis-cli -a 123456 --cluster check 192.168.192.130:6371 Warning: Using a password with '-a' or '-u' option on the command line interface may not be safe. # 192.168.192.130:6371 是主节点,当前存了9个key,分配了5461个槽,有1个从节点(剩余两行信息同理) 192.168.192.130:6371 (ae7dcca6...) -> 0 keys | 5461 slots | 1 slaves. 192.168.192.131:6373 (22110c8e...) -> 0 keys | 5462 slots | 1 slaves. 192.168.192.132:6375 (dcfb83c5...) -> 0 keys | 5461 slots | 1 slaves. [OK] 0 keys in 3 masters. 0.00 keys per slot on average. # 集群状态检查操作由 192.168.192.130:6371 节点执行 >>> Performing Cluster Check (using node 192.168.192.130:6371) # M 表示master即主节点,下面是它的信息和从节点个数 M: ae7dcca6168577aa5ce82ce3b1cd2c6736c99fa0 192.168.192.130:6371 slots:[0-5460] (5461 slots) master 1 additional replica(s) # S 表示从节点,从节点信息以及复制的主节点ID.由此可知,该从节点的主节点为 6375 端口 S: 1161aafba5ba88d8917ec7e22a84dec242910eee 192.168.192.130:6372 slots: (0 slots) slave replicates dcfb83c5ff905f0328a702c9a73a6bb08a2dabfa M: 22110c8e2f5fbbce83dff59605c5afd0ccad7c2b 192.168.192.131:6373 slots:[5461-10922] (5462 slots) master 1 additional replica(s) M: dcfb83c5ff905f0328a702c9a73a6bb08a2dabfa 192.168.192.132:6375 slots:[10923-16383] (5461 slots) master 1 additional replica(s) S: 885400f76d5b7be0b10efb6767c0609a865f130e 192.168.192.131:6374 slots: (0 slots) slave replicates ae7dcca6168577aa5ce82ce3b1cd2c6736c99fa0 S: 02fed433a6a5f0f45e6bf545f30036f9f41097fd 192.168.192.132:6376 slots: (0 slots) slave replicates 22110c8e2f5fbbce83dff59605c5afd0ccad7c2b [OK] All nodes agree about slots configuration. >>> Check for open slots... >>> Check slots coverage... [OK] All 16384 slots covered. # (2) 查看集群信息(cluster info命令),连接任意一个节点执行命令即可 [root@localhost redis-5]# bin/redis-cli -h 192.168.192.131 -p 6373 -a 123456 cluster info Warning: Using a password with '-a' or '-u' option on the command line interface may not be safe. cluster_state:ok # 集群状态 cluster_slots_assigned:16384 # 集群槽已分配个数 cluster_slots_ok:16384 # 集群槽分配成功数 cluster_slots_pfail:0 # 集群槽可能失效数 cluster_slots_fail:0 # 集群槽已经失效数 cluster_known_nodes:6 # 集群中redis节点个数 cluster_size:3 cluster_current_epoch:6 cluster_my_epoch:3 cluster_stats_messages_ping_sent:922 cluster_stats_messages_pong_sent:956 cluster_stats_messages_meet_sent:1 cluster_stats_messages_sent:1879 cluster_stats_messages_ping_received:956 cluster_stats_messages_pong_received:923 cluster_stats_messages_received:1879 # (3) 查看节点信息(cluster nodes命令),连接任意一个节点执行命令即可 [root@localhost redis-5]# bin/redis-cli -h 192.168.192.131 -p 6373 -a 123456 cluster nodes Warning: Using a password with '-a' or '-u' option on the command line interface may not be safe. 1161aafba5ba88d8917ec7e22a84dec242910eee 192.168.192.130:6372@16372 slave dcfb83c5ff905f0328a702c9a73a6bb08a2dabfa 0 1638094809000 5 connected 22110c8e2f5fbbce83dff59605c5afd0ccad7c2b 192.168.192.131:6373@16373 myself,master - 0 1638094807000 3 connected 5461-10922 885400f76d5b7be0b10efb6767c0609a865f130e 192.168.192.131:6374@16374 slave ae7dcca6168577aa5ce82ce3b1cd2c6736c99fa0 0 1638094807000 1 connected 02fed433a6a5f0f45e6bf545f30036f9f41097fd 192.168.192.132:6376@16376 slave 22110c8e2f5fbbce83dff59605c5afd0ccad7c2b 0 1638094809000 6 connected ae7dcca6168577aa5ce82ce3b1cd2c6736c99fa0 192.168.192.130:6371@16371 master - 0 1638094810007 1 connected 0-5460 dcfb83c5ff905f0328a702c9a73a6bb08a2dabfa 192.168.192.132:6375@16375 master - 0 1638094808000 5 connected 10923-16383 -
查看主/从节点日志。略~
-
集群测试
# 连接集群中的任意一个节点即可,但一定要加 "-c",该参数表示集群模式。若是不加有可能会报 moved 异常~~
[root@localhost redis-5]# bin/redis-cli -c -a 123456 -h 192.168.192.130 -p 6371
Warning: Using a password with '-a' or '-u' option on the command line interface may not be safe.
192.168.192.130:6371> ping
PONG
192.168.192.130:6371> set zhangsan:age 18
-> Redirected to slot [9979] located at 192.168.192.131:6373
OK
192.168.192.131:6373> set zhangsan:phone 18362610001
-> Redirected to slot [3426] located at 192.168.192.130:6371
OK
192.168.192.130:6371> set zhangsan:address luoyang
-> Redirected to slot [6169] located at 192.168.192.131:6373
OK
192.168.192.131:6373> get zhangsan:phone
-> Redirected to slot [3426] located at 192.168.192.130:6371
"18362610001"

 浙公网安备 33010602011771号