

“瑞士军刀”便捷的工具箱:100 个实用的 Python 入门代码片段
一、 基础与数据结构 (1-25)
1. 交换两个变量
# 1. 交换两个变量
a, b = 5, 10
a, b = b, a
print(f"a:{a},b:{b}")  # a:10,b:5
2. 列表推导式-生成列表
# 2. 列表推导式 (List Comprehension)
squares = [x ** 2 for x in range(10) if x % 2 == 0]
print(squares) # [0, 4, 16, 36, 64]
3. 列表推导式-生成字典
# 3. 列表推导式 (List Comprehension)
nums = [0, 1, 2, 3, 4]
squares_dict = {x: x ** 2 for x in nums}
print(squares_dict)  # {0: 0, 1: 1, 2: 4, 3: 9, 4: 16}
4. 合并两个字典 (Python 3.9+)
# 4. 合并两个字典 (Python 3.9+)
dict1 = {"a": 1, "b": 2}
dict2 = {"b": 3, "c": 4}
merged_dict = dict1 | dict2
merged_dict_old = {**dict1, **dict2}  # 兼容旧版本
print(merged_dict)  # {'a': 1, 'b': 3, 'c': 4}
print(merged_dict_old)  # {'a': 1, 'b': 3, 'c': 4}
5. collections.Counter 统计元素
# 5. collections.Counter 统计元素
from collections import Counter
my_list = ["a", "b", "c", "b", "b", "a"]
count = Counter(my_list)
print(count)  # Counter({'b': 3, 'a': 2, 'c': 1})
print(count.most_common())  # [('b', 3), ('a', 2), ('c', 1)]
print(count.most_common(1))  # [('b', 3)]
6. collections.defaultdict 默认字典
# 6. collections.defaultdict 默认字典
from collections import defaultdict
d = defaultdict(list)  # defaultdict(, {})
# 告诉 defaultdict:“如果以后有人试图访问一个还不存在的键(key),请不要报错(KeyError),而是自动为那个键创建一个空列表([])作为它的默认值。
d['g1'].append("item1")
d["g2"].append("item2")
print(d)  # defaultdict(, {'g1': ['item1'], 'g2': ['item2']})
print(dict(d))  # {'g1': ['item1'], 'g2': ['item2']}
这段代码的核心意义在于“简化代码,避免在向字典中的列表添加元素时出现 KeyError 错误”。简单来说defaultdict 最大的好处是:当访问一个不存在的键(key)时,它会自动创建这个键,并赋予一个事先指定的“默认值”。
对比d['g1']=["item1"]方式:
| 操作 | d['g1'].append("item1") (追加) | d['g1'] = ["item1"] (赋值) |
| 含义 | "获取 'g1' 对应的列表,然后在这个列表末尾添加 'item1'。" | "创建一个全新的列表 ["item1"],然后让 'g1' 这个键指向这个新列表。" |
| 执行过程 | 1. 找到 d['g1'] (即 ['existing_item'])。 2. 调用这个列表的 .append() 方法。 | 1. 找到 d['g1'] (即 ['existing_item'])。 2. 丢弃这个旧列表。 3. 将 d['g1'] 指向一个全新的列表 ["item1"]。 |
| 最终结果 | {'g1': ['existing_item', 'item1']} | {'g1': ['item1']} |
| 是否利用了 defaultdict 特性? | 是。 正是因为 defaultdict,我们才能在 d 为空时也直接 .append() 而不报错。 | 否。 这是一个标准的字典赋值操作,defaultdict 的工厂函数没有被调用。 |
7. collections.deque 双端队列高效地在列表两端添加或删除元素
# 7. collections.deque 双端队列 高效地在列表两端添加或删除元素。
from collections import deque
q = deque(maxlen=3)
q.append(1)
q.append(2)
q.append(3)
print(q)  # deque([1, 2, 3], maxlen=3)
q.append(4)  # 自动从另一端挤出 1
print(q)  # deque([2, 3, 4], maxlen=3)
q.appendleft(0)  # 从左侧添加
print(q)  # deque([0, 2, 3], maxlen=3)
8. 列表去重 (保持顺序)
# 8. 列表去重 (保持顺序)
my_list = [1, 2, 3, 2, 1, 5, 4, 3]
unique_list = list(dict.fromkeys(my_list))
#   # 当你对一个字典(dict)直接使用 list() 函数时,Python 的默认行为是只获取字典中所有的“键”(keys),并把它们放进一个新的列表里。
#   # 从 Python 3.7 开始,字典在创建时会自动保持键的插入顺序
print(unique_list)  # [1, 2, 3, 5, 4]
提示:如果直接使用set会打乱顺序。wrong_list = list(set(my_list)) !!错误方法,顺序会随机。下面提供一个使用set实现的正确方法
# 一个使用 set 实现的正确方法,在 Python 3.6 及更早版本中也能正确工作
my_list = [1, 2, 3, 2, 1, 5, 4, 3]
seen = set()
unique_list_with_set = []
for item in my_list:
    if item not in seen:
        unique_list_with_set.append(item)
        seen.add(item)
9. 字典的 get() 安全取值
# 9. 字典的 get() 安全取值
my_dict = {'name': 'Alice', 'age': 25}
city = my_dict.get("city", "unknown")
print(my_dict)  # {'name': 'Alice', 'age': 25}
print(city)  # unknown
10. 字典的 setdefault() 如果键不存在,则插入该键及默认值,并返回该值
# 10. 字典的 setdefault() 如果键不存在,则插入该键及默认值,并返回该值
my_dict_10 = {"a": 1}
value_a = my_dict_10.setdefault("a", 10)
value_b = my_dict_10.setdefault("b", 2)
print(f"a:{value_a},b:{value_b}")  # a:1,b:2
11. 三元运算符
# 11. 三元运算符
age = 20
status = "Adult" if age >= 18 else "Minor"
print(status)  # Adult
12. * 解包可迭代对象
# 12. * 解包可迭代对象
my_list = [1, 2, 3]
print(*my_list)  # 1 2 3
a, *middle, b = [1, 2, 3, 4, 5]
print(f"a:{a},middle:{middle},b:{b}")  # a:1,middle:[2, 3, 4],b:5
13. ** 解包字典
# 13. ** 解包字典
def user_profile(name, age, city):
    print(f"name:{name} age:{age} city:{city}")
profile_13 = {"name": "YuYe", "age": 34, "city": "Lundon"}
user_profile(**profile_13)  # name:YuYe age:34 city:Lundon
14. zip 组合多个列表
# 14. zip 组合多个列表
names_14 = ['Alice', 'Bob', 'Charlie']
ages_14 = [25, 30, 35]
for name, age in zip(names_14, ages_14):
    print(f"{name} is {age} years old")  # Alice is 25 years old...
15. enumerate 获取索引和值
# 15. enumerate 获取索引和值
fruits = ['apple', 'banana', 'cherry']
for index, fruit in enumerate(fruits, start=1):
    print(f"Fruit {index}: {fruit}")  # Fruit 1: apple...
16. any 和 all 检查
# 16. any 和 all 检查
nums = [0, 1, 2, 3]
print(any(nums))  # True (只要有一个为 True)
print(all(nums))  # False (因为 0 是 False)
17. 展平嵌套列表
# 17. 展平嵌套列表
nested_list = [[1, 2, 3], [4, 5], [6]]
flat_list = [item for sublist in nested_list for item in sublist]
print(flat_list)  # [1, 2, 3, 4, 5, 6]
18. collections.namedtuple 命名元组
# 18. collections.namedtuple 命名元组
from collections import namedtuple
Point = namedtuple('Point', ['x', 'y'])
p = Point(10, 20)
print(p.x + p.y)  # 30
print(p)  # Point(x=10, y=20)
# # 普通的元组方法:
# p = (10, 20)
# x = p[0] # 必须用“索引数字”来访问数据
# y = p[1]
# print(x + y)  # 30
collections.namedtuple是 Python 中一个非常有用的工具,它是一个工厂函数,用于创建带有命名字段的元组(tuple)子类。可以把它想象成一种“轻量级的类”,它兼具了元组的不可变性和内存效率,以及字典(或类)的易读性
19. dataclasses 数据类 (Python 3.7+) 自动生成 __init__, __repr__ 等。
19. dataclasses 数据类 (Python 3.7+) 自动生成 __init__, __repr__ 等。
from dataclasses import dataclass
@dataclass()
class Person:
    name: str
    age: int
    is_active: bool = True
p = Person("YuYe", 18)
print(p)  # Person(name='YuYe', age=18, is_active=True)
@dataclass 自动生成了一个 __repr__ 方法。 如果没有 @dataclass,手动写的“传统类”在 print(p) 时会输出: <__main__.Person object at 0x10a4f3c70> (一个无意义的内存地址)
20. copy 与 deepcopy
# 20. copy 与 deepcopy
import copy
list_20a = [[1, 1], [2, 2]]
list_20b = list_20a.copy()
list_20b[0][0] = 99
print(list_20a, list_20b)  # [[99, 1], [2, 2]] [[99, 1], [2, 2]]
list_20c = [[1, 1], [2, 2]]
lis_20d = copy.deepcopy(list_20a)
lis_20d[0][0] = 99
print(list_20c, lis_20d)  # [[1, 1], [2, 2]] [[99, 1], [2, 2]]
21. 集合运算 (Set Operations)
# 21. 集合运算 (Set Operations)
set_21a = {1, 2, 3, 4}
set_21b = {3, 4, 5, 6}
print(f"并集:{set_21a | set_21b}")  # 并集:{1, 2, 3, 4, 5, 6}
print(f"交集:{set_21a & set_21b}")  # 交集:{3, 4}
print(f"差集:{set_21a - set_21b}")  # 差集:{1, 2}
print(f"对称差集:{set_21a ^ set_21b}")  # 对称差集:{1, 2, 5, 6}
22. 排序 sorted vs list.sort
# 22. 排序 sorted vs list.sort
my_list = [3, 1, 2, 4, 6, 10, 7]
new_list = sorted(my_list)
print(
    f"my_list:{my_list},new_list:{new_list}")  # my_list:[3, 1, 2, 4, 6, 10, 7],new_list:[1, 2, 3, 4, 6, 7, 10]
my_list.sort()
print(my_list) # [1, 2, 3, 4, 6, 7, 10]sort()(方法, 原地修改, 只用于列表)sorted()(函数, 返回新列表, 可用于任何可迭代对象)
23. 按键排序 (Sorting by Key)
# 23. 按键排序 (Sorting by Key)
points_23 = [(1, 5), (3, 2), (5, 9)]
points_23.sort(key=lambda p: p[1])  # 按 Y 坐标排序
print(points_23)  # [(3, 2), (1, 5), (5, 9)]
24. heapq 获取 N 个最大/小元素
# 24. heapq 获取 N 个最大/小元素
import heapq
nums = [1, 8, 2, 23, 7, -4, 18, 23, 42, 37, 2]
print(f"最大的三个:{heapq.nlargest(3, nums)}")  # 最大的三个:[42, 37, 23]
print(f"最小的三个:{heapq.nsmallest(3, nums)}") # 最小的三个:[-4, 1, 2]- heapq优点: 效率极高,不需要对整个列表进行排序。如果
nums有100万个元素,它也只会聪明地维护一个大小为3的堆,遍历一遍列表即可。缺点: 需要import heapq,即多写一行代码 - 使用
sorted()(排序)优点: 逻辑简单, 非常直观易懂,不需要额外导入。缺点: 效率较低 - 如果列表很小(比如只有几十个元素):用
sorted()或heapq都没问题,性能差异可以忽略不计。如果列表非常大(成千上万,甚至更多)推荐使用heapq,如果只需要1个最大/最小值: 直接使用max(nums)和min(nums)是最快也是最简单的
25. isinstance 检查类型
# 25. isinstance 检查类型
x = 10
if isinstance(x, (int, float)):
    print("x is a number")
二、 字符串与正则表达式 (26-40)
26. 反转字符串
# 26. 反转字符串
s = "hello"
reversed_s = s[::-1]
print(reversed_s)  # olleh
27. f-string 格式化 (Python 3.6+)
# 27. f-string 格式化 (Python 3.6+)
name = "Yuye"
pi = 3.14159
print(f"User: {name}, Pi: {pi:.2f}")  # User: Alice, Pi: 3.14
28. join 拼接字符串列表
# 28. join 拼接字符串列表
words = ["Hello", "World", "from", "Python"]
sentence = " ".join(words)
print(sentence)  # Hello World from Python
29. isdigit, isalpha, isalnum
# 29. isdigit, isalpha, isalnum
print("12345".isdigit())  # True
print("Hello".isalpha())  # True
print("User123".isalnum())  # True
print("User 123".isalnum())  # False (因为有空格)
30. startswith 和 endswith
# 30. startswith 和 endswith
filename = "document.pdf"
print(filename.startswith("doc"))  # True
print(filename.endswith((".pdf", ".txt")))  # True (支持元组)
# 只要字符串的结尾(或开头)能匹配上元组中的任意一个元素,结果就是 True
31. strip, lstrip, rstrip
# 31. strip, lstrip, rstrip
text = "   Hello World   "
print(f"'{text.strip()}'")  # 'Hello World'
print(f"'{text.lstrip()}'")  # 'Hello World   '
print(f"'{text.rstrip()}'")  # '   Hello World'
32. 检查回文串
# 32. 检查回文串
def is_palindrome(text):
    clean_text = ''.join(filter(str.isalnum, text)).lower()  # str.isalnum 在这里被用作 filter 的过滤器函数
    return clean_text == clean_text[::-1]
print(is_palindrome("A man, a plan, a canal: Panama"))  # True
33. find vs index
# 33. find vs index
text = "hello"
print(text.find('e'))  # 1
print(text.find('z'))  # -1 (未找到)
print(text.index('e'))  # 1
# print(text.index('z')) # 会引发 ValueError
34. 批量替换
text = "Hello [name], welcome to [place]."
text = text.replace("[name]", "Bob").replace("[place]", "the office")
print(text)  # Hello Bob, welcome to the office.
35. re.findall (查找所有所有匹配,并把捕获组的内容放到一个列表里返回)
# 35. re.findall (查找所有所有匹配,并把捕获组的内容放到一个列表里返回)
import re
text = "Emails: test1@example.com, test2@domain.com"
emails = re.findall(r'[\w\.-]+@[\w\.-]+\.\w+', text)  # [用户名]@[域名].[顶级域名]
print(emails)  # ['test1@example.com', 'test2@domain.com']
36. re.finditer(find iterator)会返回一个迭代器
# 36. re.finditer(find iterator)会返回一个迭代器,需要用 for 循环来遍历它找到的每一个匹配对象
import re
text = "User 'alice' is 25, User 'bob' is 30."
# 首先,使用 re.finditer 查找所有匹配
# matches 是一个迭代器,包含了所有匹配对象
matches = re.finditer(r"User '(\w+)' is (\d+)", text)
# 然后,遍历这个迭代器
for match in matches:
    print("--------------------")  # 加一个分隔符
    # 这里的 match 对象和用 search 得到的对象是一样的
    # 可以同样使用 group() 方法
    print(f"Found: {match.group(0)}")
    print(f"Name: {match.group(1)}")
    print(f"Age: {match.group(2)}")
# 正则表达式 r"User '(\w+)' is (\d+)" 解析:
# User ' ' is:是要按字面匹配的文本。
# (\w+):是第一个捕获组 (Group 1)。
    # \w+ 匹配一个或多个“单词字符”(字母、数字、下划线)。在这里,它用来匹配名字,如 alice。
    # 圆括号 () 用来“捕获”这部分内容。
# (\d+):是第二个捕获组 (Group 2)。
    # \d+ 匹配一个或多个“数字”。在这里,它用来匹配年龄,如 25。
    # 圆括号 () 捕获这部分内容。
# for match in matches::遍历 re.finditer 返回的那个迭代器。循环会执行两次,因为字符串中有两个匹配项。
# match:在每次循环中,match 是一个“匹配对象 (Match Object)”。
# match.group(0):返回整个正则表达式匹配到的完整字符串。
# match.group(1):返回第一个捕获组 (\w+) 匹配到的内容(即名字)。
# match.group(2):返回第二个捕获组 (\d+) 匹配到的内容(即年龄)。
37 re.search (查找第一个并获取组)
# 37  re.search (查找第一个并获取组)
import re
text = "User 'alice' is 25, User 'bob' is 30."
match = re.search(r"User '(\w+)' is (\d+)", text)
if match:
    print(f"Found: {match.group(0)}")  # 完整匹配
    print(f"Name: {match.group(1)}")  # 第1个括号 (alice)
    print(f"Age: {match.group(2)}")  # 第2个括号 (25)
# Found: User 'alice' is 25
# Name: alice
# Age: 25
38. re.sub (替换)
# 38. re.sub (替换)
import re
text = "Contact us at support@example.com or sales@example.com"
# 隐藏用户名
censored = re.sub(r'([\w\.-]+)@', r'REDACTED@', text)
print(censored)  # Contact us at REDACTED@example.com or REDACTED@example.com
re.sub 只替换正则表达式 (pattern) 匹配到的内容,前面"的 "Contact us at " 字符串没有被匹配到,所以被保留了下来
39. re.split (分割)
# 39. re.split (分割)
import re
text = "apple,banana;orange|grape"
# 按 , ; | 分割
parts = re.split(r'[,;|]', text)
print(parts)  # ['apple', 'banana', 'orange', 'grape']
用
str.split():非常确定分隔符只有一个,比如只按逗号分割或只按空格分割用
re.split(): 需要更复杂的规则时
40. 编译正则表达式 (提高效率)
# 40. 编译正则表达式 (提高效率)
import re
# 预编译
email_regex = re.compile(r'[\w\.-]+@[\w\.-]+\.\w+')
text1 = "Email: a@b.com"
text2 = "Email: c@d.com"
print(email_regex.findall(text1))  # ['a@b.com']
print(email_regex.findall(text2))  # ['c@d.com']
re.compile() 函数获取一个正则表达式字符串,并将其转换(编译)成一个正则表达式对象 (email_regex)。之后无论调用 email_regex.findall() 多少次,都是直接使用这个编译好的对象,省去了重复“读取理解”的步骤
三、 文件与OS操作 (41-55)
41. with open 读写文件
# 41. with open 读写文件
try:
    with open('example.txt', 'w', encoding='utf-8') as f:
        f.write("Hello\nWorld\n")
    with open('example.txt', 'r', encoding='utf-8') as f:
        for line in f:
            print(line.strip()) # 逐行读取
except FileNotFoundError:
    print("File not found.")
42. pathlib 现代路径操作 (Python 3.4+)
# 42. pathlib 现代路径操作 (Python 3.4+)
from pathlib import Path
p = Path('example.txt')
# 读取/写入文本
p.write_text("New content", encoding='utf-8')
content = p.read_text(encoding='utf-8')
print(content)
print(f"Stem: {p.stem}, Suffix: {p.suffix}, Absolute: {p.resolve()}")p.read_text()是一个便利函数,它会一次性将文件的全部内容读取到内存中。如果example.txt是一个 10GB 的文件,p.read_text()会试图占用 10GB 内存,这很可能会导致程序内存溢出而崩溃。
43. 拼接路径 跨平台安全地拼接路径。
- os传统方式
# os传统方式
import os
path = os.path.join('my_project', 'data', 'raw_data.csv')
print(path)
# 在 Linux/Mac 上输出: my_project/data/raw_data.csv
# 在 Windows 上输出: my_project\data\raw_data.csv- Path方式(Python 3.4+)
# Path方式(Python 3.4+)
from pathlib import Path
# 使用 / 操作符来拼接路径
# Path 会自动处理不同操作系统(Windows, Linux, Mac)的分隔符
path = Path('my_project') / 'data' / 'raw_data.csv'
print(path)
# 在 Linux/Mac 上输出: my_project/data/raw_data.csv
# 在 Windows 上输出:    my_project\data\raw_data.csv
44. 检查文件/目录
- os传统方式
# os传统方式
import os
path = 'example.txt'
print(f"Exists: {os.path.exists(path)}")
print(f"Is file: {os.path.isfile(path)}")
print(f"Is dir: {os.path.isdir(path)}")- Path方式(Python 3.4+)
# Path方式(Python 3.4+)
from pathlib import Path
# 1. 将字符串路径封装成一个 Path 对象
p = Path('example.txt')
# 2. 直接在对象 p 上调用方法
print(f"Exists: {p.exists()}")
print(f"Is file: {p.is_file()}")
print(f"Is dir: {p.is_dir()}")
45. os.makedirs 递归创建目录
- os传统方式
# os传统方式
import os
os.makedirs('my_project/data/processed', exist_ok=True)
# exist_ok=True:如果目标目录(包括所有中间目录)已经存在,就什么也不做且不会报错。否则程序会崩溃并抛出一个 FileExistsError 错误。- Path方式(Python 3.4+)
# Path方式(Python 3.4+)
from pathlib import Path
# 1. 创建 Path 对象,可以用 / 拼接路径,更清晰
p = Path('my_project') / 'data' / 'processed'
# 2. 调用 .mkdir() 方法
p.mkdir(parents=True, exist_ok=True)
46. glob 查找文件 使用通配符匹配文件
- glob方式
import glob
# 查找当前目录下所有的 .txt 文件
txt_files = glob.glob('*.txt')
print(f"TXT files: {txt_files}")
# 递归查找所有 .py 文件
py_files = glob.glob('**/*.py', recursive=True)
print(f".py files: {py_files}")- Path方式(Python 3.4+)
from pathlib import Path
# 1. 获取当前目录的 Path 对象
p = Path('.') # Path() 也可以代表当前目录
# 2. 查找当前目录下所有的 .txt 文件
# p.glob() 返回一个迭代器,我们用 list() 把它转换成列表
# 注意:列表里存放的是 Path 对象,而不是字符串
txt_files = list(p.glob('*.txt'))
print(f"TXT files: {txt_files}")
# 3. 递归查找所有 .py 文件
# p.rglob() (recursive glob) 方法是专门用来递归查找的,更简洁
py_files = list(p.rglob('*.py'))
print(f".py files: {py_files}")
47. shutil 文件操作 (复制/移动/删除)
# 47. shutil 文件操作 (复制/移动/删除)
import shutil
import os
# 复制
shutil.copy('example.txt', 'example_copy.txt')
# 移动 (重命名)
shutil.move('example_copy.txt', 'example_moved.txt')
# shutil.move(src, dst) 用途有两个:
# 移动: 如果 dst 是一个目录,它会把 src 移动到该目录下。
# 重命名: 如果 dst 是一个文件名(且与 src 在同一目录),它会把 src 重命名为 dst。
# 作用: 在这个例子中,它执行的是重命名操作,将 example_copy.txt 改名为 example_moved.txt。
# 删除文件
if os.path.exists('example_moved.txt'):
    os.remove('example_moved.txt')
48. shutil.rmtree 删除目录树 非常危险的操作,会删除目录及其所有内容。
# 48. shutil.rmtree 删除目录树 非常危险的操作,会删除目录及其所有内容。
import shutil
# 先创建
os.makedirs('temp_dir/subdir', exist_ok=True)
# 再删除
# shutil.rmtree('temp_dir')
print("Directory 'temp_dir' would be removed.")
49. os.getenv 读取环境变量
import os
# 读取 API_KEY 环境变量,如果不存在则返回 None
api_key = os.getenv('API_KEY')
print(api_key)
# 提供默认值
db_host = os.getenv('DB_HOST', 'localhost')
print(f"DB Host: {db_host}")
50. os.walk 遍历目录树
# 50. os.walk 遍历目录树
import os
# (为避免输出过多,只看当前目录的第一层)
for root, dirs, files in os.walk('.'):
    print(f"Root: {root}")
    print(f"Dirs: {dirs}")
    print(f"Files: {files}")
    break # 移除 break 可递归遍历
51. tempfile 临时文件/目录
# 51. tempfile 临时文件/目录
import tempfile
import os
with tempfile.TemporaryDirectory() as tmpdir:
    print(f'Created temporary directory: {tmpdir}')
    # 在这个 'with' 块中,目录存在
    # 退出 'with' 块后,目录会自动删除
with tempfile.NamedTemporaryFile(delete=False) as tmpf:
    print(f'Created temporary file: {tmpf.name}')
    tmpf.write(b"Hello")
# (delete=False 使得文件在关闭后保留,通常用于调试)
# os.remove(tmpf.name) # 记得手动删除
52. subprocess.run 运行外部命令 (Python 3.5+)
# 52. subprocess.run 运行外部命令 (Python 3.5+)
import subprocess
import os
# 运行 'ls -l' (Linux/Mac) 或 'dir' (Windows)
cmd = 'dir' if os.name == 'nt' else 'ls -l'
result = subprocess.run(
    cmd,
    shell=True,
    capture_output=True,
    text=True,
    check=True
)
print("--- Command Output ---")
print(result.stdout)
从 Python 3.5 开始,官方强烈推荐使用 subprocess.run() 来代替 os.system()。subprocess 模块更安全、功能更强大,并且可以轻松捕获命令的输出。
53. sys.argv 简单命令行参数
# 53. sys.argv 简单命令行参数
import sys
print(f"Script name: {sys.argv[0]}")
if len(sys.argv) > 1:
print(f"Arguments: {sys.argv[1:]}")- 命令行执行
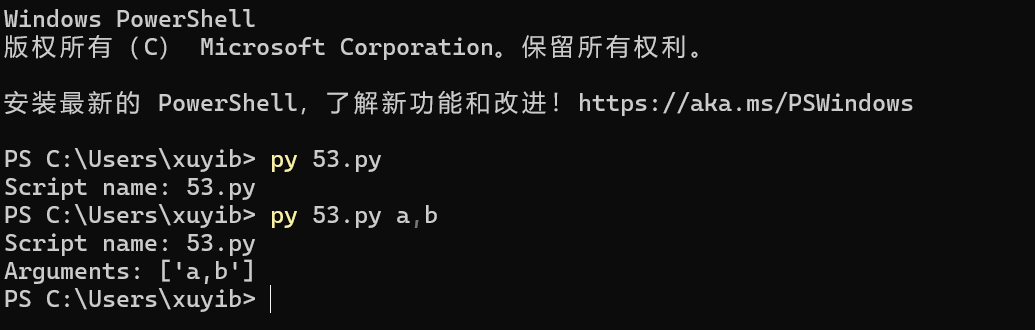
sys.argv 是 Python 脚本与外部命令行交互的基本桥梁,它让脚本可以根据运行时的不同输入,执行不同的操作(比如 tasklist 脚本接收一个进程名作为参数)
54. sys.exit 退出脚本
# 54. sys.exit 退出脚本
import sys
import os
if not os.path.exists('required_file.txt'):
    print("Error: required_file.txt not found.", file=sys.stderr)
    # sys.stderr 是“标准错误”流。这是一个专门用来发送错误和警告信息的通道
    sys.exit(1)  # 以非 0 状态码退出,表示错误
55. 读/写 Bytes 文件
# 55. 读/写 Bytes 文件
# 写入
with open('data.bin', 'wb') as f:
    f.write(b'\xDE\xAD\xBE\xEF')
# 读取
with open('data.bin', 'rb') as f:
    content = f.read()
    print(content) # b'\xde\xad\xbe\xef'
四、 函数与高级编程 (56-70)
56. lambda 匿名函数 (在 23. 按键排序 中已使用)
# 56. lambda 匿名函数 (在 23. 按键排序 中已使用)
add = lambda x, y: x + y
print(add(5, 3)) # 8
57. *args 和 **kwargs
# 57. *args 和 **kwargs
def flexible_function(*args, **kwargs):
    print("Positional args:", args)
    print("Keyword args:", kwargs)
flexible_function(1, 2, name="Alice", status="Active")
58. try...except...else...finally
# 58. try...except...else...finally
try:
    result = 10 / 2
except ZeroDivisionError:
    print("Error: Cannot divide by zero.")
else:
    print(f"Result is: {result}") # 无异常时执行
finally:
    print("Execution finished.") # 总是执行
59. 自定义异常
class MyCustomError(Exception):
    """A custom exception for my application."""
    pass
try:
    raise MyCustomError("Something went wrong!")
except MyCustomError as e:
    print(f"Caught custom error: {e}")
60. assert断言 用于调试,检查条件是否为真
# 60. assert 断言 用于调试,检查条件是否为真
def calculate_price(age):
    assert age > 0, "Age must be positive"
    if age < 18:
        return 10
    return 20
# calculate_price(-5) # 会引发 AssertionError: Age must be positive- calculate_price(-5) 执行结果

61. 简单的装饰器 (Decorator)
# 61. 简单的装饰器 (Decorator)
import time
def timer_decorator(func):
    def wrapper(*args, **kwargs):
        start = time.perf_counter()
        result = func(*args, **kwargs)
        end = time.perf_counter()
        print(f"{func.__name__} took {end - start:.4f}s")
        return result
    return wrapper
@timer_decorator
def slow_function():
    time.sleep(0.5)
slow_function() # slow_function took 0.500Xs
62. functools.lru_cache (Memoization) 自动缓存函数结果,极大提升递归(如斐波那契)性能
#62. functools.lru_cache (Memoization) 自动缓存函数结果,极大提升递归(如斐波那契)性能
import functools
@functools.lru_cache(maxsize=None)
# maxsize (最大大小) 用来控制这个缓存能“记住”多少个不同的结果。
# 默认值 (不写参数时):@functools.lru_cache() 默认等于 maxsize=128。意思是它最多只能记住 128 个不同的结果。
# maxsize=None 缓存会持续增长,直到你的程序结束或者内存耗尽
def fibonacci(n):
    if n < 2:
        return n
    return fibonacci(n - 1) + fibonacci(n - 2)
print(fibonacci(50))  # 几乎瞬间完成
63. functools.partial 偏函数 固定函数的部分参数,创建一个新函数
# 63. functools.partial 偏函数 固定函数的部分参数,创建一个新函数
from functools import partial
def power(base, exponent):
    return base ** exponent
# 创建一个总是计算平方的函数
square = partial(power, exponent=2)
print(square(5)) # 25
64. 生成器 (Generator) yield 节省内存,逐个返回值
# 64. 生成器 (Generator) yield 节省内存,逐个返回值
def count_up_to(n):
    i = 1
    while i <= n:
        yield i
        i += 1
for num in count_up_to(5):
    print(num)
65. 生成器表达式 (功能类似列表推导式,但不立即创建列表)
# 65. 生成器表达式 (功能类似列表推导式,但不立即创建列表)
# 这是一个生成器对象,不占用内存
gen_expr = (x**2 for x in range(1000000))
# print(gen_expr)
# print(sum(gen_expr)) # 迭代时才计算
66. map 和 filter
# 66. map 和 filter
nums = [1, 2, 3, 4, 5]
squared = list(map(lambda x: x**2, nums))
evens = list(filter(lambda x: x % 2 == 0, nums))
print(f"Squared: {squared}, Evens: {evens}")
67. operator.itemgetter (排序) *比 lambda 稍快,用于从元组或字典中取值排序
from operator import itemgetter
data = [('apple', 3), ('banana', 2), ('cherry', 5)]
# 按第 1 个索引 (即数字) 排序
data.sort(key=itemgetter(1))
# data.sort(key=lambda x: x[1])
print(data)  # [('banana', 2), ('apple', 3), ('cherry', 5)]
itemgetter(1) 是 lambda x: x[1] 的一种更高效的替代品,专门用于从序列(如元组、列表)或映射(如字典)中按索引或键(key)取值,非常适合用在 sort()、sorted()、min()、max() 等函数的 key 参数中
68. itertools (combinations, permutations, product)
from itertools import combinations, permutations, product
items = ['a', 'b', 'c']
print(f"Combinations(2): {list(combinations(items, 2))}") # [('a', 'b'), ('a', 'c'), ('b', 'c')]
print(f"Permutations(2): {list(permutations(items, 2))}") # [('a', 'b'), ('a', 'c'), ...]
print(f"Product: {list(product(['A', 'B'], [1, 2]))}") # [('A', 1), ('A', 2), ('B', 1), ('B', 2)]| 函数 | 功能 | 顺序是否重要? | 示例 |
combinations(items, 2) | 组合 (C) | 否。('a', 'b') 和 ('b', 'a') 相同。 | [('a', 'b'), ('a', 'c'), ('b', 'c')] |
permutations(items, 2) | 排列 (P) | 是。('a', 'b') 和 ('b', 'a') 不同。 | [('a', 'b'), ('a', 'c'), ('b', 'a'), ...] |
product(list1, list2) | 笛卡尔积 | 是 (按列表顺序)。 | [('A', 1), ('A', 2), ('B', 1), ('B', 2)] |
69. itertools.groupby (使用前必须先排序)
from itertools import groupby
data = [('A', 1), ('B', 3), ('A', 2), ('B', 1), ('C', 1)]
data.sort(key=lambda x: x[0])  # 必须先按 Key 排序
for key, group in groupby(data, key=lambda x: x[0]):
    print(f"Key: {key}, Group: {list(group)}")
按照元组的第一个元素('A', 'B', 'C')对 data 列表进行分组,并打印出每个分组的键(Key)和对应的所有成员(Group)
70. @contextmanager 自定义 with 语句
from contextlib import contextmanager
@contextmanager
def managed_resource(name):
    print(f"Setup: Acquiring {name}")
    try:
        yield name # 'with' 语句块中 'as' 接收的值
    finally:
        print(f"Teardown: Releasing {name}")
with managed_resource("MyLock") as r:
    print(f"Working with {r}")
with 语句的本质是资源管理:它能确保一段代码在执行前(Setup)和执行后(Teardown)都能正确地执行某些操作,即使中间发生了错误
五、 日期与时间 (71-75)
71. 获取当前日期时间
from datetime import datetime
now = datetime.now()
print(f"Current: {now}")
print(f"Date: {now.date()}, Time: {now.time()}")
# Current: 2025-10-31 18:35:04.391422
# Date: 2025-10-31, Time: 18:35:04.391422
72. strftime (格式化时间 -> 字符串)
from datetime import datetime
now = datetime.now()
formatted = now.strftime("%Y-%m-%d %H:%M:%S")
print(formatted)
# 2025-10-31 18:38:31
73. strptime (解析字符串 -> 时间)
from datetime import datetime
date_string = "2025-10-23 17:30:00"
dt_object = datetime.strptime(date_string, "%Y-%m-%d %H:%M:%S")
print(dt_object)  # 2025-10-23 17:30:00
print(type(dt_object))  #
print(dt_object.year)  # 2025
74. timedelta 时间计算
from datetime import datetime, timedelta
now = datetime.now()
tomorrow = now + timedelta(days=1)
one_hour_ago = now - timedelta(hours=1)
print(f"Tomorrow: {tomorrow}")
print(f"one_hour_ago:{one_hour_ago}")
75. 测量代码执行时间
import time
start = time.perf_counter() # 使用 perf_counter 更精确
# ... 你的代码 ...
time.sleep(0.1)
end = time.perf_counter()
print(f"Code took {end - start:.6f} seconds.")
六、 数据序列化 (76-83)
76. JSON 读写 (字符串)
import json
data = {"name": "Alice", "age": 30}
# 序列化 (Dict -> JSON String)
json_string = json.dumps(data, indent=2)
parsed_data = json.loads(json_string)
print(parsed_data['name'])
77. JSON 读写 (文件)
import json
data = {"name": "Bob", "active": True}
# 写入文件
with open('data.json', 'w') as f:
    json.dump(data, f, indent=2)
# 从文件读取
with open('data.json', 'r') as f:
    data_from_file = json.load(f)
print(data_from_file)
78. pickle 序列化 Python 对象
用于 Python 对象,但不安全,不要加载不信任的 pickle 文件
import pickle
from dataclasses import dataclass
@dataclass
class User:
    id: int
    name: str
user = User(1, "Alice")
# 序列化
with open('user.pkl', 'wb') as f:
    pickle.dump(user, f)
# 反序列化
with open('user.pkl', 'rb') as f:
    loaded_user = pickle.load(f)
    print(f"Loaded: {loaded_user.name}")
79. CSV 写入 (csv.writer)
import csv
data = [
    ["Name", "Department", "Salary"],
    ["Alice", "Engineering", 80000],
    ["Bob", "Sales", 60000]
]
with open('users.csv', 'w', newline='', encoding='utf-8') as f:
# newline='' 是为了防止在 Windows 系统上写入 CSV 文件时出现“多余的空行”
# 最佳实践: 根据 Python 官方文档的建议,在任何时候使用 csv 模块读写文件时,都应该始终指定 newline=''
    writer = csv.writer(f)
writer.writerows(data)- Path方式(Python 3.4+)
import csv
from pathlib import Path  # 1. 导入 Path
data = [
    ["Name", "Department", "Salary"],
    ["Alice", "Engineering", 80000],
    ["Bob", "Sales", 60000]
]
# 2. 将文件路径定义为 Path 对象
file_path = Path('users.csv')
# 3. 使用 Path 对象自带的 .open() 方法进行写入 ('w')
#    newline='' 和 encoding='utf-8' 的用法完全相同,且同样重要
with file_path.open('w', newline='', encoding='utf-8') as f:
    # 注释中的最佳实践仍然适用:
    # newline='' 是为了防止在 Windows 系统上写入 CSV 文件时出现“多余的空行”
    writer = csv.writer(f)
    writer.writerows(data) # 一次性写入所有数据
print(f"数据已成功写入 {file_path}")
80. CSV 读取 (csv.reader)
import csv
try:
    with open('users.csv', 'r', encoding='utf-8') as f:
        reader = csv.reader(f)
        header = next(reader)  # 跳过表头
        print(f"Header: {header}")
        for row in reader:
            print(row)
except FileNotFoundError:
print("users.csv not found.")- Path方式(Python 3.4+)
import csv
from pathlib import Path  # 1. 导入 Path
file_path = Path('users.csv')  # 2. 将字符串定义为 Path 对象
try:
    # 3. 使用 Path 对象自带的 .open() 方法
    #    功能与 open(file_path, ...) 完全相同
    with file_path.open('r', encoding='utf-8') as f:
        reader = csv.reader(f)
        header = next(reader)  # 跳过表头
        print(f"Header: {header}")
        for row in reader:
            print(row)
except FileNotFoundError:
    # 4. 异常处理保持不变,Path 对象会自动正确显示路径
    print(f"{file_path} not found.")
except Exception as e:
    # 捕获其他潜在错误 (如编码错误, CSV 格式错误)
    print(f"An error occurred: {e}")
81. csv.DictReader (读取为字典)
import csv
try:
    with open('users.csv', 'r', encoding='utf-8') as f:
        reader = csv.DictReader(f)
        for row in reader:
            print(f"{row['Name']} earns {row['Salary']}")
except FileNotFoundError:
print("users.csv not found.")- Path方式(Python 3.4+)
import csv
from pathlib import Path  # 1. 导入 Path
# 2. 将文件路径定义为 Path 对象,而不是一个裸露的字符串
file_path = Path('users.csv')
try:
    # 3. 使用 Path 对象自带的 .open() 方法
    #    它与内置的 open() 函数功能完全相同
    with file_path.open('r', encoding='utf-8') as f:
        # csv.DictReader 自动使用文件的第一行作为表头(键)
        reader = csv.DictReader(f)
        for row in reader:
            # row 现在是一个字典, e.g.: {'Name': 'Alice', 'Salary': '50000'}
            # 4. 保持核心逻辑不变
            print(f"{row['Name']} earns {row['Salary']}")
except FileNotFoundError:
    # 5. 在错误消息中使用 Path 对象,更清晰
    print(f"{file_path} not found.")
except KeyError as e:
    # (推荐) 增加一个健壮性检查:
    # 如果 CSV 文件中没有 'Name' 或 'Salary' 列,这里会捕获到
    print(f"Error: Missing column {e} in {file_path}")
except Exception as e:
    # 捕获其他潜在错误 (如编码错误, 权限问题)
    print(f"An error occurred: {e}")
82. configparser 读写 INI 配置文件
import configparser
config = configparser.ConfigParser()
config['DATABASE'] = {
    'Host': 'localhost',
    'User': 'admin'
}
with open('config.ini', 'w+') as f:
    config.write(f)
# 读取
config.read('config.ini')
host = config.get('DATABASE', 'Host')
print(f"DB Host: {host}")
# 键(key)不分大小写,节(section)要分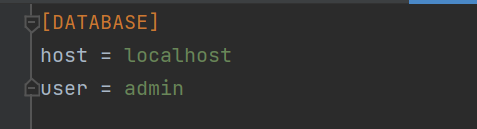
83. XML 解析 (ElementTree)
import xml.etree.ElementTree as ET
xml_string = "25 七、 Web与网络 (84-90)
(需要安装: pip install requests)
84. requests 发送 GET 请求
import requests
try:
    response = requests.get('https://api.github.com/users/google')
    response.raise_for_status() # 状态码非 2xx 则抛异常
    data = response.json()
    print(f"Google's public repos: {data['public_repos']}")
except requests.exceptions.RequestException as e:
    print(f"An error occurred: {e}")
85. requests 发送 POST (JSON)
import requests
url = 'https://httpbin.org/post'
payload = {'key': 'value', 'user': 'admin'}
try:
    response = requests.post(url, json=payload)
    data = response.json()
    print(f"Response JSON: {data['json']}")
except requests.exceptions.RequestException as e:
    print(f"An error occurred: {e}")
86. requests 带 Headers 和 Auth
import requests
url = 'https://api.httpbin.org/bearer' # 假设的受保护 API
headers = {'Authorization': 'Bearer YOUR_TOKEN_HERE'}
try:
    response = requests.get(url, headers=headers)
    print(response.json())
except requests.exceptions.RequestException as e:
    print(f"An error occurred: {e}")
87. requests 处理超时
import requests
try:
    # 限制连接超时3秒,读取超时5秒
    response = requests.get('https://httpbin.org/delay/10', timeout=(3.0, 5.0))
except requests.exceptions.Timeout:
    print("The request timed out.")
88. urllib.parse.urljoin 安全合并URL
from urllib.parse import urljoin
base_url = "https://www.example.com/path/page.html"
# 自动处理 '..' 和 '/'
relative_path = "../other.html"
full_url = urljoin(base_url, relative_path)
print(full_url) # https://www.example.com/other.html
89. 启动简单的 Web 服务器,用于快速共享当前目录文件
在终端中运行:
# Python 3
python -m http.server 8000
python代码运行:
import os
os.system("python -m http.server 8000")
90. webbrowser 打开浏览器
import webbrowser
webbrowser.open('https://www.baidu.com')
八、 并发与异步 (91-96)
91. threading 基础 (I/O密集型)
import threading
import time
def task(name):
    print(f"Thread {name} starting...")
    time.sleep(1)
    print(f"Thread {name} finished.")
threads = []
for i in range(3):
    t = threading.Thread(target=task, args=(i,))
    threads.append(t)
    t.start()
for t in threads:
    t.join() # 等待所有线程完成
print("All threads done.")
92. threading.Lock 线程锁 防止多个线程同时访问共享资源
import threading
balance = 0
lock = threading.Lock()
def deposit(amount):
    global balance
    with lock: # 自动获取和释放锁
        balance += amount
# (如果不用锁,多线程同时 'balance += amount' 会导致数据竞争)
93. multiprocessing.Pool (CPU密集型) (在 .py 文件中,必须放在 if __name__ == "__main__": 下)
from multiprocessing import Pool
def square(x):
    return x * x
if __name__ == "__main__":
    inputs = [1, 2, 3, 4, 5]
    with Pool(processes=4) as pool:
        results = pool.map(square, inputs)
    print(results) # [1, 4, 9, 16, 25]
94. concurrent.futures.ThreadPoolExecutor (现代线程池)
import concurrent.futures
import time
def download(url):
    print(f"Downloading {url}...")
    time.sleep(1) # 模拟 I/O
    return f"Data from {url}"
urls = ["url1", "url2", "url3"]
with concurrent.futures.ThreadPoolExecutor(max_workers=3) as executor:
    # map 会按提交顺序返回结果
    results = executor.map(download, urls)
for res in results:
    print(res)
95. asyncio 基础 (async/await) (Python 3.5+)
import asyncio
async def main():
    print("Hello")
    await asyncio.sleep(1) # 非阻塞睡眠
    print("World")
async def task(name):
    print(f"Task {name} started")
    await asyncio.sleep(0.5)
    print(f"Task {name} finished")
# 运行 main
# asyncio.run(main())
async def main():: 使用async def定义了一个协程(coroutine)。协程是异步函数,它可以在执行过程中暂停,让出控制权给事件循环去执行其他任务asyncio.sleep(1): 这是一个非阻塞的暂停。当main()协程执行到这里时,它会暂停 1 秒,但 不会 阻塞整个程序。事件循环会在这 1 秒内去执行其他已准备好的任务,例如其他的协程await asyncio.sleep(0.5): 任务暂停 0.5 秒(非阻塞)
96. asyncio进阶(asyncio.gather 并发运行)
import asyncio
import time
async def main():
    print(f"[{time.perf_counter():.2f}] Hello")
    await asyncio.sleep(1) # 非阻塞睡眠
    print(f"[{time.perf_counter():.2f}] World")
async def task(name):
    print(f"[{time.perf_counter():.2f}] Task {name} started")
    await asyncio.sleep(0.5) # 非阻塞睡眠
    print(f"[{time.perf_counter():.2f}] Task {name} finished")
async def run_all_concurrently():
    # 使用 asyncio.gather() 来“并发”调度这两个任务
    await asyncio.gather(
        main(),
        task("1")
    )
# ---------------------------------------------
# 只需要调用一次 asyncio.run()
# 运行那个“打包”了所有任务的函数
# ---------------------------------------------
start_time = time.perf_counter()
print("--- Starting Concurrent Execution ---")
asyncio.run(run_all_concurrently())
print(f"--- Finished in {time.perf_counter()- start_time:.2f} seconds ---")
运行结果:

九、 实用工具与杂项 (97-100)
97. logging 基础日志 (比 print 更好)
# 97. logging 基础日志 (比 print 更好)
import logging
logging.basicConfig(
level=logging.INFO, # INFO 及以上级别会被记录
# 日志级别从低到高依次是:DEBUG < INFO < WARNING < ERROR < CRITICAL
format='%(asctime)s - %(levelname)s - %(message)s',
filename='app.log' # 写入文件
# 意味着所有的日志输出(符合级别要求的)都会被写入到项目目录下的 app.log 文件中,而不会默认输出到控制台(stdout)。
# 同时输出到文件和控制台 (Console + File)需要更高级的配置,使用 logging.FileHandler 和 logging.StreamHandler,并将它们添加到日志记录器(Logger)中
)
logging.debug("This is a debug message") # 不会显示
logging.info("Application started")
logging.warning("Something might be wrong")
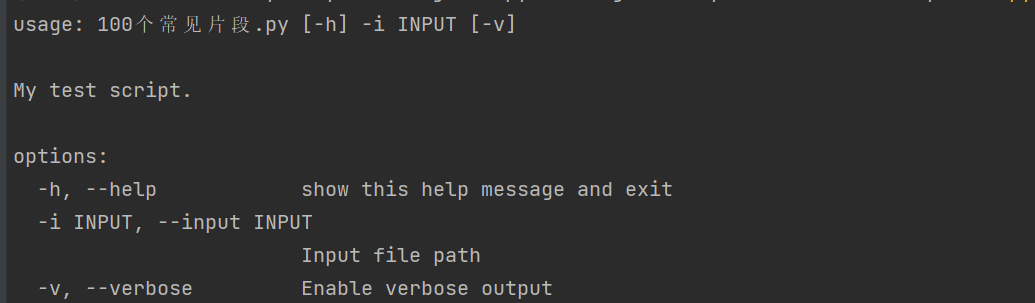
logging.error("A critical error occurred")98. argparse 命令行参数解析
import argparse
# 导入 argparse 模块,这是 Python 标准库中用于解析命令行参数的工具。
parser = argparse.ArgumentParser(description="My test script.")
# 创建一个 ArgumentParser 对象。它是命令行解析的核心
# 为脚本添加一个简短的描述,当用户运行带有 -h 或 --help 选项的脚本时会显示
parser.add_argument('-i', '--input', required=True, help="Input file path")
# 定义一个命令行参数。定义该参数的长格式 (--input) 和短格式 (-i)。用户可以使用其中任何一种来传递值。
# required=True,强制要求用户必须在命令行中提供这个参数,否则程序会报错并退出
# help="Input file path 为该参数提供帮助信息,同样会在帮助文档中显示
parser.add_argument('-v', '--verbose', action='store_true', help="Enable verbose output")
# 定义一个命令行参数。定义其短格式 (-v) 和长格式 (--verbose)。用户可以使用其中任何一种来传递值
# action='store_true'是一个布尔开关。如果用户在命令行中提供了 -v 或 --verbose,则该参数的值会被设置为 True;如果未提供,则默认为 False。它不需要用户提供值
args = parser.parse_args()
# 实际执行解析的命令。它会读取命令行中用户输入的参数,并将它们存储在一个命名空间对象 (args) 中
print(f"Input: {args.input}, Verbose: {args.verbose}")
# 通过属性访问已解析的参数值。例如,--input 的值存储在 args.input 中,--verbose 的布尔值存储在 args.verbose 中
# 命令运行: python your_script.py -i data.txt -v
# 命令运行: python your_script.py -i data.txt -v
![]()
# 命令运行: python your_script.py -h
99. hashlib (MD5, SHA256)
使用 Python 标准库中的 hashlib 模块来生成数据的 哈希值(Hash Value)
import hashlib
text = "hello world".encode('utf-8')
# 哈希算法(包括 MD5 和 SHA256)不直接处理 Python 字符串对象,它们只能处理 字节数据 (bytes)。
# 因此,必须将字符串编码(转换为字节序列),这里使用的是常见的 UTF-8 编码。
md5_hash = hashlib.md5(text).hexdigest()
# .hexdigest(): 调用哈希对象的 hexdigest() 方法,将最终的哈希值以十六进制字符串的形式返回。
sha256_hash = hashlib.sha256(text).hexdigest()
print(f"MD5: {md5_hash}")
print(f"SHA256: {sha256_hash}")
# 结果:
# MD5: 5eb63bbbe01eeed093cb22bb8f5acdc3
# SHA256: b94d27b9934d3e08a52e52d7da7dabfac484efe37a5380ee9088f7ace2efcde9- MD5 特性: MD5 生成一个 128 位(即 32 个十六进制字符)的哈希值。MD5 不再被推荐用于安全目的(如密码存储),因为它容易受到碰撞攻击(Collisions)
- SHA256 特性: SHA256 生成一个 256 位(即 64 个十六进制字符)的哈希值。SHA-2 系列算法(包括 SHA256)比 MD5 更安全,是目前常用的标准哈希算法,广泛用于数字签名、证书和密码存储等
100. decimal 高精度计算 (用于金融等需要精确小数的场合)
from decimal import Decimal, getcontext
# 浮点数陷阱
print(f"Float: {0.1 + 0.2}") # 0.30000000000000004
# Decimal
# getcontext().prec = 50 # 设置精度
a = Decimal('0.1')
b = Decimal('0.2')
print(f"Decimal: {a + b}") # 0.3- Float计算:标准的 Python
float类型使用 二进制 来表示小数。由于 0.1 和 0.2在二进制中无法被精确表示(就像 1/3在十进制中无法被精确表示一样),它们在计算机内部存储时就已经存在微小的精度损失。因此,0.1 + 0.2的结果不是精确的 0.3,而是 0.3后面跟着一长串微小的误差。这在金融计算中是不可接受的 - Decimal计算:
- 使用 字符串 "
0.1"和"0.2" 来创建Decimal对象。注意 必须使用字符串,如果使用Decimal(0.1),则会先创建不精确的float,再转换为Decimal,导致误差 a + b的结果是精确的 0.3。Decimal类型使用十进制来进行存储和运算,可以完全避免浮点数在二进制表示中产生的精度问题,因此适用于需要精确控制小数位数的场合(如货币计算、税务计算等)- 设置精度:
getcontext().prec = 50设置了所有后续Decimal运算的有效数字位数为 50 位(默认通常是 28 位),确保足够的精度
- 使用 字符串 "

 浙公网安备 33010602011771号