Linux源码安装lnmp发布wordpress博客系统
wordpress部署分步
- 安装mysql
- 安装nginx
- 安装安装php
- 发布wordpress
var code = “173b2c97-0380-4eaa-993d-09dcc7cfc082”
本文使用系统为centos7.8 可能不适用于centos6.x等
本文最后有一键安装脚本
防止安装出现问题先执行下面的依赖安装
yum -y install epel-release wget
一、安装mysql
1.安装mysql
yum -y install mairadb-server mariadb \\centos7的数据库为mariadb
2.启动mysql并修改密码
systemctl start mairadb  \\启动
mysqladmin -uroot passowrd "123456"  \\密码写在password后面
mysql安装完毕后密码默认为空所以需要修改下密码
3.创建数据库
mysql -uroot -p123456 -e 'create database wordpress' \\在数据库中创建一个名为wordpress的数据库
二、安装nginx
- 下载nginx源码包
wget http://nginx.org/download/nginx-1.12.2.tar.gz
2.安装nginx源码安装依赖
yum -y install gcc gcc-c++ pcre-devel zlib-devel
3.开始安装nginx
tar xzf nginx-1.12.2.tar.gz   \\解压刚才下载的nginx源码包
cd nginx-1.12.2
./configure
make && make install
4.启动nginx
/usr/local/nginx/sbin/nginx
5.浏览器中测试即可(注意防火墙)
systemctl stop firewalld  \\关闭防火墙
setenforce 0
然后去访问你的服务器ip 出现nginx图标择成功
6.修改nginx配置文件使得nginx支持php
vi /usr/local/nginx/conf/nginx.conf
// 下面添加index.php
// 45行 index index.php index.html index.htm;
// 修改65行到71行,把注释全部去掉,之后修改/scripts为$document_root即可
图式如下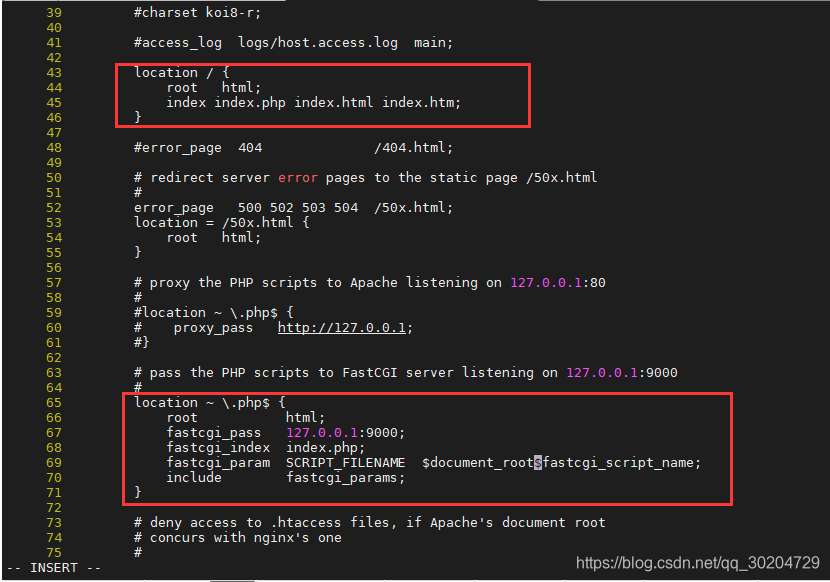
重新启动nginx
pkill nginx
/usr/local/nginx/sbin/nginx
三、安装php
1.安装php
yum -y install php php-mysql php-fpm
2.启动php
systemctl start php-fpm
三、上传wordpress
1.上传wordpress源码包
cd /root
wget http://182.92.165.158/wordpress-3.0.5-zh_CN.tar.gz
tar xzf wordpress-3.0.5-zh_CN.tar.gz
cd wordpress && mv * /usr/share/nginx/html/
chmod -R 777 /usr/share/nginx/html
最后访问ip进行安装mysql
不想安装可以执行下面的一键安装脚本
yum install -y wget && wget -O install.sh http://182.92.165.158/lnmp.sh && sh install.sh

 浙公网安备 33010602011771号