
day13-实现Spring底层机制-03
实现Spring底层机制-03
7.阶段5-后置处理器的实现
7.1分析
阶段5目标:bean后置处理器的实现
7.2代码实现
新增:
1.创建 InitializingBean 接口,实现该接口的 Bean 需要实现 Bean 的初始化方法
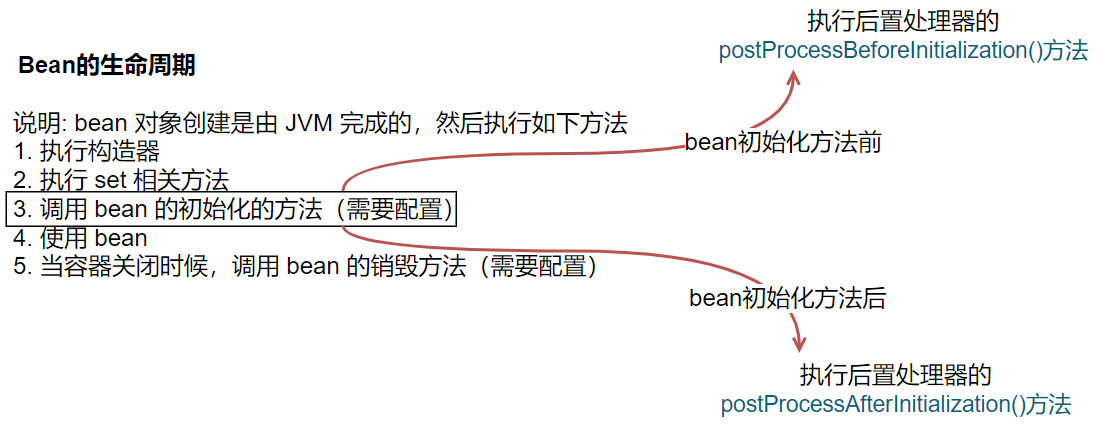
bean后置处理器的两个方法,调用时机分别在 Bean 初始化方法的前后。因此要实现bean后置处理器,首先要实现 Bean 的初始化方法。
可以参考原生 Spring 规范来定义这个接口
package com.li.spring.processor;

/**
 * @author 李
 * @version 1.0
 * 说明:
 * 1.根据 spring 原生机制定义了一个接口
 * 2.该接口有一个方法 afterPropertiesSet(),
 * 3.afterPropertiesSet() 在 bean的 setter方法后执行,相当于原生的spring的 bean初始化方法
 * 4.当一个Bean实现了这个接口后,就要实现afterPropertiesSet(),即 bean的初始化方法
 */
public interface InitializingBean {
    void afterPropertiesSet() throws Exception;
}
2.为了测试,在MonsterService中实现该接口,并实现该方法,作为MonsterService的初始化方法
注:其他注解及自动装配的实现详见上一篇
package com.li.spring.component;

import com.li.spring.annotation.AutoWired;
import com.li.spring.annotation.Component;
import com.li.spring.annotation.Scope;
import com.li.spring.processor.InitializingBean;

/**
 * @author 李
 * @version 1.0
 * MonsterService 是一个 Service
 * 1.如果指定了value,那么在注入spring容器时,以你指定的为准
 * 2.如果没有指定value,则使用类名(首字母小写)作为默认名
 */
@Component//(value = "monsterService") //将 MonsterService注入到自己的spring容器中
@Scope(value = "prototype")
public class MonsterService implements InitializingBean {
    //使用自定义注解修饰属性,表示该属性通过容器完成依赖注入
    // (说明:按照名字进行组装)
    @AutoWired(required = true)
    private MonsterDao monsterDao;

    public void m1() {
        monsterDao.hi();
    }

    /**
     * 1.afterPropertiesSet()就是在bean的setter方法执行完毕之后,被spring容器调用
     * 2.即 bean的初始化方法
     *
     * @throws Exception
     */
    @Override
    public void afterPropertiesSet() throws Exception {
        System.out.println("MonsterService 初始化方法被调用");
    }
}
3.修改MySpringApplicationContext.java,添加逻辑:在创建后bean实例后,判断是否需要进行初始化。
容器中常用的一个方法是,根据该类是否实现了某个接口,来判断该类是否要执行某个业务逻辑。这个接口被称为标记接口。
部分代码:
//完成createBean(BeanDefinition)方法
public Object createBean(BeanDefinition beanDefinition) {
    //得到Bean的class对象
    Class clazz = beanDefinition.getClazz();
    try {
        //反射创建bean实例
        Object instance = clazz.getDeclaredConstructor().newInstance();
        //todo 这里要加入依赖注入的业务逻辑
        //1.遍历当前要创建对象的所有属性字段
        for (Field declaredField : clazz.getDeclaredFields()) {
            //2.判断字段是否有AutoWired注解
            if (declaredField.isAnnotationPresent(AutoWired.class)) {
                //判断是否需要自动装配
                AutoWired autoWiredAnnotation =
                        declaredField.getAnnotation(AutoWired.class);
                if (autoWiredAnnotation.required()) {
                    //3.得到字段的名称
                    String name = declaredField.getName();
                    //4.通过getBean()方法获取要组装的对象
                    //如果name对应的对象时单例的,就到单例池去获取,如果是多例的,就反射创建并返回
                    Object bean = getBean(name);
                    //5.进行组装
                    //暴破
                    declaredField.setAccessible(true);
                    declaredField.set(instance, bean);
                }
            }
        }
        System.out.println("======已创建好实例=====" + instance);

        //todo 判断是否要执行bean的初始化方法
        // 1.判断当前创建的 bean对象是否实现了 InitializingBean
        // 2.instanceof 表示判断对象的运行类型 是不是 某个类型或某个类型的子类型
        if (instance instanceof InitializingBean) {
            //3.将instance转成接口类型,调用初始化方法
            try {
                ((InitializingBean) instance).afterPropertiesSet();
            } catch (Exception e) {
                e.printStackTrace();
            }
        }
        return instance;
    } catch (InstantiationException e) {
        e.printStackTrace();
    } catch (IllegalAccessException e) {
        e.printStackTrace();
    } catch (InvocationTargetException e) {
        e.printStackTrace();
    } catch (NoSuchMethodException e) {
        e.printStackTrace();
    }
    //如果反射对象失败
    return null;
}
4.测试类
//...
public class AppMain {
    public static void main(String[] args) {
        MySpringApplicationContext ioc =
                new MySpringApplicationContext(MySpringConfig.class);
        MonsterService monsterService = (MonsterService) ioc.getBean("monsterService");
    }
}
测试结果:MonsterService的初始化方法成功被调用。

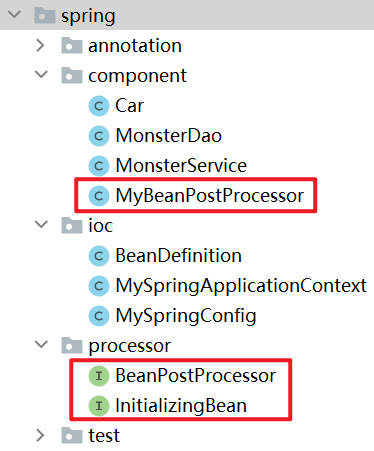
5.创建 BeanPostProcessor 接口
package com.li.spring.processor;

/**
 * @author 李
 * @version 1.0
 * 说明:
 * 1.此接口参考原生Spring容器定义
 * 2.该接口有两个方法 postProcessBeforeInitialization和 postProcessAfterInitialization
 * 3.这两个方法会对spring容器的所有bean生效(切面编程)
 */
public interface BeanPostProcessor {

    /**
     * postProcessBeforeInitialization方法在bean的初始化方法前 调用
     *
     * @param bean
     * @param beanName
     * @return
     */
    default Object postProcessBeforeInitialization(Object bean, String beanName) {
        return bean;
    }


    /**
     * postProcessAfterInitialization方法在bean的初始化方法后 调用
     *
     * @param bean
     * @param beanName
     * @return
     */
    default Object postProcessAfterInitialization(Object bean, String beanName) {
        return bean;
    }
}
6.为了测试,自定义MyBeanPostProcessor实现上述接口。
package com.li.spring.component;

import com.li.spring.annotation.Component;
import com.li.spring.processor.BeanPostProcessor;

/**
 * @author 李
 * @version 1.0
 * 1.这是我们自己的一个后置处理器,它实现了我们自定义的 BeanPostProcessor
 * 2.通过重写 BeanPostProcessor的方法实现相应业务
 * 3.仍然将 MyBeanPostProcessor 看做一个Bean对象,使用Component注解,注入到spring容器中。
 */
@Component
public class MyBeanPostProcessor implements BeanPostProcessor {
    @Override
    public Object postProcessBeforeInitialization(Object bean, String beanName) {
        System.out.println("后置处理器MyBeanPostProcessor的 Before()方法被调用,bean类型="
                + bean.getClass() + ",bean的名字=" + beanName);
        return bean;
    }

    @Override
    public Object postProcessAfterInitialization(Object bean, String beanName) {
        System.out.println("后置处理器MyBeanPostProcessor的 After()方法被调用,bean类型="
                + bean.getClass() + ",bean的名字=" + beanName);
        return bean;
    }
}
7.修改 MySpringApplicationContext.java(模拟原生的ioc)
后置处理器和普通bean的创建顺序问题:
因为后置处理器要对容器中的所有bean对象都生效。因此后置处理器的bean对象的创建,要比普通的bean对象创建的时机靠前。
为了解决这个问题,我们将后置处理器对象的反射创建,提前到扫描包的时候完成(因为ioc容器初始化时,扫描工作要比反射对象的工作靠前)。
在原生的spring容器中,对后置处理器还是走的getBean,createBean方法。但如果这样做,需要在singletonObjects中加入相应业务逻辑,这里为了方便,我们简化处理了
然后将创建的后置处理器对象放到一个单独的集合来调用。
部分代码:
//该方法完成对指定包的扫描,并将Bean信息封装到BeanDefinition对象,再放入map中
    public void beanDefinitionByScan(Class configClass) {
        //步骤一:获取要扫描的包
        //...

        //步骤二:得到要扫描的包下的所有资源(类.class)
        //...

        //步骤三:获取全类名反射对象,并放入容器中
        //...
        //判断该类是否有特定注解
        if (clazz.isAnnotationPresent(Component.class)) {
            //如果该类使用了 @Component ,说明是spring bean
            System.out.println("是一个spring bean=" + clazz + " 类名=" + className);
            //--------------------新增代码------------------------
   			 /*
              为了方便,如果发现是一个后置处理器,将其放入到ArrayList集合中
              1.在原生的spring容器中,对后置处理器还是走的getBean,createBean方法
              2.如果这样做,需要在singletonObjects中加入相应业务逻辑
              3.这里为了方便,我们简化处理
             */
            //判断当前class有没有实现接口
            //注意这里我们不能通过 instanceof 判断 class是否实现了 BeanPostProcessor
            //因为clazz不是一个实例对象,而是一个Class对象,需要如下判断:
            if (BeanPostProcessor.class.isAssignableFrom(clazz)) {
                BeanPostProcessor beanPostProcessor =
                        (BeanPostProcessor)clazz.newInstance();
                //放入ArrayList集合中
                beanPostProcessorList.add(beanPostProcessor);
                continue;//简化处理,不再将后置处理器的bean信息放到beanDefinition对象中
            }
            //--------------------新增代码------------------------

            //得到 BeanName-key
            //...

            //将 Bean信息封装到 BeanDefinition对象-value
            //...

            //将beanDefinition对象放入Map中
            //...
        } else {
            //如果没有使用,则说明不是spring bean
            System.out.println("不是一个 spring bean=" + clazz + " 类名=" + className);
        }
    } catch (Exception e) {
        e.printStackTrace();
    }
}
System.out.println("===========================");
}}}

//完成createBean(BeanDefinition)方法
public Object createBean(String beanName, BeanDefinition beanDefinition) {
    //得到Bean的class对象
    Class clazz = beanDefinition.getClazz();
    try {
        //反射创建bean实例
        Object instance = clazz.getDeclaredConstructor().newInstance();
        // 这里要加入依赖注入的业务逻辑
        //...
        System.out.println("======已创建好实例=====" + instance);

         //--------------------新增代码start------------------------
        //在bean的初始化方法前调用后置处理器的before方法
         for (BeanPostProcessor beanPostProcessor : beanPostProcessorList) {
                //在后置处理器的before方法,可以对容器的bean进行处理
                // 然后返回处理后的bean实例。相当于做了前置处理
                Object current = beanPostProcessor.
                        postProcessBeforeInitialization(instance, beanName);
             	//如果current为null,就不对instance做处理
                if (current != null) {
                    instance = current;
                }
            }
        //--------------------新增代码end------------------------

        //判断是否要执行bean的初始化方法
        // 1.判断当前创建的 bean对象是否实现了 InitializingBean
        // 2.instanceof 表示判断对象的运行类型 是不是 某个类型或某个类型的子类型
        if (instance instanceof InitializingBean) {
            //3.将instance转成接口类型,调用初始化方法
            try {
                ((InitializingBean) instance).afterPropertiesSet();
            } catch (Exception e) {
                e.printStackTrace();
            }
        }

        //--------------------新增代码start------------------------
        // 在bean的初始化方法后调用后置处理器的 after方法
         for (BeanPostProcessor beanPostProcessor : beanPostProcessorList) {
                //在后置处理器的 after方法,可以对容器的 bean进行处理
                // 然后返回处理后的bean实例。相当于做了后置处理
                Object current = beanPostProcessor.
                        postProcessAfterInitialization(instance, beanName);
                if (current != null) {
                    instance = current;
                }
            }
        //--------------------新增代码end------------------------

        return instance;
    } catch (InstantiationException e) {
       //...
    }
    //如果反射对象失败
    return null;
}
8.测试类
//...
public class AppMain {
    public static void main(String[] args) {
        MySpringApplicationContext ioc =
                new MySpringApplicationContext(MySpringConfig.class);
        MonsterService monsterService = (MonsterService) ioc.getBean("monsterService");
        monsterService.m1();
    }
}
测试结果:成功在所有bean对象的初始化方法前后,调用后置处理器的方法(无论bean对象有无初始化方法)
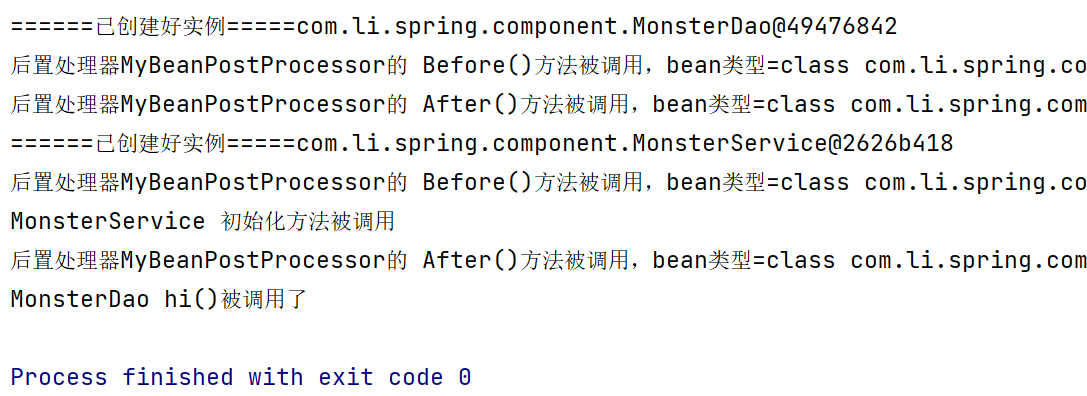
后置处理器是对容器的所有bean生效,因此相当于可以对多个对象编程,即切面编程。日志,身份,权限,事务……都可以在后置处理器进行处理。
8.阶段6-AOP实现
8.1分析
阶段6目标:实现自己的AOP机制
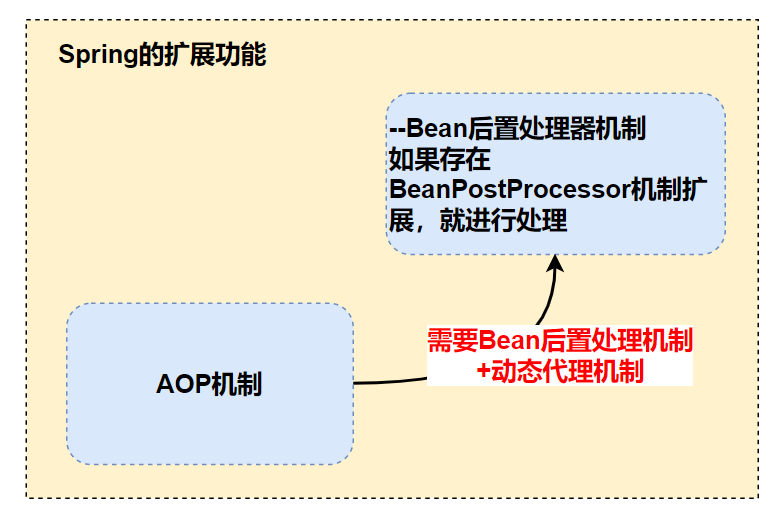
在原生的Spring中,如果我们同时配置了后置处理器和切面类,并在后置处理器的两个方法中输出bean的运行类型。你会发现,在后置处理器的before...()方法输出bean的类型时,bean对象还是原生类型;但在后置处理器的after...()方法输出时,bean对象已经被封装成了代理对象。

当然,变化的只是aop的目标方法对应的bean对象
因此,我们需要编写方法,在后置处理器的after方法中,将原生的bean对象封装成代理对象并返回。在代理对象中切入要执行的前置/返回/异常/最终通知等。
8.2代码实现
1.为了测试,创建接口和实现类,模拟aop的需求
(1)SmartAnimal 接口
package com.li.spring.component;

/**
 * @author 李
 * @version 1.0
 */
public interface SmartAnimal {
    public float getSum(float i, float j);

    public float getSub(float i, float j);
}
(2)SmartDog 实现类
package com.li.spring.component;

import com.li.spring.annotation.Component;

/**
 * @author 李
 * @version 1.0
 */
@Component(value = "smartDog")
public class SmartDog implements SmartAnimal {
    @Override
    public float getSum(float i, float j) {
        float res = i + j;
        System.out.println("SmartDog-getSum()-res=" + res);
        return res;
    }

    @Override
    public float getSub(float i, float j) {
        float res = i - j;
        System.out.println("SmartDog-getSub()-res=" + res);
        return res;
    }
}
2.模拟切面类
原生的切面类有@Aspect,@Before,@AfterReturning,@AfterThrowing,@After等注解。
这里为了简化,先将SmartAnimalAspect 当做一个“切面类”来使用,后面再分析如何做得更加灵活
package com.li.spring.component;

/**
 * @author 李
 * @version 1.0
 * 先将SmartAnimalAspect 当做一个切面类来使用
 * 后面再分析如何做得更加灵活
 */
public class SmartAnimalAspect {
    public static void showBeginLog() {
        System.out.println("前置通知...");
    }

    public static void showSuccessLog() {
        System.out.println("返回通知...");
    }
}
3.修改配置的后置处理器 MyBeanPostProcessor
在实现后置处理器时,调用createBean()方法反射bean对象后,会调用后置处理器的两个方法。因此,我们可以在postProcessAfterInitialization()方法中判断当前bean是否要返回代理对象,并进行处理。
部分代码:
package com.li.spring.component;

import com.li.spring.annotation.Component;
import com.li.spring.processor.BeanPostProcessor;

import java.lang.reflect.InvocationHandler;
import java.lang.reflect.Method;
import java.lang.reflect.Proxy;

/**
 * @author 李
 * @version 1.0
 * 这是我们自己的一个后置处理器,它实现了我们自定义的 BeanPostProcessor
 */
@Component
public class MyBeanPostProcessor implements BeanPostProcessor {
    @Override
    public Object postProcessBeforeInitialization(Object bean, String beanName) {
       //...
       //...
    }

    @Override
    public Object postProcessAfterInitialization(Object bean, String beanName) {
        System.out.println("后置处理器MyBeanPostProcessor的 After()方法被调用,bean类型="
                + bean.getClass() + ",bean的名字=" + beanName);
        //实现aop,返回代理对象,即对bean进行包装
        //先写死,后面我们可以通过注解的方式更加灵活运用
        if ("smartDog".equals(beanName)) {
            //使用jdk的动态代理,返回bean的代理对象
            Object proxyInstance = Proxy.newProxyInstance(MyBeanPostProcessor.class.getClassLoader(),
                    bean.getClass().getInterfaces(), new InvocationHandler() {
                        @Override
                        public Object invoke(Object proxy, Method method, Object[] args) throws Throwable {
                            System.out.println("method=" + method.getName());
                            Object result = null;
                            //假设我们要进行前置,返回通知处理的方法是getSum()
                            //(原生的spring的通知方法是通过注解来获取的)
                            //这里我们后面再通过注解来做得更加灵活
                            if ("getSum".equals(method.getName())) {
                                //前置通知
                                SmartAnimalAspect.showBeginLog();
                                //目标方法
                                result = method.invoke(bean, args);
                                //返回通知
                                SmartAnimalAspect.showSuccessLog();
                            } else {
                                result = method.invoke(bean, args);
                            }
                            return result;
                        }
                    });
            //如果bean需要返回代理对象,这里就直接return ProxyInstance
            return proxyInstance;
        }
        //如果不需要AOP,直接返回 bean
        return bean;
    }
}
4.测试类
//...
public class AppMain {
public static void main(String[] args) {
MySpringApplicationContext ioc =
new MySpringApplicationContext(MySpringConfig.class);
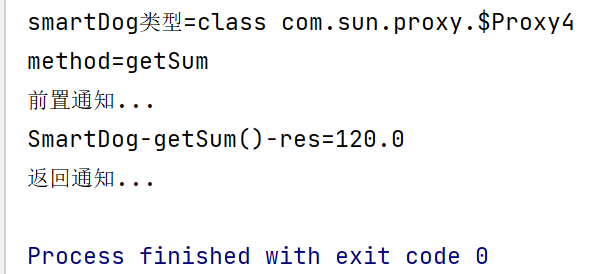
SmartAnimal smartDog = (SmartAnimal) ioc.getBean("smartDog");
System.out.println("smartDog类型=" + smartDog.getClass());
smartDog.getSum(100, 20);
}
}
测试结果:成功通过后置处理器的 postProcessAfterInitialization 方法,对bean对象进行包装返回,同时通过invoke方法,插入前置通知和后置通知的方法。
拓展:如何做得更加灵活?
-
前面我们使用的硬编码,不灵活,但是aop的核心机制差不多如此。
-
如果要把aop做得更加灵活,需要实现一点其他的逻辑
知识点:注解+map集合+切入表达式,其实和aop机制关系不大了
8.3拓展
实现原生spring切面类的注解,使实现的aop更加灵活
1.Aspect注解
package com.li.spring.annotation;

import java.lang.annotation.ElementType;
import java.lang.annotation.Retention;
import java.lang.annotation.RetentionPolicy;
import java.lang.annotation.Target;

/**
 * @author 李
 * @version 1.0
 */
@Retention(RetentionPolicy.RUNTIME)
@Target(ElementType.TYPE)
public @interface Aspect {
    String value() default "";
}
2.Before注解
package com.li.spring.annotation;

import java.lang.annotation.ElementType;
import java.lang.annotation.Retention;
import java.lang.annotation.RetentionPolicy;
import java.lang.annotation.Target;

/**
 * @author 李
 * @version 1.0
 */
@Retention(RetentionPolicy.RUNTIME)
@Target(ElementType.METHOD)
public @interface Before {
    String value();

    String argNames() default "";
}
3.AfterReturning注解
package com.li.spring.annotation;

import java.lang.annotation.ElementType;
import java.lang.annotation.Retention;
import java.lang.annotation.RetentionPolicy;
import java.lang.annotation.Target;

/**
 * @author 李
 * @version 1.0
 */
@Retention(RetentionPolicy.RUNTIME)
@Target(ElementType.METHOD)
public @interface AfterReturning {
    String value() default "";

    String pointcut() default "";

    String returning() default "";

    String argNames() default "";
}
4.After注解
package com.li.spring.annotation;

import java.lang.annotation.ElementType;
import java.lang.annotation.Retention;
import java.lang.annotation.RetentionPolicy;
import java.lang.annotation.Target;

/**
 * @author 李
 * @version 1.0
 */
@Retention(RetentionPolicy.RUNTIME)
@Target(ElementType.METHOD)
public @interface After {
    String value();

    String argNames() default "";
}
5.修改原先的模拟切入类,加入注解
这里为了方便,将模拟的切入表达式简化。
package com.li.spring.component;

import com.li.spring.annotation.*;

/**
 * @author 李
 * @version 1.0
 */
@Aspect
@Component
public class SmartAnimalAspect {
    @Before(value = "execution com.li.spring.component.SmartDog getSum")
    public static void showBeginLog() {
        System.out.println("前置通知...");
    }

    @AfterReturning(value = "execution com.li.spring.component.SmartDog getSum")
    public static void showSuccessLog() {
        System.out.println("返回通知...");
    }

    @After(value = "execution com.li.spring.component.SmartDog getSum")
    public static void showFinallyLog() {
        System.out.println("最终通知...");
    }
}
6.测试类
package com.li.spring.test;
import com.li.spring.annotation.After;
import com.li.spring.annotation.AfterReturning;
import com.li.spring.annotation.Before;
import com.li.spring.component.SmartAnimalAspect;
import java.lang.reflect.InvocationTargetException;
import java.lang.reflect.Method;
/**
* @author 李
* @version 1.0
*/
public class AOPTest {
public static void main(String[] args) throws NoSuchMethodException, InstantiationException, IllegalAccessException, InvocationTargetException {
//1.获取切面类的class对象
Class<SmartAnimalAspect> smartAnimalAspectClass = SmartAnimalAspect.class;
//2.遍历该类的所有方法
for (Method declaredMethod : smartAnimalAspectClass.getDeclaredMethods()) {
//3.如果切面类的方法有 @Before注解
if (declaredMethod.isAnnotationPresent(Before.class)) {
//4.得到该切入方法
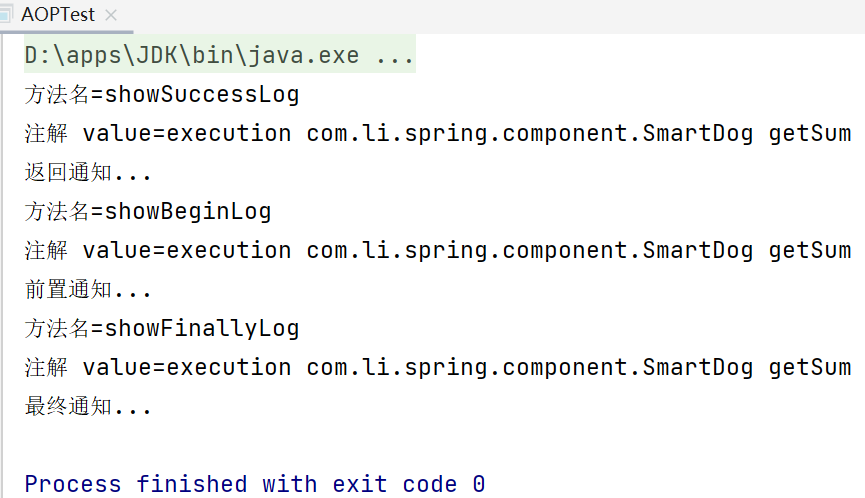
System.out.println("方法名=" + declaredMethod.getName());
//得到注解的 value值
Before annotation = declaredMethod.getAnnotation(Before.class);
System.out.println("注解 value=" + annotation.value());
//5.当前的方法就是要执行的方法
Method declaredMethod1 = smartAnimalAspectClass.getDeclaredMethod(declaredMethod.getName());
//6.反射调用切入方法
declaredMethod1.invoke(smartAnimalAspectClass.newInstance(), null);
} else if (declaredMethod.isAnnotationPresent(AfterReturning.class)) {
//如果切面类的方法有 @AfterReturning 注解
//逻辑和 if分支相同
System.out.println("方法名=" + declaredMethod.getName());
AfterReturning annotation = declaredMethod.getAnnotation(AfterReturning.class);
System.out.println("注解 value=" + annotation.value());
Method declaredMethod1 = smartAnimalAspectClass.getDeclaredMethod(declaredMethod.getName());
declaredMethod1.invoke(smartAnimalAspectClass.newInstance(), null);
} else if (declaredMethod.isAnnotationPresent(After.class)) {
//如果切面类的方法有 @After 注解
//逻辑和 if分支相同
System.out.println("方法名=" + declaredMethod.getName());
After annotation = declaredMethod.getAnnotation(After.class);
System.out.println("注解 value=" + annotation.value());
Method declaredMethod1 = smartAnimalAspectClass.getDeclaredMethod(declaredMethod.getName());
declaredMethod1.invoke(smartAnimalAspectClass.newInstance(), null);
}
}
}
}
测试结果:通过反射调用了切入方法。
完整的逻辑:
事先在一个Map中保存要代理的对象关系,在实现的后置处理器的postProcessAfterInitialization()方法中,通过实现的特定注解,在map中查看当前获取的bean对象是否已经被代理。
如果不是,就直接返回bean。如果是,在InvocationHandler()的匿名内部类的invoke()方法中,调用目标方法的前后等位置就可以切入方法。判断要切入哪个方法也是通过特定注解(如@Before,@After等),最后返回bean的代理对象。

 浙公网安备 33010602011771号