Nginx安装部署与测试
场景:项目需要部署在生产环境中,这些新的工具都需要在生产环境中去实践练习。有时间再部署一套ELK的日志分析系统,这样的系统才算具有一定的应用价值。
1 Nginx安装
用root用户安装,采用源代码编译的方式来进行安装,正式开始前,请确认gcc、g++开发库之类的已经预先安装好
------------------------------------------------------------------------------------------------
先把nginx安装要用到的所有文件(“软件/nginx-1.8.0 下面的所有文件”)上传至服务器/root/nginx目录(没有该目录则新建)
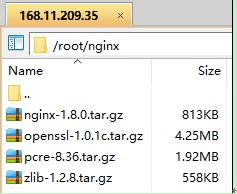
一般我们都需要先装pcre,zlib,前者用于url rewrite,后者用于gzip压缩,openssl用于后续可能升级到https时使用
首先切换到nginx目录
cd /root/nginx
1.1 安装pcre
tar -zxvf pcre-8.36.tar.gz

cd pcre-8.36/

./configure

make

make install
1.2 安装zlib
tar -zxvf zlib-1.2.8.tar.gz

cd zlib-1.2.8/

./configure

make

make install
1.3 安装openssl
tar -zxvf openssl-1.0.1c.tar.gz

cd openssl-1.0.1c/

./config

make

make install
1.4 安装nginx
tar -zxvf nginx-1.8.0.tar.gz

cd nginx-1.8.0/

#这里要根据自己安装软件的版本填写
./configure --prefix=/usr/local/nginx --with-http_ssl_module --with-pcre=../pcre-8.36 --with-zlib=../zlib-1.2.8 --with-openssl=../openssl-1.0.1c

make

make install
1.5 测试nginx的启动与关闭是否正常
cd /usr/local/nginx/sbin
//启动
./nginx


ps –ef|grep nginx

//关闭进程
kill -QUIT 主进程号(上面ps命令看到的带master字样的进程号)
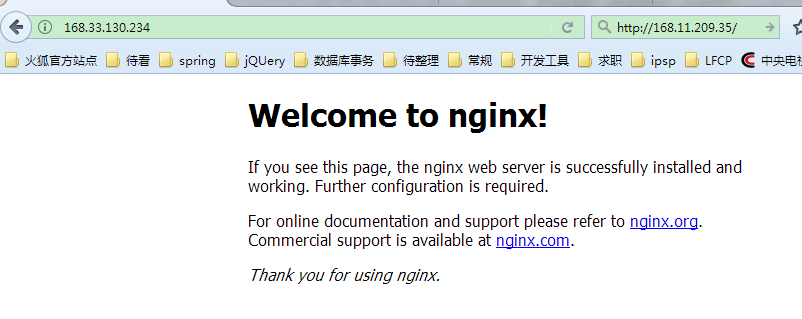
浏览器访问如:http://168.33.130.234/
如果能正常显示nginx首页,则表示安装成功,测试关闭
1.6 开机自启动脚本
ps:这里看到很多清晰明白的nginx开机自启动教程,但是死活都安装不成功。最后询问运维人员发现是系统不一致造成的。这里我采用的suse系统,所以自启动脚本的制作过程不太一样。
常规自启动过程:http://www.tuicool.com/articles/FBva2i
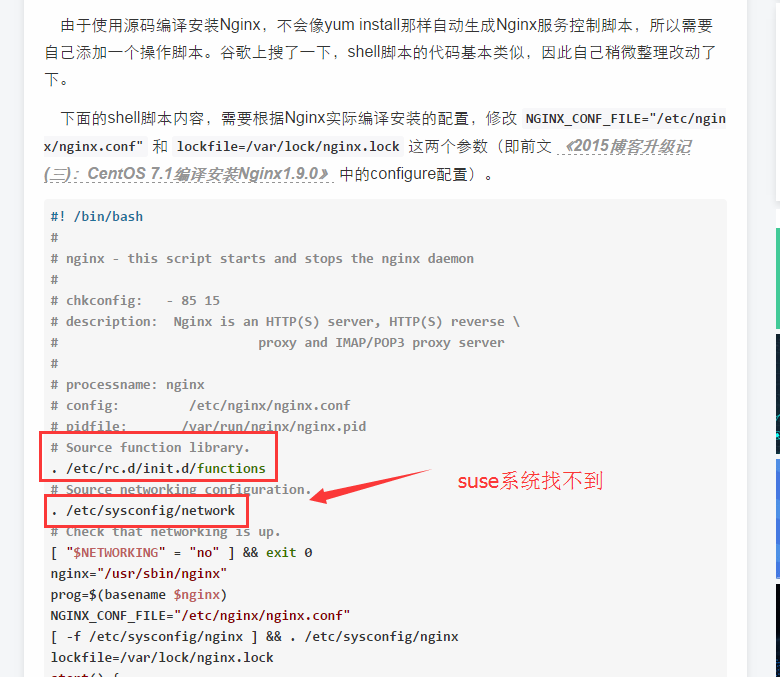
没办法,这里只能另外寻求解决办法:
[root@localhost nginx-1.0.15]# ln -sf /usr/local/nginx/sbin/nginx /usr/sbin
nginx: the configuration file /usr/local/nginx/conf/nginx.conf syntax is ok
nginx: configuration file /usr/local/nginx/conf/nginx.conf test is successful
[root@linux nginx-1.0.15]#
[root@linux nginx-1.0.15]# netstat -anpt|grep 80
tcp        0      0 0.0.0.0:80                  0.0.0.0:*                   LISTEN      16787/nginx
[root@linux nginx-1.0.15]#
在客户端浏览器中执行:http://10.0.0.133(服务器IP地址)进行查看:

[root@localhost nginx-0.8.54]# elinks http://10.0.0.133

6.使用系统信号控制nginx进程:
启动:nginx
重启:kill -HUP `cat /usr/local/nginx/logs/nginx.pid`
#!/bin/bash
#description: Nginx Service Control Script
case "$1" in
  start)
         /usr/sbin/nginx
         ;;
  stop)
         /usr/bin/killall -s QUIT nginx
            ;;
  restart)
         $0 stop
         $0 start
         ;;
  reload)
         /usr/bin/killall -s HUP nginx
         ;;
  *)
    echo "Usage:$0 {start|stop|restart|reload}"
    exit 1
esac
exit 0
保存后复制“/root/nginx/nginx”脚本到/etc/init.d下
cp nginx /etc/init.d
接下来就可以使用service nginx stop|start|restart|reload对nginx服务进行控制:
[root@linux nginx-1.0.15]# service nginx restart
[root@linux nginx-1.0.15]# !nets
netstat -anpt|grep 80
tcp 0 0 0.0.0.0:80 0.0.0.0:* LISTEN 16787/nginx
[root@linux nginx-1.0.15]#
2 niginx配置
2.1 配置文件详解
以root用户登录ssh
cd /usr/local/nginx/conf/
vi nginx.conf
#修改配置
worker_processes  4;

events {
    use epoll;
    worker_connections  65535;
}
#生产虚拟机为4个物理cpu,32GB内存,使用epoll事件模型,最大连接数为65535
#在http{}里面配置增加
client_max_body_size 200m;
client_header_buffer_size 16k;
large_client_header_buffers 4 64k;

keepalive_timeout  900;
gzip  on;
gzip_types text/plain application/x-javascript text/css application/xml;

#负载均衡配置
upstream opss.web{
    ip_hash;
server 168.11.209.37:80;
server 168.11.209.42:80;
}

#在server{}里面增加配置
location ^~ /opssweb/ {
proxy_pass http://opss.web;
proxy_set_header X-Real-IP $remote_addr;
proxy_set_header X-Forwarded-For $proxy_add_x_forwarded_for;
client_max_body_size 10m;
client_body_buffer_size 128k;
proxy_connect_timeout 900;
proxy_send_timeout 900;
proxy_read_timeout 900;
proxy_buffer_size 4k;
proxy_buffers 4 32k;
proxy_busy_buffers_size 64k;
proxy_temp_file_write_size 64k;
}
配置也很简单,upstream中配置轮询策略和服务器的ip、端口(端口可以去tomcat的server.xml中查看),绿色部分随意命名,只要一只即可。
upstream 那里随便命名 和下面server里面的proxy_pass名称对应上就可以了。这里请参考问题3.2中的分析
nginx通过ip和端口 会自动找到tomcat部署的应用程序 ,与server.xml中的<Context path= 配置无关。
这里附上自己的配置示例nginx.conf:
#user  nobody;
worker_processes  8;

#error_log  logs/error.log;
#error_log  logs/error.log  notice;
#error_log  logs/error.log  info;

#pid        logs/nginx.pid;


events {
    use epoll;
    worker_connections  65535;

}


http {
    include       mime.types;
    default_type  application/octet-stream;

    client_max_body_size 200m;
    client_header_buffer_size 16k;
    large_client_header_buffers 4 64k;


    #log_format  main  '$remote_addr - $remote_user [$time_local] "$request" '
    #                  '$status $body_bytes_sent "$http_referer" '
    #                  '"$http_user_agent" "$http_x_forwarded_for"';

    #access_log  logs/access.log  main;

    sendfile        on;
    #tcp_nopush     on;

    #keepalive_timeout  0;
    keepalive_timeout  900;
    gzip_types text/plain application/x-javascript text/css application/xml;

    gzip  on;
    upstream nginxweb{
     ip_hash; #轮询侧率(如果省略就执行轮换轮询)
     #这里的ip和端口随意添加,和tomcat中的应用保持一只
        server 168.33.131.126:8088;
        server 168.33.130.234:8088;
    }


    server {
        listen       80;
        server_name  localhost;

        #charset koi8-r;

        #access_log  logs/host.access.log  main;

        location / {
            root   html;
            index  index.html index.htm;
        }

        #error_page  404              /404.html;

        # redirect server error pages to the static page /50x.html
        #
        error_page   500 502 503 504  /50x.html;
        location = /50x.html {
            root   html;
        }

        # proxy the PHP scripts to Apache listening on 127.0.0.1:80
        #
        #location ~ \.php$ {
        #    proxy_pass   http://127.0.0.1;
        #}

        # pass the PHP scripts to FastCGI server listening on 127.0.0.1:9000
        #
        #location ~ \.php$ {
        #    root           html;
        #    fastcgi_pass   127.0.0.1:9000;
        #    fastcgi_index  index.php;
        #    fastcgi_param  SCRIPT_FILENAME  /scripts$fastcgi_script_name;
        #    include        fastcgi_params;
        #}

        # deny access to .htaccess files, if Apache's document root
        # concurs with nginx's one
        #
        #location ~ /\.ht {
        #    deny  all;
        #}

        location ^~ /lfcpweb/ {
            proxy_pass http://nginxweb;
            proxy_set_header X-Real-IP $remote_addr;
            proxy_set_header X-Forwarded-For $proxy_add_x_forwarded_for;
            client_max_body_size 10m;
            client_body_buffer_size 128k;
            proxy_connect_timeout 900;
            proxy_send_timeout 900;
            proxy_read_timeout 900;
            proxy_buffer_size 4k;
            proxy_buffers 4 32k;
            proxy_busy_buffers_size 64k;
            proxy_temp_file_write_size 64k;
        }

    }


    # another virtual host using mix of IP-, name-, and port-based configuration
    #
    #server {
    #    listen       8000;
    #    listen       somename:8080;
    #    server_name  somename  alias  another.alias;

    #    location / {
    #        root   html;
    #        index  index.html index.htm;
    #    }
    #}


    # HTTPS server
    #
    #server {
    #    listen       443 ssl;
    #    server_name  localhost;

    #    ssl_certificate      cert.pem;
    #    ssl_certificate_key  cert.key;

    #    ssl_session_cache    shared:SSL:1m;
    #    ssl_session_timeout  5m;

    #    ssl_ciphers  HIGH:!aNULL:!MD5;
    #    ssl_prefer_server_ciphers  on;

    #    location / {
    #        root   html;
    #        index  index.html index.htm;
    #    }
    #}

}
配置完成后,只要server端的应用正常启动,就可以通过
http://168.33.130.234/lfcpweb/login来访问
server 168.33.131.126:8088;
server 168.33.130.234:8088;两台服务器上的应用,这里我是通过改变轮询侧率,然后在两台服务器上查看日志打印来确定nginx能够正常的工作
2.2 配置日志切割
1) 配置nginx日志自动切割
第一步就是重命名日志文件,不用担心重命名后nginx找不到日志文件而丢失日志。在你未重新打开原名字的日志文件前,nginx还是会向你重命名的文件写日志,linux是靠文件描述符而不是文件名定位文件。
第二步向nginx主进程发送USR1信号。
nginx主进程接到信号后会从配置文件中读取日志文件名称,重新打开日志文件(以配置文件中的日志名称命名),并以工作进程的用户作为日志文件的所有者。
重新打开日志文件后,nginx主进程会关闭重名的日志文件并通知工作进程使用新打开的日志文件。
工作进程立刻打开新的日志文件并关闭重名名的日志文件。
建立日志文件/usr/local/nginx/nginx_log.sh
然后你就可以处理旧的日志文件了。vi nginx_log.sh
#nginx clean access.log and error.log

#!/bin/bash

#设置日志文件存放目录

logs_path="/usr/local/nginx/logs/"

#设置pid文件

pid_path="/usr/local/nginx/nginx.pid"


#重命名日志文件
mv ${logs_path}access.log ${logs_path}access_$(date -d "yesterday" +"%Y%m%d").log
mv ${logs_path}error.log ${logs_path}error_$(date -d "yesterday" +"%Y%m%d").log


#向nginx主进程发信号重新打开日志
kill -USR1 `cat ${pid_path}`

#删除7天以前的日志文件
find ${logs_path} -mtime +7 -name '*.log' -exec rm -f {} \;
保存以上脚本nginx_log.sh
crontab 设置作业
0 0 * * * bash /usr/local/nginx/nginx_log.sh
这样就每天的0点0分把nginx日志重命名为日期格式,并重新生成今天的新日志文件。
2.3 日志格式设置
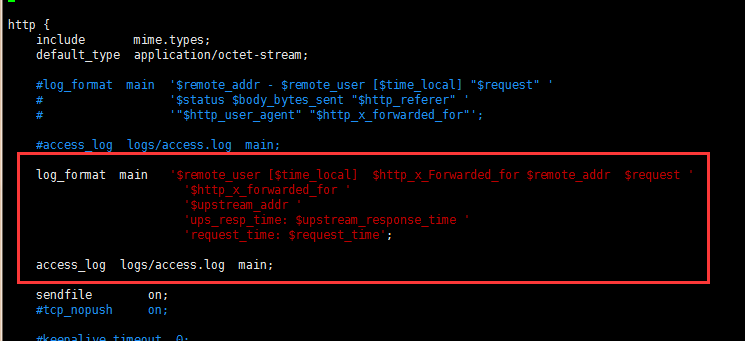
在nginx接收到请求之后, 需把请求分发到后端WEB服务集群. 在这里需要记录分发日志, 来分析后端每台WEB服务器处理的请求数目.
对日志输出格式进行如下设置即可:
http {
log_format  main
  ' $remote_user [$time_local]  $http_x_Forwarded_for $remote_addr  $request '
 '$http_x_forwarded_for '
 '$upstream_addr '
 'ups_resp_time: $upstream_response_time '
 'request_time: $request_time';

access_log  logs/access.log  main;

server{}
...
}
在日志显示的信息为:
- [31/May/2013:00:01:03 -0700]  - xxx.ip.addr.xxx  GET /portal/index.html HTTP/1.1 - 192.168.100.15:8188 ups_resp_time: 0.010 request_time: 0.011
- [31/May/2013:00:01:03 -0700]  - xxx.ip.addr.xxx  GET /portal/index.html HTTP/1.1 - 192.168.100.16:8188 ups_resp_time: 0.006 request_time: 0.006
- [31/May/2013:00:01:03 -0700]  - xxx.ip.addr.xxx  GET /portal/index.html HTTP/1.1 - 192.168.100.15:8188 ups_resp_time: 0.013 request_time: 0.013
- [31/May/2013:00:01:03 -0700]  - xxx.ip.addr.xxx  GET /portal/index.html HTTP/1.1 - 192.168.100.17:8188 ups_resp_time: 0.003 request_time: 0.003
- [31/May/2013:00:01:03 -0700]  - xxx.ip.addr.xxx  GET /portal/index.html HTTP/1.1 - 192.168.100.18:8188 ups_resp_time: 0.004 request_time: 0.004
- [31/May/2013:00:01:03 -0700]  - xxx.ip.addr.xxx  GET /portal/index.html HTTP/1.1 - 192.168.100.15:8188 ups_resp_time: 0.012 request_time: 0.013
- [31/May/2013:00:01:03 -0700]  - xxx.ip.addr.xxx  GET /portal/index.html HTTP/1.1 - 192.168.100.18:8188 ups_resp_time: 0.005 request_time: 0.005
- [31/May/2013:00:01:03 -0700]  - xxx.ip.addr.xxx  GET /portal/index.html HTTP/1.1 - 192.168.100.16:8188 ups_resp_time: 0.011 request_time: 0.011
- [31/May/2013:00:01:03 -0700]  - xxx.ip.addr.xxx  GET /portal/index.html HTTP/1.1 - 192.168.100.15:8188 ups_resp_time: 0.447 request_time: 0.759
3 问题分析
3.1 轮询策略
nginx 报failed (13: Permission denied),最终发现是采用默认轮询策略,导致session丢失,程序访问失败。
主要是程序的验证码,两次访问不一致,就无法访问。观察程序发现后台是通过session获取验证码。
#负载均衡配置
upstream lfcpweblist{
ip_hash;
server 168.33.130.113:8088;
server 168.33.130.114:8088;
}
ps:这里轮询策略采用ip_hash;的策略, 每个请求按访问ip的hash结果分配,这样每个访客固定访问一个后端服务器,可以解决session的问题。
3.2 Nginx配置proxy_pass转发的/路径问题
因为路径问题,折腾了好久都没解决nginx中的404错误,惭愧~
Nginx配置proxy_pass转发的/路径问题
在nginx中配置proxy_pass时,如果是按照^~匹配路径时,要注意proxy_pass后的url最后的/,
当加上了/,相当于是绝对根路径,则nginx不会把location中匹配的路径部分代理走;
如果没有/,则会把匹配的路径部分也给代理走。
location ^~ /static_js/
{
proxy_cache js_cache;
proxy_set_header Host js.test.com;
proxy_pass http://js.test.com/;
}
如上面的配置,如果请求的url是http://servername/static_js/test.html
会被代理成http://js.test.com/test.html
而如果这么配置
location ^~ /static_js/
{
proxy_cache js_cache;
proxy_set_header Host js.test.com;
proxy_pass http://js.test.com;
}
则会被代理到http://js.test.com/static_js/test.htm
当然,我们可以用如下的rewrite来实现/的功能
location ^~ /static_js/
{
proxy_cache js_cache;
proxy_set_header Host js.test.com;
rewrite /static_js/(.+)$ /$1 break;
proxy_pass http://js.test.com;
}
1

 浙公网安备 33010602011771号