RHEL9.4搭建虚拟机实验环境
日期:2024.10.27
目的:搭建Linux虚拟机环境供学习测试,无图形界面。同等硬件配置下性能上要优于带图形界面的虚拟化解决方案。
参照:
- 鸟哥Linux私房菜服务器篇 RockyLinux 9版
https://linux.vbird.org/linux_server/rocky9/ - Linux中国 如何在 Rocky Linux 9 / AlmaLinux 9 上安装 KVM
https://linux.cn/article-15843-1.html
拓扑结构图
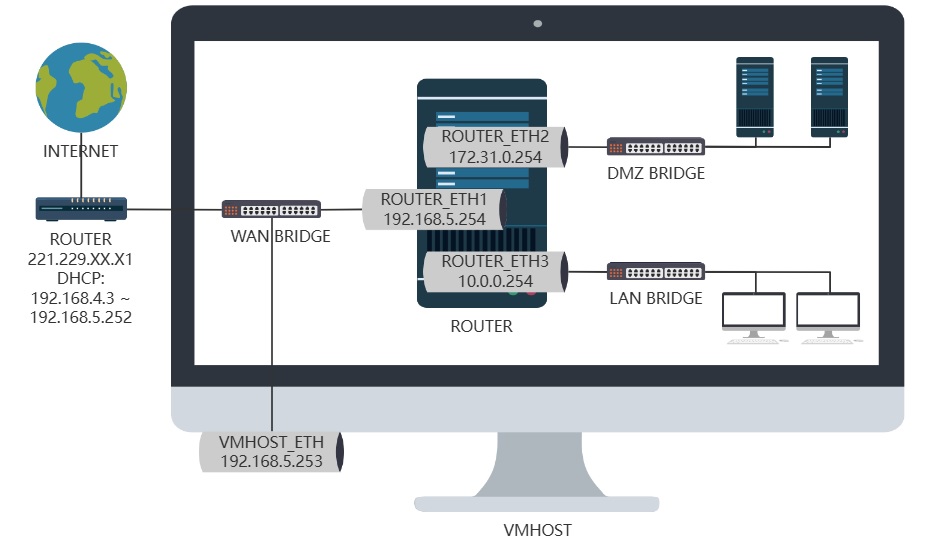
物理机安装RHEL9.4系统,这个机器后续还打算做ansible的主控,还有可能做个浏览器代理等,所以主机名还是暂时设置为RHEL9
[root@localhost ~]# hostnamectl set-hostname RHEL9
CPU
[root@RHEL9 ~]# lscpu | head -n9
Architecture:                         x86_64
CPU op-mode(s):                       32-bit, 64-bit
Address sizes:                        39 bits physical, 48 bits virtual
Byte Order:                           Little Endian
CPU(s):                               4
On-line CPU(s) list:                  0-3
Vendor ID:                            GenuineIntel
BIOS Vendor ID:                       Intel(R) Corporation
Model name:                           Intel(R) Core(TM) i3-8100 CPU @ 3.60GHz
虚拟化支持
[root@RHEL9 ~]# lscpu | grep Virtual
Virtualization:                       VT-x
内存
[root@RHEL9 ~]# free -h
               total        used        free      shared  buff/cache   available
Mem:            15Gi       522Mi        14Gi       9.0Mi       495Mi        14Gi
Swap:          2.0Gi          0B       2.0Gi
主板
[root@RHEL9 ~]# dmidecode | grep 'Base Board Information' -A2
Base Board Information
	Manufacturer: Gigabyte Technology Co., Ltd.
	Product Name: H310M DS2 2.0
发行版本
[root@RHEL9 ~]# cat /etc/redhat-release
Red Hat Enterprise Linux release 9.4 (Plow)
网卡
[root@RHEL9 ~]# nmcli con show
NAME    UUID                                  TYPE      DEVICE
enp4s0  a14dc4d0-42ca-409b-a285-635a55788d3e  ethernet  enp4s0
lo      9e4dc40f-43b7-4906-8f24-c398821cbcf9  loopback  lo
网络环境
[root@RHEL9 ~]# nmcli con show enp4s0 | grep IP4
IP4.ADDRESS[1]:                         192.168.4.156/23
IP4.GATEWAY:                            192.168.4.1
IP4.ROUTE[1]:                           dst = 192.168.4.0/23, nh = 0.0.0.0, mt = 100
IP4.ROUTE[2]:                           dst = 0.0.0.0/0, nh = 192.168.4.1, mt = 100
IP4.DNS[1]:                             218.2.2.2
IP4.DNS[2]:                             218.4.4.4
目前是通过路由器的DHCP自动获取的IP地址
[root@RHEL9 ~]# nmcli con show enp4s0 | grep ipv4.method:
ipv4.method:                            auto
先装命令补全和vim编辑器
[root@RHEL9 ~]# dnf install -y bash-completion vim-enhanced
准备设置网桥并手动配置IP地址
由于设置网桥要删除原有网卡的配置,通过ssh的远程连接会中断,所以编写脚本用nohup运行
[root@RHEL9 ~]# vim network_init.sh

#!/bin/bash
#填写要配置的静态IP/掩码,网关,DNS
wan_ip='192.168.5.253/23'
wan_gateway='192.168.4.1'
wan_dns1='218.2.2.2'
wan_dns2='218.4.4.4'
#sed抓出初始网卡的UUID
eth_uuid=$(nmcli connection show | sed -En 's/^.+ +(.+) +ethernet.+$/\1/p')
#sed抓出初始网卡的名称
eth_device=$(nmcli device | sed -En 's/^([[:alnum:]]+) +ethernet.+$/\1/p')
#使用UUID删除初始网卡配置文件 创建网桥 配置网桥参数 添加网桥slave 上线网桥
nmcli connection delete $eth_uuid
nmcli connection add type bridge autoconnect yes con-name WANbridge ifname WANbridge
nmcli connection modify WANbridge ipv4.method manual ipv4.addresses $wan_ip
nmcli connection modify WANbridge ipv4.gateway $wan_gateway
nmcli connection modify WANbridge ipv4.dns $wan_dns1 +ipv4.dns $wan_dns2
nmcli connection add type bridge-slave autoconnect yes con-name $eth_device ifname $eth_device master WANbridge
nmcli connection up WANbridge
#创建实验需要用的另外两个交换机
nmcli connection add type bridge con-name DMZbridge ifname DMZbridge
nmcli connection add type bridge con-name LANbridge ifname LANbridge
nmcli connection modify DMZbridge ipv4.method disabled ipv6.method disabled
nmcli connection modify LANbridge ipv4.method disabled ipv6.method disabled
nmcli connection up DMZbridge
nmcli connection up LANbridge

[root@RHEL9 ~]# nohup sh ./network_init.sh
新的网络连接
[root@RHEL9 ~]# nmcli connection show
NAME       UUID                                  TYPE      DEVICE
WANbridge  901555b3-308e-40ff-a678-0242a05204bc  bridge    WANbridge
DMZbridge  7fe518c4-2647-47d9-9695-e491506eabac  bridge    DMZbridge
enp4s0     b2c038e0-3c4b-4b84-b748-ce125e6a8cf0  ethernet  enp4s0
LANbridge  9ca0a06b-61dd-4744-87c7-a5abfc1e6315  bridge    LANbridge
lo         9e4dc40f-43b7-4906-8f24-c398821cbcf9  loopback  lo
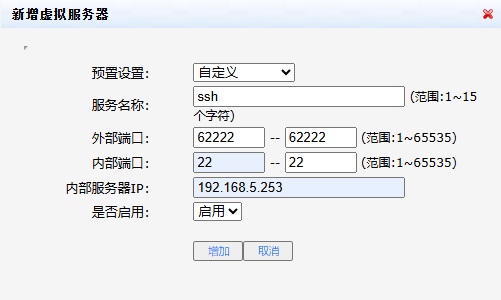
进入路由管理页面,映射路由62222端口到本机的22端口
以后可以通过公网IP:221.229.XX.X1的62222端口发起ssh连接到本机的22端口
硬盘情况,一块120G的固态硬盘,还有一块2.7T的数据盘没有挂载
[root@RHEL9 ~]# lsblk
NAME          MAJ:MIN RM   SIZE RO TYPE MOUNTPOINTS
sda             8:0    0 119.2G  0 disk
├─sda1          8:1    0   100M  0 part /boot/efi
├─sda2          8:2    0 118.6G  0 part
│ ├─rhel-root 253:0    0  16.6G  0 lvm  /
│ ├─rhel-swap 253:1    0     2G  0 lvm  [SWAP]
│ └─rhel-home 253:2    0   100G  0 lvm  /kvm
└─sda3          8:3    0   512M  0 part /boot
sdb             8:16   0   2.7T  0 disk
└─sdb1          8:17   0   2.7T  0 part
我这块硬盘之前用过,做实验可以先练习擦除一下数据
[root@RHEL9 ~]# wipefs /dev/sdb
DEVICE OFFSET        TYPE UUID LABEL
sdb    0x200         gpt
sdb    0x2baa1475e00 gpt
sdb    0x1fe         PMBR
[root@RHEL9 ~]# wipefs -a /dev/sdb
/dev/sdb: 8 bytes were erased at offset 0x00000200 (gpt): 45 46 49 20 50 41 52 54
/dev/sdb: 8 bytes were erased at offset 0x2baa1475e00 (gpt): 45 46 49 20 50 41 52 54
/dev/sdb: 2 bytes were erased at offset 0x000001fe (PMBR): 55 aa
/dev/sdb: calling ioctl to re-read partition table: Success
得到初始化过的硬盘,用fdisk分区,会提示硬盘过大,DOS分区表不支持,要使用GPT格式的分区表
[root@RHEL9 ~]# fdisk /dev/sdb

Welcome to fdisk (util-linux 2.37.4).
Changes will remain in memory only, until you decide to write them.
Be careful before using the write command.

Device does not contain a recognized partition table.
The size of this disk is 2.7 TiB (3000592982016 bytes). DOS partition table format cannot be used on drives for volumes larger than 2199023255040 bytes for 512-byte sectors. Use GUID partition table format (GPT).

Created a new DOS disklabel with disk identifier 0xdbcf0123.

Command (m for help): g
Created a new GPT disklabel (GUID: 3CFE7EBE-322A-5243-9CC6-5C7E8E791E04).

Command (m for help): n
Partition number (1-128, default 1):
First sector (2048-5860533134, default 2048):
Last sector, +/-sectors or +/-size{K,M,G,T,P} (2048-5860533134, default 5860533134):

Created a new partition 1 of type 'Linux filesystem' and of size 2.7 TiB.

Command (m for help): w
The partition table has been altered.
Calling ioctl() to re-read partition table.
Syncing disks.
分区后结果如下
[root@RHEL9 ~]# parted /dev/sdb print
Model: ATA ST3000DM001-1ER1 (scsi)
Disk /dev/sdb: 3001GB
Sector size (logical/physical): 512B/4096B
Partition Table: gpt
Disk Flags:

Number  Start   End     Size    File system  Name  Flags
 1      1049kB  3001GB  3001GB
格式化为xfs文件系统
[root@RHEL9 ~]# mkfs.xfs /dev/sdb1
meta-data=/dev/sdb1              isize=512    agcount=4, agsize=183141597 blks
         =                       sectsz=4096  attr=2, projid32bit=1
         =                       crc=1        finobt=1, sparse=1, rmapbt=0
         =                       reflink=1    bigtime=1 inobtcount=1 nrext64=0
data     =                       bsize=4096   blocks=732566385, imaxpct=5
         =                       sunit=0      swidth=0 blks
naming   =version 2              bsize=4096   ascii-ci=0, ftype=1
log      =internal log           bsize=4096   blocks=357698, version=2
         =                       sectsz=4096  sunit=1 blks, lazy-count=1
realtime =none                   extsz=4096   blocks=0, rtextents=0
看下UUID
[root@RHEL9 ~]# blkid | grep dev/sdb1
/dev/sdb1: UUID="9bce0c90-9206-4121-be23-3f069e66a0a0" TYPE="xfs" PARTUUID="7cc849ff-4eb2-3143-b733-6a69b55250cc"
创建挂载点文件夹,修改fstab
[root@RHEL9 ~]# mkdir /data
[root@RHEL9 ~]# vim /etc/fstab

/dev/mapper/rhel-root   /                       xfs     defaults        0 0
UUID=5d03a640-f6d5-4e52-bf9f-9833e5b8cc96 /boot                   ext4    defaults        1 2
UUID=1990-9D2E          /boot/efi               vfat    umask=0077,shortname=winnt 0 2
/dev/mapper/rhel-home   /kvm                    xfs     defaults        0 0
/dev/mapper/rhel-swap   none                    swap    defaults        0 0
#下方为新添加
UUID=9bce0c90-9206-4121-be23-3f069e66a0a0 /data                   xfs     defaults        1 2
自动挂载,重新载入配置文件
[root@RHEL9 ~]# mount -a
mount: (hint) your fstab has been modified, but systemd still uses
       the old version; use 'systemctl daemon-reload' to reload.
[root@RHEL9 ~]# systemctl daemon-reload
观察挂载结果
[root@RHEL9 ~]# df -Th | grep /data
/dev/sdb1             xfs       2.8T   20G  2.8T   1% /data
安装Virtualization Host组包并启动libvirtd服务
[root@RHEL9 ~]# dnf -y groupinstall 'Virtualization Host'
[root@RHEL9 ~]# systemctl enable --now libvirtd
Created symlink /etc/systemd/system/multi-user.target.wants/libvirtd.service → /usr/lib/systemd/system/libvirtd.service.
Created symlink /etc/systemd/system/sockets.target.wants/libvirtd.socket → /usr/lib/systemd/system/libvirtd.socket.
Created symlink /etc/systemd/system/sockets.target.wants/libvirtd-ro.socket → /usr/lib/systemd/system/libvirtd-ro.socket.
Created symlink /etc/systemd/system/sockets.target.wants/libvirtd-admin.socket → /usr/lib/systemd/system/libvirtd-admin.socket.
关闭虚拟化软件自带的一些暂时用不到的服务和端口
[root@RHEL9 ~]# systemctl mask rpcbind.service rpcbind.socket
Created symlink /etc/systemd/system/rpcbind.service → /dev/null.
Created symlink /etc/systemd/system/rpcbind.socket → /dev/null.
[root@RHEL9 ~]# systemctl stop rpcbind.service rpcbind.socket
[root@RHEL9 ~]# virsh net-list
 Name      State    Autostart   Persistent
--------------------------------------------
 default   active   yes         yes

[root@RHEL9 ~]# virsh net-destroy default
Network default destroyed

[root@RHEL9 ~]# virsh net-undefine default
Network default has been undefined
安装tuned服务给系统调优
[root@RHEL9 ~]# dnf install -y tuned
[root@RHEL9 ~]# systemctl enable --now tuned
Created symlink /etc/systemd/system/multi-user.target.wants/tuned.service → /usr/lib/systemd/system/tuned.service.
[root@RHEL9 ~]# tuned-adm profile virtual-host
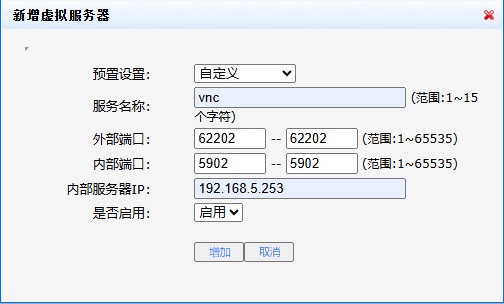
配置防火墙,开vnc端口供以后图形化安装系统使用,关闭多余不用服务
[root@RHEL9 ~]# firewall-cmd --add-port=5902/tcp
success
[root@RHEL9 ~]# firewall-cmd --list-ports
5902/tcp
[root@RHEL9 ~]# firewall-cmd --list-services
cockpit dhcpv6-client ssh
[root@RHEL9 ~]# firewall-cmd --remove-service={cockpit,dhcpv6-client}
success
[root@RHEL9 ~]# firewall-cmd --list-services
ssh
[root@RHEL9 ~]# firewall-cmd --runtime-to-permanent
success
同样通过路由将公网地址上的62202端口映射到刚打开的5902端口,方便以后远程访问
待填的坑:
- 后续打算给安装常用软件和配置写一个通用的脚本。
- 启动libvirt后,鸟哥查111端口是哪个进程开启的过程改天还需要详细写出来消化一下。
给第二块硬盘分区和挂载暂时就不写入脚本了,先实现虚拟化环境的安装和配置。
脚本实现自动化
#rhel9vmhost.sh
#Date: 2024-11-04
#!/bin/bash

#网桥的ip地址,请手动输入
wan_ip=''
#后续安装虚拟机时连接vnc的端口
vnc_port='5902'

#获取ethernet网卡的配置文件名,如有多个网卡请手动指定
#eth_con=''
eth_con=$(nmcli connection show | sed -En 's/^([[:alnum:]]+) +.+ +ethernet.+$/\1/p')

#获取原网络配置文件的子网掩码、网关和DNS1,DNS2准备赋值给网桥
wan_netmask=$(nmcli connection show ${eth_con} | sed -En 's/IP4.ADDRESS\[1\]: +.+\/([[:digit:]]+)$/\1/p')
wan_gateway=$(nmcli connection show ${eth_con} | sed -En 's/^IP4.GATEWAY: +(.+)$/\1/p')
wan_dns1=$(nmcli connection show ${eth_con} | sed -En 's/^IP4.DNS\[1\]: +(.+)$/\1/p')
wan_dns2=$(nmcli connection show ${eth_con} | sed -En 's/^IP4.DNS\[2\]: +(.+)$/\1/p')

#将新IP和旧子网掩码组成CIDR格式
wan_ip=${wan_ip}/${wan_netmask}

#获取ethernet网卡的UUID
eth_uuid=$(nmcli connection show | sed -En 's/^.+ +(.+) +ethernet.+$/\1/p')
#获取ethernet网卡的设备名称
eth_device=$(nmcli device | sed -En 's/^([[:alnum:]]+) +ethernet.+$/\1/p')

#使用UUID删除初始网卡配置文件 创建网桥 配置网桥参数 添加网桥slave 上线网桥
nmcli connection delete ${eth_uuid}
nmcli connection add type bridge autoconnect yes con-name WANbridge ifname WANbridge
nmcli connection modify WANbridge ipv4.method manual ipv4.addresses ${wan_ip}
nmcli connection modify WANbridge ipv4.gateway ${wan_gateway}
nmcli connection modify WANbridge ipv4.dns ${wan_dns1} +ipv4.dns ${wan_dns2}
nmcli connection add type bridge-slave autoconnect yes con-name ${eth_device} ifname ${eth_device} master WANbridge
nmcli connection up WANbridge

#创建实验额外需要用的两个交换机
nmcli connection add type bridge con-name DMZbridge ifname DMZbridge
nmcli connection add type bridge con-name LANbridge ifname LANbridge
nmcli connection modify DMZbridge ipv4.method disabled ipv6.method disabled
nmcli connection modify LANbridge ipv4.method disabled ipv6.method disabled
nmcli connection up DMZbridge
nmcli connection up LANbridge

#安装并启动libvirt服务
dnf -y groupinstall 'Virtualization Host'
systemctl enable --now libvirtd

#关闭不用的服务和端口
systemctl mask rpcbind.service rpcbind.socket
systemctl stop rpcbind.service rpcbind.socket
#virsh命令来自libvirt-client软件包,有可能不会自动安装
rpm -q libvirt-client || dnf -y install libvirt-client
virsh net-destroy default
virsh net-undefine default

#安装tuned调优
rpm -q tuned || dnf install -y tuned
systemctl enable --now tuned
tuned-adm profile virtual-host

#配置防火墙
firewall-cmd --remove-service={cockpit,dhcpv6-client}
firewall-cmd --add-port=${vnc_port}/tcp
firewall-cmd --runtime-to-permanent

 浙公网安备 33010602011771号